はじめに
この記事では Unity からサービスアカウント経由で Google Cloud の API を叩くときの基本的な流れを解説します。
この記事でのテスト環境は以下の通りです。
- Unity 6000.0.25f1
- Visual Studio 2022 17.11.5
- UniTask 2.5.10
- NuGetForUnity 4.1.1
- Google.Apis.Auth 1.68.0
手順
サービスアカウントの作成
早速、手順を解説します。
まだサービスアカウントを作成していない場合はサービスアカウントを作成します。
手順1
Google Cloud 自体の初期設定が完了していない場合は Google アカウントの作成や無料トライアルへの登録、プロジェクトの作成などの Googe Cloud の初期設定を行います。
以下の記事が参考になるかと思います。
- Google Cloud を初めて利用する方は、ここから始めましょう
- 【超初心者向け】Google Cloudを始めるための事前準備
- 基礎から学ぶGCP 第1回 〜GCPを使う準備をする〜
- Google Cloud(旧GCP)無料で使ってみた!クラウド初心者もかんたんに開設、始め方大解説(前編:説明編)
- 【Google Cloud】【最短10分】無料ではじめるGoogle Cloud入門
- 【初心者向け】Google Cloudのアカウント作成手順を分かりやすく解説!
手順2
Google Cloud にアクセスして「IAM と管理 > サービスアカウント」に行って「サービスアカウントを作成」を押します。

手順3
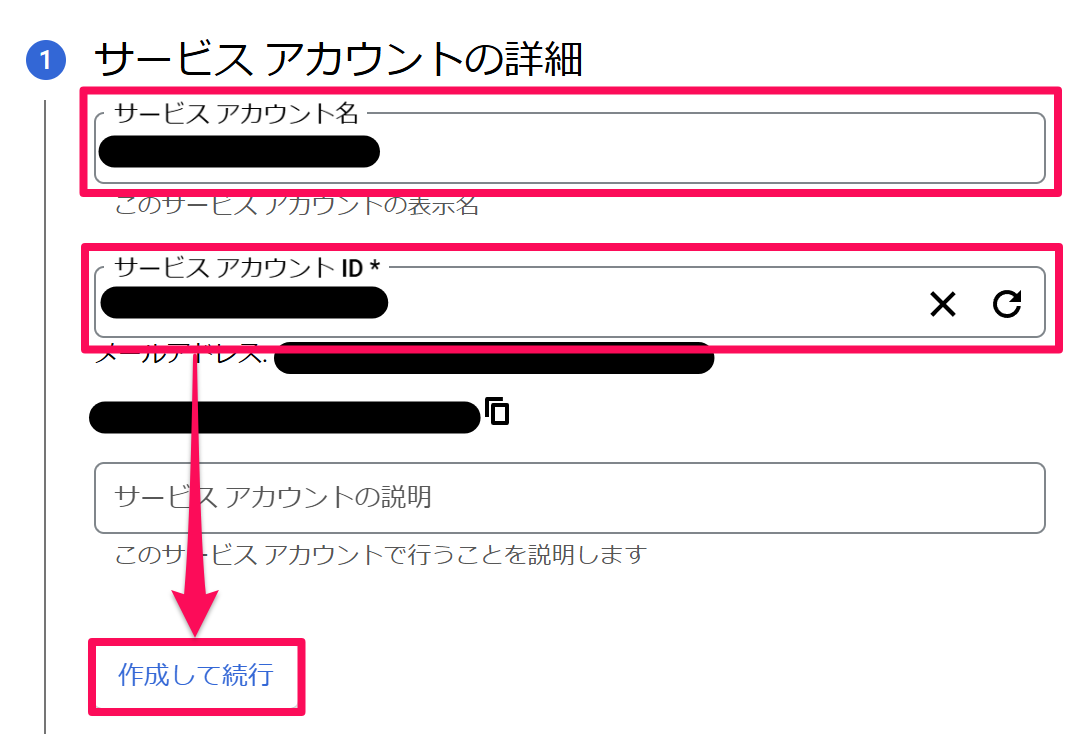
「サービスアカウント名」と「サービスアカウント ID」を入力して「作成して続行」を押します。
手順4
必要に応じて「ロールを選択」を押してロールを選択し、「続行」を押します。
例えば Cloud Storage のオブジェクトを読み取る権限をこのサービスアカウントに付与したい場合は「Cloud Storage > Storage オブジェクト閲覧者」を選択します。

手順5
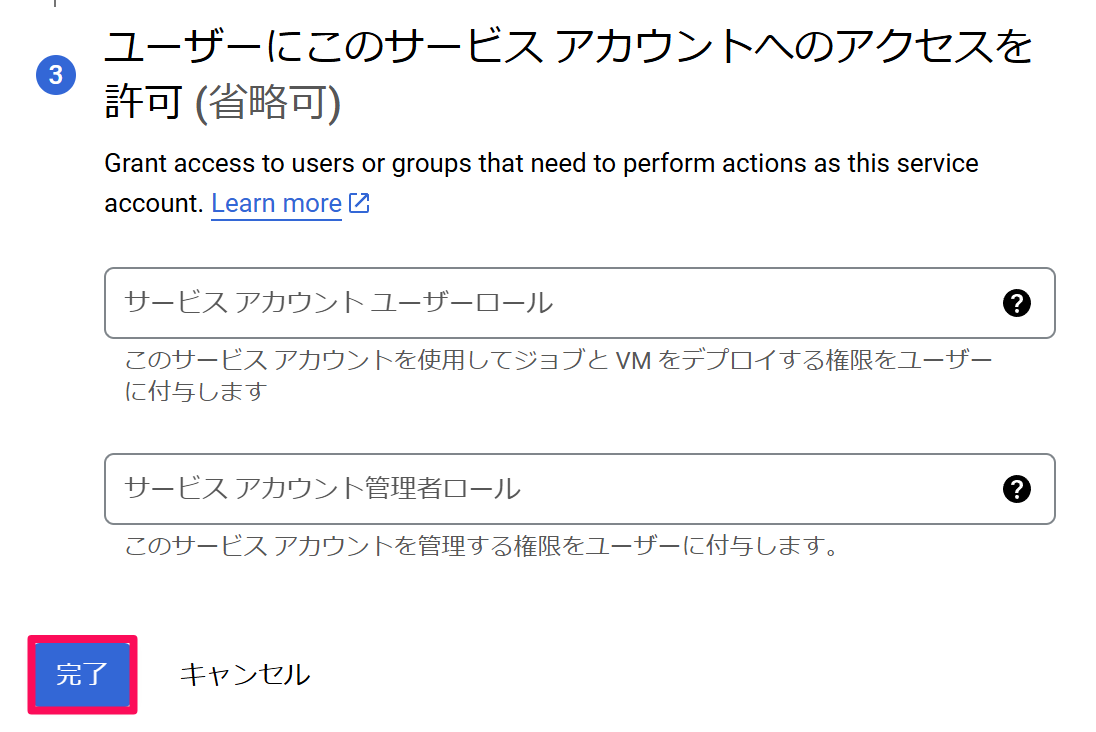
必要に応じて「サービスアカウントユーザーロール」と「サービスアカウント管理者ロール」を設定して「完了」を押します。
秘密鍵のダウンロード
手順6
作成したサービスアカウントを選択して「キー > 鍵を追加 > 新しい鍵を作成」を押します。

手順7
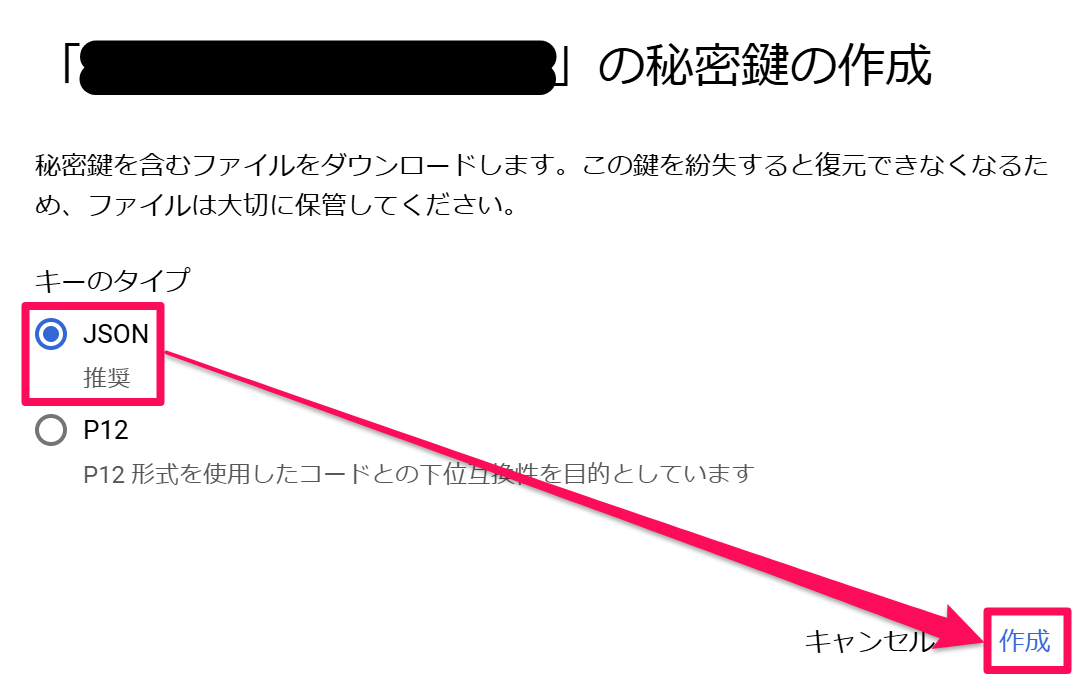
キーのタイプで「JSON」を選択して右下の「作成」を押し、秘密鍵の JSON ファイルをダウンロードします。
この JSON ファイルは大切に保管しておきましょう。
プラグインやライブラリのインポート
ここからは Unity での作業になります。
まずは必要なプラグインやライブラリをプロジェクトにインポートします。
手順8
UniTask と NuGetForUnity の最新版のリリースを GitHub からダウンロードします。
ダウンロードできたら Assets フォルダの中で右クリックして「Import Package > Custom Package...」を選択し、ダウンロードした .unitypackage ファイルをインポートします。

手順9
エディタ上部の「NuGet > Manage NuGet Packages」を選択して NuGet のウィンドウを開きます。

手順10
検索窓に「google api」などと入力して「Search」を押して検索します。
「Google.Apis.Auth」の「Install」を押してインストールします。
インストールが終わったらそのウィンドウは閉じて大丈夫です。

API の使用(Cloud Translation API の場合)
ここからは実際にコードを書いて Google Cloud の API を使用します。
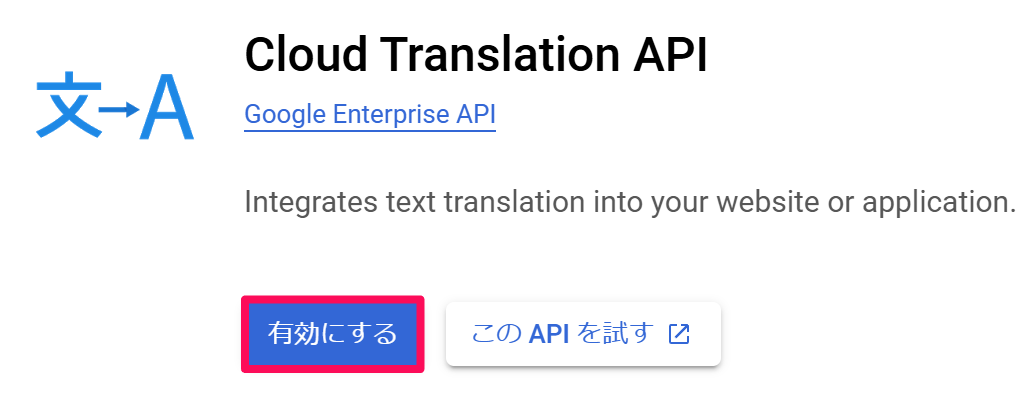
この記事では文章の翻訳に使える Cloud Translation API を叩きます。
手順11
Google Cloud に戻って、使いたい API の画面を開いて「有効にする」を押します。
手順12
Unity に戻って、Google Cloud の API を叩くときに必要なアクセストークンを取得する関数を作成します。
以下はその一例です。
/*
using Cysharp.Threading.Tasks;
using Google.Apis.Auth.OAuth2;
using System;
using System.IO;
using System.Text;
*/

public static async UniTask<string> GetGoogleCloudAccessTokenAsync(TextAsset serviceAccountJsonFile, string[] scopes)
{
    try
    {
        if (serviceAccountJsonFile == null || string.IsNullOrEmpty(serviceAccountJsonFile.text))
        {
            Debug.LogError("The service account JSON file is not set or empty.");

            return string.Empty;
        }

        byte[] jsonData = Encoding.UTF8.GetBytes(serviceAccountJsonFile.text);

        using MemoryStream memoryStream = new(jsonData);

        GoogleCredential googleCredential = GoogleCredential.FromStream(memoryStream).CreateScoped(scopes); ;

        if (googleCredential.IsCreateScopedRequired)
        {
            Debug.LogError("The provided credentials are not valid for generating JWT.");

            return string.Empty;
        }

        return await ((ServiceAccountCredential)googleCredential.UnderlyingCredential).GetAccessTokenForRequestAsync();
    }
    catch (Exception exception)
    {
        Debug.LogException(exception);

        return string.Empty;
    }
}
手順13
叩きたい API のドキュメントを参考にしながら、その API を叩く関数を作成します。
ヘッダーの Authorization に Google Cloud 用のアクセストークンを渡してあげるのがポイントです。
以下は Cloud Translation API を叩く例です。
using System;

[Serializable]
public struct Request
{
    public string[] q;

    public string target;
}
using System;

[Serializable]
public struct Response
{
    public Data data;
}
using System;

[Serializable]
public struct Data
{
    public Translation[] translations;
}
using System;

[Serializable]
public struct Translation
{
    public string translatedText;

    public string detectedSourceLanguage;
}
/*
using Cysharp.Threading.Tasks;
using System;
using System.Collections.Generic;
using System.Text;
using UnityEngine;
using UnityEngine.Networking;
*/

public static async UniTask<Response> GetTranslatedTextAsync(string googleCloudAccessToken, string[] sourceTexts, string targetLanguageCode)
{
    Dictionary<string, string> headers = new()
    {
        {
            "Content-type",
            "application/json"
        },
        {
            "Authorization",
            "Bearer " + googleCloudAccessToken //ここでアクセストークンを渡す
        }
    };

    Request request = new()
    {
        q = sourceTexts,
        target = targetLanguageCode
    };

    using UnityWebRequest unityWebRequest = new("https://translation.googleapis.com/language/translate/v2", "POST")
    {
        uploadHandler = new UploadHandlerRaw(Encoding.UTF8.GetBytes(JsonUtility.ToJson(request))),
        downloadHandler = new DownloadHandlerBuffer()
    };

    foreach (KeyValuePair<string, string> header in headers)
    {
        unityWebRequest.SetRequestHeader(header.Key, header.Value);
    }

    try
    {
        await unityWebRequest.SendWebRequest();
    }
    catch (Exception exception)
    {
        Debug.LogException(exception);

        return new();
    }

    if (unityWebRequest.result != UnityWebRequest.Result.Success)
    {
        Debug.LogError(unityWebRequest.error);

        return new();
    }

    return JsonUtility.FromJson<Response>(unityWebRequest.downloadHandler.text);
}
手順14
実際に API を叩いて動作を確認します。
アクセストークンを発行する際、API ドキュメントに書かれている必要なスコープを渡してあげるのがポイントです。
private async void Start()
{
    //必要なスコープを設定する
    string[] scopes =
    {
        "https://www.googleapis.com/auth/cloud-translation"
    };

    //この例の serviceAccountJsonFile はインスペクターからオブジェクトを注入できるメンバ変数で、
    //サービスアカウントの秘密鍵を作成したときにダウンロードした JSON ファイルを serviceAccountJsonFile に入れます
    string googleCloudAccessToken = await GetGoogleCloudAccessTokenAsync(serviceAccountJsonFile, scopes);

    string[] sourceTexts =
    {
        "Hello world",
        "My name is Tsubasamusu."
    };

    Response response = await GetTranslatedTextAsync(googleCloudAccessToken, sourceTexts, "de");

    Debug.Log(JsonUtility.ToJson(response));
}