はじめに
この記事では Unreal Engine のプロジェクトを Git でバージョン管理するための基本的な手順を解説します。
Git の操作にはコマンドではなく Sourcetree を使用していますが、Git Bash でも他の Git クライアントでも OK です。
また、この記事ではリモートのファイルはすべて GitHub に置く想定です。
この記事の手順を踏むにあたっての前提条件は以下の通りです。
- GitHub のアカウントを作成してあること
- Git や Git LFS を PC にインストールしてあること
- Sourcetree をインストールして GitHub アカウントの認証などの初期設定が済んでいること
また、この記事でのテスト環境は以下の通りです。
- UE 5.1.1
- Visual Studio 2022
- UEGitPlugin 3.15
手順
GitHub でのリポジトリの作成
手順1
早速、手順を解説します。
まずは GitHub でリポジトリを作成します。
GitHub を開いて右上の「+」から「New repository」を押します。

手順2
リポジトリ名や公開範囲などを設定して右下の「Create repository」を押します。

Sourcetree でのリポジトリの作成
手順3
次は Sourcetree を使ってローカルにリポジトリを作成します。
GitHub のリポジトリの画面で通信プロトコルが「HTTPS」になっていることを確認してそのリポジトリの URL をコピーします。

手順4
Sourcetree を開いて「Create」を押します。
対象の UE プロジェクトのルートディレクトリのパスを指定してリポジトリ名も設定します。
種類が「Git」になっていることも確認してから「作成」を押します。

手順5
「出力先ディレクトリのエラー」が表示された場合は「はい」を押します。

手順6
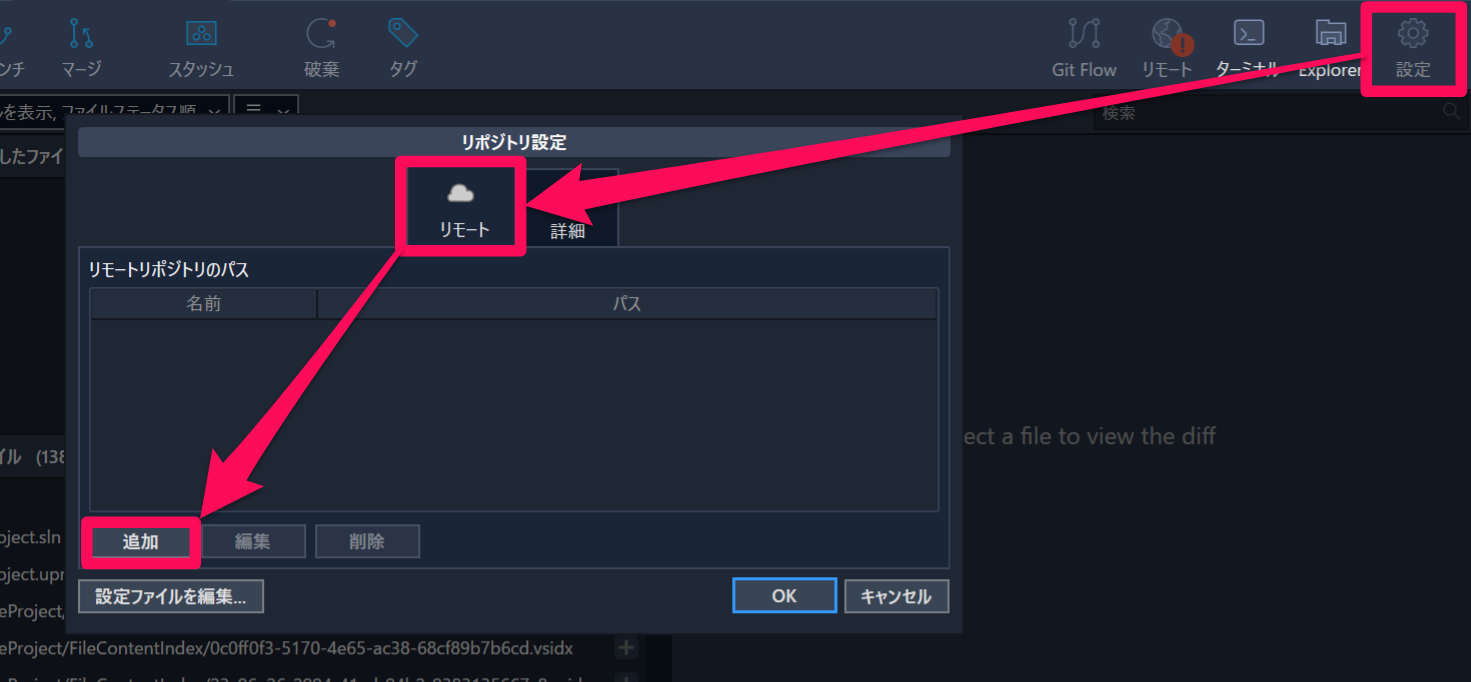
リポジトリの画面が開いたら、右上から「設定 > リモート > 追加」を押します。

手順7
「デフォルトリモート」にチェックを入れて、先ほどコピーした URL を「URL/パス」に貼り付けます。
「Remote Account」で自分の GitHub アカウントを選択して「OK」を押します。

Git LFS の有効化
手順8
「OK」を押してリポジトリ設定を閉じた後、左上の「リポジトリ」から「Git LFS > リポジトリを初期化…」を選択します。

手順9
「Git LFSを利用する」を押します。

手順10
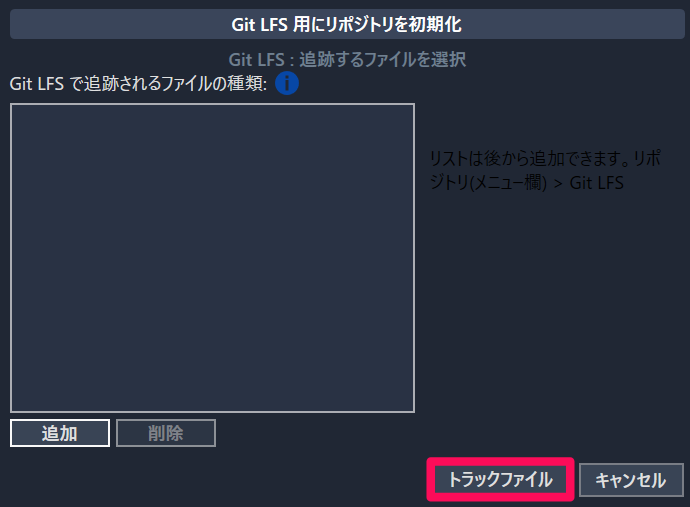
「トラックファイル」を押します。

UEGitPlugin の導入
次は UEGitPlugin というプラグインを導入します。
UEGitPlugin が無くてもバージョン管理しようと思えばできますが、この神プラグインがあるといろいろと便利なのでプロジェクトに入れておきます。
手順11
UEGitPlugin の GitHub リポジトリに行って右の「Releases」を押します。
緑色の「Latest」の文字が表示されている最新バージョンを押して詳細を開きます。

手順12
「Assets > Source code (zip)」を押してソースコードを ZIP ファイルでダウンロードします。

手順13
ダウンロードした ZIP ファイルを展開します。
Visual Studio などの IDE や Unreal Editor を閉じている状態で UE プロジェクトのルートディレクトリにある Plugins フォルダの中に展開したフォルダを移動させます。
(まだ Plugins フォルダが無い場合は手動で作成しましょう)

手順14
プロジェクトの .uproject ファイルで右クリックして「Generate Visual Studio project files」でソリューションファイルを再生成してビルドします。
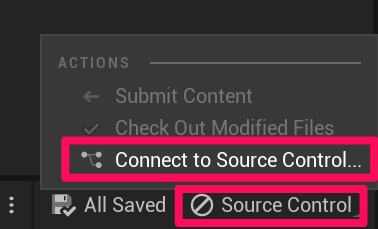
UE プロジェクトを開いて右下の「Source Control」から「Connect to Source Control...」を選択します。

手順15
Provider で「Git LFS 2」を選択して、Git Path も設定します。
Use Git LFS のチェックボックスにチェックが付いていることと、User Name や E-mail などを確認して「Accept Settings」を押します。

手順16
Sourcetree に戻って右上の「設定」から「詳細 > リポジトリ固有の無視リスト > 編集」を押します。

手順17
メモ帳などのテキストエディタが開いたらこちらのコードをコピペして保存します。

手順18
UE プロジェクトのルートディレクトリに .gitattributes という名前のファイルを作成します。
作成したファイルをメモ帳などで開き、こちらのコードをコピペして保存します。

手順19
UE プロジェクトのルートディレクトリにある Config フォルダの中に DefaultEditorPerProjectUserSettings.ini を作成して以下のコードをコピペします。
[/Script/UnrealEd.EditorLoadingSavingSettings]
bSCCAutoAddNewFiles=False
bAutomaticallyCheckoutOnAssetModification=False
bPromptForCheckoutOnAssetModification=True

[/Script/UnrealEd.EditorPerProjectUserSettings]
bAutoloadCheckedOutPackages=True
手順20
この DefaultEditorPerProjectUserSettings.ini と同じ階層にある DefaultEngine.ini を開いて以下のコードをコピペします。
[SystemSettingsEditor]
r.Editor.SkipSourceControlCheckForEditablePackages=1
エディタ専用モジュールの作成
次はエディタ専用モジュールというものを作成します。
この記事の画像やコードでは「YourModuleName」というモジュール名にしていますが、この部分は何でも OK です。
ちなみに自分はよく「GitEditor」という名前にしています。
手順21
UE プロジェクトのルートディレクトリにある Source フォルダの中に新しくフォルダを作成します。
フォルダ名は任意のモジュール名にします。
そのフォルダの中に「{モジュール名}.Build.cs」と「{モジュール名}.cpp」、「{モジュール名}.h」の3つのファイルを作成します。

手順22
作成した3つファイルにそれぞれ以下のコードをコピペします。
YourModuleName の部分は書き換えてください。
using UnrealBuildTool;

public class YourModuleName : ModuleRules
{
    public YourModuleName(ReadOnlyTargetRules Target) : base(Target)
    {
        PCHUsage = PCHUsageMode.UseExplicitOrSharedPCHs;

        PublicDependencyModuleNames.AddRange(new string[] { "Core", "CoreUObject", "Engine", "Slate", "SlateCore", "UnrealEd" });
    }
}
#pragma once

#include "CoreMinimal.h"
#include "Modules/ModuleInterface.h"
#include "Modules/ModuleManager.h"
#include "Editor/UnrealEdEngine.h"

class YOURMODULENAME_API FYourModuleName : public IModuleInterface
{

};
#include "YourModuleName.h"
#include "ISourceControlModule.h"
#include "ISourceControlProvider.h"

IMPLEMENT_MODULE(FYourModuleName, YourModuleName);
手順23
UE プロジェクトの Source フォルダにある「{プロジェクト名}Editor.Target.cs」に ExtraModuleNames.Add("作成したエディタ専用モジュールの名前"); を追加します。
// Copyright Epic Games, Inc. All Rights Reserved.

using UnrealBuildTool;
using System.Collections.Generic;

public class YourProjectNameEditorTarget : TargetRules
{
	public YourProjectNameEditorTarget( TargetInfo Target) : base(Target)
	{
		Type = TargetType.Editor;
		DefaultBuildSettings = BuildSettingsVersion.V2;
		IncludeOrderVersion = EngineIncludeOrderVersion.Unreal5_1;
		ExtraModuleNames.Add("YourProjectName");
        ExtraModuleNames.Add("YourModuleName");//追加
    }
}
手順24
.uproject ファイルを以下のように編集して、作成したモジュールをプロジェクトに追加します。
{
	"FileVersion": 3,
	"EngineAssociation": "5.1",
	"Category": "",
	"Description": "",
	"Modules": [
		{
			"Name": "YourProjectName",
			"Type": "Runtime",
			"LoadingPhase": "Default"
		},
		{
			"Name": "YourModuleName",
			"Type": "Editor",
			"LoadingPhase": "Default"
		}
	],
	"Plugins": [
		{
			"Name": "ModelingToolsEditorMode",
			"Enabled": true,
			"TargetAllowList": [
				"Editor"
			]
		}
	]
}
ステータスブランチの設定
手順25
全ての変更を保存した後、.uproject ファイルで右クリックして「Generate Visual Studio project files」してビルドします。
UE プロジェクトを開いて「Tools > New C++ Class…」を選択します。

手順26
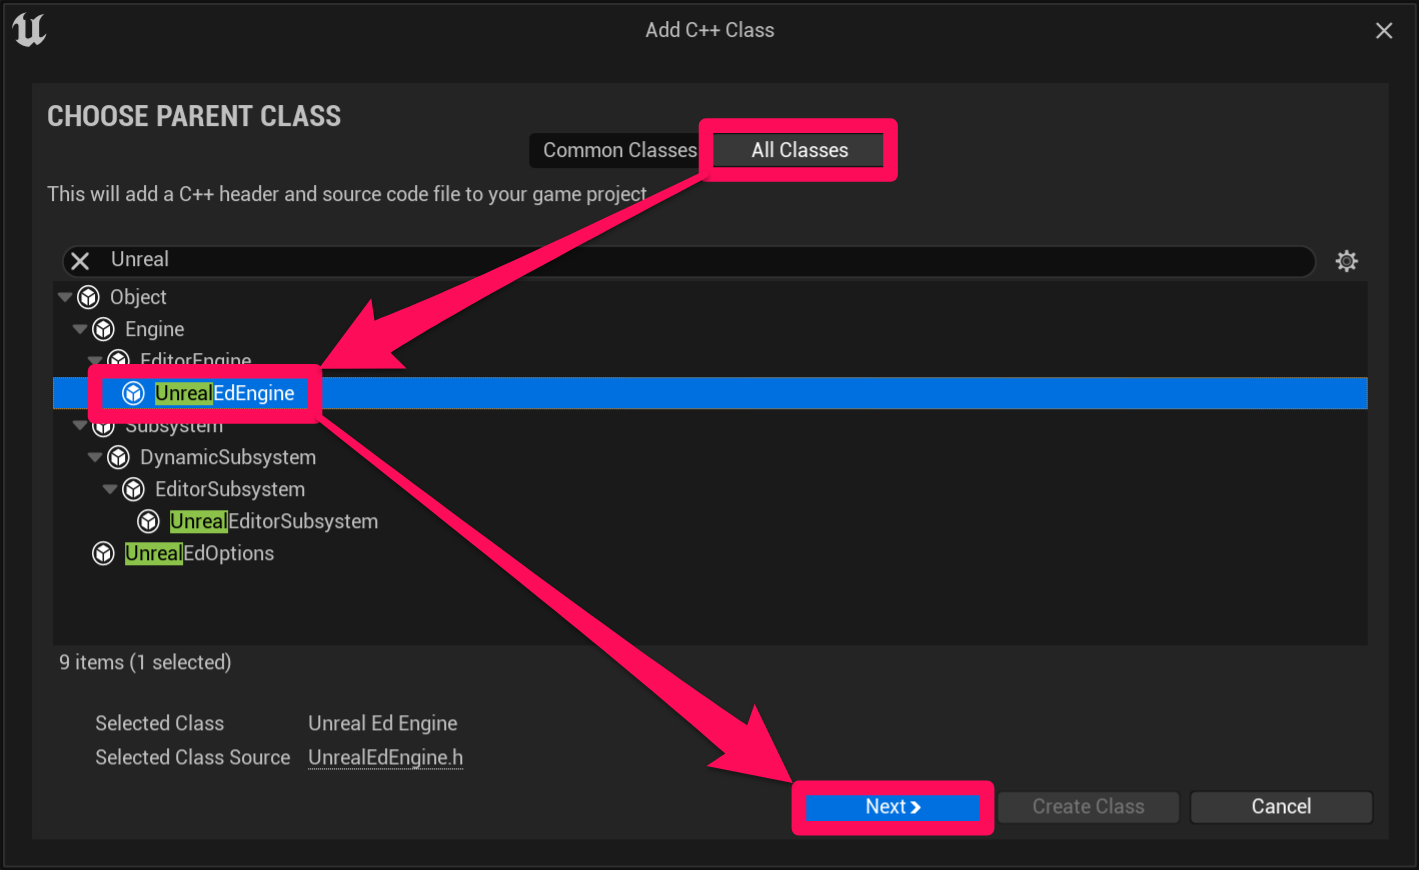
「All Classes」タブで UnrealEdEngine を親クラスに設定して「Next」を押します。

手順27
Class Type を「Public」に、作成場所を「{作成したエディタ専用モジュールの名前}(Editor)」にして「Create Class」を押します。
この記事では Name は「MyUnrealEdEngine」にしてあります。
この部分は何でも OK です。

手順28
Visual Studio や Rider などの IDE が開いたら、作成した各ファイルに以下のコードをコピペします。
(Branches の要素はこちらを参考にして適宜修正します)
変更を保存したら Unreal Editor を閉じて IDE からビルドします。
#pragma once

#include "CoreMinimal.h"
#include "Editor/UnrealEdEngine.h"
#include "MyUnrealEdEngine.generated.h"

UCLASS()
class YOURMODULENAME_API UMyUnrealEdEngine : public UUnrealEdEngine
{
	GENERATED_BODY()

public:
	void Init(IEngineLoop* InEngineLoop) override;
};
#include "MyUnrealEdEngine.h"
#include "ISourceControlModule.h"

void UMyUnrealEdEngine::Init(IEngineLoop* InEngineLoop)
{
	Super::Init(InEngineLoop);

	const ISourceControlModule& SourceControlModule = ISourceControlModule::Get();
	{
		ISourceControlProvider& SourceControlProvider = SourceControlModule.GetProvider();

		const TArray<FString> Branches{ "origin/main", "origin/develop" };

		SourceControlProvider.RegisterStateBranches(Branches, TEXT("Content"));
	}
}
作成したエディタ専用モジュールの登録
手順29
ビルドが完了したら UE プロジェクトの Config フォルダの中にある DefaultEngine.ini に以下のコードを追加します。
YourModuleName と MyUnrealEdEngine の部分は適宜修正してください。
[/Script/Engine.Engine]
UnrealEdEngine=/Script/YourModuleName.MyUnrealEdEngine
手順30
Unreal エディタを開いて適当なアセットを右クリックして「Source Control」を選択した際に Check In や Refresh、Revert などの選択肢が表示されていれば OK です!

最後に
参考記事
参考にした GitHub のリポジトリ
株式会社ModelingXについて

富山県を拠点とするスタートアップ企業、ModelingXは、2022年4月に創業し、「テクノロジーで感動体験を提供する」というミッションを掲げています。当社が開発中の暮らし体験メタバース「MELIFE(ミライフ)」は、バーチャル住宅展示場や銀行相談、家具購入、婚活などができる「地域単位の新たな経済圏」を目指しています。
↓サービスサイトはこちらから↓
ModelingXはリモートワーク&フレックスタイム制を完備。
UnityやUEを共に探求する仲間を全国から募集しています。
↓企業詳細はこちら↓