はじめに
Webフロントエンドに詳しい方にはなじみがあるかもしれませんが、Angularなどのように独自に作成した小さなコンポーネントをいろいろな場面で使いまわす、というようなことを.NET MAUIでもできないかと思いいろいろ試してみました。
環境
- Microsoft Visual Studio Enterprise 2022: Version 17.10.4
- .NET MAUI 8.0.61
コントロールを作成、使用
どこでもいいですがここではControlsフォルダを切ってその中に独自コントロールをまとめて行く想定で進めます。
Controlsの中に.NET MAUI ContentView (XAML) を新規作成します。ここではMyButton.xamlとします。
MyButton.xamlの中身はこんな感じ。
<?xml version="1.0" encoding="utf-8" ?>
<ContentView xmlns="http://schemas.microsoft.com/dotnet/2021/maui"
             xmlns:x="http://schemas.microsoft.com/winfx/2009/xaml"
             x:Class="CustomControls.Controls.MyButton">
    <Button Text="My Button works!!"
            Background="Azure" />
</ContentView>
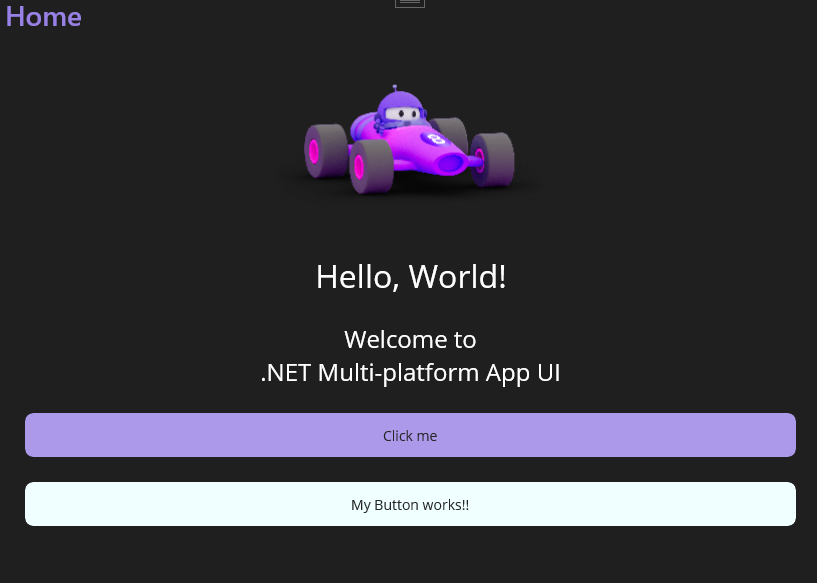
試しにMainPage.xamlで使用します。xmlns:controls="..."を追記し、コントロールを使いたい箇所に配置します。
<?xml version="1.0" encoding="utf-8" ?>
<ContentPage xmlns="http://schemas.microsoft.com/dotnet/2021/maui"
             xmlns:x="http://schemas.microsoft.com/winfx/2009/xaml"
             xmlns:controls="clr-namespace:CustomControls.Controls;assembly=CustomControls"
             x:Class="CustomControls.MainPage">

    <ScrollView>
        <VerticalStackLayout
            Padding="30,0"
            Spacing="25">
            ...

            <controls:MyButton />

        </VerticalStackLayout>
    </ScrollView>

</ContentPage>
うまくいきました。
プロパティ作成
独自コントロールをプロパティを渡すことでカスタマイズできるようにします。独自コントロールのコードビハインド(MyButton.xaml.cs)にプロパティを作成することで実現できます。
namespace CustomControls.Controls;

public partial class MyButton : ContentView
{
    public static readonly BindableProperty TextProperty = BindableProperty.Create(
		nameof(Text), // プロパティ名
		typeof(string), // プロパティの型
		typeof(MyButton), // プロパティを宣言しているクラスの型
		default(string) // デフォルト値
	);
	public string Text
    {
        get => (string)GetValue(TextProperty);
        set => SetValue(TextProperty, value);
    }

    public MyButton()
	{
		InitializeComponent();
	}
}
x:Nameを指定することでコードビハインドを参照できるようにします。
<?xml version="1.0" encoding="utf-8" ?>
<ContentView xmlns="http://schemas.microsoft.com/dotnet/2021/maui"
             xmlns:x="http://schemas.microsoft.com/winfx/2009/xaml"
             x:Name="self"
             x:Class="CustomControls.Controls.MyButton">
    <Button Text="{Binding Source={Reference self}, Path=Text}" />
</ContentView>
プロパティを設定します。
<controls:MyButton Text="This is Customized Button." />
背景色も設定できます。
    public static readonly BindableProperty BgColorProperty = BindableProperty.Create(
        nameof(BgColor),
        typeof(Color),
        typeof(MyButton),
        Colors.White
    );
    public Color BgColor
    {
        get => (Color)GetValue(BgColorProperty);
        set => SetValue(BgColorProperty, value);
    }
<Button Text="{Binding Source={Reference self}, Path=Text}"
        Background="{Binding Source={Reference self}, Path=BgColor}"/>
<controls:MyButton Text="This is Customized Button."
                   BgColor="Aqua"/>
プロパティの変更を反映する
ボタンの色を直接指定するのではなくPrimary、Secondaryのように状態を定義しておいてその状態によって色を変更できるようにします。
Stateをインプットとして受け取りBgColorに対応付けます。
public enum State
{
    Primary,
    Secondary,
    Warning,
    Danger,
}
public partial class MyButton : ContentView
{
    ...

    public static readonly BindableProperty StateProperty = BindableProperty.Create(
        nameof(State),
        typeof(State),
        typeof(MyButton),
        State.Primary
    );
    public State State
    {
        get => (State)GetValue(StateProperty);
        set => SetValue(StateProperty, value);
    }

    public Color BgColor
    {
        get => State switch
        {
            State.Primary => Colors.Blue,
            State.Secondary => Colors.Green,
            State.Warning => Colors.Yellow,
            State.Danger => Colors.Red,
            _ => Colors.Blue,
        };
    }
BgColorではなくStateを渡すようにします。
<controls:MyButton Text="This is Customized Button."
                   State="Secondary"/>
これでGreenで表示される想定ですが、Primaryに対応付けたBlueでしか表示されません。
どういうことかというとStatePropertyのデフォルト値にPrimaryを指定しています。すると最初に描画されるときにはPrimaryの色、つまりBlueで描画されます。そのあとStateの値を受け取りBgColorが変更されますが、xamlは変更されたことを知りません。そのため、Stateが変更されたときに値が変更されたことを通知する必要があります。
StateにpropertyChangedを追加し、BgColorが変更されたことを通知します。
    public static readonly BindableProperty StateProperty = BindableProperty.Create(
        nameof(State),
        typeof(State),
        typeof(MyButton),
        State.Primary,
        propertyChanged: OnStateChanged
    );
    public State State
    {
        get => (State)GetValue(StateProperty);
        set => SetValue(StateProperty, value);
    }

    private static void OnStateChanged(BindableObject bindable, object oldValue, object newValue)
    {
        if (bindable.GetType() != typeof(MyButton))
            return;

        var instance = (MyButton)bindable;
        instance.OnPropertyChanged(nameof(BgColor));
    }
これでうまくいきました。ホットリロードも効くので渡しているStateの値を直接変更しても即座に反映されるかと思います。
今回の例を応用すれば背景色だけでなく表示・非表示の切り替え、アイコンの出し分けなどいろいろなことができるようになります。
最後に
プロパティ定義とか変更通知とかちょっと面倒かもしれませんが、コンポーネント単位でしっかりと作りこんでいけばかなりコード量を削減できますし、種類が充実してくれば実装がサクサクできるようになって楽しいです。
いつもDRY(Don't Repeat Yourself)の精神でコーディングしたいですね。

