はじめに
ソフトウェア無線(SDR : Software-defined radio)は、ソフトウェアによりラジオを構築する手法です。
SDRは、アナログの電波をADC(analog to digital converter)で、デジタル化して、ソフトウェアによる信号処理でラジオを定義します。
GNU Radio はソフトウェア無線を実装するための信号処理ブロックを提供するソフトウェア・ツール・キットです。
今回は安価なUSBドングルチューナ(RTL-SDR)で、GNU Radio を動かしてみました。
GNU Radio インストールからFMステレオラジオ構築(スケルチ、RFゲイン付き)までを紹介します。
ハードウェア
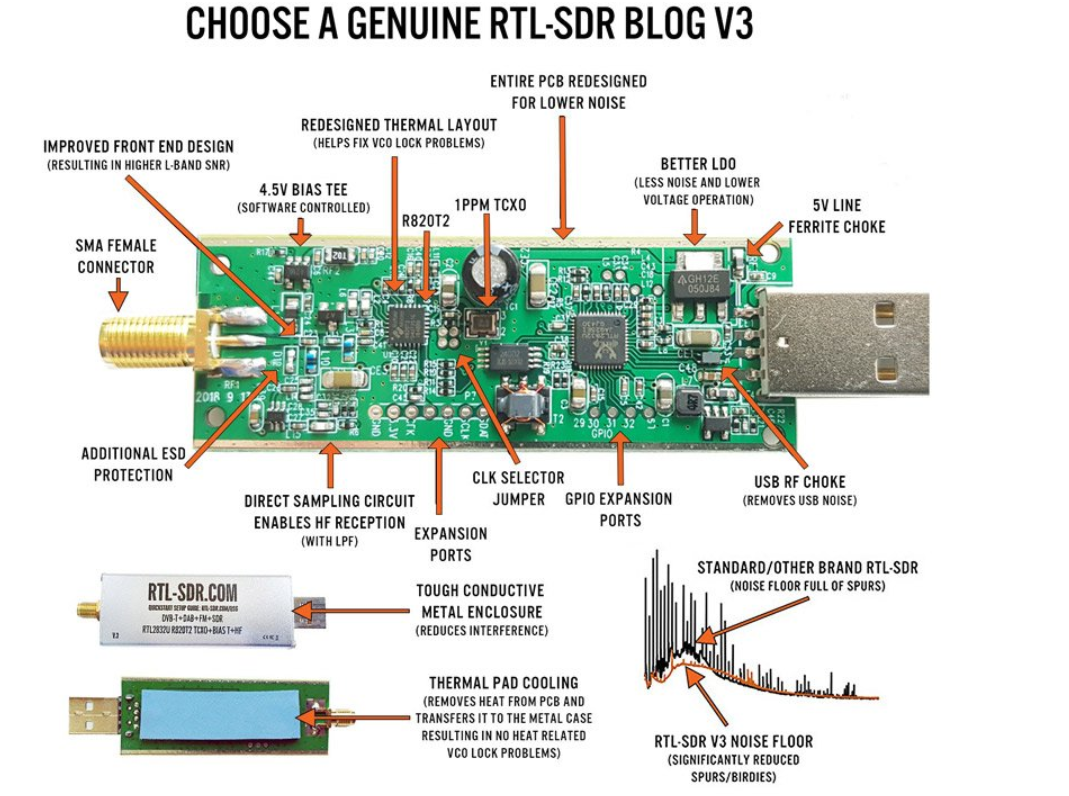
(RTL-SDR.COM より)
今回はハードウェアとして上記のUSBドングル「RTL-SDR BLOG V.3」を使用しました。
- 周波数 28MHz ~ 1700MHz (500 kHz – 24 MHz in direct sampling mode)
- 帯域幅 2.8MHz
- サンプリング周波数 28.8MHz (ブロックダイアグラムより)
- チップ R820T2 (RFアナログ処理)
- チップ RTL2832U (ADC、デジタル処理)
チップ R820T(RFアナログ処理)ブロックダイヤグラム
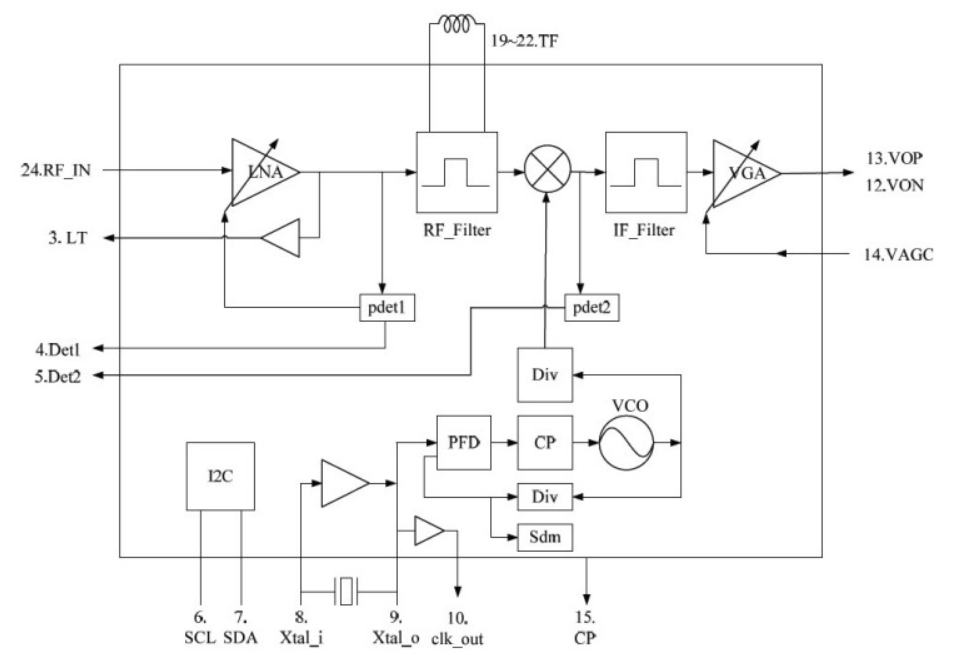
(ワンセグTVチュナー HF 受信アダプターの実験より http://ja7vra.blogspot.com/2013/02/blog-post.html)
LNA (Low noise amplifier、低ノイズ増幅器)
VCO(Voltage-controlled oscillator、電圧制御発振器)
VGA (Variable Gain Amplifier、可変利得アンプ)
チップ RTL2832(ADC、デジタル処理)ブロックダイヤグラム
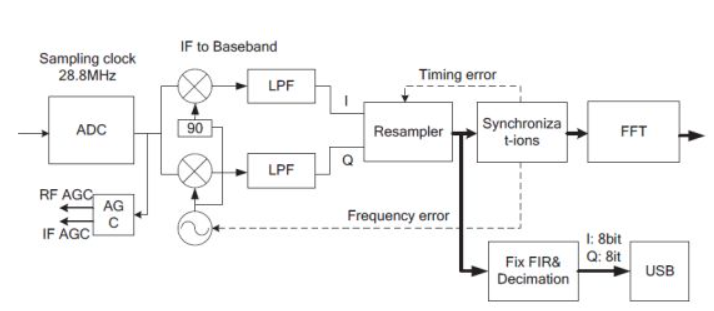
(ワンセグTVチュナー HF 受信アダプターの実験より http://ja7vra.blogspot.com/2013/02/blog-post.html)
ADC (analog to digital converter、アナログ-デジタル変換回路) サンプリング周波数 28.8MHz
LPF(Low-pass filter: LPF、低域通過濾波器)
参考HW HackRF One(GNU Radio 対応)
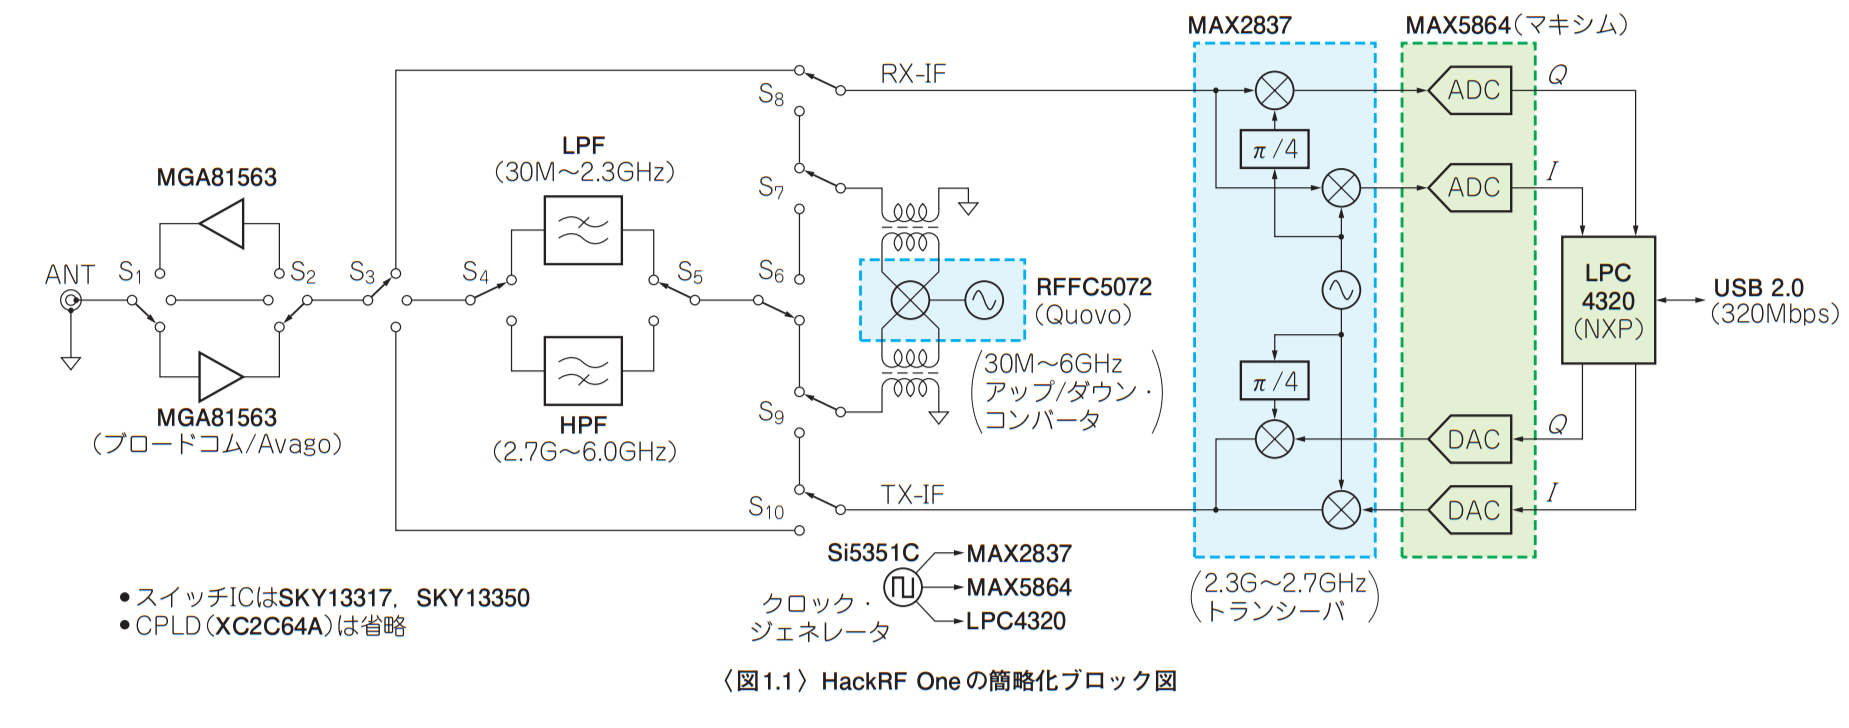
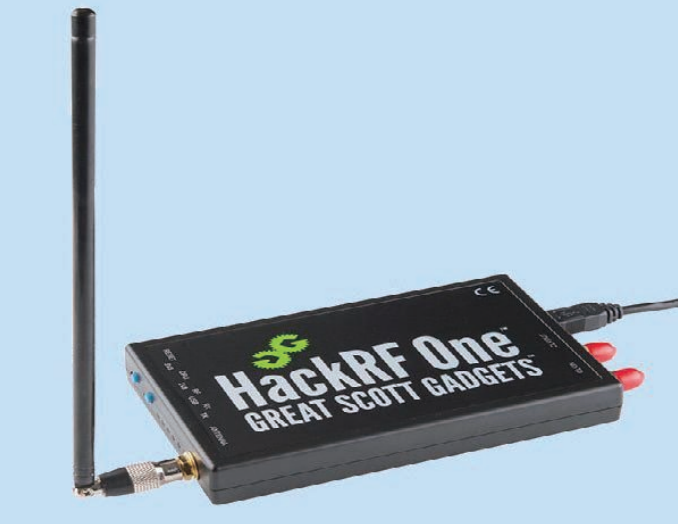
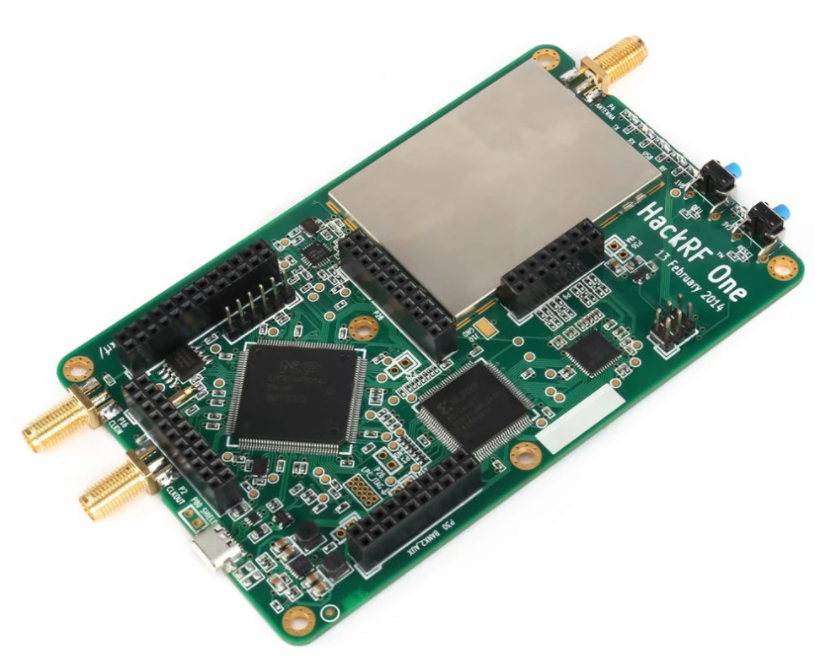
GNU Radio 対応の参考 HW として、HackRF One を紹介します。
 |
|
- 受信だけでなく、送信も可能
- 周波数 1MHz ~ 6GHz(output power of 30 mW to 1 mW)
- 帯域幅 20MHz
- サンプリング周波数 2 to 20 MHz
- hardware and software's open source
(RFワールド No.44 GRCで広がるSDRの世界 より)
参考HW PORTAPACK H2(GNU Radio 対応 ?)
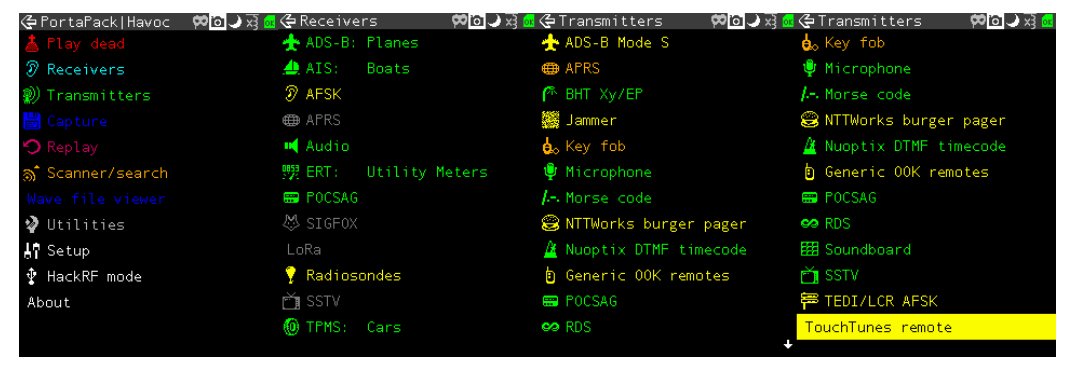
上記のHackRF One にアドオンできる、追加ボード(信号処理、GUI)も紹介します。
- PORTAPACK H2(3.2インチLCD)、古い H1 は2.4インチLCD。
- OS はリアルタイムOSである ChibiOS (Raspberry Piにも移植済みらしい)
- GNU Radio 対応は不明です

|

|
(https://www.rtl-sdr.com/a-review-of-the-hackrf-portapack-with-havok-firmware/ より)
(https://github.com/eried/portapack-mayhem より)
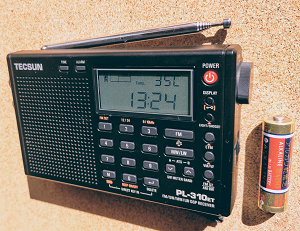
参考HW DSPラジオ(TECSUN PL-310ET)
参考 HW として、DSP(Digital Signal Processor)ラジオも紹介します。安価で感度も良くお勧めです。
 |
 |
長波: 153 - 513 kHz
中波: 520 - 1710 kHz(AM)
短波: 2300 - 21950 kHz
超短波: 64 - 108 MHz(FM)
選局、音量は右側の ロータリエンコーダ
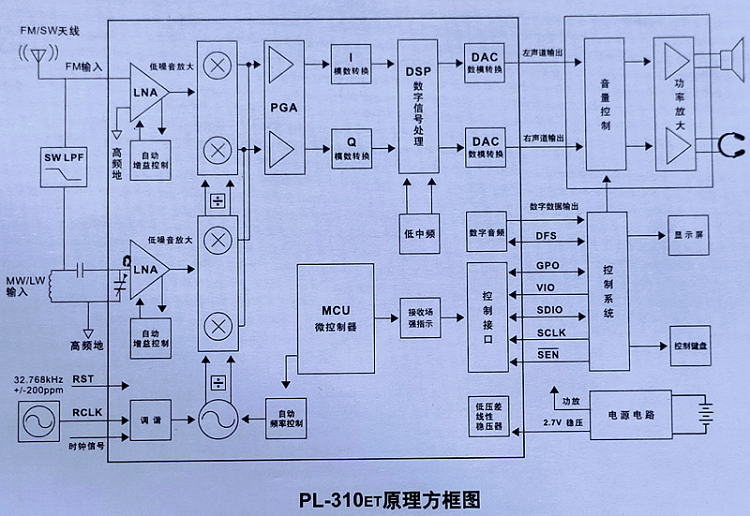
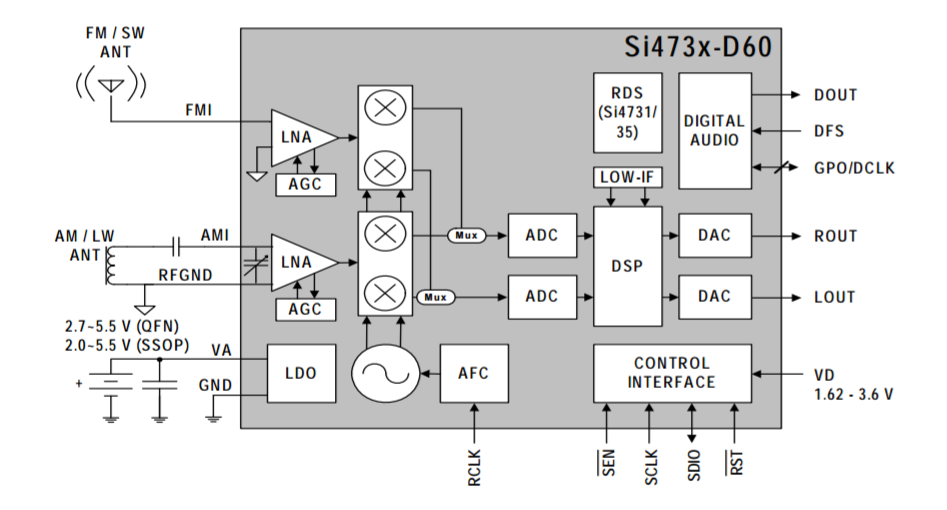
このDSPラジオが使用しているチップは、Si4734(AM/FM/SW/LW ラジオ・レシーバ)です。
このチップのブロックダイヤグラムをつぎに示します。
(https://www.silabs.com/documents/public/data-sheets/Si4730-31-34-35-D60.pdf より)
ハードウェアの動作確認
最初に今回使用した、「RTL-SDR BLOG V.3」ハードウェアの動作確認をつぎのように行います。
- プログラム 「SDR#」 によるFM放送局の受信
- rtl_test 実行
具体的な操作をつぎに示します。
SDR# ダウンロード
Windows SDR Software Package
https://airspy.com/download/
SDR# インストールと実行
クイックスタートガイド https://www.rtl-sdr.com/rtl-sdr-quick-start-guide/
を参考にして、つぎの操作を行います。
ファイルを解凍して、次を実行する
install-rtlsdr.bat
zadig.exe (管理者モードで実行)
"Options->List All Devices"
"Bulk-In, Interface (Interface 0)"
Replace Driverボタン
SDRSharp.exe
"Source->RTL-SDR USB (Original)"
Setup
Sample Rate -> 2.4MSPS
RF gain settings
rtl_test 実行
rtl_test.exe は GNURadio のインストールで自動的に生成されます。
C:\Program Files\GNURadio-3.7\bin\rtl_test.exe -t [-d デバイス番号]
デバイス番号は、0 から
Found 1 device(s):
0: Realtek, RTL2838UHIDIR, SN: 00000001
Using device 0: Generic RTL2832U OEM
Found Rafael Micro R820T tuner
Supported gain values (29): 0.0 0.9 1.4 2.7 3.7 7.7 8.7 12.5 14.4 15.7 16.6 19.7 20.7 22.9 25.4 28.0 29.7 32.8 33.8 36.4 37.2 38.6 40.2 42.1 43.4 43.9 44.5 48.0 49.6
[R82XX] PLL not locked!
Sampling at 2048000 S/s.
No E4000 tuner found, aborting.
インストール GNURadio Win64 Binaries
「Complete GNURadio 3.7.9.2 64-bit Packages」と記載があるので、最新のV3.8 でなく v3.7.9.2/v1.1.1 をクリックしてダウンロードします。
ダウンロードした gnuradio_3.7.9.2_win64.msi を実行します。
GNURadio Hello world
GNURadio の動作確認として、信号を生成してグラフ表示します。具体的な手順をつぎに示します。
フローグラフ作成
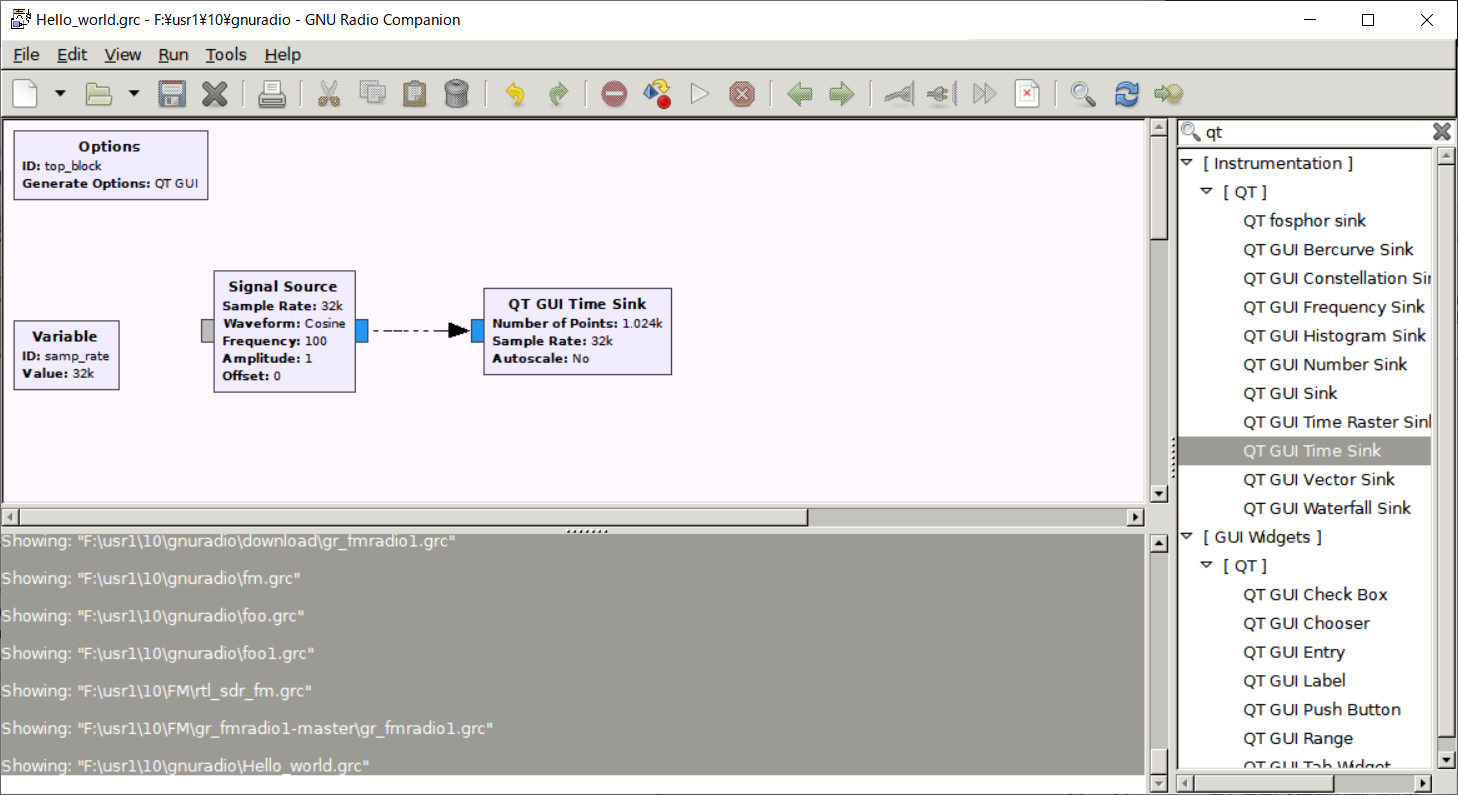
「GNURadio Companion」を実行し、GNURadio画面を表示します。
2つのブロック「Signal Source」、「QT GUI Time Sink」を右側メニューより選択して、左側に配置して結線します。
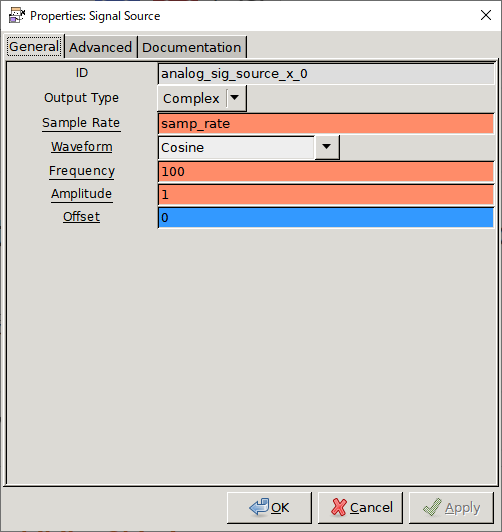
配置した「Signal Source」をダブルクリックしてプロパティ画面を表示し、
「Frequency」 を 100 に変更します。
作成したフローグラフを保存します。ファイルはテキストファイルで、サフィックス「.grc」付きで保存されます。
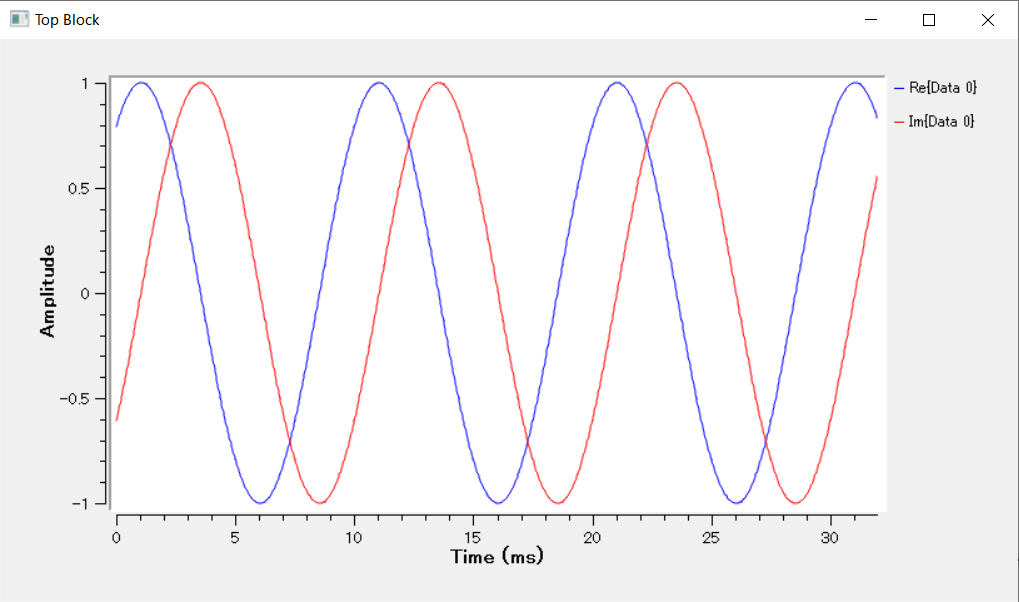
フローグラフ実行
「GNURadio Companion」上部メニュー 「▷」 をクリックすると、つぎの波形が表示されます。
シンプルFMラジオ
4つの GNU Radio ブロックだけで、FMラジオを構築できます。
受信する放送局は、エフエム東京 80MHz です。放送の帯域は 200KHz です。
GNU Radio フローグラフ
使用 Block
使用した4つのBlockは、
- RTL-SDR Source
- Low Pass Filter
- WBFM Receive
- Audio Sink
サンプリング周波数を、2.4MHz → 480kHz → 48kHz と下げていきます。これは、
デシメーション機能で、「Low Pass Filter」に 1/5、 「WBFM Receive」に 1/10 を指定して行います。
ローパスフィルタ「Low Pass Filter」の遮断周波数は、150kHzで、上下300kHzでFM放送の帯域200KHzを通します。
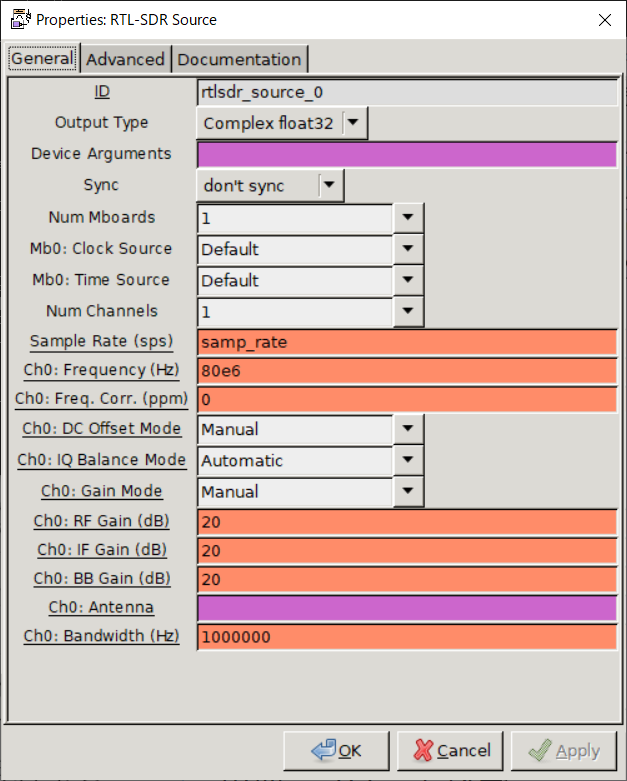
「RTL-SDR Source」ブロックプロパティ
- 複数のハードウェアがある場合は、上記の「Device Arguments」欄で、rtl=デバイス番号(0..)のように指定します。
- 受信周波数は、「Ch0:Frequency(Hz)」欄で、80MHzを指定しています。
ステレオFMラジオ
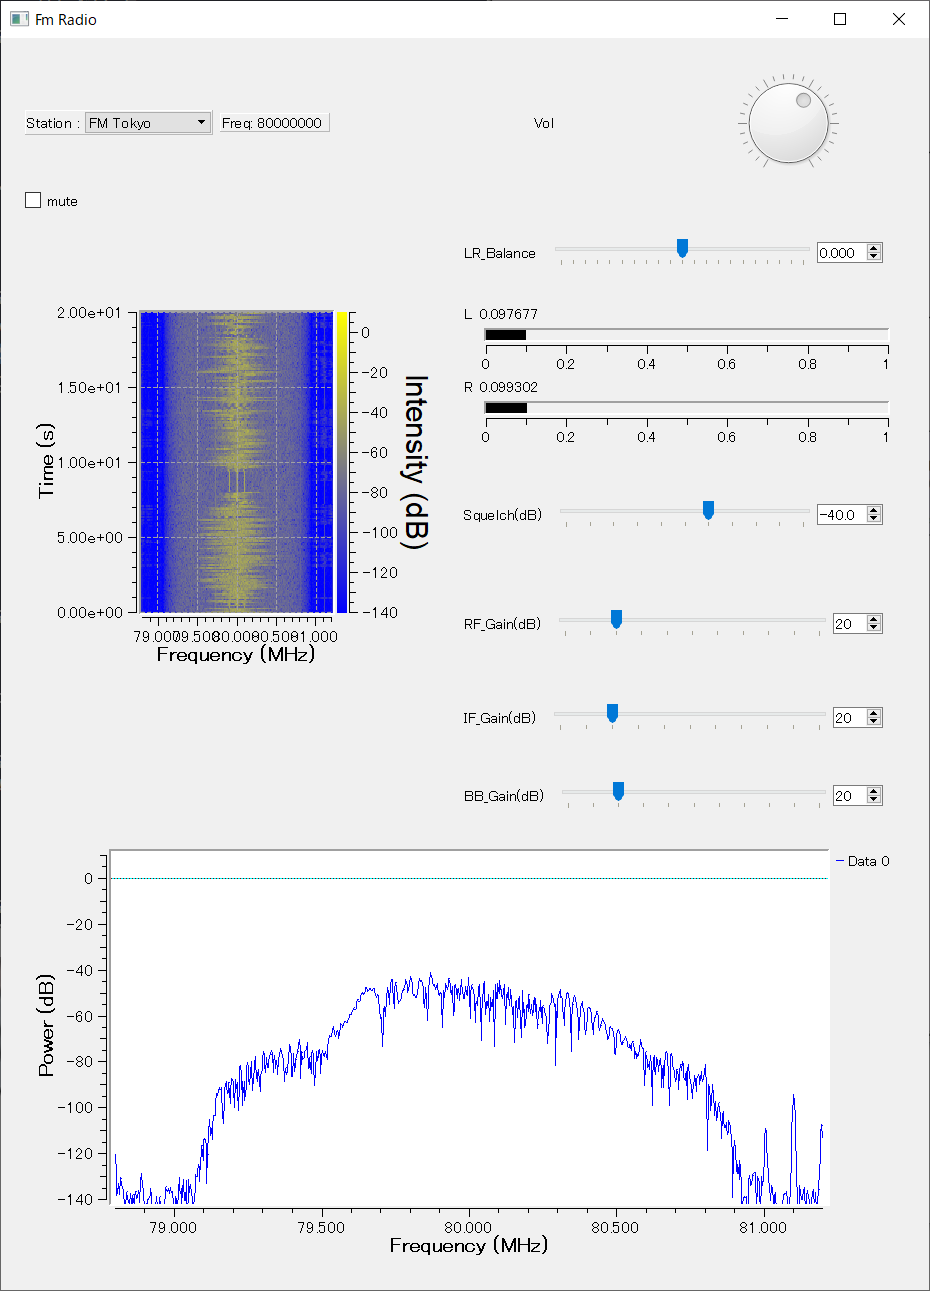
作成した「ステレオFMラジオ」のGUI画面、機能、GNU Radio フローグラフをつぎに示します。
GUI画面
機能
- 放送局名リストから選局
- ステレオ受信
- 音量つまみ
- VUメータ
- RFアンプ利得 (IF,BBアンプ利得は機能しない)
- スケルチ
- ミュート
- 周波数スペクトル
- ウォータフォールパネル
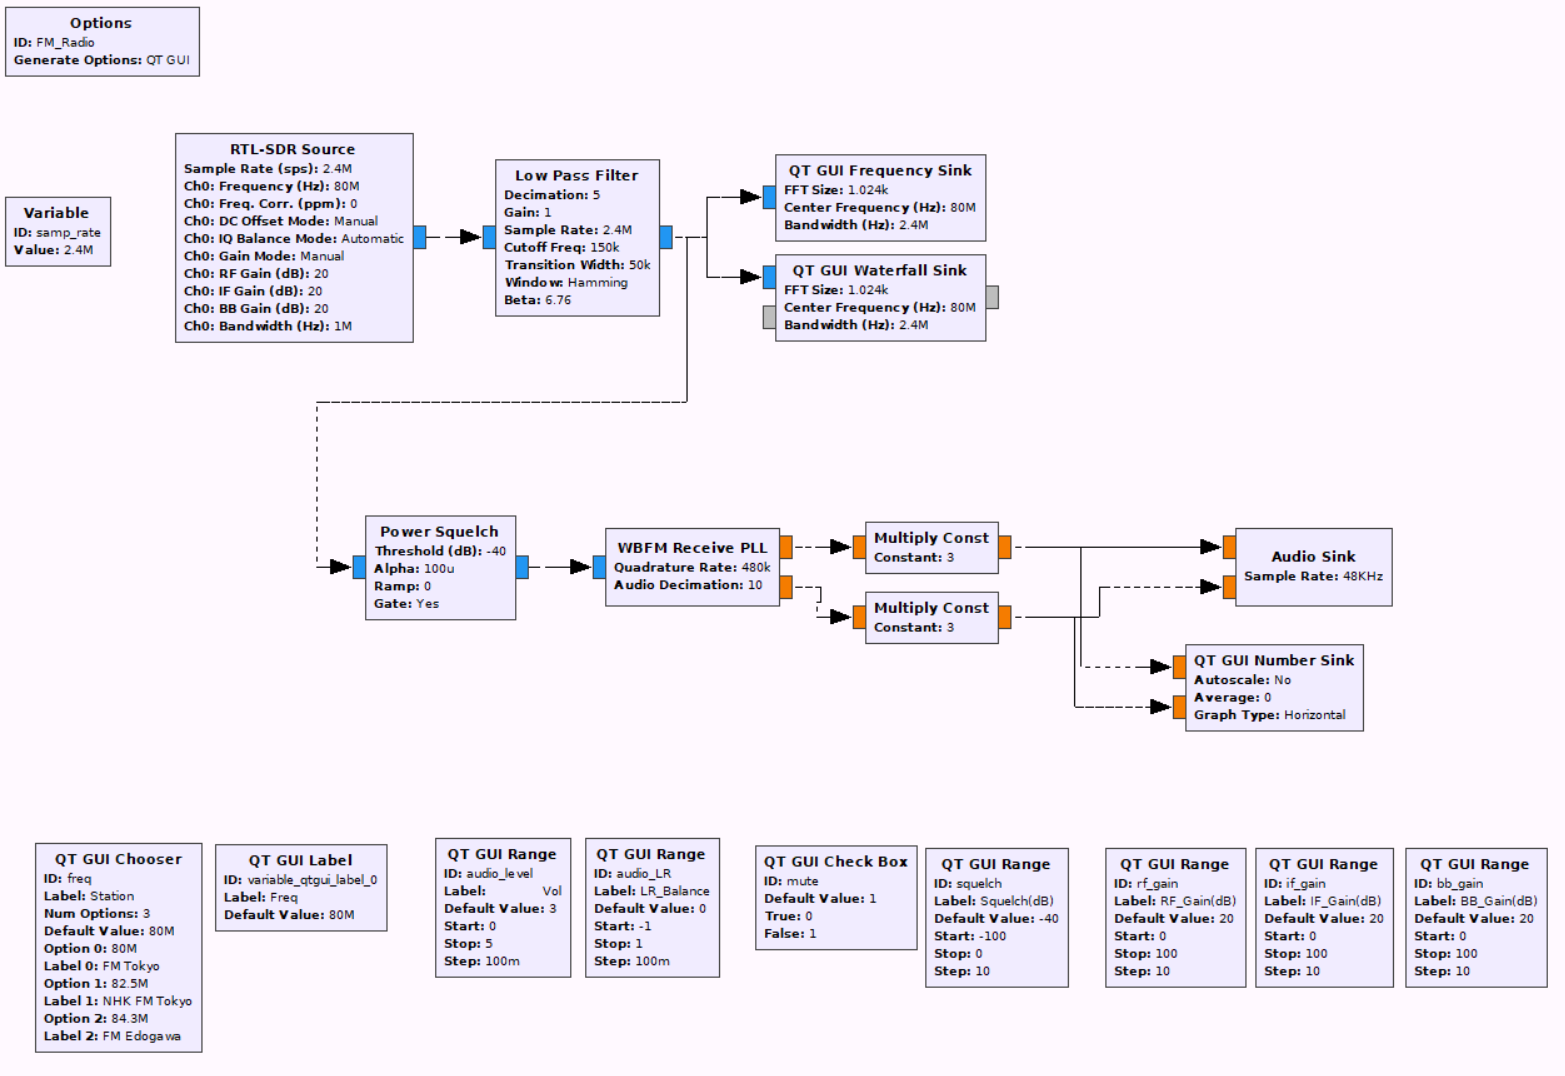
GNU Radio フローグラフ
フローグラフの最下段には、GUI 関連のブロックが並んでいます。
おわりに
GNU Radio は、多くのブロックが有り信号処理が簡単にできます。つまみや、周波数スペクトル画面などを配置してGUIも簡単に構築できます。
また、Python で信号処理を記述したり、Web上で GUIを構築するパッケージもあるようで楽しめそうです。
参考資料
GNU Radio
https://wiki.gnuradio.org/index.php/Main_Page
https://wiki.gnuradio.org/index.php/Category:Block_Docs
https://wiki.gnuradio.org/index.php/GUI_Hint
https://wiki.gnuradio.org/index.php/Tutorials
https://wiki.gnuradio.org/index.php/FAQ
https://wiki.gnuradio.org/index.php/Simulation_example:_AM_transmitter_and_receiver
https://wiki.gnuradio.org/index.php/Guided_Tutorial_Hardware_Considerations
Wikipedia
https://ja.wikipedia.org/wiki/ソフトウェア無線
https://ja.wikipedia.org/wiki/GNU_Radio
https://ja.wikipedia.org/wiki/直角位相振幅変調
https://ja.wikipedia.org/wiki/サンプリング周波数
https://ja.wikipedia.org/wiki/Qt
https://ja.wikipedia.org/wiki/WxWidgets
その他 URL
電波とIQ変調
http://nolinknolife.livedoor.blog/archives/19171967.html
書籍
RFワールド No.44 GRCで広がるSDRの世界 2019/3/29 トランジスタ技術編集部
http://www.rf-world.jp/bn/RFW44/samples/p011-012.pdf
ハードウェア データ
RTL-SDR BLOG V.3
QUICK START GUIDE「RTL-SDR Blog V3 R820T2 RTL2832U 1PPM TCXO SMA Software Defined Radio」
https://www.rtl-sdr.com/rtl-sdr-quick-start-guide/
RTL-SDR BLOG V.3. DONGLES USER GUIDE
https://www.rtl-sdr.com/rtl-sdr-blog-v-3-dongles-user-guide/
RTL-SDR Blog V3 Datasheet
https://www.rtl-sdr.com/wp-content/uploads/2018/02/RTL-SDR-Blog-V3-Datasheet.pdf
チップのブロックダイヤグラム
ワンセグTVチュナー HF 受信アダプターの実験
http://ja7vra.blogspot.com/2013/02/blog-post.html
チップの回路図
ピンクの像 DVB-T DAB+FMの回路図を想象する RTL2832U R820T
https://ggtoshi.at.webry.info/201406/article_6.html
R820T データシート(RFアナログ処理)
R820T High Performance Low Power Advanced Digital TV Silicon Tuner Datasheet
https://www.rtl-sdr.com/wp-content/uploads/2013/04/R820T_datasheet-Non_R-20111130_unlocked1.pdf
R820T2 Register Description
https://www.rtl-sdr.com/wp-content/uploads/2016/12/R820T2_Register_Description.pdf
RTL2832U データシート(ADC、デジタル処理)
RTL2832U
https://www.realtek.com/ja/products/communications-network-ics/item/rtl2832u
Datasheets
There is no datasheet available for the RTL2832U as it is only available to manufacturers under NDA.
Si4734 データシート(AM/FM/SW/LW RADIO RECEIVER)
HackRF One
https://en.wikipedia.org/wiki/HackRF_One
https://greatscottgadgets.com/hackrf/
https://github.com/mossmann/hackrf/wiki
https://github.com/mossmann/hackrf/tree/master/doc/hardware
https://github.com/mossmann/hackrf/wiki/Hardware-Components
https://akizukidenshi.com/download/ds/gsg/hackrf-one-schematic.pdf
PortaPack
https://github.com/sharebrained/portapack-hackrf/wiki
https://github.com/eried/portapack-mayhem/wiki/Hardware-overview
https://github.com/sharebrained/portapack-hackrf/wiki/Firmware-Architecture
https://www.rtl-sdr.com/a-review-of-the-hackrf-portapack-with-havok-firmware/
https://github.com/furrtek/portapack-havoc/
https://github.com/furrtek/portapack-havoc/wiki
https://github.com/eried/portapack-mayhem
https://ja.wikipedia.org/wiki/ChibiOS/RT
https://ja.aliexpress.com/item/4001213658873.html
https://github.com/eried/portapack-mayhem/wiki/Differences-Between-H1-and-H2-models
付録 サンプリング周波数(Wikipedia)
ある波形を正しく標本化するには、波形の持つ周波数成分の帯域幅の2倍より高い周波数で標本化する必要がある(これをサンプリング定理と呼ぶ)。
逆に、サンプリング周波数の1/2の帯域幅の外側の周波数成分は、復元時に折り返し雑音となるため、標本化の前に帯域制限フィルタにより遮断しておかなければならない。
音楽CDで使用されるサンプリング周波数は44.1kHzであるため、直流から22.05kHzまでの音声波形を損なわずに標本化できる。あらかじめ、カットオフ周波数20kHzないし22kHz程度のローパスフィルタで前処理が行なわれているが、人の可聴域の上限20kHzにほぼ一致している。
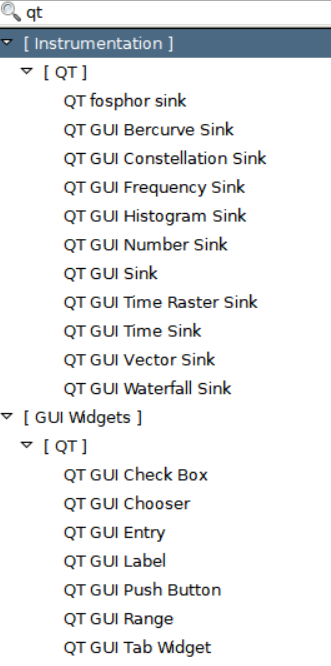
付録 GUI一覧(QTブロック一覧)
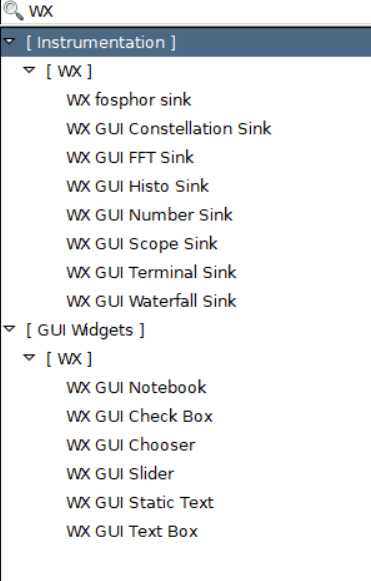
付録 GUI一覧(WXブロック一覧)
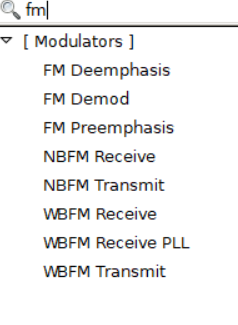
付録 FMブロック一覧
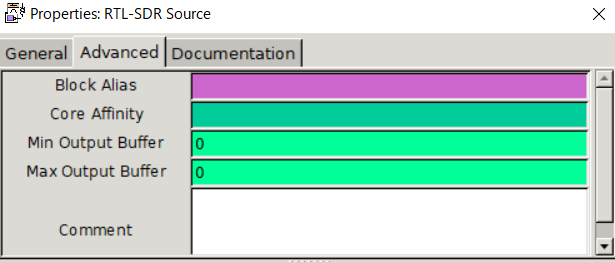
付録 RTL-SDR Source ブロック(Documentation)
The osmocom source block:
While primarily being developed for the OsmoSDR hardware, this block as well supports:
- FUNcube Dongle through libgnuradio-fcd
- FUNcube Dongle Pro+ through gr-fcdproplus
- sysmocom OsmoSDR Devices through libosmosdr
- RTL2832U based DVB-T dongles through librtlsdr
- RTL-TCP spectrum server (see librtlsdr project)
- MSi2500 based DVB-T dongles through libmirisdr
- SDRplay RSP devices through SDRplay library
- gnuradio .cfile input through libgnuradio-blocks
- RFSPACE SDR-IQ, SDR-IP, NetSDR (incl. X2 option)
- AirSpy Wideband Receiver through libairspy
- CCCamp 2015 rad1o Badge through libhackrf
- Great Scott Gadgets HackRF through libhackrf
- Nuand LLC bladeRF through libbladeRF library
- Ettus USRP Devices through Ettus UHD library
- Fairwaves UmTRX through Fairwaves' fork of UHD
- Red Pitaya SDR transceiver (http://bazaar.redpitaya.com)
By using the osmocom source block you can take advantage of a common software api in your application(s) independent of the underlying radio hardware.
Output Type:
This parameter controls the data type of the stream in gnuradio. Only complex float32 samples are supported at the moment.
Device Arguments:
The device argument is a comma delimited string used to locate devices on your system. Device arguments for multiple devices may be given by separating them with a space.
Use the device id or name/serial (if applicable) to specify a certain device or list of devices. If left blank, the first device found will be used.
Examples:
Optional arguments are placed into [] brackets, remove the brackets before using them! Specific variable values are separated with a |, choose one of them. Variable values containing spaces shall be enclosed in '' as demonstrated in examples section below.
Lines ending with ... mean it's possible to bind devices together by specifying multiple device arguments separated with a space.
fcd=0[,device=hw:2][,type=2]
miri=0[,buffers=32] ...
rtl=serial_number ...
rtl=0[,rtl_xtal=28.8e6][,tuner_xtal=28.8e6] ...
rtl=1[,buffers=32][,buflen=N512] ...
rtl=2[,direct_samp=0|1|2][,offset_tune=0|1] ...
rtl_tcp=127.0.0.1:1234[,psize=16384][,direct_samp=0|1|2][,offset_tune=0|1] ...
osmosdr=0[,buffers=32][,buflen=N512] ...
file='/path/to/your file',rate=1e6[,freq=100e6][,repeat=true][,throttle=true] ...
netsdr=127.0.0.1[:50000][,nchan=2]
sdr-ip=127.0.0.1[:50000]
cloudiq=127.0.0.1[:50000]
sdr-iq=/dev/ttyUSB0
airspy=0[,bias=0|1][,linearity][,sensitivity]
redpitaya=192.168.1.100[:1001]
hackrf=0[,buffers=32][,bias=0|1][,bias_tx=0|1]
bladerf=0[,tamer=internal|external|external_1pps][,smb=25e6]
uhd[,serial=...][,lo_offset=0][,mcr=52e6][,nchan=2][,subdev='\'B:0 A:0\''] ...
Num Channels:
Selects the total number of channels in this multi-device configuration. Required when specifying multiple device arguments.
Sample Rate:
The sample rate is the number of samples per second output by this block on each channel.
Frequency:
The center frequency is the frequency the RF chain is tuned to.
Freq. Corr.:
The frequency correction factor in parts per million (ppm). Set to 0 if unknown.
DC Offset Mode:
Controls the behavior of hardware DC offset corrrection.
Off: Disable correction algorithm (pass through).
Manual: Keep last estimated correction when switched from Automatic to Manual.
Automatic: Periodicallly find the best solution to compensate for DC offset.
This functionality is available for USRP devices only.
IQ Balance Mode:
Controls the behavior of software IQ imbalance corrrection.
Off: Disable correction algorithm (pass through).
Manual: Keep last estimated correction when switched from Automatic to Manual.
Automatic: Periodicallly find the best solution to compensate for image signals.
This functionality depends on http://cgit.osmocom.org/cgit/gr-iqbal/
Gain Mode:
Chooses between the manual (default) and automatic gain mode where appropriate.
To allow manual control of RF/IF/BB gain stages, manual gain mode must be configured.
Currently, only RTL-SDR devices support automatic gain mode.
RF Gain:
Overall RF gain of the device.
IF Gain:
Overall intermediate frequency gain of the device.
This setting is available for RTL-SDR and OsmoSDR devices with E4000 tuners and HackRF in receive and transmit mode. Observations lead to a reasonable gain range from 15 to 30dB.
BB Gain:
Overall baseband gain of the device.
This setting is available for HackRF in receive mode. Observations lead to a reasonable gain range from 15 to 30dB.
Antenna:
For devices with only one antenna, this may be left blank.
Otherwise, the user should specify one of the possible antenna choices.
Bandwidth:
Set the bandpass filter on the radio frontend. To use the default (automatic) bandwidth filter setting, this should be zero.
See the OsmoSDR project page for more detailed documentation:
http://sdr.osmocom.org/trac/wiki/GrOsmoSDR
http://sdr.osmocom.org/trac/wiki/rtl-sdr
http://sdr.osmocom.org/trac/
