CircuitPython は Adafruit社が、MicroPython をベースに開発したCPUボードのシリーズ名です。このCPUボードの実体はUSBメモリ+Pythonインタープリタです。パソコンのUSB端子に接続すると、USBメモリとして認識されます。
このUSBメモリ上のテキストファイル main.py (Pythonプログラム) を直接、パソコンのテキストエディタ編集して上書きすると、即時に実行されます。このため特別な開発環境は不要です。パソコンからこのボード抜いて、ボードに電源だけを供給すれば、main.py を実行できます。
CircuitPythonボードはUSB経由のシリアルポートとしても、パソコンから認識されます。このUSBシリアルポートにターミナルエミュレーター Tera Term等を接続すれば、コンソール入出力ができます。
このコンソールを使用してPythonを対話モードで使用することもできます。この対話モードはデバッグやテスト時に威力を発揮します。
CircuitPython はまだベータ版のようです。
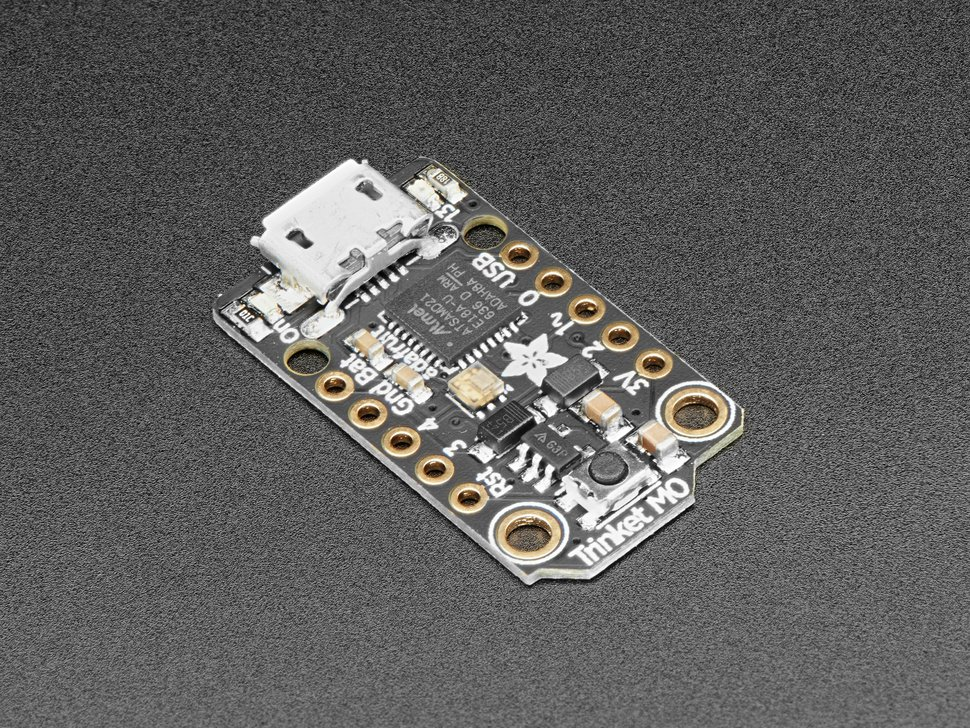
一番小さな CircuitPython 紹介
Size:27mm x 15.3mm x 2.75mm、1.4g
Name:Adafruit Trinket M0 - for use with CircuitPython & Arduino IDE $8.95
CPU:AT SAMD21E18 32-bit Cortex M0+ 48MHz
MEM:32 KB RAM, 256KB Flash
パソコンから見ると 59KB のリムーバルディスクとして認識されます。空き領域は 20KB 程度です。
プログラム Lチカ
import digitalio
import board
import time

led = digitalio.DigitalInOut(board.D13)
led.direction = digitalio.Direction.OUTPUT
while True:
    led.value = not led.value
    time.sleep(0.5)
CircuitPython デモプログラム
出荷時のボードに入っていた main.py を次に記載します。
実際に静電容量方式タッチ・センサとして定義されている3番ピン(D3)を指で触れると、ボード上のLED(D13)を制御できます。
# Trinket IO demo
# Welcome to CircuitPython 2.0.0 :)

import board
from digitalio import DigitalInOut, Direction, Pull
from analogio import AnalogOut, AnalogIn
import touchio
from adafruit_hid.keyboard import Keyboard
from adafruit_hid.keycode import Keycode
import adafruit_dotstar as dotstar
import time
import neopixel

# One pixel connected internally!
dot = dotstar.DotStar(board.APA102_SCK, board.APA102_MOSI, 1, brightness=0.2)

# Built in red LED
led = DigitalInOut(board.D13)
led.direction = Direction.OUTPUT

# Analog input on D0
analog1in = AnalogIn(board.D0)

# Analog output on D1
aout = AnalogOut(board.D1)

# Digital input with pullup on D2
button = DigitalInOut(board.D2)
button.direction = Direction.INPUT
button.pull = Pull.UP

# Capacitive touch on D3
touch = touchio.TouchIn(board.D3)

# NeoPixel strip (of 16 LEDs) connected on D4
NUMPIXELS = 16
neopixels = neopixel.NeoPixel(board.D4, NUMPIXELS, brightness=0.2, auto_write=False)

# Used if we do HID output, see below
kbd = Keyboard()

######################### HELPERS ##############################

# Helper to convert analog input to voltage
def getVoltage(pin):
    return (pin.value * 3.3) / 65536

# Helper to give us a nice color swirl
def wheel(pos):
    # Input a value 0 to 255 to get a color value.
    # The colours are a transition r - g - b - back to r.
    if (pos < 0):
        return [0, 0, 0]
    if (pos > 255):
        return [0, 0, 0]
    if (pos < 85):
        return [int(pos * 3), int(255 - (pos*3)), 0]
    elif (pos < 170):
        pos -= 85
        return [int(255 - pos*3), 0, int(pos*3)]
    else:
        pos -= 170
        return [0, int(pos*3), int(255 - pos*3)]

######################### MAIN LOOP ##############################

i = 0
while True:
  # spin internal LED around! autoshow is on
  dot[0] = wheel(i & 255)

  # also make the neopixels swirl around
  for p in range(NUMPIXELS):
      idx = int ((p * 256 / NUMPIXELS) + i)
      neopixels[p] = wheel(idx & 255)
  neopixels.show()

  # set analog output to 0-3.3V (0-65535 in increments)
  aout.value = i * 256

  # Read analog voltage on D0
  print("D0: %0.2f" % getVoltage(analog1in))

  # use D3 as capacitive touch to turn on internal LED
  if touch.value:
      print("D3 touched!")
  led.value = touch.value

  if not button.value:
      print("Button on D2 pressed!")
      # optional! uncomment below & save to have it sent a keypress
      #kbd.press(Keycode.A)
      #kbd.release_all()

  i = (i+1) % 256  # run from 0 to 255
  #time.sleep(0.01) # make bigger to slow down
参考資料
AdafruitがCircuitPythonへ移行
http://makezine.jp/blog/2017/08/circuitpython-snakes-way-adafruit-hardware.html
CircuitPythonを試してみよう | スイッチサイエンス マガジン
http://mag.switch-science.com/2017/08/30/circuitpython/
Adafruit Trinket M0 (107ページ)
https://cdn-learn.adafruit.com/downloads/pdf/adafruit-trinket-m0-circuitpython-arduino.pdf
Adafruit CircuitPython API Reference
https://circuitpython.readthedocs.io/en/latest/index.html
