前 Vue.js入門 #05 3章 コンポーネントの基礎(コンポーネントとは何か/Vueコンポーネントの定義)
次 Vue.js入門 #07 4章 Vue Routerによるシングルページアプリケーション(SPA)
コンポーネント間の通信
- 親コンポーネントから子コンポーネントへのみ、propsというオプションを使用して通信が行える。
- 子から親へは、イベントを使用して通信が行える。
親コンポーネントから子コンポーネントへデータの伝播
Vue.component(コンポーネント名,{
  props: {
    親から受け取る属性名: {
      type: StringやObjectなどのデータ名,
      default: デフォルト値,
      required: 必須かどうかの真偽値,
      validator: バリデーション用の関数
    }
  }
})
<script src="https://unpkg.com/vue@2.5.17"></script>

<div id="app">
  <idem-desc v-bind:item-name="myItem"></idem-desc>
</div>

<script>
// 子はデータのpropsで受け取り準備をしておく
Vue.component('idem-desc', {
  props: {
    itemName: {
      type: String
    }
  },
  template: '<p>{{ itemName }}は便利です。</p>'
})

// 親
new Vue({
  el: '#app',
  data: { myItem: 'pen'  }
})
</script>
<script src="https://unpkg.com/vue@2.5.17"></script>
<!-- 親がfruits-componentにマウントされたインスタンス -->
<div id="fruits-component">
  <ol>
    <!-- v-forで繰り返した各furitをprops(fruits-item)に与えている -->
    <fruits-item-name v-for="fruit in fruitsItems" :key="fruit.name" :fruits-item="fruit"></fruits-item-name>
  </ol>
</div>

<script>
// 子はデータのpropsで受け取り準備をしておく
Vue.component('fruits-item-name', {
  props: {
    fruitsItem: { // テンプレート中ではケバブケース
      type: Object, // オブジェクトかどうか
      required: true // このコンポーネントには必須なのでtrue
    }
  },
  template: '<li>{{fruitsItem.name}}</li>'
})

// 親
new Vue({
  el: '#fruits-component',
  data: { // 親では配列だがv-dorでObjectとして渡している
    fruitsItems: [
      {name: '梨'},
      {name: 'イチゴ'}
    ]
  }
})
</script>
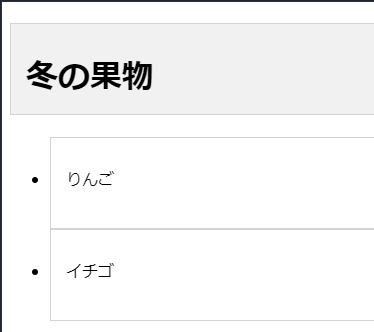
- 実行結果
子コンポーネントから親コンポーネントへの通信
- 子から親への通信ではカスタムイベントを使用する。以下のようなインタフェースが用意されている。
- イベントのlisten・・・$on(eventName)
- イベントのtrigger・・・$emit(eventName)
<script src="https://unpkg.com/vue@2.5.17"></script>

<div id="fruits-counter">
  <div v-for="fruit in fruits">
    {{fruit.name}}: <counter-button v-on:increment="incrementCartStatus()"></counter-button>
  </div>
  <p>合計: {{total}}</p>
</div>

<script>
// 子コンポーネントのカウンターボタン
var counterButton = Vue.extend({
  template: '<span>{{counter}}個<button v-on:click="addToCart">追加</button></span>',
  data: function () {
    return {
      counter: 0
    }
  },
  methods: {
    addToCart: function () {
      this.counter += 1
      this.$emit('increment') // incrementカスタムイベントの発火
    }
  },
})

new Vue({
  el: '#fruits-counter',
  components:{
    'counter-button': counterButton
  },
  data: {
    total: 0,
    fruits: [
      {name: '梨'},
      {name: 'イチゴ'}
    ]
  },
  methods: {
    incrementCartStatus: function () {
      this.total += 1
    }
  }
})
</script>
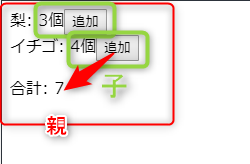
- ボタンを押すと、自身のコンポーネントの個数を+1して、親コンポーネントの個数も+1する。
コンポーネントの設計
コンポーネントの分割方針
- ページを設計するにあたってコンポーネント分割をする。
- コンポーネント分割の例
- ルート
- ナビゲーションバー
- サイドバー
- カテゴリx3
- メイン
- アイテムx3
- ルート
コンポーネント自体の設計
- コンポーネントを作成する際は外部から使用されることを意識して設計すべき。
- 多くの箇所で再利用されるコンポーネントは、どのような親コンポーネントから使用されたとしても耐えられるように、疎結合になるようにインターフェイスを設計する。
スロットコンテンツを活かしたヘッダーコンポーネントの作成
-
slot属性が入ったタグが、コンポーネントへの入力値となり、コンポーネントテンプレートの<slot>タグを置き換える。 - 入力がなければ、
<slot>タグの中身(No titleなど)が表示される。
<div id="fruits-list">
  <page-header class="header">
    <h1 slot="header">
      冬の果物
    </h1>
  </page-header>
  <page-content class="content">
    <ul slot="content">
      <li>りんご</li>
      <li>イチゴ</li>
    </ul>
  </page-content>
</div>
var headerTemplate = `
  <div>
    <slot name="header">No title</slot>
  </div>
`

var contentTemplate = `
  <div>
    <slot name="content">No contents</slot>
  </div>
`

Vue.component('page-header', {
  template: headerTemplate
})
Vue.component('page-content', {
  template: contentTemplate
})

new Vue({
  el: "#fruits-list"
})
.header h1{
  width: 100%;
  height: 30px;
  background-color: #f1f1f1;
  border: 1px solid #d3d3d3;
  padding: 30px 15px;
}

.content li {
  width: 100%;
  height: 30px;
  padding: 30px 15px;
  background-color: white;
  border: 1px solid #d3d3d3;
  text-align: left;
}
ログインフォームコンポーネントの作成
HTML側
-
login-exampleにVueインスタンスをマウントする。 - ログインフォームコンポーネントを
<user-login>タグで設置する。 -
<script type="text/x-template">の方法でlogin-templateというテンプレートを設定する -
v-modelで、コンポーネントのdataと双方向データバインディングを行う。
<script src="https://unpkg.com/vue@2.5.17"></script>
<div id="login-example">
  <user-login></user-login>
</div>

<script type="text/x-template" id="login-template">
  <div id="login-template">
    <div>
      <input type="text" placeholder="ログインID" v-model="userid">
    </div>
    <div>
      <input type="password" placeholder="パスワード" v-model="password">
    </div>
    <button @click="login">ログイン</button>
  </div>
</script>
JS側
-
user-loginコンポーネントを定義する。 - div="login-template"がテンプレート。
- dataのuseridと、passwordの初期値は空。
- loginというmethodsを持ち、呼ばれると、auth.loginがuserid、passwordを引数として呼ばれる。
- 入力したuseidとpasswodがダイアログで表示される。
Vue.component('user-login', {
  template: '#login-template',
  data: function() {
  	return {
    	userid: '',
      password: ''
    }
  },
  methods: {
  	login: function() {
    	auth.login(this.userid, this.password);
    }
  }
})

var auth = {
	login: function(id, pass) {
  	window.alert("userid:" + id + "\n" + "password:" + pass);
  }
}

new Vue({
  el: "#login-example"
})
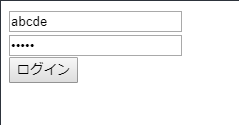
- userid、passwordを入力して、ログインボタンを押すと
- ダイアログに表示される。
まとめ
- コンポーネントをプログラム言語の関数に例えて、引数と戻り値を意識すると理解できるようになった。


