この記事は、Nefry Advent Calendar 2017の13日目の記事です。
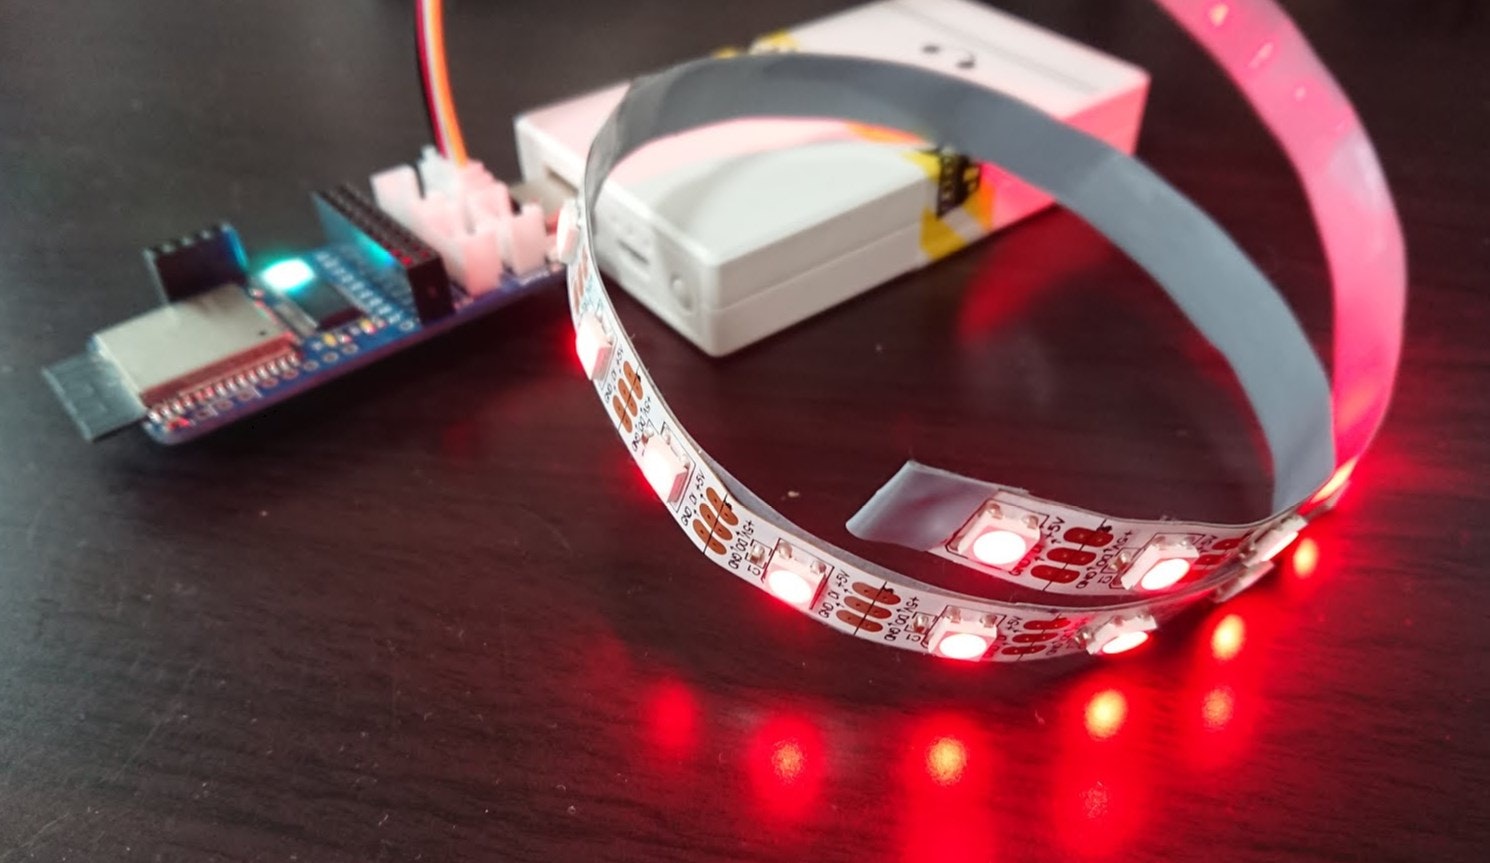
ちょっと展示ごとへ向けてソースとか持ち物とか確認してたら書き忘れてたので書きます。今回はNefryBTとテープLEDでRGB色指定するメモです。
伝えるときにおける色の効用を考えていた
最近、LTでテープLEDを光らせて状況を伝えるときに、色というのは、やはり伝えやすいのではと思っています。
1つのライトのON/OFFだけですと、ある1つの事象の「起きた=ON」「終わった=OFF」だけになります。もちろん、1つの事象を濃く伝える時はよいのですが、いろいろな関係性を伝えたい複数の状況を伝えたいときに見ている人が「ん?何がどう関連して起こってる?」と混乱させてるなーと実感するときがあります。
反応する機器を事象に対して一緒に増やすことも考えるのですが、仮に送信&受信で1つずつ機器増えてしまうと、実直にやると4事象で8デバイス・・・。機器が増えてしまうと登壇成功率も下がりますし、いい手ではありません。
そんなときに色で伝える情報を分けてやると伝達が多層にできます。ぱっと見てわかるくらいだと、虹色にあたる7色(赤、オレンジ、黄色、緑、水色、青、紫)あたりは、十分伝わりそうです。
このあたりは、ポキオ @pokiiio さんの
LEDの光らせからでも、とても重要だなーと思いました。
MQTT経由でRGB送るようにしてみよう
では、やってみましょう。
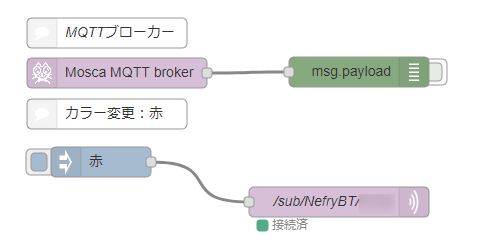
最近良く基礎で使っている、Node-RED MQTTブローカー経由でNefryBT+フルカラーテープLEDを動かすメモの仕組みで、NefryBTに送られる値(ペイロード)を、以下のように
{"led":1 , "r":255 , "g":0 , "b":0 }
と送られて、赤く光る仕組みをつくってみます。もちろん、RGB値を変更すれば、多彩な変更が可能。
このような形で、 のところに先ほどのJSON情報が入っています。
出来上がった者で動かすと、injectノードを押すと赤く光っています。
実際のNefryBTのソースコード
ソースコードです。
NefryBTでDataStoreを使ったIoTデモ成功率を高めるネットワーク設定施策のメモで、MQTTブローカーへのつながりやすさは保ちつつ、受信を司るmqttCallbackのほうで、RGBを受信できるようにするJSONへ分解してます。
# include <Nefry.h>
# include <WiFiClient.h>
# include <PubSubClient.h>
# include <ArduinoJson.h>
# include <Adafruit_NeoPixel.h>

IPAddress endpoint;
const int port = 1883;

String deviceNameStr,pubTopicStr,subTopicStr,ip1_str,ip2_str,ip3_str,ip4_str;
const char *pubTopic;
const char *subTopic;
const char *deviceName;
int ip1,ip2,ip3,ip4;

WiFiClient httpsClient;
PubSubClient mqttClient(httpsClient);

int OUTPUT_PIN = D2;  // 出力ピン D2

// 光らせるLEDの数
# define NUMPIXELS      60  // 100cmで60個

// 明るさ
int brigntness = 50;

// NeoPixel設定
Adafruit_NeoPixel pixels = Adafruit_NeoPixel(NUMPIXELS, OUTPUT_PIN, NEO_GRB + NEO_KHZ800);

void setup() {

  //// NefryBT設定画面まわり ////////////////////////////////////////

  // NefryBTから値入力の場所を取得する
  Nefry.setStoreTitle("IP1",0);  // IP 右から1桁目
  Nefry.setStoreTitle("IP2",1);  // IP 右から2桁目
  Nefry.setStoreTitle("IP3",2);  // IP 右から3桁目
  Nefry.setStoreTitle("IP4",3);  // IP 右から4桁目
  Nefry.setStoreTitle("pubTopic",4);
  Nefry.setStoreTitle("subTopic",5);
  Nefry.setStoreTitle("deviceName",6);
  // IPアドレス:変換前に変数に入れておく
  ip1_str = Nefry.getStoreStr(0);
  ip2_str = Nefry.getStoreStr(1);
  ip3_str = Nefry.getStoreStr(2);
  ip4_str = Nefry.getStoreStr(3);
  // IPアドレス:IPを数字に変換
  ip1 = ip1_str.toInt();
  ip2 = ip2_str.toInt();
  ip3 = ip3_str.toInt();
  ip4 = ip4_str.toInt();
  // NefryBT入力画面
  pubTopicStr = Nefry.getStoreStr(4);
  subTopicStr = Nefry.getStoreStr(5);
  deviceNameStr = Nefry.getStoreStr(6);
  pubTopic = pubTopicStr.c_str();
  subTopic = subTopicStr.c_str();
  deviceName = deviceNameStr.c_str();
  // IPAddress型に収納。配列っぽく入れる。
  endpoint[0] = ip1;
  endpoint[1] = ip2;
  endpoint[2] = ip3;
  endpoint[3] = ip4;

  //// 以下通常処理 ////////////////////////////////////////

  Serial.begin(115200);

  mqttClient.setServer(endpoint, port);
  mqttClient.setCallback(mqttCallback);

  Nefry.enableSW(); // SW有効化

  pixels.begin();

  connectMQTT();
}

void connectMQTT() {
    Serial.println("connectMQTT");
    Serial.println(deviceName);
    while (!mqttClient.connected()) {
      Serial.print(".");
        if (mqttClient.connect(deviceName)) {
            Serial.println("Connected.");
            int qos = 0;
            mqttClient.subscribe(subTopic, qos);
            Serial.println("Subscribed.");
        } else {
            Serial.print("Failed. Error state=");
            Serial.print(mqttClient.state());
            // Wait 5 seconds before retrying
            delay(5000);
        }
    }
}

char pubMessage[128];
int led = 0;
int r = 255;
int g = 255;
int b = 255;

void mqttCallback (char* topic, byte* payload, unsigned int length) {

    String str = "";
    Serial.print("Received. topic=");
    Serial.println(topic);
    for (int i = 0; i < length; i++) {
        Serial.print((char)payload[i]);
        str += (char)payload[i];
    }
    Serial.print("\n");

    StaticJsonBuffer<200> jsonBuffer;

    JsonObject& root = jsonBuffer.parseObject(str);

    // パースが成功したか確認。できなきゃ終了
    if (!root.success()) {
      Serial.println("parseObject() failed");
      return;
    }

    // RGBを受信できるようにするJSONへ分解
    const char* message = root["message"];
    led = root["led"];
    r = root["r"];
    g = root["g"];
    b = root["b"];

    Serial.print("led = ");
    Serial.println(led);

    if( led == 1 ){
      ledOn();
    } else {
      ledOff();
    }

    Nefry.ndelay(1000);

}

void mqttLoop() {
    if (!mqttClient.connected()) {
        connectMQTT();
    }
    mqttClient.loop();
}

int sensorValueCurrent;

void loop() {
  mqttLoop();

  if (Nefry.readSW()) {
    Serial.println("sensor ON");
    mqttClient.publish(pubTopic, "{\"flag\":1}");
  }

  Nefry.ndelay(50);
}

void ledOn() {
  Serial.println("led on");
  pixels.setBrightness(brigntness);
  for(int i=0;i<NUMPIXELS;i++){
    pixels.setPixelColor(i, pixels.Color(r,g,b));
  }
  pixels.show();
}

void ledOff() {
  Serial.println("led off");
  pixels.clear();
  pixels.show();
}
こちらを書き込むと、さきほどのNode-REDのようなMQTTから与えられるJSONデータに応じて反応が変わります。
活用例
この実装を、以下のように、登壇で「なんのデバイスが動いているか?」を細かく伝えるために、最近、使いました!
さきほどの魔法話の電池不要の2つめ「振力電池」を使ったSmart Button SwitchというものでBluetooth(BLE)信号を飛ばして反応させてます。 #ltlovers pic.twitter.com/x62KuYs5Vs
— 1ft_seabass (@1ft_seabass) 2017年11月30日
さきほどの魔法話の電池不要の1つめEnOceanのネタです。4つのボタンで違うカラーが光ります。 #EnOcean #ltlovers pic.twitter.com/5VpJ8HoXO3
— 1ft_seabass (@1ft_seabass) 2017年11月30日
さっきの魔法話でつかった最初のネタです。自作のテープLEDとNefryBTが、NefryBTの別のボタンと連携するものです。 #NefryBT #ltlovers pic.twitter.com/XqMv2W40mG
— 1ft_seabass (@1ft_seabass) 2017年11月30日
デモ前に、カラーに対応した動きを伝えていたのでスムーズに伝わりました。
というわけで
NefryBTとテープLEDでRGB色指定するメモをMQTTのソースコードともにお伝えしました。
光というのは、色に加えて光らせ方や見せ方によっても、様々に表情を変えます!
色と事象を紐付けたNefryBT実装、ぜひ試してみて下さい。


