本記事はNuxt Advent Calendar 2022の7日目です。
Nuxt3がStableになりましたね。
私も少し先取りして3.0.0-rc.12のあたりから使ってみていましたが、そろそろいい感じに動いているので色々盛り込んたテンプレートプロジェクトを作って今後も使いまわしたいと思います。
今回作るプロジェクトの概要
以下を含むプロジェクトを作成し、今後作るアプリのベースとして使います。
- フレームワーク
- 開発ツール
-
Mock Service Worker (msw)
- 通信処理のモック化
- ESLint
- Prettier
-
Mock Service Worker (msw)
- SSRはオフ
- 最低限の画面実装
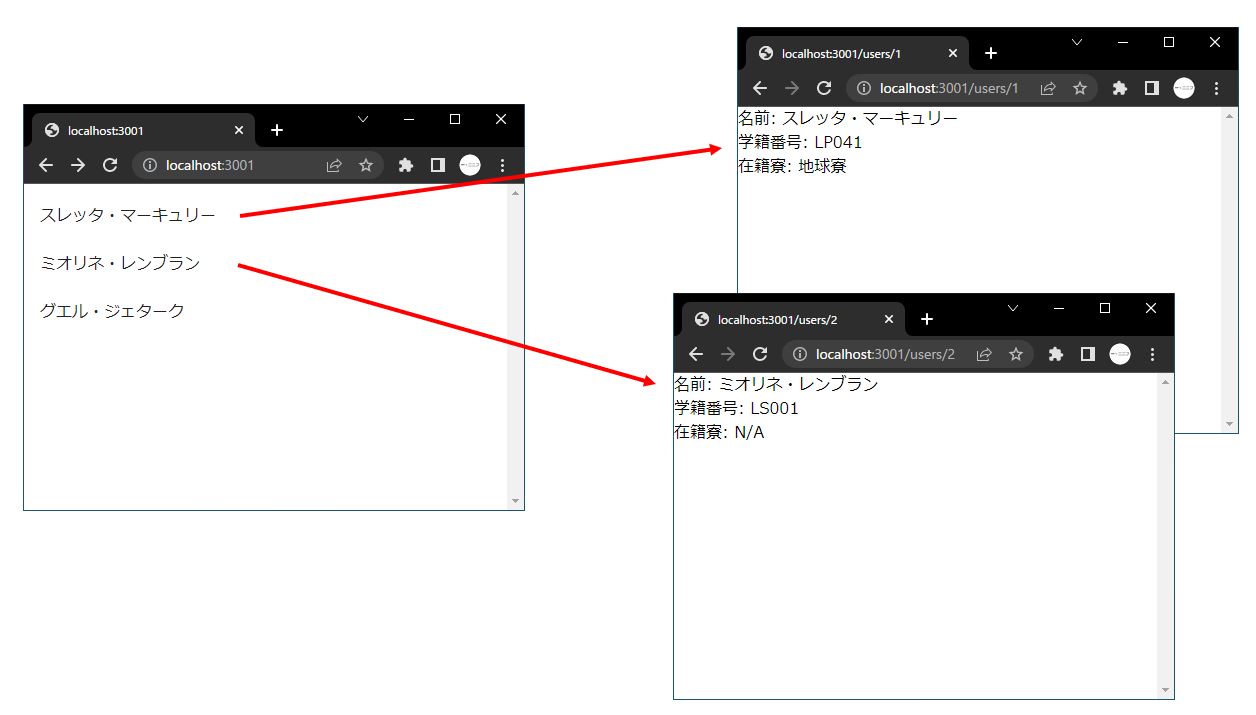
- よくある「ユーザー一覧」「ユーザー詳細」の画面遷移と、APIリクエスト処理
ソースコードは以下で公開しています。
プロジェクト生成
プロジェクトは以下のコマンドで生成します。
$ npx nuxi init my-nuxt-template
生成したら、ひとまずyarn installでyarn.lockを生成します。
$ yarn install
VSCode向けの設定
EditorConfig用の設定ファイルを作成します。
root = true

[*]
charset = utf-8
end_of_line = lf
insert_final_newline = true
indent_size = 2
indent_style = space
trim_trailing_whitespace = true

[*.md]
trim_trailing_whitespace = false
これは好みが分かれる所だと思いますが、私は新規開発者がソースコードをcloneしてきて開いた際にConfig Default拡張で .vscode/settings.json を生成したいので、以下の設定ファイルをコミットしておきます。
Config Default拡張をインストールした状態でこのプロジェクトを開くと、同じ内容で .vscode/settings.json が自動生成されます。
{
  "editor.formatOnSave": true
}
また、推奨拡張機能も列挙しておきます。
{
  "recommendations": [
    "spadin.config-defaults",
    "editorconfig.editorconfig",
    "dbaeumer.vscode-eslint",
    "esbenp.prettier-vscode",
    "vue.volar"
  ]
}
.gitignore の記載としては、よくある .vscode/* をignoreするような記載ではなく、settings.jsonのみをignoreしておきます。
/.vscode/settings.json
ESLint及びPrettierの導入
NuxtプロジェクトにESLintを追加する場合、 @typescript-eslint/parser 等を個別に追加する代わりに @nuxtjs/eslint-config-typescript で一括で設定できるようです。
$ yarn add -D @nuxtjs/eslint-config-typescript eslint
package.jsonのscriptsにlintを追加しておきます。
  "scripts": {
    "build": "nuxt build",
    "dev": "nuxt dev",
    "lint": "eslint .", // 追加
    "generate": "nuxt generate",
    "preview": "nuxt preview",
    "postinstall": "nuxt prepare"
  },
また、PrettierもESLintと連携して動作するようにしたいので、以下のパッケージを追加します。
$ yarn add -D eslint-config-prettier eslint-plugin-prettier prettier typescript
設定ファイルは以下のようになります。セミコロン有無等は好みによって変えてください。
module.exports = {
  env: {
    browser: true,
    es2021: true,
  },
  extends: [
    "@nuxtjs/eslint-config-typescript",
    "prettier",
    "plugin:prettier/recommended",
  ],
  parserOptions: {
    ecmaVersion: "latest",
    sourceType: "module",
  },
  plugins: ["prettier"],
  rules: {},
}
{
  "semi": false
}
Vuetify 3の追加
(Nuxt Advent Calendar 2022 2日目のNuxt3 で Vuetify3 を使う もご参考に!)
以下でVuetifyを追加します。
パッケージの追加
$ yarn add vuetify@next @mdi/font
$ yarn add -D sass
Nuxt用の設定を行います。
export default defineNuxtConfig({
  css: [
    "vuetify/lib/styles/main.sass",
    "@mdi/font/css/materialdesignicons.min.css",
  ],
  build: {
    transpile: ["vuetify"],
  },
})
import { createVuetify } from "vuetify"
import * as components from "vuetify/components"
import * as directives from "vuetify/directives"

export default defineNuxtPlugin((nuxtApp) => {
  const vuetify = createVuetify({
    components,
    directives,
  })

  nuxtApp.vueApp.use(vuetify)
})
APIプロキシ設定の追加
別立てでAPIサーバーを用意する前提で、開発サーバー(Nitro)にプロキシサーバーを設定します。
※本記事ではSSR非対応です、ゴメンナサイ!
  ssr: false, // SSRは使わない
  nitro: {
    devProxy: {
      "/api": {
        target: "http://localhost:8000/api", // ポート8000で/api以下を転送する例
      },
    },
  },
上記で、 /api 以下へのHTTPリクエストをAPIサーバーに転送できます。
useRuntimeConfigを使ってuseFetchに渡すURLを切り替えたり、APIサーバー側でCORSの設定を入れる必要が無くなります。
なお、APIサーバーへの転送はこの後でmswを追加するので一旦は使われなくなります。
mswの追加
APIサーバーとは独立でフロントエンドを開発していくために、Mock Service Worker (msw)を使ってAPIのモック化を行います。
まずパッケージを追加します。
$ yarn add -D msw
次に、サンプルとして以下のAPIをモック化します。
- GET /api/users -> ユーザー一覧を返す
- GET /api/users/{userId} -> ユーザー詳細を返す
※完全なコードはGitHubリポジトリを参照してください。
// ダミーのレスポンスを定義

import { ResponseResolver, restContext, RestRequest } from "msw"

import { User } from "@/assets/models/User"

const get: ResponseResolver<RestRequest, typeof restContext> = (
  _req,
  res,
  ctx
) => {
  return res(
    ctx.status(200),
    ctx.json([
      {
        userId: 1,
        name: "スレッタ・マーキュリー",
      },
      {
        userId: 2,
        name: "ミオリネ・レンブラン",
      },
      {
        userId: 3,
        name: "グエル・ジェターク",
      },
    ] as User[])
  )
}

export default { get }
// ダミーのレスポンスを定義

import { ResponseResolver, restContext, RestRequest } from "msw"

import { UserDetail } from "@/assets/models/UserDetail"

const get: ResponseResolver<RestRequest, typeof restContext> = (
  req,
  res,
  ctx
) => {
  const userId = parseInt(req.params.userId as string, 10)
  let response: UserDetail
  switch (userId) {
    case 1:
      response = {
        userId: 1,
        name: "スレッタ・マーキュリー",
        studentId: "LP041",
        dormName: "地球寮",
      }
      break
    case 2:
      response = {
        userId: 2,
        name: "ミオリネ・レンブラン",
        studentId: "LS001",
        dormName: "N/A",
      }
      break
    case 3:
      response = {
        userId: 3,
        name: "グエル・ジェターク",
        studentId: "KP001",
        dormName: "N/A",
      }
      break
    default:
      return res(ctx.status(404))
  }
  return res(ctx.status(200), ctx.json(response))
}

export default { get }
// URLとの関連付け

import { rest } from "msw"
import getUsers from "@/mocks/api/getUsers"
import getUserDetail from "@/mocks/api/getUserDetail"

export const handlers = [
  rest.get("/api/users", getUsers.get),
  rest.get("/api/users/:userId", getUserDetail.get),
]
// Service Workerの定義

import { setupWorker } from "msw"
import { handlers } from "./handlers"

export const worker = setupWorker(...handlers)
// mswの初期化

import { worker } from "@/mocks/browser"

export default defineNuxtPlugin(async () => {
  await worker.start() // setupでfetchするにはawaitが必要
})
public/mockServiceWorker.js というファイルも必要になります。以下のコマンドで作成します。
$ mkdir public
$ npx msw init public/ --save=false
サンプルアプリの実装
mswで設定したAPIを呼び出す簡単なアプリをコーディングします。
pages/
  index.vue        ユーザー一覧(トップページ)
  users/
    [userId].vue   ユーザー詳細(URLは /users/{userId})
<template>
  <div>
    <div v-if="pending">Loading...</div>
    <div v-else>
      <v-list>
        <v-list-item
          v-for="user in data"
          :key="user.userId"
          :to="`/users/${user.userId}`"
          >{{ user.name }}</v-list-item
        >
      </v-list>
    </div>
  </div>
</template>

<script setup lang="ts">
import { User } from "@/assets/models/User"

const { pending, data } = useFetch<User[]>("/api/users")
</script>
<template>
  <div>
    <div v-if="pending || !data">Loading...</div>
    <div v-else>
      <div>
        <span>名前: </span><span>{{ data.name }}</span>
      </div>
      <div>
        <span>学籍番号: </span><span>{{ data.studentId }}</span>
      </div>
      <div>
        <span>在籍寮: </span><span>{{ data.dormName }}</span>
      </div>
    </div>
  </div>
</template>

<script setup lang="ts">
import { UserDetail } from "@/assets/models/UserDetail"

// URLからユーザーIDを取得
const route = useRoute()
const userId = route.params.userId

const { pending, data } = useFetch<UserDetail>(`/api/users/${userId}`)
</script>
mswの選択有効化
フロントエンドの開発中はmswによるダミーAPIを使用し、APIサーバーが実装できてきたらそちらと結合して動作できるように、mswをオフにする機能を追加します。
NuxtのRuntime Config機能を使用して、NUXT_PUBLIC_MSW環境変数が設定されている場合のみmswが初期化されるようにします。
  runtimeConfig: {
    public: {
      msw: "",
    },
  },
export default defineNuxtPlugin(async () => {
  const config = useRuntimeConfig()
  // 環境変数 NUXT_PUBLIC_MSW が設定されている場合有効化
  if (config.msw) {
    await worker.start() // setupでfetchするにはawaitが必要
  }
})
これで、以下のように実行した場合のみmswが有効になり、通常のyarn devでは本物のAPIサーバーと通信するようになります。
$ NUXT_PUBLIC_MSW=1 yarn dev
まとめ
以上でテンプレートプロジェクトの完成になります。
今後何かあれば更新するかもしれません。
