ハイサイ!オースティンやいびーん
概要
WordPressのGutenbergの主要な機能、BlockをWeb Componentsで実装する方法を紹介します。
Gutenbergとは
WordPressのブログ体験をよりモダンで快適なものにするために、WordPressチームは数年前から大掛かりな新機能開発に取り掛かっています。
そのプロジェクトと追加される機能をすべてGutenbergと呼んでいます。
その主な機能は、投稿などで再利用が可能になるBlockです。
上級開発者は、プラグインでBlockを開発して追加することもできます。
Block開発の問題
Block開発を試みたものなら分かるかと思いますが、まず、わかりにくいんです。![]()
一般的なWebのインタフェースに一切則っておらず、学習ハードルが非常に高いと筆者は思います。
以下の問題点を思い付きます。
- Vanilla JSとPHPだけでBlockが作れない
- Reactの使用をどうしても強要される
- 編集時以外でもパッケージサイズが大きくなる
- 閲覧時のパフォーマンスが悪い
- Gutenberg Blockで作ったロジックは他のアプリケーションで使えない
- 他のJSフレームワークがほぼ使えない(Reactが入っているから使うべきではないし)
- Gutenbergとやりとりするための
Windowオブジェクトwindow.wpのTypeScriptインタフェースの型が公開されておらず、ほとんどドキュメントがない
Reactを強要されていることは最も抵抗が強いです。
GutenbergをWeb Componentベースで作っていたら、最高によかったのに、残念極まりないです。![]()
GutenbergはReactでも、Web Componentsを使いましょう
上記の問題点がたくさんありますが、工夫すればWeb Componentsを使うことができます。
そうすると、Reactに依存しない、他のプロジェクトでも使える部品が開発できます。
しかも、ブラウザ標準のWeb Componentsなので、Reactの最悪のパフォーマンスをさらに悪化させるような心配をしなくてもいいです。
Reactで脳死状態になっているWeb開発に抵抗する意を胸に、反抗しましょう。
Viteで新規プロジェクトを作成する
WordPressがプラグインを保存するダイレクトリーにViteでプロジェクトを作りましょう。
通常だと、/var/www/html/wp-content/pluginsになるかと思います。
ちなみに筆者は、Docker Composeでpluginsとthemesをsrc/plugins、src/themesのバインドマウントをしてGitにコミットしているのでそこを編集します。
cd src/plugins
yarn create vite
# OR
npm create vite@latest
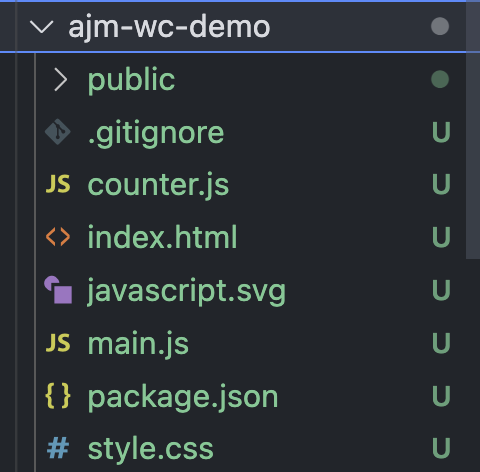
TypeScript、Litなどが使いたかったらそれらの選択をすればいいのですが、今回の場合は単純にJSを使います。
上記のようにファイルが生成されますが、あれこれ設定を変える必要があります。後々やりますが、まずパッケージをインストールしておきましょう。
cd ajm-wc-demo #読者が指定したプロジェクト名でいいです
yarn install
プラグインのPHPメインファイルを追加する
次、PHP側でプラグインとブロックを追加するロジックを先に追加しておきます。以下のようにプロジェクト名と同じ名前の.phpファイルを追加します。
中身は以下のようにチュートリアルの実装を参考に作ります。
<?php

/**
 * Plugin Name:       Web Component Block Demo
 * Requires at least: 6.1
 * Requires PHP:      7.0
 * Version:           0.1.0
 * Author:            Austin J. Mayer
 * License:           MIT
 * Text Domain:       todo-api-block
 */

namespace WcDemo;

function create_block_init()
{
	$dir = __DIR__;

	$index_js = 'build/main.js';
	wp_register_script(
		'create-block-ajm-wc-demo',
		plugins_url($index_js, __FILE__),
		[
			'wp-block-editor',
			'wp-blocks',
			'wp-element',
		],
		filemtime("$dir/$index_js"),
		true
	);

	register_block_type(
		$dir,
		[
			'editScript' => 'create-block-ajm-wc-demo',
		]
	);
}
add_action('init', __NAMESPACE__ . '\create_block_init');
block.jsonを追加する
Blockにはblock.jsonでブロックの詳細な情報をWPに教えるファイルも必要です。
このファイルに入るメタデータの詳細は以下のドキュメントで確認できます。
{
	"$schema": "https://schemas.wp.org/trunk/block.json",
	"apiVersion": 2,
	"name": "ajm/wc-demo-block",
	"version": "0.1.0",
	"title": "Web Component Demo",
	"category": "widgets",
	"icon": "menu",
	"description": "Example static block scaffolded with Create Block tool.",
	"supports": {
			"html": false
	},
	"textdomain": "gutenpride"
}
Viteのビルド設定を追加する
Viteのエントリポイント等の設定を追加しておきます。
import { defineConfig } from "vite";

// https://vitejs.dev/config/
export default defineConfig({
  build: {
    outDir: "./build",
    lib: {
      entry: ["./main.js"],
      formats: ["es"],
    },
  },
});
これでyarn buildを実行すればビルドしてくれるはずです!
Web ComponentのJSをかく
src/plugins/ajm-wc-demo/main.jsのViteが作ってくれたファイルを開いてすべてを削除してください。
また、style.cssなどのViteのファイルはすべて削除していいので削除してください。
そしてwc-counter.jsというファイル名で以下のようにクリックするとカウントが増えるWeb Componentを作りましょう。
class WcCounter extends HTMLElement {
  /** @type {ShadowRoot} */
  #root;
  /** @type {Text} */
  #countTextRef;
  /** @type {number} */
  #count;

  constructor() {
    super();
    this.#root = this.attachShadow({ mode: "open" });
    this.#countTextRef = document.createTextNode("0");
    this.#count = 0;
  }

  connectedCallback() {
    this.#root.innerHTML = `
    <style>
      :host {
        background-color: white;
        border: 1px solid white;
        border-radius: 4px;
        display: block;
        padding: 1rem;
        width: 90%;
        max-width: 700px;
        margin: 1rem auto;
        box-shadow: 0 0 8px rgba(0, 0, 0, 0.162);
      }
    </style>
    <h1>Shadow DOM Counter</h1>
    <p>Count: </p>
    `;
    const p = /** @type {HTMLParagraphElement} */ (this.#root.querySelector("p"));
    p.append(this.#countTextRef);
    this.addEventListener("click", () => this.handleClick());
  }

  /** @private */
  handleClick() {
    this.#count += 1;
    this.#countTextRef.textContent = String(this.#count);
  }
}

window.customElements.define("wc-counter", WcCounter);
そして最後にmain.jsに戻ってBlockとしてReactに追加するロジックを追加します。
import "./wc-counter";

function registerBlock(blocks, createElement, blockEditor) {
  blocks.registerBlockType("ajm/wc-demo-block", {
    edit: () => {
      const blockProps = blockEditor.useBlockProps();
      return createElement("wc-counter", blockProps, "");
    },
    save: () => createElement("wc-counter", null, ""),
    title: "Wc Counter",
    category: "widgets",
    icon: "menu",
  });
}

registerBlock(window.wp.blocks, window.wp.element.createElement, window.wp.blockEditor);
頭に先ほど書いたWeb Componentをまずインポートしておきましょう。
window.wpは、WordPressのJavaScriptがWindowに追加しているAPIです。
そのblocksに我々の今回のブロックを登録しているわけなのですが、編集時(edit)と閲覧時(save)のそれぞれの動作を指定しています。他の設定はGutenbergのReactに教えるためのプロパティのようです。
useBlockPropsをeditに渡しているのは、Blockの編集機能(異動、削除など)が表示されるように取っている対策です。<wc-counter>にクラス名とメタデータを追加して、GutenbergのReactアプリが編集機能を追加してくれるようになります。
上記のJSをビルドしましょう。
yarn build
これでコードの準備はOKのはず!
試してみよう
プラグイン一覧に入ってこのプラグインを有効にしてください。
そして新規投稿のリンクをクリックして編集画面を開きましょう。
そこで、ブロックの追加のプラスボタンをクリックして「wc counter」を探しましょう。
追加すると、おめでとう!Reactを突破してWeb Componentを入れることができました!
投稿を公開しても同様に動作します。
まとめ
これでWeb Componentをプラグインにパッケージ化してWeb ComponentをWordPressのあちらこちらで再利用する方法を紹介してきました。
WordPressでWeb Componentを使っている人の少なさに驚きましたが、英語でもまともな紹介の記事がないのです。
今回のようにWeb Componentを使うと、わけがわからないGutenbergのごちゃごちゃを無視して、Viteで好きなアプリケーションが作れるのです!
SvelteでWeb Componentsも作れるし、実はAngularもできるのです。AngularはバンドルサイズはReact以上に大きいのでちょっとアレですが。
WordPressの開発もWeb Component中心になってよりモダンなフロントエンド開発に向かって舵を切ることを願うばかりです。


