ASP.Net Core 2.2 の認証をカスタマイズする必要に迫られたため、必要な作業を整理しました。
ソースコードはこちらです。
カスタマイズする点
下記2点を変更します。
- ユーザー情報の保存先: SQLServer → MySQL
- ログイン情報の保存先: ローカル → Redis
これは次の構成を取るためです。
API(ASP.Net Core) ┬ MySQL
                  └ Redis
AWSで下記のリソース群を用いることを想定しています。
ALB ー Fargate ┬ Aurora
              └ Elasticache
前提条件
- ASP.Net Core 2.2 SDK、Visual Studio 2019、Docker for Windowsが利用できる。
- 接続できるMySQL、Redisがある。
- MySQL for Visual Studio および MySQL Connector/Net がインストール済。
作業手順
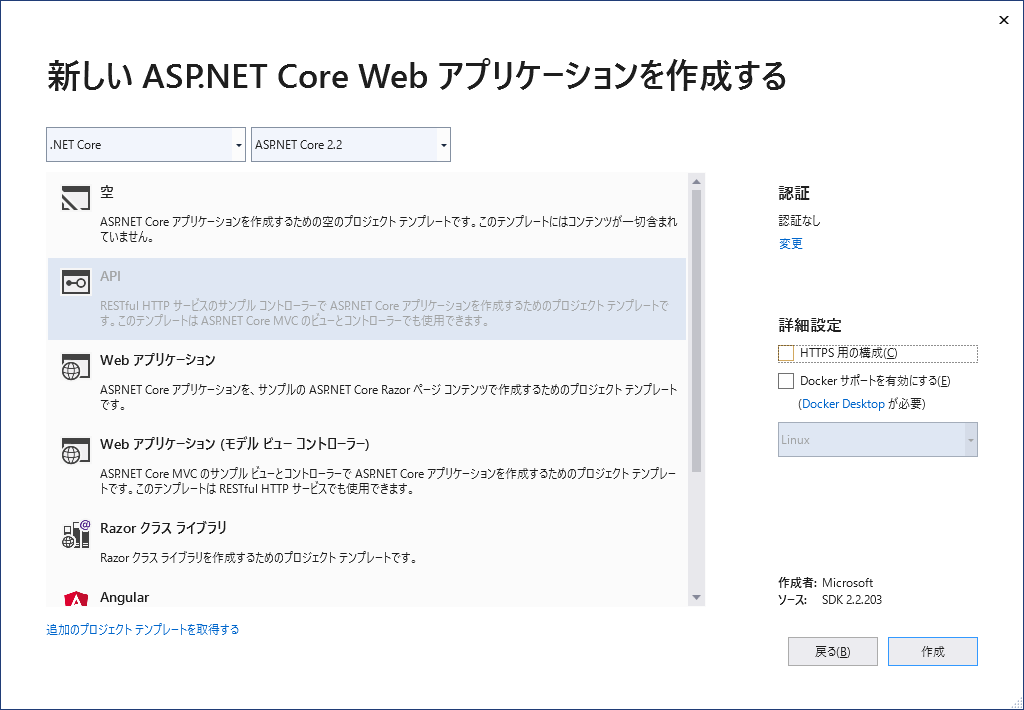
プロジェクトの作成
VisualStudio2019から適当な名前をつけてプロジェクトを作成します。ここでは空のAPIを選択しています。
認証用DBの作成
MySQLに接続し、下記SQLを実行します。認証に使うDBとテーブルが用意されます。
    CREATE DATABASE `example`;
    use `example`;
    CREATE TABLE `user` (
    `id` int(10) unsigned NOT NULL AUTO_INCREMENT COMMENT 'ID',
    `name` varchar(255) COLLATE utf8mb4_bin NOT NULL COMMENT 'ユーザー名(兼メールアドレス)',
    `normalized_name` varchar(255) COLLATE utf8mb4_bin NOT NULL COMMENT 'ノーマライズ後ユーザー名',
    `security_stamp` varchar(255) COLLATE utf8mb4_bin NOT NULL COMMENT 'セキュリティスタンプ',
    `password` varchar(255) COLLATE utf8mb4_bin NOT NULL COMMENT 'パスワード',
    PRIMARY KEY (`id`),
    UNIQUE KEY `name` (`name`),
    UNIQUE KEY `normalized_name` (`normalized_name`)
    ) ENGINE=InnoDB DEFAULT CHARSET=utf8mb4 COLLATE=utf8mb4_bin COMMENT='ユーザーテーブル';
Entity Frameworkの初期設定
Entity Frameworkを利用するため、次の作業を行います。
- NugetからMySql.Data.EntityFrameworkCoreをインストールします。
- パッケージマネージャーコンソールで下記コマンドを入力します。接続文字列は環境に合わせてご変更下さい。
- Scaffold-DbContext "server=localhost;port=3306;user=root;password=password;database=example" MySql.Data.EntityFrameworkCore -OutputDir Models -f
- EF用のファイルとModelが出力されるため、exampleContext.csのファイル名と中の記載をexampleContext → ExampleContextに修正します。(しなくても動きますが、スネークケースのクラス名が気持ち悪いので)
- appsettings.Development.jsonを修正します。MySQLとRedisの接続文字列は自環境に合わせて下さい。
{
  "Logging": {
    "LogLevel": {
      "Default": "Debug",
      "System": "Information",
      "Microsoft": "Information"
    }
  },
  "ConnectionStrings": {
    "RedisConnection": "127.0.0.1:6379",
    "MysqlConnection": "server=127.0.0.1;userid=root;password=password;database=example;"
  }
}
- Startup.csを修正します。
//...
using CustomAuthentication.Models;
using Microsoft.EntityFrameworkCore;
//...

        public void ConfigureServices(IServiceCollection services)
        {
            //...

            // DB
            services.AddDbContext<exampleContext>(options => options.UseMySQL(
                 Configuration.GetValue<string>("ConnectionStrings:MysqlConnection")
            ));
        }
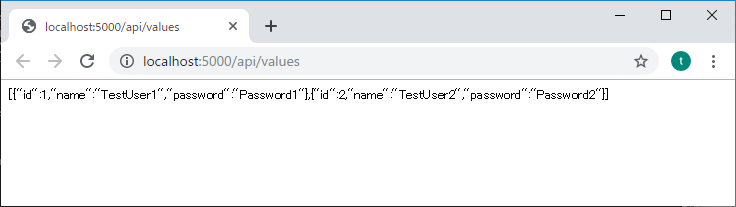
- テストデータを入れ、かつValuesController.cs を編集するなどして、Entity Frameworkが動作することを確認します。
//...
using Microsoft.EntityFrameworkCore;
//...
        namespace CustomAuthentication.Controllers
        {
            [Route("api/[controller]")]
            [ApiController]
            public class ValuesController : ControllerBase
            {
                private readonly ExampleContext _context;

                public ValuesController(ExampleContext context)
                {
                    _context = context;
                }

                // GET api/values
                [HttpGet]
                public async Task<IEnumerable<User>> Get()
                {
                    return await _context.User.ToListAsync();
                }
        //...
IUserStoreの実現
認証に必要なのはサインアップ(登録)、サインイン(ログイン)、サインアウト(ログアウト)です。
サインアップにはUserManagerを使います。サインインとサインアウトにはSignInManagerを使います。
SignInManagerはUserManagerに依存しています。UserManagerはIUserStoreに依存しています。
そこでIUserStoreを実現するCustomUserStoreクラスを作成し、FWに登録します。IRoleStoreを実現したクラスもないと動かないためCustomRoleStoreクラスも追加します。これらはそれぞれUserStoreBase、RoleStoreBaseから継承して作成します。
CustomUserStore作成
using System;
using System.Collections.Generic;
using System.Linq;
using System.Security.Claims;
using System.Threading;
using System.Threading.Tasks;
using CustomAuthentication.Models;
using Microsoft.AspNetCore.Identity;

namespace CustomAuthentication
{
    class CustomUserStore : UserStoreBase<IdentityUser, string, IdentityUserClaim<string>, IdentityUserLogin<string>, IdentityUserToken<string>>
    {
        private readonly ExampleContext _context;
        private readonly IdentityErrorDescriber _describer;

        public CustomUserStore(IdentityErrorDescriber describer, ExampleContext context) : base(describer)
        {
            _describer = describer;
            _context = context;
        }

        public override async Task<IdentityResult> CreateAsync(IdentityUser user, CancellationToken cancellationToken = new CancellationToken())
        {
            _context.User.Add(new User() { Name = user.UserName, NormalizedName = user.NormalizedUserName, SecurityStamp = user.SecurityStamp, Password = user.PasswordHash });
            await _context.SaveChangesAsync();
            return IdentityResult.Success;
        }

        public override async Task<IdentityResult> UpdateAsync(IdentityUser user, CancellationToken cancellationToken = new CancellationToken())
            => throw new NotImplementedException();

        public override async Task<IdentityResult> DeleteAsync(IdentityUser user, CancellationToken cancellationToken = new CancellationToken())
            => throw new NotImplementedException();

        public override async Task<IdentityUser> FindByIdAsync(string userId, CancellationToken cancellationToken = new CancellationToken())
            => throw new NotImplementedException();

        public override async Task<IdentityUser> FindByNameAsync(string normalizedUserName, CancellationToken cancellationToken = new CancellationToken())
        {
            var user = _context.User.FirstOrDefault(x => x.NormalizedName == normalizedUserName);
            if (user == null)
                return null;

            return new IdentityUser()
            {
                Id = user.Id.ToString(),
                UserName = user.Name,
                PasswordHash = user.Password,
                SecurityStamp = user.SecurityStamp,
            };
        }

        protected override async Task<IdentityUser> FindUserAsync(string userId, CancellationToken cancellationToken)
            => throw new NotImplementedException();

        protected override async Task<IdentityUserLogin<string>> FindUserLoginAsync(string userId, string loginProvider, string providerKey, CancellationToken cancellationToken)
            => throw new NotImplementedException();

        protected override async Task<IdentityUserLogin<string>> FindUserLoginAsync(string loginProvider, string providerKey, CancellationToken cancellationToken)
            => throw new NotImplementedException();

        public override async Task<IList<Claim>> GetClaimsAsync(IdentityUser user, CancellationToken cancellationToken = new CancellationToken())
            => new Claim[0];

        public override async Task AddClaimsAsync(IdentityUser user, IEnumerable<Claim> claims, CancellationToken cancellationToken = new CancellationToken())
            => throw new NotImplementedException();

        public override async Task ReplaceClaimAsync(IdentityUser user, Claim claim, Claim newClaim, CancellationToken cancellationToken = new CancellationToken())
            => throw new NotImplementedException();

        public override async Task RemoveClaimsAsync(IdentityUser user, IEnumerable<Claim> claims, CancellationToken cancellationToken = new CancellationToken())
            => throw new NotImplementedException();

        public override async Task<IList<IdentityUser>> GetUsersForClaimAsync(Claim claim, CancellationToken cancellationToken = new CancellationToken())
            => throw new NotImplementedException();

        protected override async Task<IdentityUserToken<string>> FindTokenAsync(IdentityUser user, string loginProvider, string name, CancellationToken cancellationToken)
            => throw new NotImplementedException();

        protected override async Task AddUserTokenAsync(IdentityUserToken<string> token)
            => throw new NotImplementedException();

        protected override async Task RemoveUserTokenAsync(IdentityUserToken<string> token)
            => throw new NotImplementedException();

        public override IQueryable<IdentityUser> Users
            => throw new NotImplementedException();

        public override async Task AddLoginAsync(IdentityUser user, UserLoginInfo login, CancellationToken cancellationToken = new CancellationToken())
            => throw new NotImplementedException();

        public override async Task RemoveLoginAsync(IdentityUser user, string loginProvider, string providerKey, CancellationToken cancellationToken = new CancellationToken())
            => throw new NotImplementedException();

        public override async Task<IList<UserLoginInfo>> GetLoginsAsync(IdentityUser user, CancellationToken cancellationToken = new CancellationToken())
            => throw new NotImplementedException();

        public override async Task<IdentityUser> FindByEmailAsync(string normalizedEmail, CancellationToken cancellationToken = new CancellationToken())
            => throw new NotImplementedException();
    }
}
CustomRoleStore作成
using System;
using System.Collections.Generic;
using System.Linq;
using System.Security.Claims;
using System.Threading;
using System.Threading.Tasks;
using Microsoft.AspNetCore.Identity;

namespace CustomAuthentication
{
    class CustomRoleStore : RoleStoreBase<IdentityRole, string, IdentityUserRole<string>, IdentityRoleClaim<string>>
    {
        private readonly IdentityErrorDescriber _describer;

        public CustomRoleStore(IdentityErrorDescriber describer) : base(describer)
        {
            _describer = describer;
        }

        public override async Task<IdentityResult> CreateAsync(IdentityRole role, CancellationToken cancellationToken = new CancellationToken())
            => throw new NotImplementedException();

        public override async Task<IdentityResult> UpdateAsync(IdentityRole role, CancellationToken cancellationToken = new CancellationToken())
            => throw new NotImplementedException();

        public override async Task<IdentityResult> DeleteAsync(IdentityRole role, CancellationToken cancellationToken = new CancellationToken())
            => throw new NotImplementedException();

        public override async Task<IdentityRole> FindByIdAsync(string id, CancellationToken cancellationToken = new CancellationToken())
            => throw new NotImplementedException();

        public override async Task<IdentityRole> FindByNameAsync(string normalizedName, CancellationToken cancellationToken = new CancellationToken())
            => throw new NotImplementedException();

        public override async Task<IList<Claim>> GetClaimsAsync(IdentityRole role, CancellationToken cancellationToken = new CancellationToken())
            => throw new NotImplementedException();

        public override async Task AddClaimAsync(IdentityRole role, Claim claim, CancellationToken cancellationToken = new CancellationToken())
            => throw new NotImplementedException();

        public override async Task RemoveClaimAsync(IdentityRole role, Claim claim, CancellationToken cancellationToken = new CancellationToken())
            => throw new NotImplementedException();

        public override IQueryable<IdentityRole> Roles
            => throw new NotImplementedException();
    }
}
Startup.csに登録
//...
using Microsoft.AspNetCore.Identity;
//...
        public void ConfigureServices(IServiceCollection services)
        {
            //...
            // Identity
            services.AddIdentity<IdentityUser, IdentityRole>(options =>
                    {
                        options.Password.RequireDigit = false;
                        options.Password.RequireLowercase = false;
                        options.Password.RequireNonAlphanumeric = false;
                        options.Password.RequireUppercase = false;
                        options.Password.RequiredLength = 6;
                    })
                    .AddUserStore<CustomUserStore>()
                    .AddRoleStore<CustomRoleStore>()
                    .AddDefaultTokenProviders();
        }

        public void Configure(IApplicationBuilder app, IHostingEnvironment env)
        {
            //...
            app.UseAuthentication();
            //...
        }
    }
}
AccountController
ここまででサインアップ・サインイン・サインアウトができるはずです。
Controllerから実際に動かしてみます。
using System.Threading.Tasks;
using Microsoft.AspNetCore.Authorization;
using Microsoft.AspNetCore.Identity;
using Microsoft.AspNetCore.Mvc;

namespace ApiIdentity.Controllers
{
    [Route("api/[controller]")]
    [ApiController]
    public class AccountController : ControllerBase
    {
        private readonly SignInManager<IdentityUser> _signInManager;
        private readonly UserManager<IdentityUser> _userManager;

        // ※ 実際はユーザーの入力を受け取ります
        private readonly string email = "user1@example.com";
        private readonly string password = "123456aA!";

        public AccountController(SignInManager<IdentityUser> signInManager, UserManager<IdentityUser> userManager)
        {
            _signInManager = signInManager;
            _userManager = userManager;
        }

        [HttpGet("signup")]
        [AllowAnonymous]
        public async Task<string> SignUp()
        {
            var createResult = await _userManager.CreateAsync(new IdentityUser(){ UserName = email }, password);
            return createResult.Succeeded.ToString();
        }

        [HttpGet("signin")]
        [AllowAnonymous]
        public async Task<string> SignIn()
        {
            var signInResult = await _signInManager.PasswordSignInAsync(email, password, false, false);
            return signInResult.Succeeded.ToString();
        }

        [HttpGet("signout")]
        [AllowAnonymous]
        public async Task<string> SignOut()
        {
            await _signInManager.SignOutAsync();

            return "sign out.";
        }

        [HttpGet("membersonly")]
        [Authorize]
        public string MembersOnly()
        {
            var isSignedIn = _signInManager.IsSignedIn(this.User);
            var userName = _userManager.GetUserName(this.User);

            return isSignedIn.ToString() + " : " + userName;
        }

        //...
    }
}

//...
ログイン情報の保存先をRedisに変更する
ASP.NetCoreのデフォルトでは、ログイン情報を各ノードがローカルに保存するようです。しかし、アプリケーションサーバーをスケールインした時にログイン情報が揮発するのは困ります。そこで共用のRedisに保存できるよう、ITicketStoreを実現したクラスをSessionStoreとして登録します。
参考: Storing ASP.NET core identity authorization tickets in Redis.
これにはData Protectionも設定しないと正しく動作しなかったため、同時にこちらも設定します。
参考: ASP.NET Coreのセッション情報をRedisに格納する方法
- NugetからMicrosoft.Extensions.Caching.StackExchangeRedis とMicrosoft.AspNetCore.DataProtection.StackExchangeRedisをインストールします。
- ITicketStoreを実現するクラスを作成します。
using System;
using System.Threading.Tasks;
using Microsoft.AspNetCore.Authentication;
using Microsoft.AspNetCore.Authentication.Cookies;
using StackExchange.Redis;

namespace CustomAuthentication
{
    public class RedisTicketStore : ITicketStore
    {
        private readonly string KeyPrefix = "AuthSessionStore-";
        private IDatabase _cache;

        public RedisTicketStore(IConnectionMultiplexer redis)
        {
            _cache = redis.GetDatabase();
        }

        public async Task<string> StoreAsync(AuthenticationTicket ticket)
        {
            var key = KeyPrefix + Guid.NewGuid().ToString();
            await RenewAsync(key, ticket);
            return key;
        }

        public async Task RenewAsync(string key, AuthenticationTicket ticket)
        {
            byte[] val = TicketSerializer.Default.Serialize(ticket);
            await _cache.StringSetAsync(key, val);
        }

        public async Task<AuthenticationTicket> RetrieveAsync(string key)
        {
            var bytes = await _cache.StringGetAsync(key);
            var ticket = TicketSerializer.Default.Deserialize(bytes);
            return ticket;
        }

        public async Task RemoveAsync(string key)
            => await _cache.KeyDeleteAsync(key);
    }
}
- StartUp.csを修正します。
//...
using Microsoft.AspNetCore.DataProtection;
using StackExchange.Redis;
//...

        public void ConfigureServices(IServiceCollection services)
        {
            //...
            // Redis
            services.AddSingleton<IConnectionMultiplexer>(ConnectionMultiplexer.Connect(Configuration.GetValue<string>("ConnectionStrings:RedisConnection")));
            services.AddScoped<RedisTicketStore>();
            services.ConfigureApplicationCookie(options => options.SessionStore = services.BuildServiceProvider().GetRequiredService<RedisTicketStore>());
            services.AddDataProtection()
                    .SetApplicationName("CustomAuthentication")
                    .PersistKeysToStackExchangeRedis(services.BuildServiceProvider().GetRequiredService<IConnectionMultiplexer>(), "DataProtection-Keys");
            //...
        }
    }
}
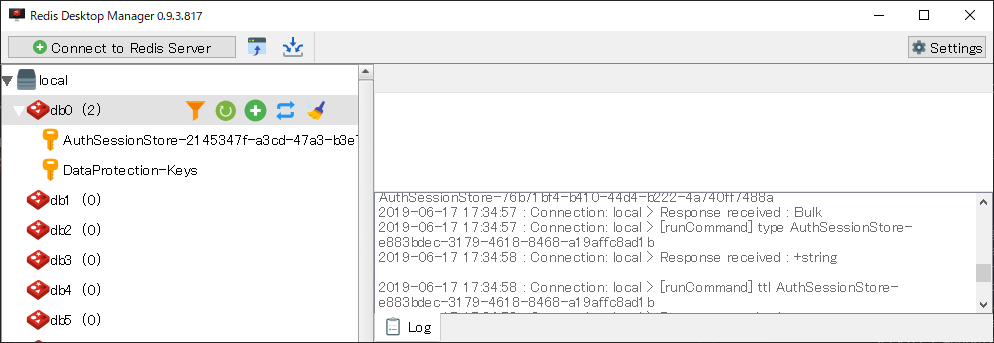
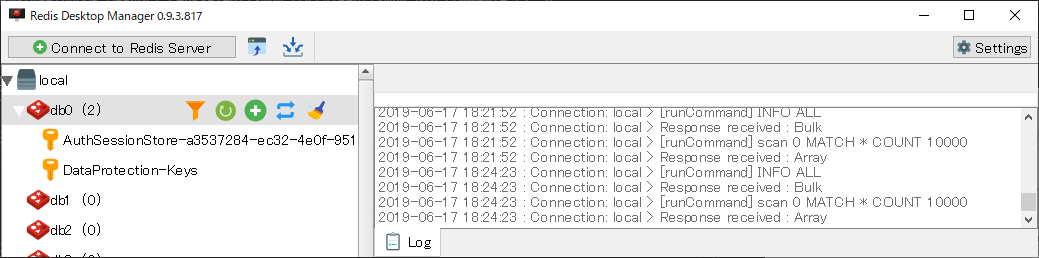
実行するとRedisにDataProtectionとログインの情報が保存されます。
動作確認
異なるアプリサーバ間で本当にログイン情報を共有できているか、コンテナを使ってテストしてみます。
次の作業を行います。
- appsettings.UnitTest.jsonを追加します。
{
  "Logging": {
    "LogLevel": {
      "Default": "Debug",
      "System": "Information",
      "Microsoft": "Information"
    }
  },
  "ConnectionStrings": {
    "RedisConnection": "redis:6379",
    "MysqlConnection": "server=mysql;userid=root;password=password;database=example;"
  }
}
- powershellを起動し、CustomAuthentication.slnのあるディレクトリで下記コマンドを実行します。VisualStudioとローカルでポートを占有しているサービスは事前に落としておく必要があります。
dotnet publish -c Release -o out
docker-compose build --no-cache
docker-compose up
- 利用する設定ファイルは下記となります。
- docker-compose.yml
version: '3'
services:
  webapp1:
    build:
      context: .
      dockerfile: app.dockerfile
    ports:
      - "8000:8000"
    depends_on:
      - redis
      - mysql
    environment:
      - ASPNETCORE_ENVIRONMENT=UnitTest
      - ASPNETCORE_URLS=http://+:8000

  webapp2:
    build:
      context: .
      dockerfile: app.dockerfile
    ports:
      - "8080:8080"
    depends_on:
      - redis
      - mysql
    environment:
      - ASPNETCORE_ENVIRONMENT=UnitTest
      - ASPNETCORE_URLS=http://+:8080

  redis:
    build:
      context: .
      dockerfile: redis.dockerfile
    container_name: redis
    ports:
      - "6379:6379"

  mysql:
    build:
      context: .
      dockerfile: mysql.dockerfile
    command: mysqld --character-set-server=utf8mb4 --collation-server=utf8mb4_bin
    container_name: mysql
    ports:
      - "3306:3306"
    environment:
      - MYSQL_ROOT_PASSWORD=password
- app.dockerfile
FROM mcr.microsoft.com/dotnet/core/aspnet:2.2
COPY ./CustomAuthentication/out/ /app/
WORKDIR /app/
ENTRYPOINT ["dotnet", "CustomAuthentication.dll"]
- redis.dockerfile
FROM redis:5.0
- mysql.dockerfile
FROM mysql:5.7
COPY ./init.sql /docker-entrypoint-initdb.d/
- init.sql
    DROP DATABASE IF EXISTS `example`;
    CREATE DATABASE `example`;
    use `example`;
    CREATE TABLE `user` (
    `id` int(10) unsigned NOT NULL AUTO_INCREMENT COMMENT 'ID',
    `name` varchar(255) COLLATE utf8mb4_bin NOT NULL COMMENT 'ユーザー名(兼メールアドレス)',
    `normalized_name` varchar(255) COLLATE utf8mb4_bin NOT NULL COMMENT 'ノーマライズ後ユーザー名',
    `security_stamp` varchar(255) COLLATE utf8mb4_bin NOT NULL COMMENT 'セキュリティスタンプ',
    `password` varchar(255) COLLATE utf8mb4_bin NOT NULL COMMENT 'パスワード',
    PRIMARY KEY (`id`),
    UNIQUE KEY `name` (`name`),
    UNIQUE KEY `normalized_name` (`normalized_name`)
    ) ENGINE=InnoDB DEFAULT CHARSET=utf8mb4 COLLATE=utf8mb4_bin COMMENT='ユーザーテーブル';

    CREATE TABLE `role` (
    `id` int(10) unsigned NOT NULL COMMENT 'ID',
    `user_id` int(10) unsigned NOT NULL COMMENT 'ID',
    `role` varchar(20) COLLATE utf8mb4_bin NOT NULL COMMENT 'ロール名',
    PRIMARY KEY (`id`),
    UNIQUE KEY `user_id` (`user_id`)
    ) ENGINE=InnoDB DEFAULT CHARSET=utf8mb4 COLLATE=utf8mb4_bin COMMENT='ロール';
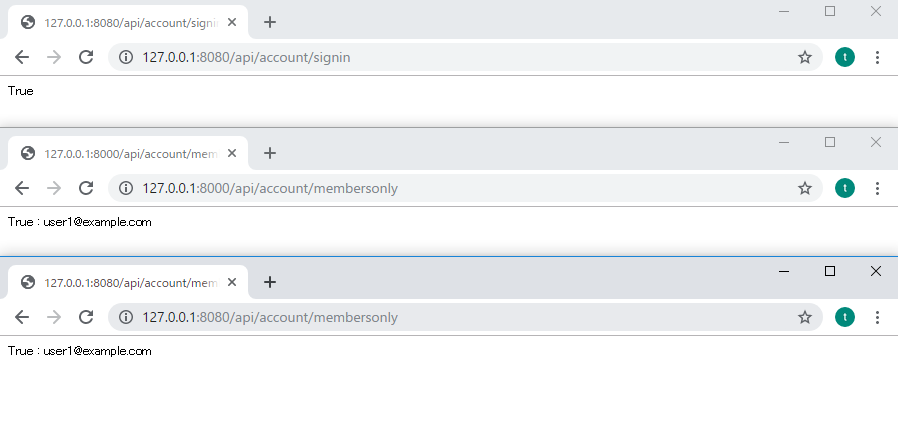
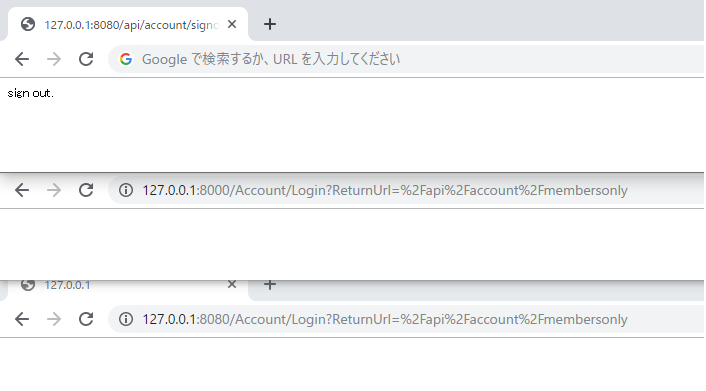
- http://127.0.0.1:8000/api/account/signup にアクセスし、次に http://127.0.0.1:8080/api/account/signin にアクセスした後、http://127.0.0.1:8000/api/account/membersonly と http://127.0.0.1:8080/api/account/membersonly の両方を閲覧できることを確認します。
- Redisに入っているログイン情報が一つだけであることを確認します。
- http://127.0.0.1:8080/api/account/signout にアクセスし、http://127.0.0.1:8000/api/account/membersonly と http://127.0.0.1:8080/api/account/membersonly の両方が閲覧できないことを確認します。
以上。