はじめに
はじめまして!リンクバルでWebエンジニアをしているタンです。
この記事はLinkbal Advent Calendar 2018の8日目の記事です。こちらも僕のQiitaのはじめての記事です。
今回はChrome拡張の作り方を紹介させていただきます。
Chrome拡張の構造
まず、Chrome拡張のプロジェクトの基本構造について説明したいと思います。

一番大切なものはmanifest.jsonファイルです。
これは拡張の設定ファイルです。
以下はmafifest.jsonの例です。
{
  "name": "Youtube Turn off light",
  "version": "1.0.0",
  "manifest_version": 2,
  "description": "Turn off light when playing video on Youtube",
  "icons": {
    "16": "images/icon-16.png",
    "128": "images/icon-128.png"
  },
  "default_locale": "en",
  "background": {
    "scripts": [
      "scripts/background.js"
    ]
  },
  "permissions": ["activeTab", "storage"],
  "page_action": {
    "default_icon": {
      "19": "images/icon-19.png",
      "38": "images/icon-38.png"
    },
    "default_title": "youtube turn off light",
    "default_popup": "popup.html"
  },
  "content_scripts": [
      {
        "matches": [
          "https://www.youtube.com/*", "https://m.youtube.com/*"
        ],
        "css": [
          "styles/style.css"
        ],
        "js": [
          "scripts/content_script.js"
        ],
        "run_at": "document_start",
        "all_frames": false
      }
    ],
  "options_page": "options.html"
}
- name: 拡張名です。
- version: 拡張のバージョンです。
- manifest_version: chrome拡張のバージョンです。(現在は
version 2です) - description: 拡張についての説明文です。
- default_locale: デフォルト言語
- background: これはバックグラウンドで動くことでブラウザーのイベントを管理・ハンドリングするためです
- content_scripts: javascript,cssで対象ページのDOM情報を取得したり、変更することができます。対象ページにコンフリクトされないようにcontent scriptsは孤立の世界(Insolate World)で動きます。
- matches: ここに定義するパターンに合っているページのみにcontent_scriptsを入れる(上の)
- scripts: 対象ページのDOM情報を取得・変更するためのjavascriptsファイルです。
- css: 対象ページのDOM情報を取得・変更するためのjavascriptsファイルです。
- run_at: jsファイルが入れられるタイミング("document_start", "document_end", "document_idle")
- permissions: 拡張で使いたい権限(例えば: storage, bookmarks)
- option_page: 拡張のオプションを設定するためのページです。
- page_action: Chromeのアドレスバーの右側に表示されるアイコン、クリックする時の表示ポップアップです
拡張を作ってみましょう
さあ、実際の拡張を作りましょう!
僕はYoutubeの動画を良く見ます。
動画を再生する時、動画に集中したいので、ページで動画の以外の部分を暗くなるようにするという機能がほしいです。
ですから、今回はその機能をYoutubeにいれるというChrome拡張を作りたいと思います。
このチュートリアルを読みながら作ります。
まず、manifest.jsonファイルを作成します。基本には上記の例ファイルと同じです
今回はYoutubeのUIを変更したいので、両方javascriptとcssが必要ですね
簡単な実装方針はjavascriptでYoutubeのwatchページにdivを入れて、cssでページのUIを変更するということです
content_script.js
console.log("Content script is loaded")
var yContent = document.getElementById("content");
var overlayDiv = document.createElement("div");
overlayDiv.innerHTML = "<div class='yt-turn-off-light_overlay' id='ytTurnOffLight'></div>";
yContent.appendChild(overlayDiv);
style.css
.yt-turn-off-light_overlay {
  display: block;
  z-index: 1;
  position:  fixed;
  top: 0;
  background: rgba(10,10,10,.9);
  width: 100%;
  height: 100%;
}
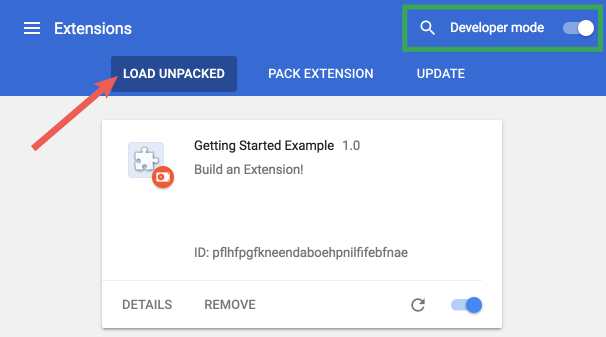
これで「chrome://extensions」にアクセスして、chromeに拡張を入れてみます。
次、Youtubeの動画再生ページを開いて、結果をみます。
拡張のアイコンを有効状態になりましたが、UIを変更されません。
コンソールはこのエラーを出ました。

contentIDである素子が取れなかったですね
原因はYoutubeのコンテンツがクライアント側でレンダリングされるっぽいですね。
だから、コンテンツがレンダリング完了するまでdivを追加するscriptを走らないようにしたら、解決できます。
console.log("Content script is loaded")

function addOverlay() {
	var yContent = document.getElementById("content");
	if (!yContent) return false;
	var overlayDiv = document.createElement("div");
	overlayDiv.innerHTML = "<div class='yt-turn-off-light_overlay' id='ytTurnOffLight'></div>";
	yContent.appendChild(overlayDiv);
	return true;
}

var interval = setInterval(function () {
	if (addOverlay()) clearInterval(interval);
}, 1000);
もう一回chromeに入れてみます。

できましたが、以下の問題が発生しました。
- ホームページから動画を選択したら、できまない。(その時に全部のページがリロードしないので、拡張のcontent_scriptsが走っていない)
- 動画再生の以外ページでも変更されちゃう(笑)
- 動画再生は完了・一時停止する時に元の状態に戻らない
解決するために、content_script.jsを以下のとおりに変更します
// 別のパスに遷移させる時
window.addEventListener("yt-navigate-start", function () {
	if (isWatchPage()) {
	   addOverlay();
	} else {
	   removeOverlay();
	}
});

// 解除
function removeOverlay() {
	var overlayDiv = document.getElementById("ytTurnOffLight");
	if (overlayDiv) overlayDiv.remove();
}

function addOverlay () {
	if (document.getElementById("ytTurnOffLight")) return true;
	var yContent = document.getElementById("content");
	if (!yContent) return false;
	var overlayDiv = document.createElement("div");
	overlayDiv.innerHTML = "<div class='yt-turn-off-light_overlay' id='ytTurnOffLight'></div>";
	yContent.appendChild(overlayDiv);
	videoHandler();
	return true;
}

function isWatchPage () {
	return location.pathname === '/watch';
}

// ビデオの再生・停止・再開のハンドリング
function videoHandler () {
	var video = document.getElementsByTagName("video")[0];
	if (!video) return;
	// TODO: should change to use remove/add class
	video.onended = function () {
		console.log("ended")
		removeOverlay();
	}
	video.onpause = function () {
		console.log("paused")
		removeOverlay();
	}
	video.onplay = function () {
		console.log("play")
		addOverlay();
	}
}

var interval = setInterval(function () {
	if (!isWatchPage() || addOverlay()) {
		clearInterval(interval);
	}
}, 1000);
結果はこんな感じです。
おわりに
今回は僕の初めてのQiita記事で簡単なChrome拡張を紹介させていただきました。
ご拝読いただきありがとうございます!