Layer機能を使ったLambda functionをローカル環境で開発しつつ、SAM&CodeBuildでAWS上へデプロイするとこまでをやってみた備忘録。
1.構成
project/
  ├ .git
  ├ functions/
  │  ├ lambda-payloads.json
  │  └ lambda_function.py
  ├ .gitignore
  ├ buildspec.yml
  ├ template.yaml
 --以下はRequestsライブラリ部分⇒ここがLambda Layerとしてuploadされている状態--
  ├ certifi/
  ├ certifi-2018.11.29.dist-info/
  ├ chardet/
  ├ chardet-3.0.4.dist-info/
  ├ idna/
  ├ idna-2.8.dist-info/
  ├ requests/
  ├ requests-2.21.0.dist-info/
  ├ urllib3/
  └ urllib3-1.24.1.dist-info/
2.Layerの扱い
悩んだのは、
・AWS上ではRequestsライブラリをLayerとしてアップロードして使いたい
・でも開発段階ではローカル環境上でテストしたい
というケース。
Layerをどう扱えばいいのか悩んだ結果、以下のようにすることにしてみた。
・AWS上と同様にimport requestsできるようにrequestsライブラリ用の各モジュールを配置(前述構成の下からの10ディレクトリ)
・該当ディレクトリをgitignore
これで、ひとまずAWS上/ローカルで差異ないimport指定で通しつつ、Lambda上に無駄なモジュールを載せずに済んだ。
import boto3
import json
import datetime
import os
import requests
certifi*/
chardet*/
idna*/
requests*/
urllib3*/
functions/lambda-payloads.json
3.Lambda functionをデプロイ
Lambda functionのデプロイは、CodeBuildでAWS SAMを使って自動化。
①AWS SAM用テンプレートを作成
Propertiesに必要な設定を埋めてtemplate.yamlファイルを作成。
"Layers"でupload済LayerのARNを指定しつつ、"Tracing"でX-Rayトレースを有効化しています。
AWSTemplateFormatVersion: '2010-09-09'
Transform: 'AWS::Serverless-2016-10-31'
Description: Create Lambda function by using AWS SAM.
Resources:
  UpdateItemFunction:
    Type: 'AWS::Serverless::Function'
    Properties:
      Handler: functions/lambda_function.lambda_handler
      Runtime: python3.6
      Role: 'arn:aws:iam::<Account_ID>:role/deploy_lambda_role'
      Timeout: 15
      Layers:
        - 'arn:aws:lambda:us-west-2:<Account_ID>:layer:requests:1'
      Tracing: Active
      Environment:
        Variables:
          URL: '<API Gateway Endpoint>'
      Description: ''
      MemorySize: ''
②CodeBuild用のbuildspec.yamlを作成
CodeBuildでは以下の流れでLambda functionをデプロイ。
Ⅰ.SAMテンプレートからLambda用コードをパッケージ化してS3へアップロード(S3バケットは事前に作成)
Ⅱ.アップロード先S3のURIが展開されたSAMテンプレートを出力
Ⅲ.Ⅱで出力されたSAMテンプレートを使用して、CloudFormationでLambda functionをデプロイ
この流れを実行させるためのbuildspecファイルを以下の通り作成。(Ⅰ&Ⅱがbuildステップ、Ⅲがpost_buildステップ)
version: 0.2
phases:
  build:
    commands:
      - >-
        aws cloudformation package --template-file template.yaml --s3-bucket
        sam-repository --output-template-file packaged-template.yaml
  post_build:
    commands:
      - >-
        aws cloudformation deploy --template-file packaged-template.yaml
        --stack-name msa-lambda-stack --capabilities CAPABILITY_IAM
        --no-fail-on-empty-changeset
ポイントは、aws cloudformation deploy時にオプション"--no-fail-on-empty-changeset"を付けること。
これがないと初回デプロイの際、対象のChange Setが存在しないためにStatus Code≠0となりデプロイが失敗してしまうが、オプションを付けることでStatus Code=0を応答させることができる。
もう1点気を付けるべきポイントが、使用するRoleへの権限付与。
特にlambda、cloudformationに対して結構多くのActionを許可しなければいけなかった。
{
	"Effect": "Allow",
	"Action": [
            "lambda:CreateFunction",
            "lambda:UpdateFunctionCode",
            "lambda:GetLayerVersion",
            "lambda:UpdateFunctionConfiguration",
            "cloudformation:CreateStack",
            "cloudformation:UpdateStack",
            "cloudformation:CreateChangeSet",
            "cloudformation:DescribeChangeSet",
            "cloudformation:ExecuteChangeSet",
            "cloudformation:GetTemplateSummary",
            "cloudformation:DescribeStacks"
        ],
	"Resource": "*"
}
※なおaws cloudformation packageコマンドでは、packaged-template.yamlがこんな感じに展開される
AWSTemplateFormatVersion: '2010-09-09'
Description: Create Lambda function by using AWS SAM.
Resources:
  UpdateItemFunction:
    Properties:
      CodeUri: s3://<アップロード先S3のURI>
      Environment:
        Variables:
          URL: '<API Gateway Endpoint>'
      Handler: functions/lambda_function.lambda_handler
      Layers:
      - arn:aws:lambda:us-west-2:<Account_ID>:layer:requests:1
      Role: arn:aws:iam::<Account_ID>:role/deploy_lambda_role
      Runtime: python3.6
      Timeout: 15
      Tracing: Active
    Type: AWS::Serverless::Function
Transform: AWS::Serverless-2016-10-31
③CodeBuildプロジェクトを作成
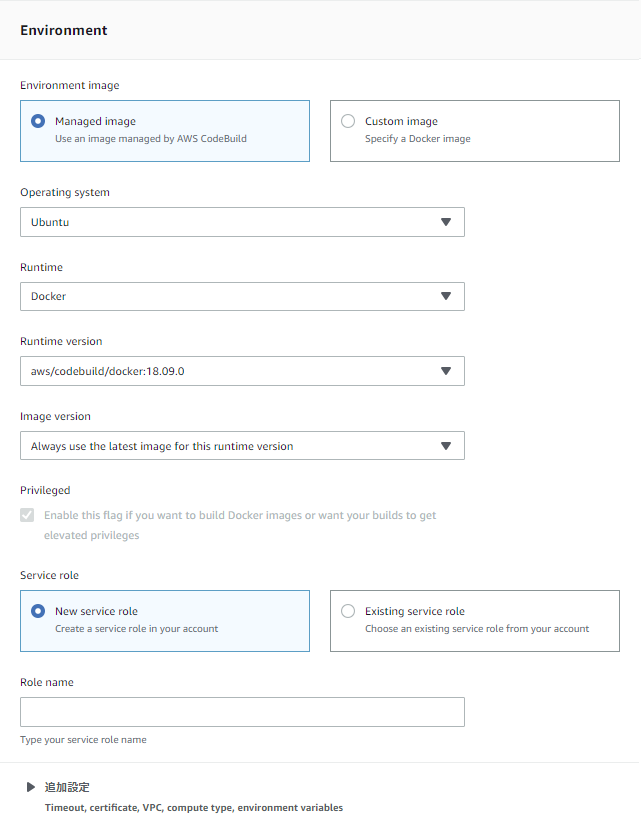
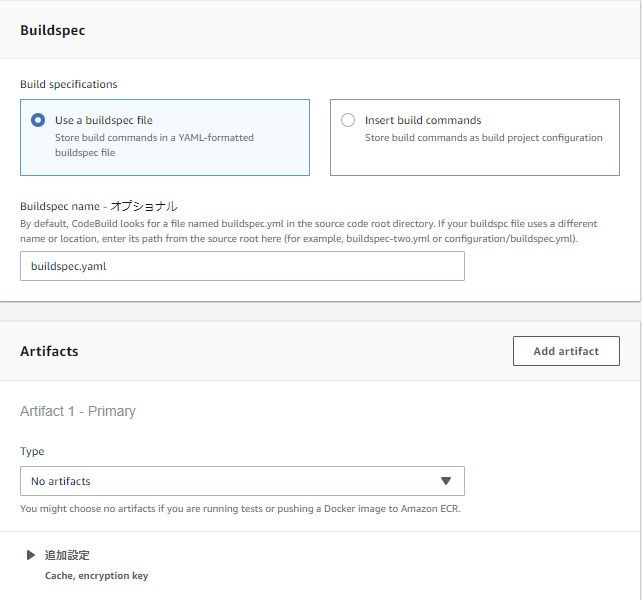
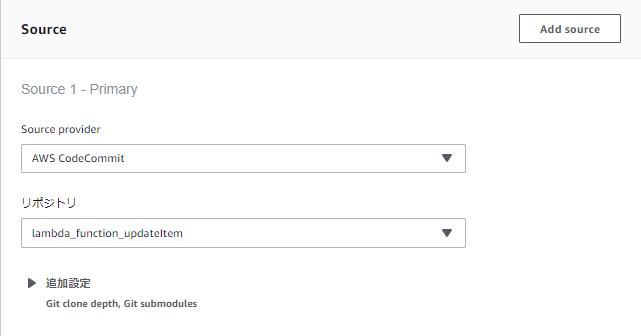
CodeBuildでは、単にbuildspec通りにコマンド実行させるだけなので、特筆すべき点はなし。
Source
Environment
aws cloudformation package & deployコマンドを実行するだけなので、RuntimeはDockerを指定。

Buildspec & Artifacts
BuildspecファイルにSourceリポジトリに配置したbuildspec.yamlを指定。Artifactsは不要。

以上でCodeBuildプロジェクト作成は完了。
④実行
作成したBuildプロジェクトを実行すると、CFnスタックが作成された後、無事Lambda functionがデプロイされる。
あとはCodePipelineでCodeCommitと繋げれば自動化もOK。
4.あとがき
Lambdaのデプロイもいろいろやり方あるけど、これが一番シンプルな気がしました。
ローカル環境でのLayerの扱いは確実に正解ではないと思うものの、いい方法が思いつかない...
これぞというやり方があれば、ご教示いただけると幸いです。
