昨日開かれたSplunk Live Tokyoで大会の開催がアナウンスされたので、忘備録として
概要
githubにversion1とversion2が上がっている。
流石にフルデータは量が多いので、
Alternatively, this collection represents a much smaller version of the original dataset containing only attack data. In other words, "just the needles, no haystack." botsv1-attack-only.tgz(135MB compressed)
を使用
index=botsv1 earliest=0
で開始
参考資料
BOTSに関してのSplunkのブログ
What You Need to Know About Boss of the SOC (Google翻訳)
Hunting with Splunk: The Basics
やり方
@odorusatoshiさんが
Splunkを使ったセキュリティトインシデント調査レーニングを書いてくれたので、そのままやってみる。
結果的に全7回になってしまった。![]()
使用するデータ
version1のbotsv1-attack-only.tgz(135MB compressed)
中のデータの確認
BotsのAppsで表示される構文をそのまま使ってみる。時間だけ読みやすくしてみた。
| metadata type=sourcetypes index=botsv1
| foreach *Time  [eval <<FIELD>>=strftime(<<FIELD>>,"%d/%b/%y %H:%m:%S")]
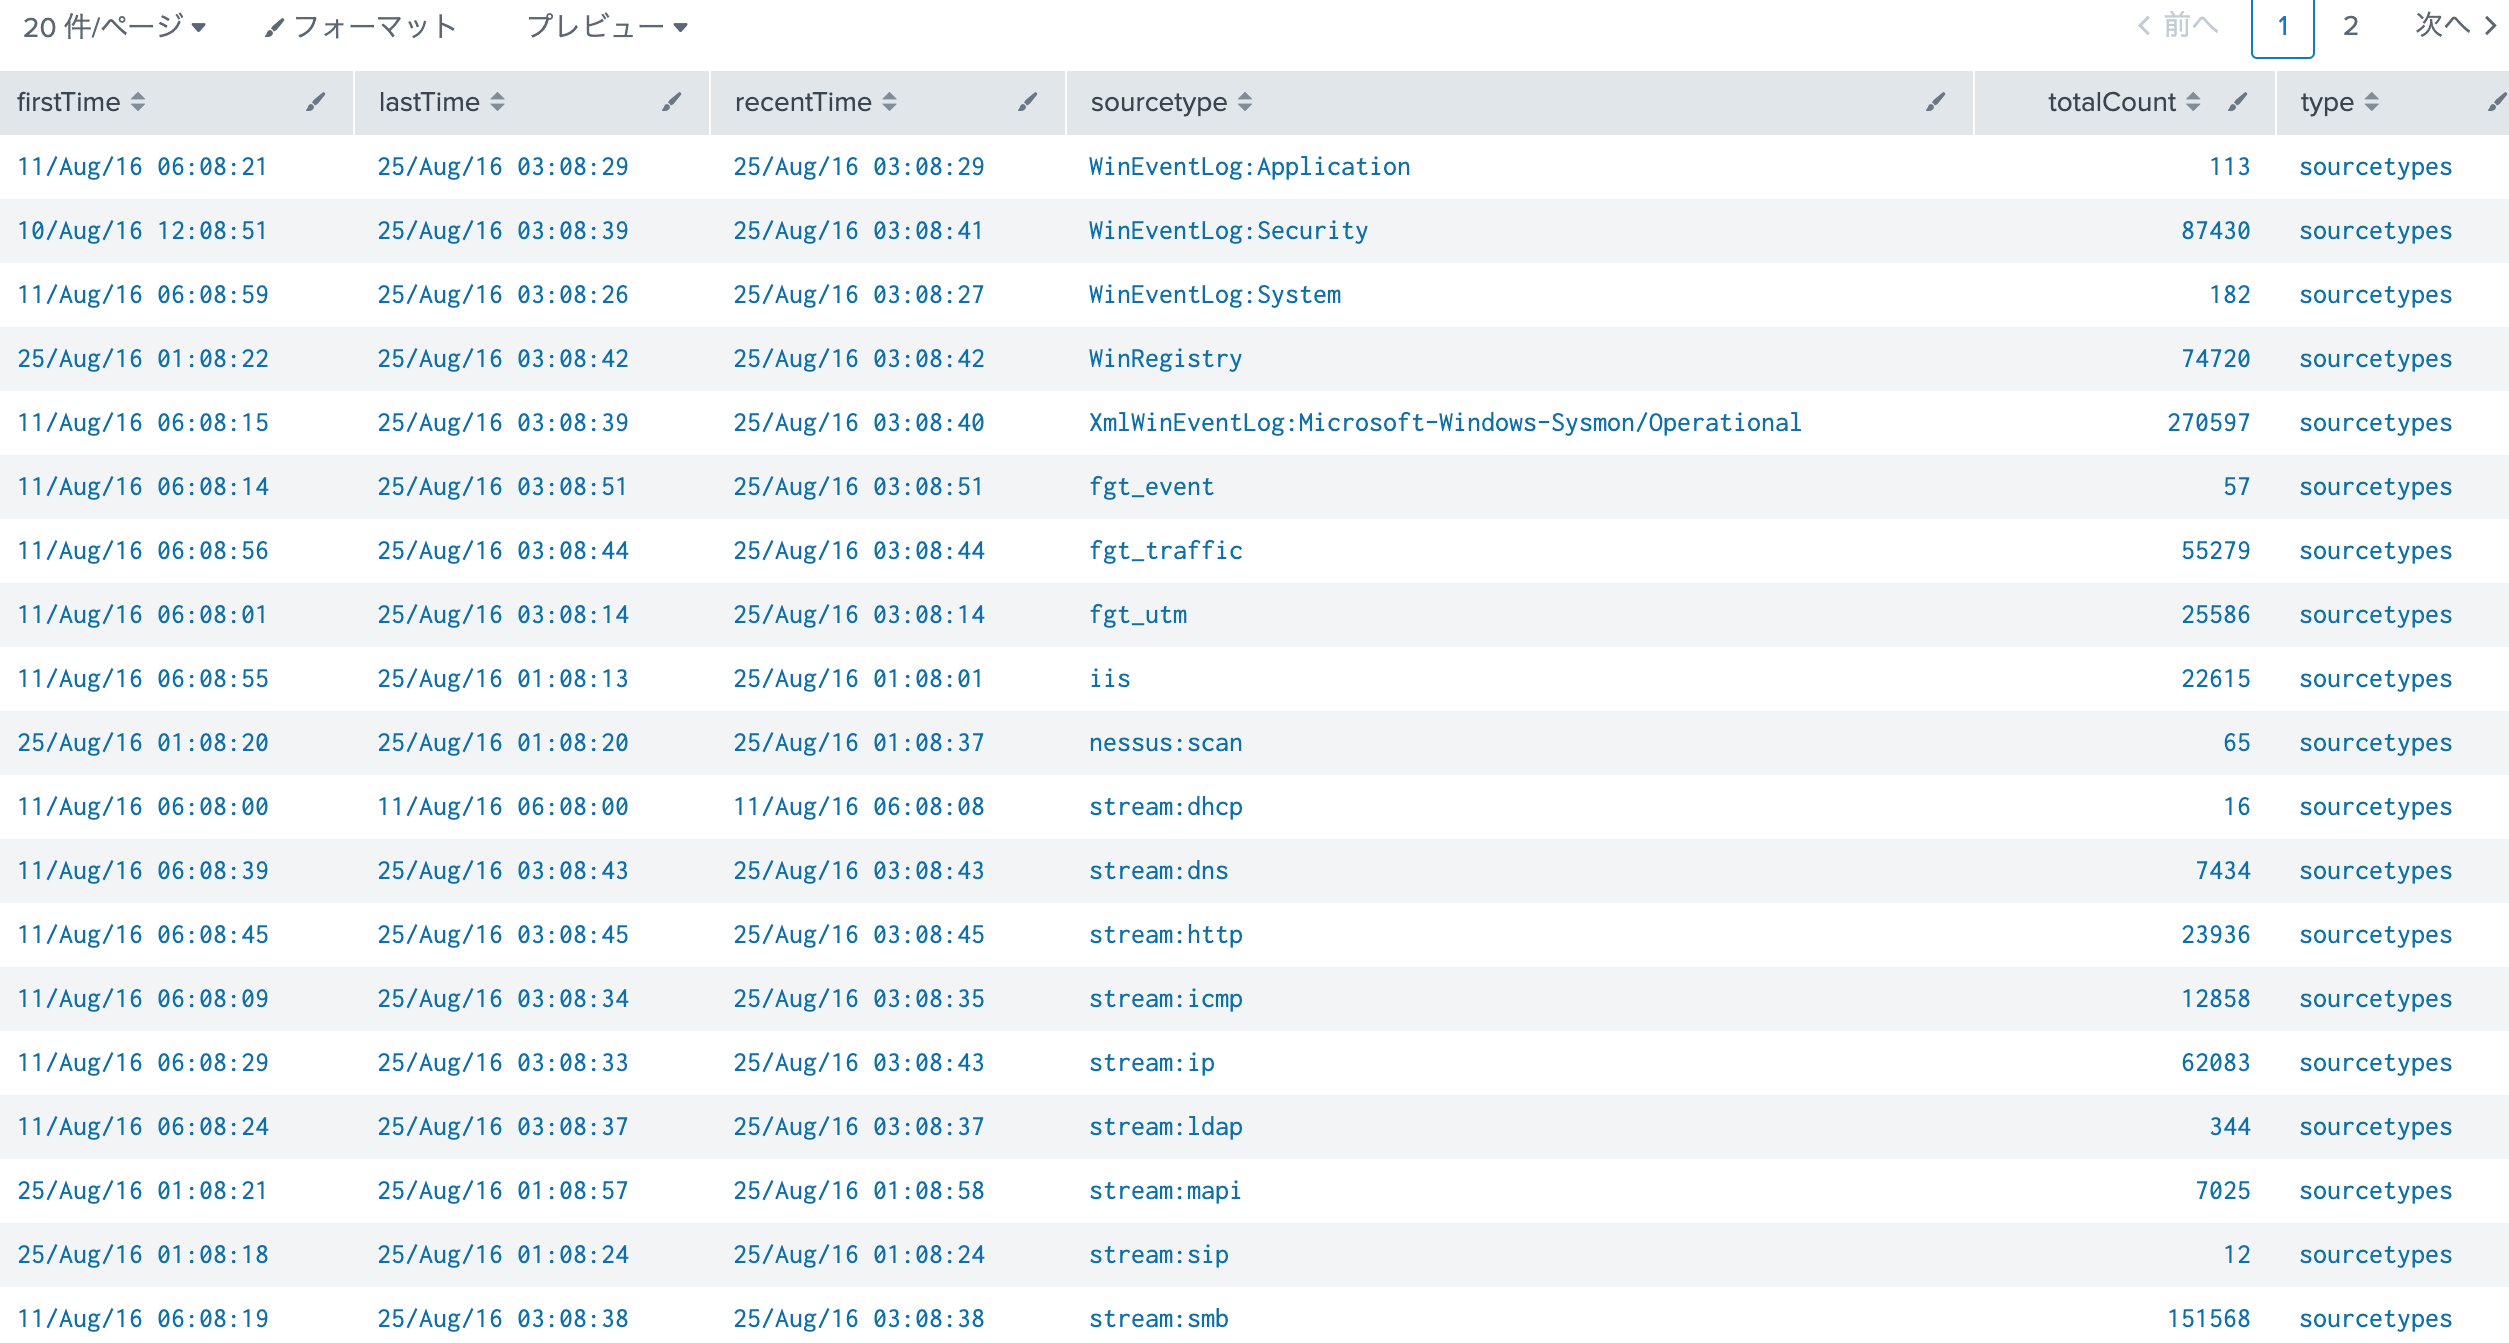
firstTimeとlastTimeをポチポチすると、一番最初がWinEventLog:Applicationで一番最後がfgt_eventだった。
2019/10/27追加
| tstats count WHERE (index=botsv1) BY source _time span=1d prestats=t
| timechart limit=0 span=1d count by source
| untable _time log count
| eval time=strftime(_time,"%Y-%m-%d")
| xyseries log time count
ログのソースと日付だけを確認したいときの爆速クエリー、すぐにでる。tstatsすごいな。
ソースは24個
Appsの確認
きちんと入れておかないと、うまく動かない
| makeresults
| eval label="Splunk Add-on for Microsoft Windows,Fortinet Fortigate Add-on for Splunk,Splunk Add-on for Tenable,Splunk Stream Add-on,Splunk Add-on for Microsoft Windows,Microsoft Sysmon Add-on,URL Toolbox,TA-Suricata"
| makemv delim="," label
| mvexpand label
| fields - _time
| join label [| rest /services/apps/local
| table label version]
全部入っていれば_version_に値が入る(はず)
Scenario #1 - APT
In this scenario, reports of the below graphic come in from your user community when they visit the Wayne Enterprises website, and some of the reports reference "P01s0n1vy." In case you are unaware, P01s0n1vy is an APT group that has targeted Wayne Enterprises. Your goal, as Alice, is to investigate the defacement, with an eye towards reconstructing the attack via the Lockheed Martin Kill Chain.
このシナリオでは、ユーザーコミュニティがWayne EnterprisesのWebサイトにアクセスすると、以下の図のレポートがユーザーコミュニティから届き、一部のレポートは「P01s0n1vy」を参照します。あなたが気付いていない場合、P01s0n1vyはWayne EnterprisesをターゲットにしたAPTグループです。アリスとしてのあなたの目標は、ロッキードマーティンキルチェーンを介して攻撃を再構築することに目を向けて、改ざんを調査することです。
During the scenario, we will build both Kill Chain and traffic flow diagrams to help visualize what has happened. While investigating, you may find yourself working backward to reconstruct an attack, but you may also find yourself in the middle of the Kill Chain based on indicators that are identified. If this happens, you must work BOTH backward to reconstruct the past but also forward to find if additional actions have transpired. For simplicity in this exercise, we will build across the Kill Chain using Splunk, starting with reconnaissance the adversary took and build things out as they move through the Kill Chain. That said, there are some phases of the Kill Chain that we will not address with Splunk and we will utilize Open Source Intelligence (OSINT) and other findings to fill in the gaps of the Kill Chain.
このシナリオでは、何が起こったのかを視覚化するために、キルチェーンとトラフィックフロー図の両方を作成します。調査中に、攻撃を再構築するために後方に作業していることに気付く場合がありますが、識別されたインジケーターに基づいてキルチェーンの途中にいる場合もあります。これが発生した場合、過去を再構築するために後方に作業する必要がありますが、追加のアクションが発生したかどうかを見つけるために前方に作業する必要があります。この演習を簡素化するために、Splunkを使用してキルチェーン全体を構築し、敵がとった偵察から始めて、キルチェーン内を移動しながら物事を構築します。とはいえ、Splunkで対処しないキルチェーンのフェーズがいくつかあり、オープンソースインテリジェンス(OSINT)およびその他の調査結果を活用して、キルチェーンのギャップを埋めます。
Finding the IP Scanning Your Web Server (Part 1 of 2)
What is the likely IP address of someone from the P01s0n1vy group scanning imreallynotbatman.com for web application vulnerabilities?
imreallynotbatman.comでWebアプリケーションの脆弱性をスキャンしているP01s0n1vyグループの誰かのIPアドレスは何ですか?
index=botsv1 imreallynotbatman.com
|stats values(source) by src_ip
結果をみると3つ、surictaがよくわからない。

index=botsv1 imreallynotbatman.com source=/var/log/suricata/eve.json
hostをみるとIDSらしい
All Data Referencing the Website by src
Appsのクエリーをみるとsrcフィールドで抽出しているけど、そっちはURL内のクエリーの一つでしかないため、どう見てもsrc_ipの方だろということで修正
index=botsv1 imreallynotbatman.com
| stats count by src_ip
| eventstats sum(count) as perc
| eval percentage=round(count*100/perc,2)
| fields - perc |sort - count

これで次の40.80.148.42で検索することに繋がる(はず)
Because the question asked about scanning the web site for vulnerabilities, it makes sense to drill down on the sourcetype of stream:http to see what kind of web data is being seen on the wire. Stream is a free app for Splunk that collects wire data and can focus on a number of different protocols including smtp, tcp, ip, http and so on.
この質問ではWebサイトの脆弱性をスキャンするように求められたため、stream:httpのsourcetypeをドリルダウンして、どの種類のWebデータがワイヤ上で見られているかを確認することは理にかなっています。 Streamは、ワイヤーデータを収集し、smtp、tcp、ip、httpなどを含むさまざまなプロトコルに焦点を当てることができるSplunk用の無料アプリです。
Once we have narrowed our search to stream:http data, we can again drill down and see what source IP addresses are associated with our domain. At this point, only two source IPs are seen in the http traffic. One of them is associated with 95% of the traffic, so a reasonable assumption would be that this address is the one of greatest interest.
stream:httpデータに検索を絞り込んだら、もう一度ドリルダウンして、どのソースIPアドレスがドメインに関連付けられているかを確認できます。この時点で、httpトラフィックには2つのソースIPのみが表示されます。そのうちの1つはトラフィックの95%に関連付けられているため、このアドレスが最も重要なアドレスであるという合理的な仮定になります。
That said, we should validate this hypothesis and since we have other sourcetypes available to us, perhaps we should use them.
とはいえ、この仮説を検証する必要があります。また、他のソースタイプを利用できるので、おそらくそれらを使用する必要があります。
index=botsv1 imreallynotbatman.com sourcetype=stream:http
| stats count by src_ip
| eventstats sum(count) as perc
| eval percentage=round(count*100/perc,2)
| fields - perc
| sort - count
こちらもsrcをsrc_ipに変更している。
普通にtopでいいような。
index=botsv1 imreallynotbatman.com sourcetype=stream:http
| top src_ip

Validating the IP That is Scanning Your Web Server (Part 2 of 2)
While we have an answer, it is important during an investigation to validate our findings. Different data sets provide different perspectives to the same question, so finding corroboration within our data sets is important.
回答はありますが、調査中は調査結果を検証することが重要です。同じ質問に対して異なるデータセットが異なる視点を提供するため、データセット内の確証を見つけることが重要です。
If we take the IP address we found with our stream data and change our sourcetype to Suricata (an IDS tool and more), we can see a number of logged events coming from that source IP address. Because Suricata has IDS signatures associated with it, we can scroll through the interesting fields on the left side of the screen and discover additional fields to look within. We can also scroll to the bottom of the list and we will see that we have 58 more fields.
ストリームデータで見つかったIPアドレスを取得し、sourcetypeをSuricata(IDSツールなど)に変更すると、そのソースIPアドレスからの多数のログイベントが表示されます。 SuricataにはIDS署名が関連付けられているため、画面の左側にある興味深いフィールドをスクロールして、内部を見るための追加フィールドを見つけることができます。リストの一番下までスクロールすると、さらに58のフィールドがあることがわかります。
suricata Signatures on 40.80.148.42
自分のところだとCIM導入していないからか、動かなかった。クエリーは以下の通り。
index=botsv1 imreallynotbatman.com src_ip=40.80.148.42 sourcetype=suricata
| top alert.signature
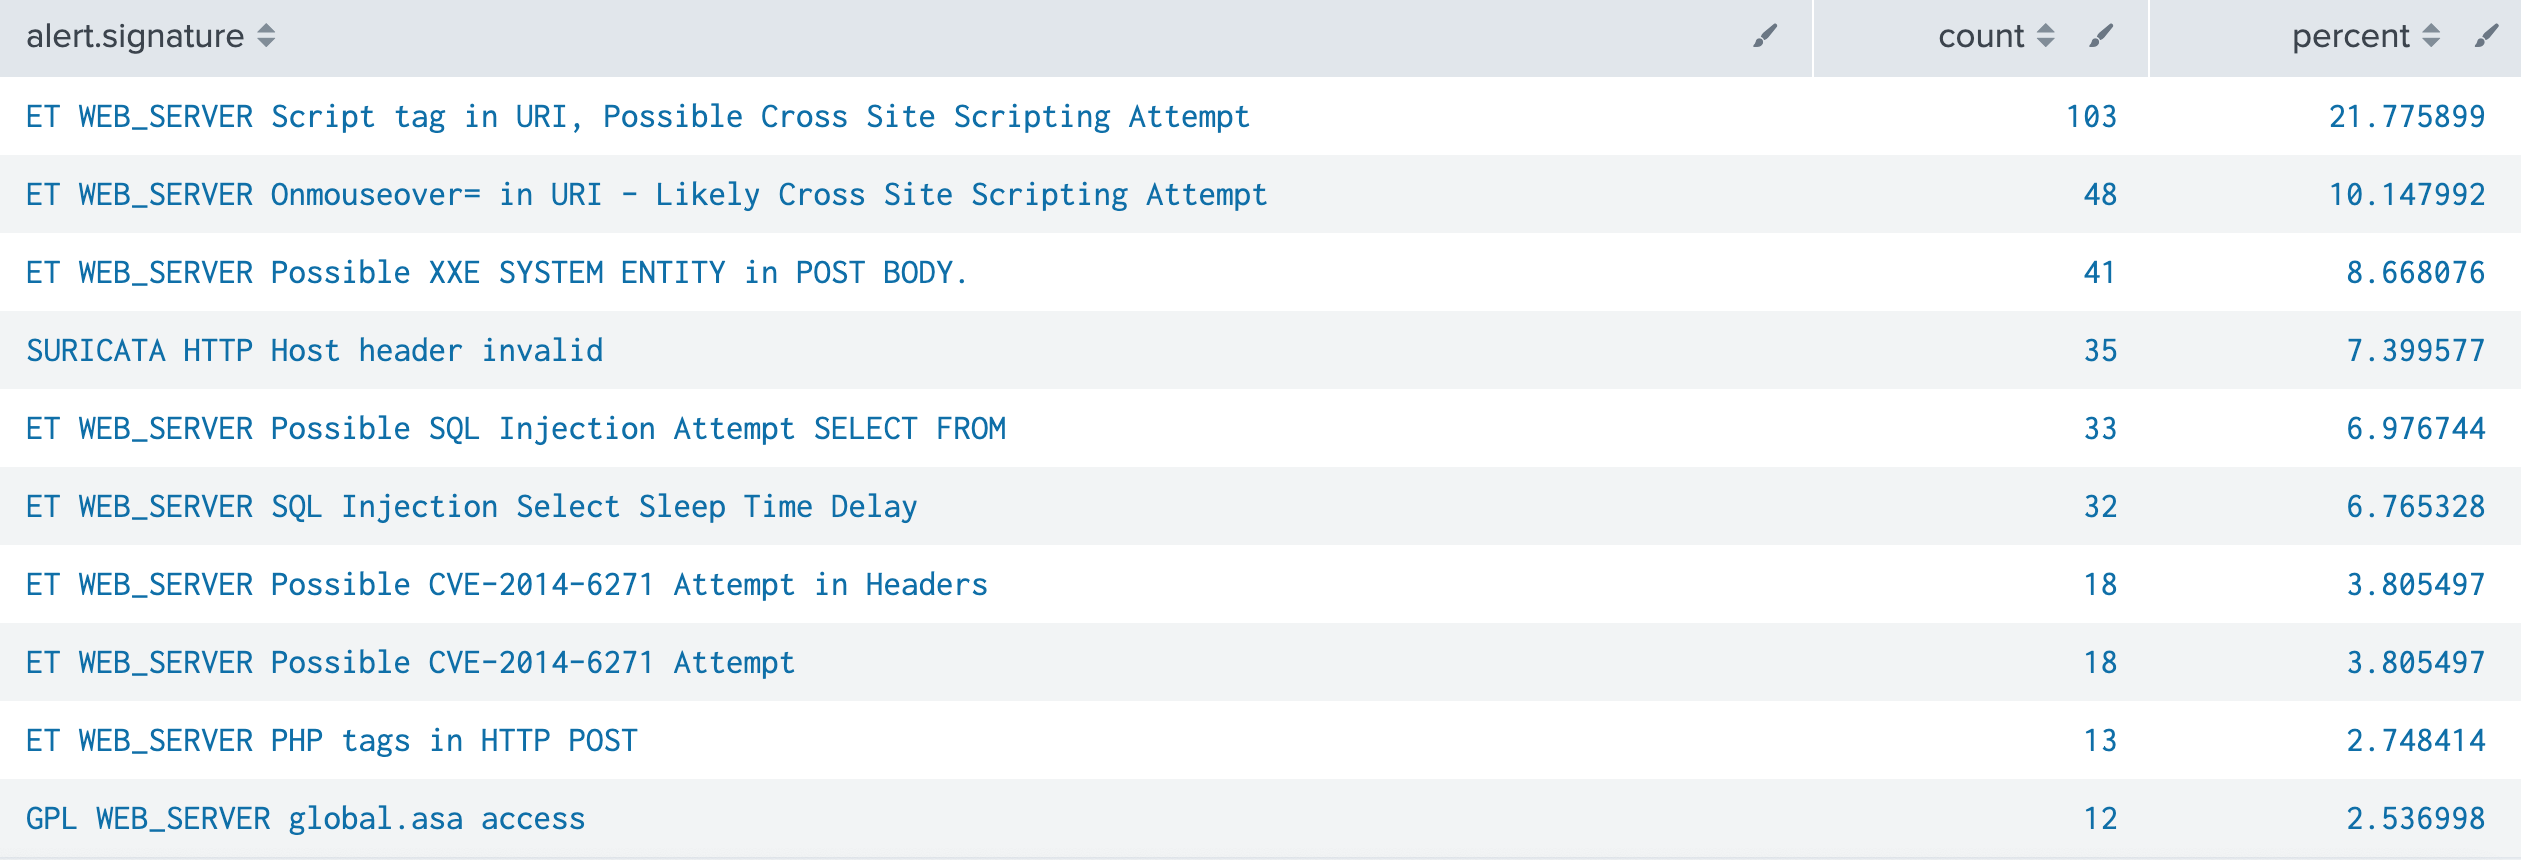
まーいろいろいろやられていますね
Another Option: Search Stream sourcetype and Count the src_ip
Keep in mind there are a number of ways to conduct these searches so there isn’t a single right way to find the answer. Using our answers from another data source helps us validate our findings.
これらの検索を実行する方法は多数あるため、答えを見つける正しい方法は1つではありません。別のデータソースからの回答を使用すると、調査結果の検証に役立ちます。
23.22.63.114も頭に置いておきなさいよということですね。
Identifying The Web Vulnerability Scanner
acunetixを使用していることを突き止めようとしている。
クエリーはsrcをsrc_ipに変更する必要あり。
Examine http_user_agent on 40.80.148.42
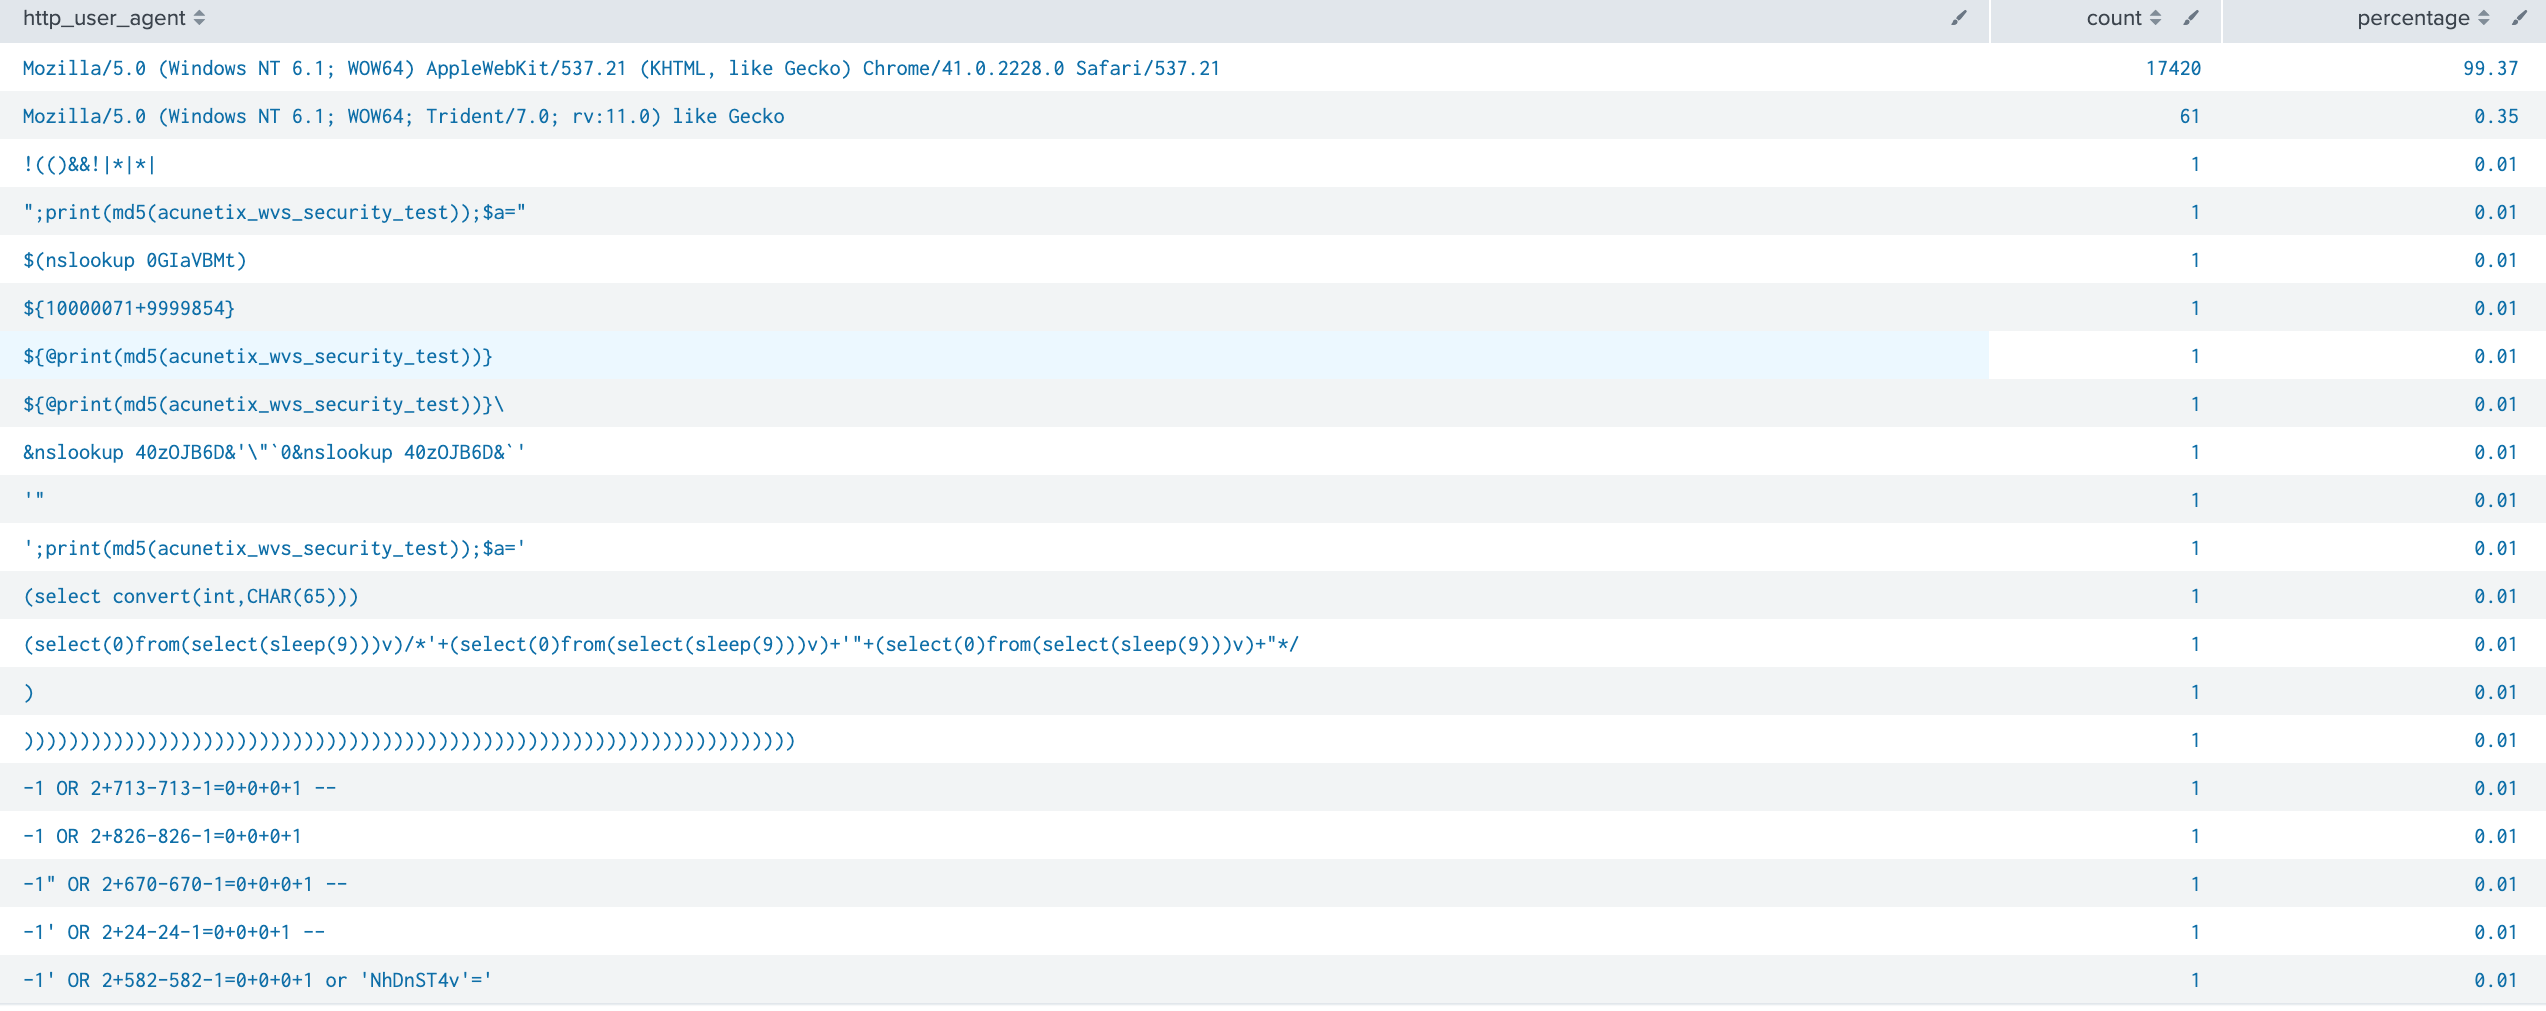
わかりやすい。
Determining Which Web Server is the Target
Finding the Server IP
index=botsv1 src_ip=40.80.148.42 sourcetype=stream:http | top dest_ip

192.168.250.70が大部分を占めている。
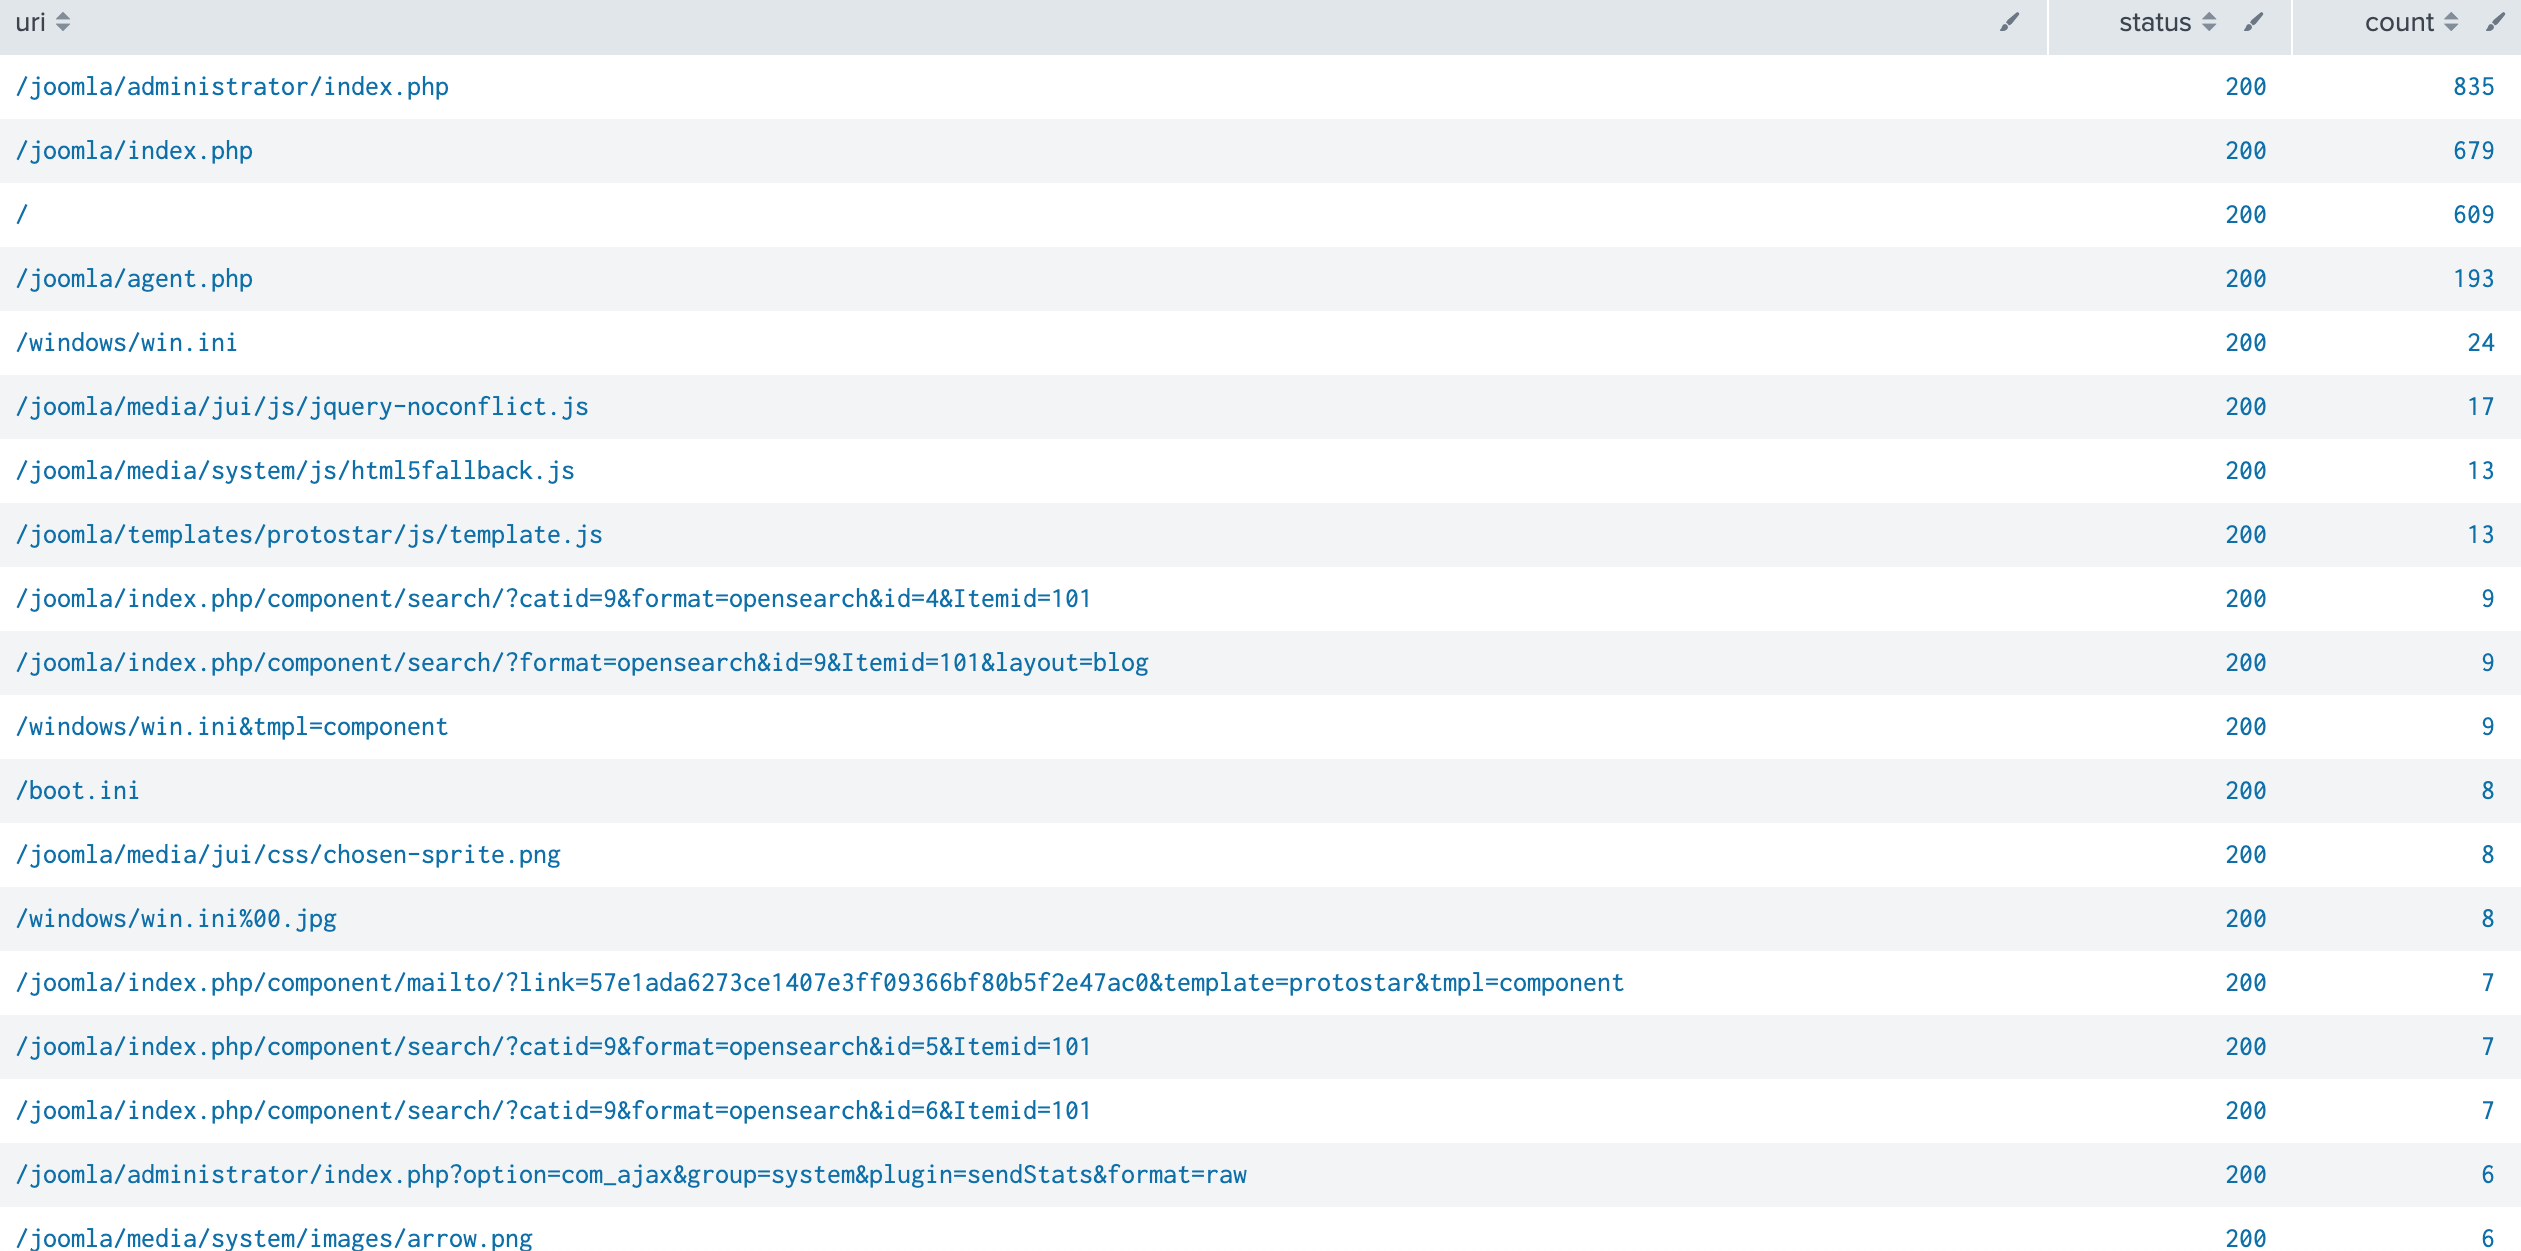
Examine URIs On the Web Server IP
index=botsv1 dest_ip=192.168.250.70 sourcetype=stream:http | top uri
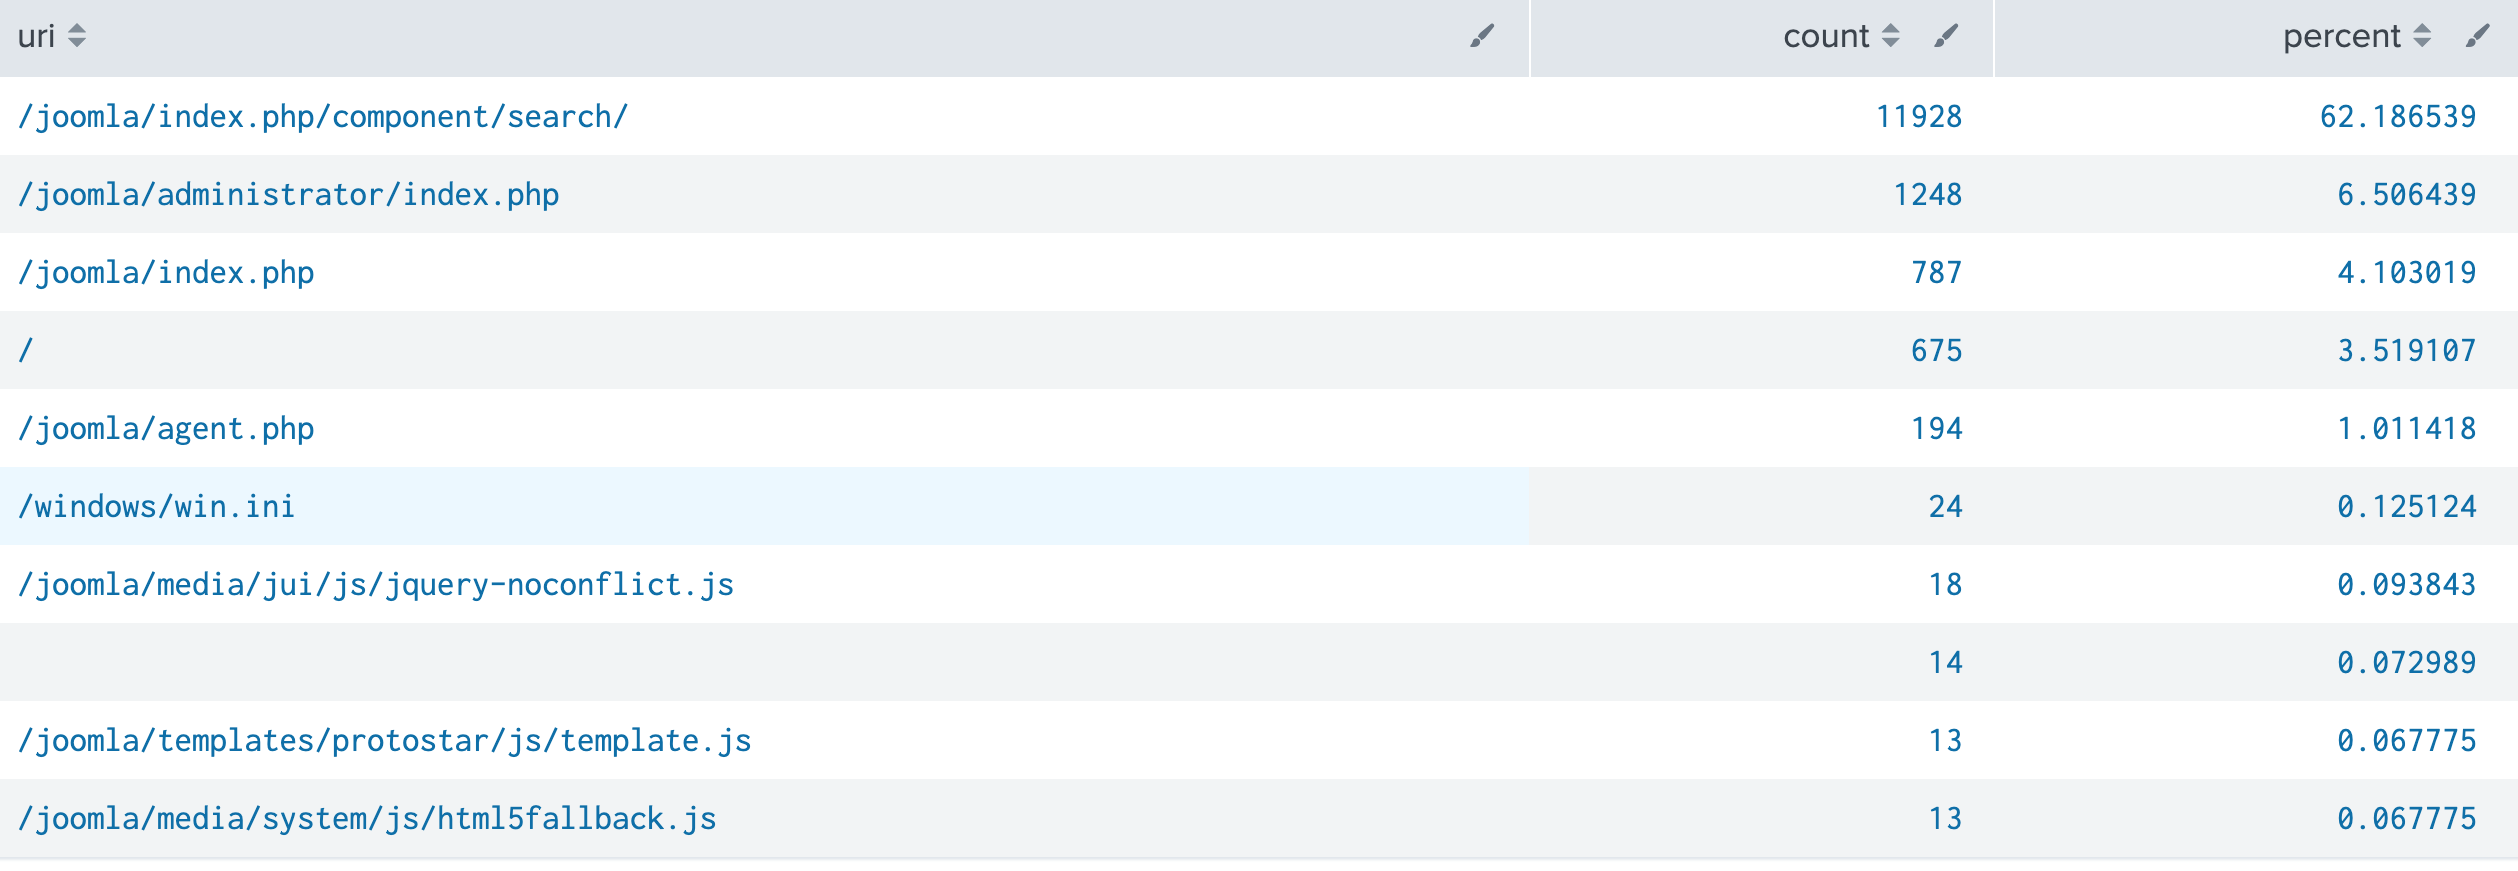
searchが多いのもあるし、windows/wininiって・・・・
Confirm Our Suspicions Adding in Successful Page Loads
Appsではstatus=200で検索しているけど、200だけだと心配ということで、クエリーを変更
レスポンスコードの詳細はこことか
index=botsv1 dest_ip=192.168.250.70 sourcetype=stream:http status=2* OR status=3* OR status=5*
| stats count by uri ,status
| sort status, - count
本来なら404を返してもおかしくないところで200が帰っているのがわかる。
次にAppsではiisで検索している。stream:http版は以下のとおり。
index=botsv1 dest_ip=192.168.250.70 sourcetype=stream:http status=2* OR status=3* OR status=5*
| stats values(uri) by status
数の違いは、strem:httpはトラフィックをそのまま記録しているからIIS(この場合_joomla_)以外のHTTPアクセスも記録されている場合がある。
Reconnaissanceの項目はこれで終了。長くなったので、一旦おしまいとします。