Greasmonkeyについて知らなかったので調査と適当にスクリプトを作ってみたのでその時のメモ
参考
Greasmonkeyとは?
- FirefoxやGoogleChromeなどのブラウザのアドオン
- インストールすることで各種Webサイトで任意のJavaScriptを実行することができる
- 上記によってHTML要素や機能、CSSの変更などができる
- 実行するJavaScriptはユーザースクリプトと言い、自分で作成する事ができる
準備
まず、FirefoxにGreasmonekyのアドンオンをインストールします。
インストールして再起動後、アドオンの表示欄に猿のアイコンが表示されればOKです。
ユーザースクリプトを作成してみる
ユーザースクリプトを作成してみましょう。
Firefoxを開いて、猿アイコン右の矢印を選択後、「ユーザースクリプト新規作成」を選択します。
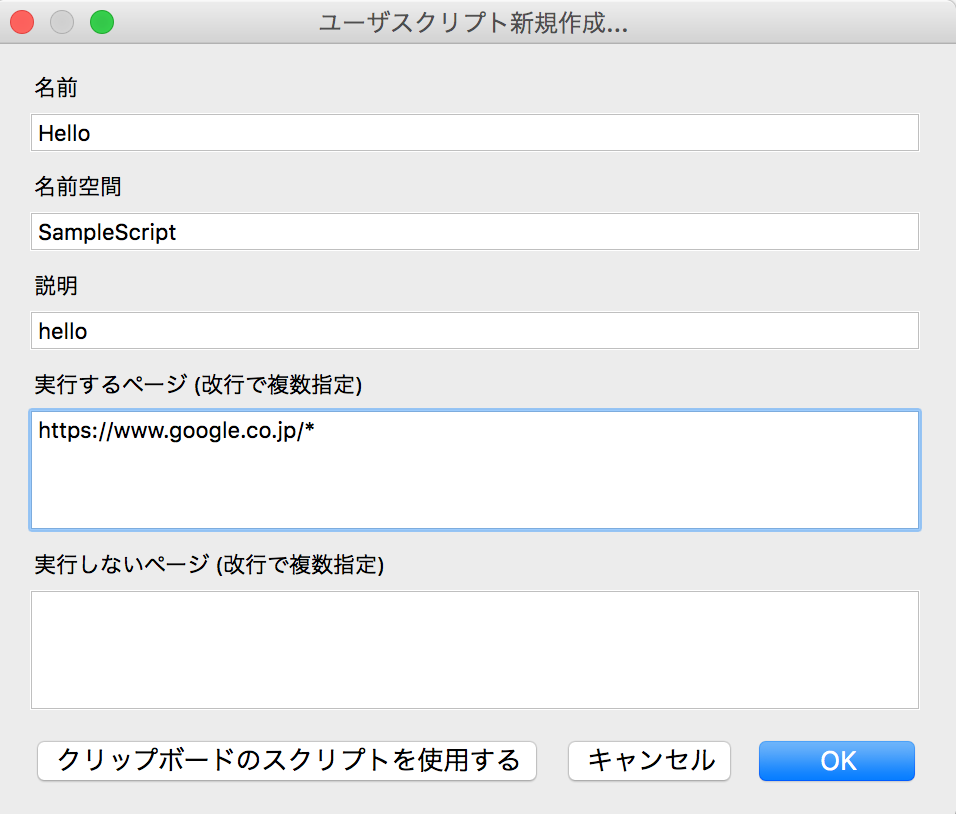
その後画面が表示され、スクリプト名やスクリプト名を実行するサイトのURLや実行しないURLなどを記入します。
今回はGoogleトップページのみで実行できるように以下のようにします。
OKを選択後、エディタが開くので以下のように追記します。
// ==UserScript==
// @name        Hello
// @namespace   SampleScript
// @description helloworld
// @include     https://www.google.co.jp/*
// @version     1
// @grant       none
// ==/UserScript==
(function () {
  alert('Hello, monkey!');
})();
追記後、Ctrl+Sで保存し、Googleトップページを開いてみます。
うまくできている場合、「Hello, monkey!」というアラートが表示されます。
もう少し何か書いてみる
以下を参考にGoogle検索時のページに更新日時によるフィルターリンクを追加してみました。(はみ出てますが。。。)
Firebugで作るGreasemonkeyスクリプト~入門と実践(From Kanasan.JS)
// ==UserScript==
// @name        Hello
// @namespace   SampleScript
// @description helloworld
// @include     https://www.google.co.jp/#q=*
// @version     1
// @grant       none
// ==/UserScript==

function createMyLi(href, text) {
  var li = document.createElement('li');
  var a = document.createElement('a');

  var textNode = document.createTextNode(text);
  a.setAttribute('href', href);
  a.appendChild(textNode);
  li.appendChild(a);

  return li;
}

function createMyDiv() {
  var div = document.createElement('div');
  var ul = document.createElement('ul');
  // 現在のURLを取得
  var url = window.location.href;
  console.log(url);
  // 既にパラメーターが設定されている場合には削除
  url = url.replace(/&tbs=qdr:[hdmwmy]/, '');
  var QUERY='&tbs=qdr:'

  ul.appendChild(createMyLi(url+QUERY+'h', '1時間以内'));
  ul.appendChild(createMyLi(url+QUERY+'d', '24時間以内'));
  ul.appendChild(createMyLi(url+QUERY+'w', '1週間以内'));
  ul.appendChild(createMyLi(url+QUERY+'m', '1ヶ月以内'));
  ul.appendChild(createMyLi(url+QUERY+'y', '1年以内'));
  div.appendChild(ul);

  return div;
}

(function () {
  console.log('start!');

  var div = createMyDiv();
  var searchButton = document.getElementById('sblsbb');
  console.log(searchButton);
  searchButton.appendChild(div);

})();
これによって本来は2クリック必要な遷移が1クリックでできるようになりました。
次、時間あれば以下などを確認して、良さげな開発環境作りたいです。

