swift4でLineログインとFacebookログインを実装してみた
- Cocoapods
- Info.plist
- AppDelegate.swift
- Lineログイン
- Facebookログイン
- Facebookフレンド
Cocoapods
  pod 'LineSDK', '~> 4.1.0'
  pod 'FacebookCore'
  pod 'FacebookLogin'
  pod 'FacebookShare'
上記を追加。
Info.plist
<key>LineSDKConfig</key>
	<dict>
		<key>ChannelID</key>
		<string>※LineDevに記載されてるID</string>
	</dict>
	<key>CFBundleURLTypes</key>
	<array>
		<dict>
			<key>CFBundleTypeRole</key>
			<string>Editor</string>
			<key>CFBundleURLSchemes</key>
			<array>
				<string>line3rdp.$(PRODUCT_BUNDLE_IDENTIFIER)</string>
				<string>※FacebookDevに記載されてるfb+AppID</string>
			</array>
		</dict>
	</array>
	<key>FacebookAppID</key>
	<string>※FacebookDevに記載されてるAppID</string>
	<key>FacebookDisplayName</key>
	<string>※Facebookアプリ名</string>
	<key>LSApplicationQueriesSchemes</key>
	<array>
		<string>line</string>
		<string>lineauth</string>
		<string>line3rdp.$(PRODUCT_BUNDLE_IDENTIFIER)</string>
		<string>fbapi</string>
		<string>fb-messenger-share-api</string>
		<string>fbauth2</string>
		<string>fbshareextension</string>
	</array>
「※」のついてるが各自の設定に合わせて変更する箇所です。
Line、Facebook共に公式チュートリアルに書いてあるので、詳しくはそちらを参考に。
AppDelegate
import FacebookCore
import FacebookLogin
import LineSDK
func application(_ application: UIApplication, didFinishLaunchingWithOptions launchOptions: [UIApplicationLaunchOptionsKey: Any]?) -> Bool {
        // Override point for customization after application launch.

        // for Facebook
        //Facebook初期化
        SDKApplicationDelegate.shared.application(application, didFinishLaunchingWithOptions: launchOptions)
        return true
    }

    // MARK: - for Line, facebook login

    func application(_ app: UIApplication, open url: URL, options: [UIApplicationOpenURLOptionsKey : Any] = [:]) -> Bool {
        if LineSDKLogin.sharedInstance().handleOpen(url) {
            return true
        }
        if SDKApplicationDelegate.shared.application(app, open: url, options: options) {
            return true
        }
        return false
    }

    // MARK: - for facebook log

    func applicationDidBecomeActive(_ application: UIApplication) {
        // Call the 'activate' method to log an app event for use
        // in analytics and advertising reporting.
        AppEventsLogger.activate(application)
    }
わざと最初から存在するコメントも残したので、どのfuncかわかりやすければ幸いです。
とにかくAppDelegateは似たfuncが羅列するから。。。
AppEventsLogger.activate(application)
はログインとは別で、ログ用ですね。
必要なければ無視してください。
Lineログイン
Lineログインコード編
とりま、ログインのボタンを置くコントローラーをLoginViewController.swift、ログイン後の遷移segue idをgoViewControllerとします。
import LineSDK
/// Lineログインタップアクション
    @IBAction func lineLoginButtonTapped() {
        LineSDKLogin.sharedInstance().delegate = self // Lineログイン処理開始1
        LineSDKLogin.sharedInstance().start() // Lineログイン処理開始2(結果はextensionのdidLoginで受け取る)
    }
// MARK: - for Line

extension LoginViewController: LineSDKLoginDelegate {
    func didLogin(
        _ login: LineSDKLogin,
        credential: LineSDKCredential?,
        profile: LineSDKProfile?,
        error: Error?
        ) {

        log?.debug("login check!")

        if let _error = error {
            log?.error("error: \(_error.localizedDescription)")
            // 1. キャンセルあるいは設定ミスなどによりログインできなかった場合の処理
            return
        }

        // クレデンシャルの有無
        guard let _credential = credential,
            let _profile = profile else {
                log?.error("Failed to login by Line. credential or profile is nil.")
                return
        }

        // アクセストークンの有無
        guard (_credential.accessToken?.accessToken) != nil else {
            log?.error("Failed to login by Line. accessToken is not as String.")
            return
        }

//        /// 表示名(Line)
//        let userName = _profile.displayName
//        /// ユーザーID(Line)
//        let userId = _profile.userID
//        /// ステータスメッセージ(Line)
//        let statusMessage = _profile.statusMessage
//        /// 画像URL(Line)
//        let pictureUrl = _profile.pictureURL


        // 2. ログイン成功時ここにくる
        performSegue(withIdentifier: "goViewController", sender: nil)
    }
}
コードは簡単で、上記を追加するだけです。驚くほどあっという間にできました。
Lineログインデザイン編
続いてボタンのデザイン側をstoryboardで作ります。
LineDevの「ドキュメント>LINEログイン>LINEログインボタン デザインガイドライン」に書いてある「ダウンロードリンク:LINE Login button images」からボタンのzipをダウンロードし、
images.xcassets
に追加します。
その後Xcode上で開いて、ログインボタンの「Start Slicing」をクリック。
一番左の左右に伸ばすボタンをクリックして↓画像のようにストレッチ範囲を定めます。

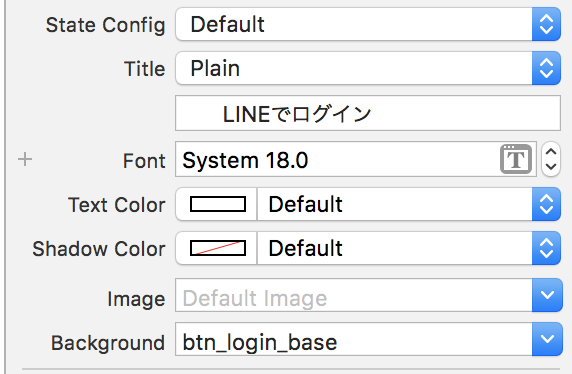
ストーリーボードではこんな感じ


また、タップ中はアイコンをそれと判るように変更することとガイドラインに定めてあるため、ハイライトも作ります。

btn_login_pressの方もストレッチ範囲の変更を忘れずに。
最後に、ボタンとコードの
    @IBAction func lineLoginButtonTapped() {
        LineSDKLogin.sharedInstance().delegate = self // Lineログイン処理開始1
        LineSDKLogin.sharedInstance().start() // Lineログイン処理開始2(結果はextensionのdidLoginで受け取る)
    }
を紐付けて完成です。
Facebookログイン
import FacebookLogin
    /// Facebook login したか
    var isFacebookLoggedin = false
    override func viewDidLoad() {
        super.viewDidLoad()

        /// Facebookログインボタン
        /// 欲しい情報の設定
        /// public_profile => プロフィール
        /// email          => メールアドレス
        /// user_friends   => フレンド情報
        /// userBirthday   => 生年月日
        let fbLoginBtn = LoginButton(readPermissions: [ .publicProfile, .email, .userFriends, .userBirthday ])
        fbLoginBtn.center = self.view.center
        fbLoginBtn.delegate = self
        self.view.addSubview(fbLoginBtn)
    }
    override func viewDidAppear(_ animated: Bool) {
        // Facebookログイン後に再度呼ばれる。perfromSegueはviewDidAppear以降に書かないとエラーになる
        if isFacebookLoggedin {
            self.performSegue(withIdentifier: "goViewController", sender: nil)
        }
    }
// MARK: - for Facebook

extension LoginViewController: LoginButtonDelegate {
    func loginButtonDidCompleteLogin(_ loginButton: LoginButton, result: LoginResult) {
        switch result {
        case .failed(let error):
            log?.debug(error)
            break
        case .cancelled:
            log?.debug("User cancelled login.")
            break
        //        case .success(let grantedPermissions, let declinedPermissions, let accessToken):
        case .success( _, _, _):
            log?.debug("Logged in with Facebook!")
            isFacebookLoggedin = true
        }
    }

    func loginButtonDidLogOut(_ loginButton: LoginButton) {
        log?.debug("Logged out with Facebook!")
        isFacebookLoggedin = false
    }
}
Facebookはコードしかいじりません。
ハマリポイントはコメントにあるこれ
「perfromSegueはviewDidAppear以降に書かないとエラーになる」
Lineの時はコールバック内で遷移コード書いて問題なかったのに、Facebookだとエラーになります。
エラーになるというか、エラーも出力されないので一見すると何も起きてないのに遷移しないというイミフな感じになるので注意です。(これでかなり時間を無駄にした)
なので、コールバック内ではフラグ管理だけして、viewDidAppear内で遷移するようにすると正常に動作します。
Facebookフレンド
おまけです。
ユーザー情報の取得と、ユーザーのフレンド情報の取得swif4対応版です。
import FacebookCore
import FacebookLogin

/// Facebookサービス
class FacebookService {
    // シングルトン化
    static var facebookService: FacebookService = {
        return FacebookService()
    }()

    // シングルトン化
    private init() {
    }

    func getFacebookData() {
        let params = ["fields": "id, email, gender, link, locale, name, timezone, updated_time, verified, last_name, first_name, middle_name, birthday"]
        let graphRequest = GraphRequest(graphPath: "me", parameters: params)
        graphRequest.start {(urlResponse, requestResult) in
            switch requestResult {
            case .failed(let error):
                log?.debug("error in graph request:", error)
                break
            case .success(let graphResponse):
                if let responseDictionary = graphResponse.dictionaryValue {
                    // ここに取得した結果からやりたいことを書く
                    // ↓こんな感じで取得(例:ファーストネーム)
                    let firstName: String = responseDictionary["first_name"] as! String
                }
            }
        }
    }

    func getFacebookFriendsData() {
        let graphRequest = GraphRequest(graphPath: "me/friends", parameters: [:])
        graphRequest.start {(urlResponse, requestResult) in
            switch requestResult {
            case .failed(let error):
                log?.debug("error in graph request:", error)
                break
            case .success(let graphResponse):
                if let responseDictionary = graphResponse.dictionaryValue {
                    //  友達の数を取得し次のリクエストのlimitに利用
                    let summary = responseDictionary["summary"] as! [AnyHashable: Any]
                    let counts = summary["total_count"] as! Int

                    let params = ["fields": "id, name, picture", "limit": "\(counts)"]
                    let graphReq = GraphRequest(graphPath: "me/taggable_friends", parameters: params)
                    graphReq.start {(urlRes, requestRes) in
                        switch requestRes {
                        case .failed(let error):
                            log?.debug("error in graph request:", error)
                            break
                        case .success(let graphRes):
                            // ここに取得した結果からやりたいことを書く
                            // ↓こんな感じで取得(例:id, 名前)
                            if let responseDic = graphRes.dictionaryValue {
                                // 友達を一人ずつ出力
                                let friends = responseDic["data"] as! [Any]
                                var count = 1
                                if let array = friends as? [[AnyHashable: Any]] {
                                    for friend : [AnyHashable: Any] in array {
                                        let name = friend["name"] as! String
                                        let id = friend["id"] as! String
                                        log?.debug("\(count) \(name)\(id)")
                                        count += 1
                                    }
                                }
                            }
                        }
                    }
                }
            }
        }
    }
}
以上です。
公式の日本語はobjective-cという過去の遺産でまだ書いていたので、swift4版をまとめてみました。
あと、本来であれば参考URLをペタペタ貼ってくのですが、日にちおいてしまって判らなくなってしまったので、参考にさせていただいた方には申し訳ありませんが割愛させていただきます。
ありがとうございました。