どうもこんにちは、忘年会をなかなか開催できず今年は悲しいTOSHです。
本日はZOZOテクノロジーズアドベントカレンダー17日目を担当させてもらいます!
はじめに
さて、iOSエンジニアなら誰でも、CollectionViewを使っていますよね。
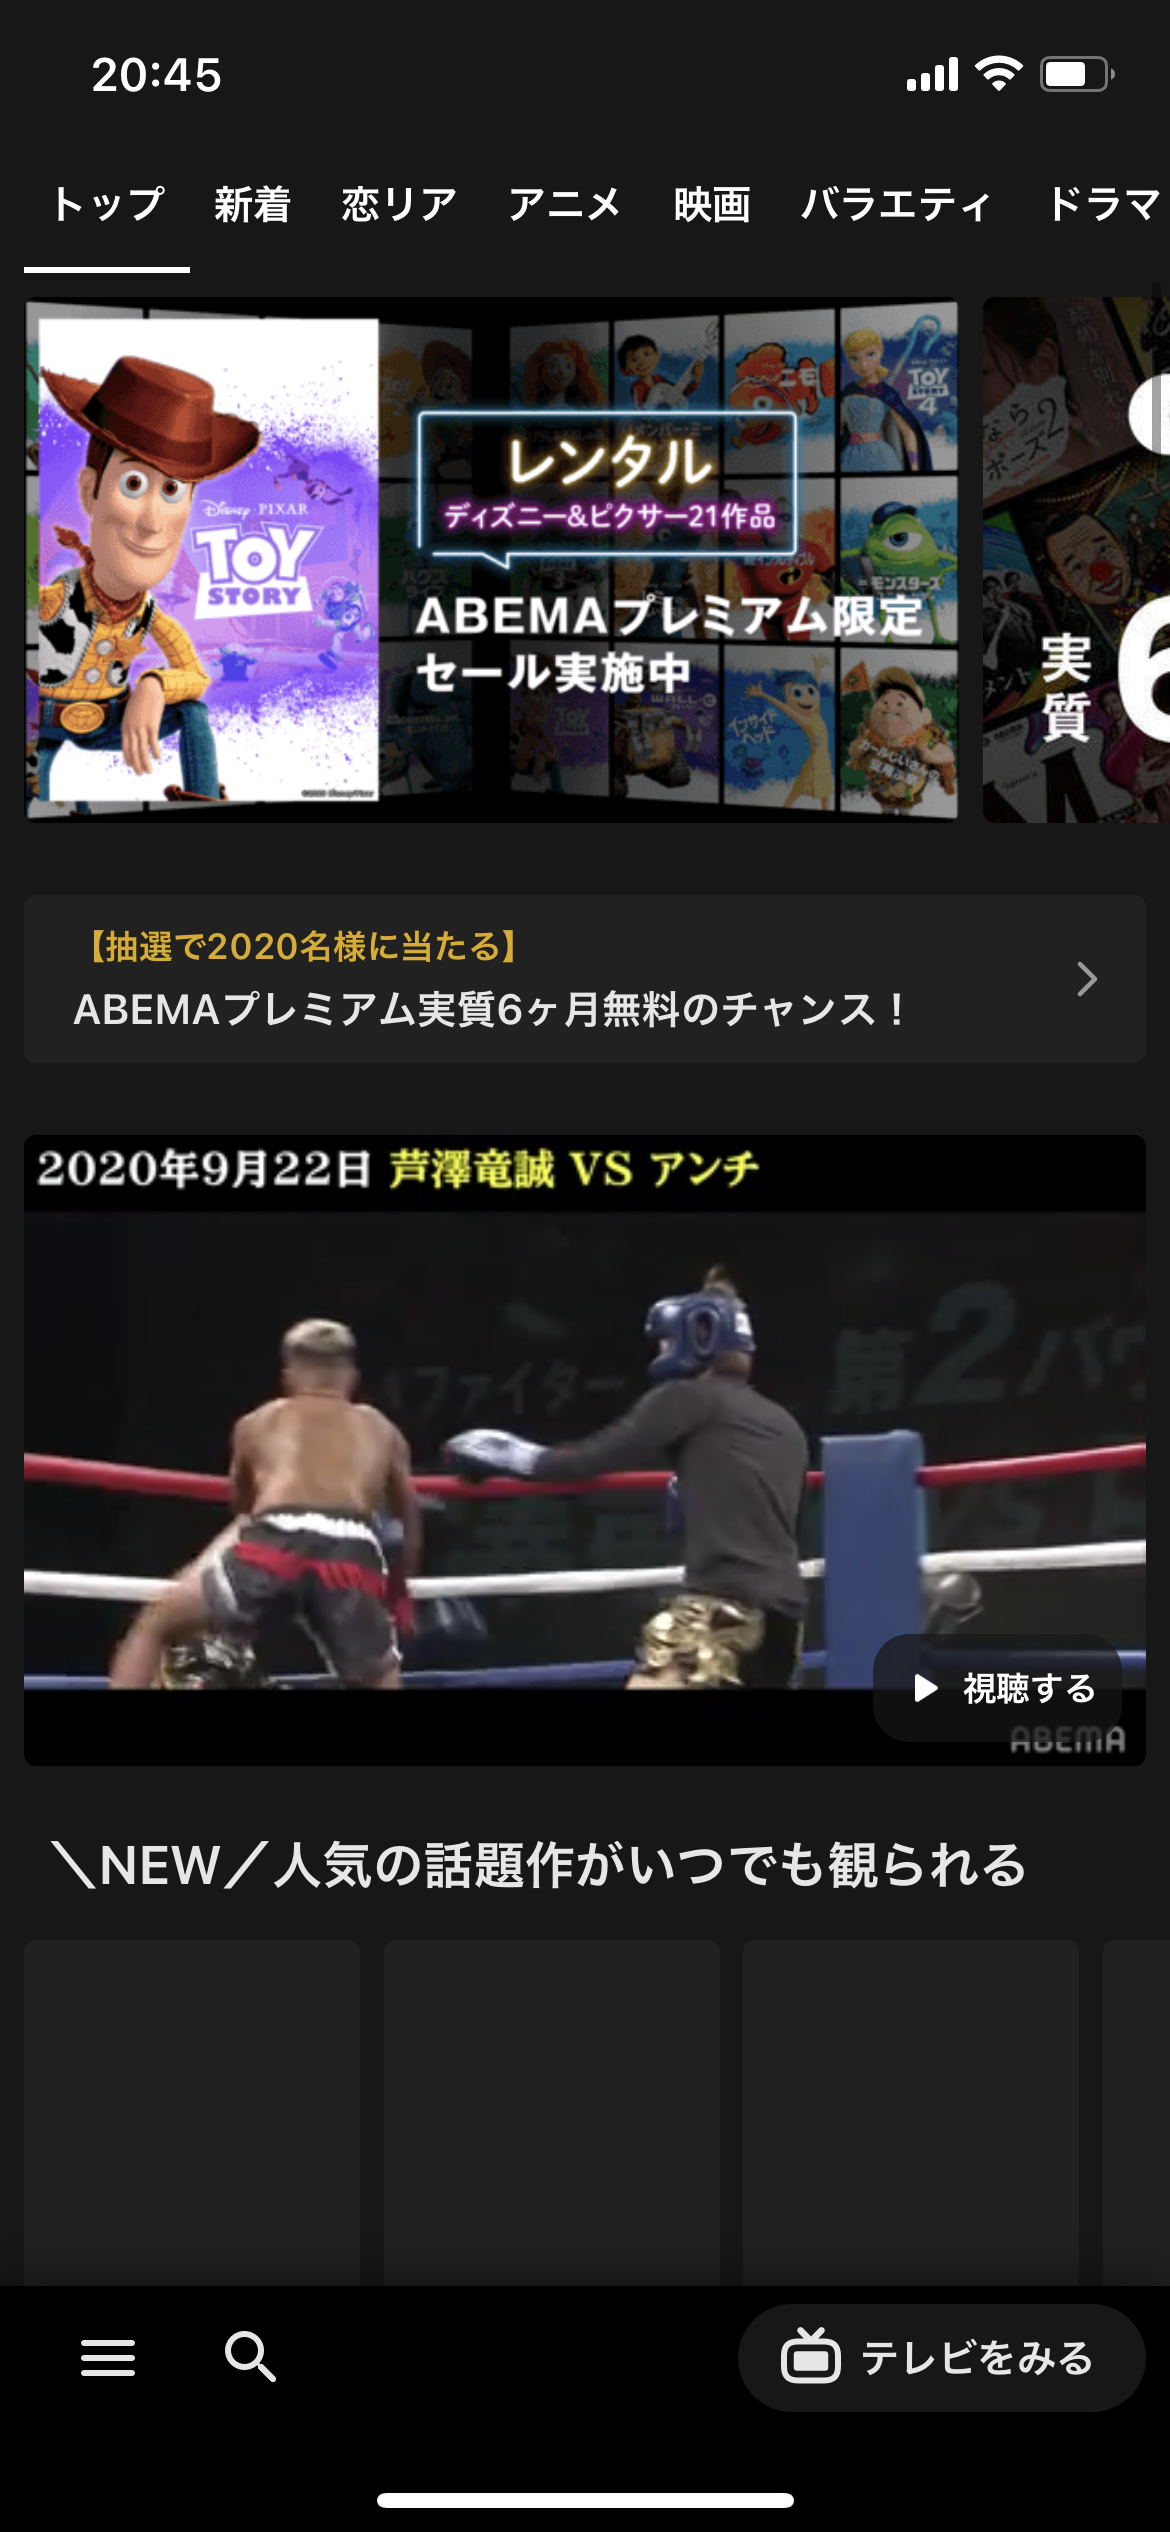
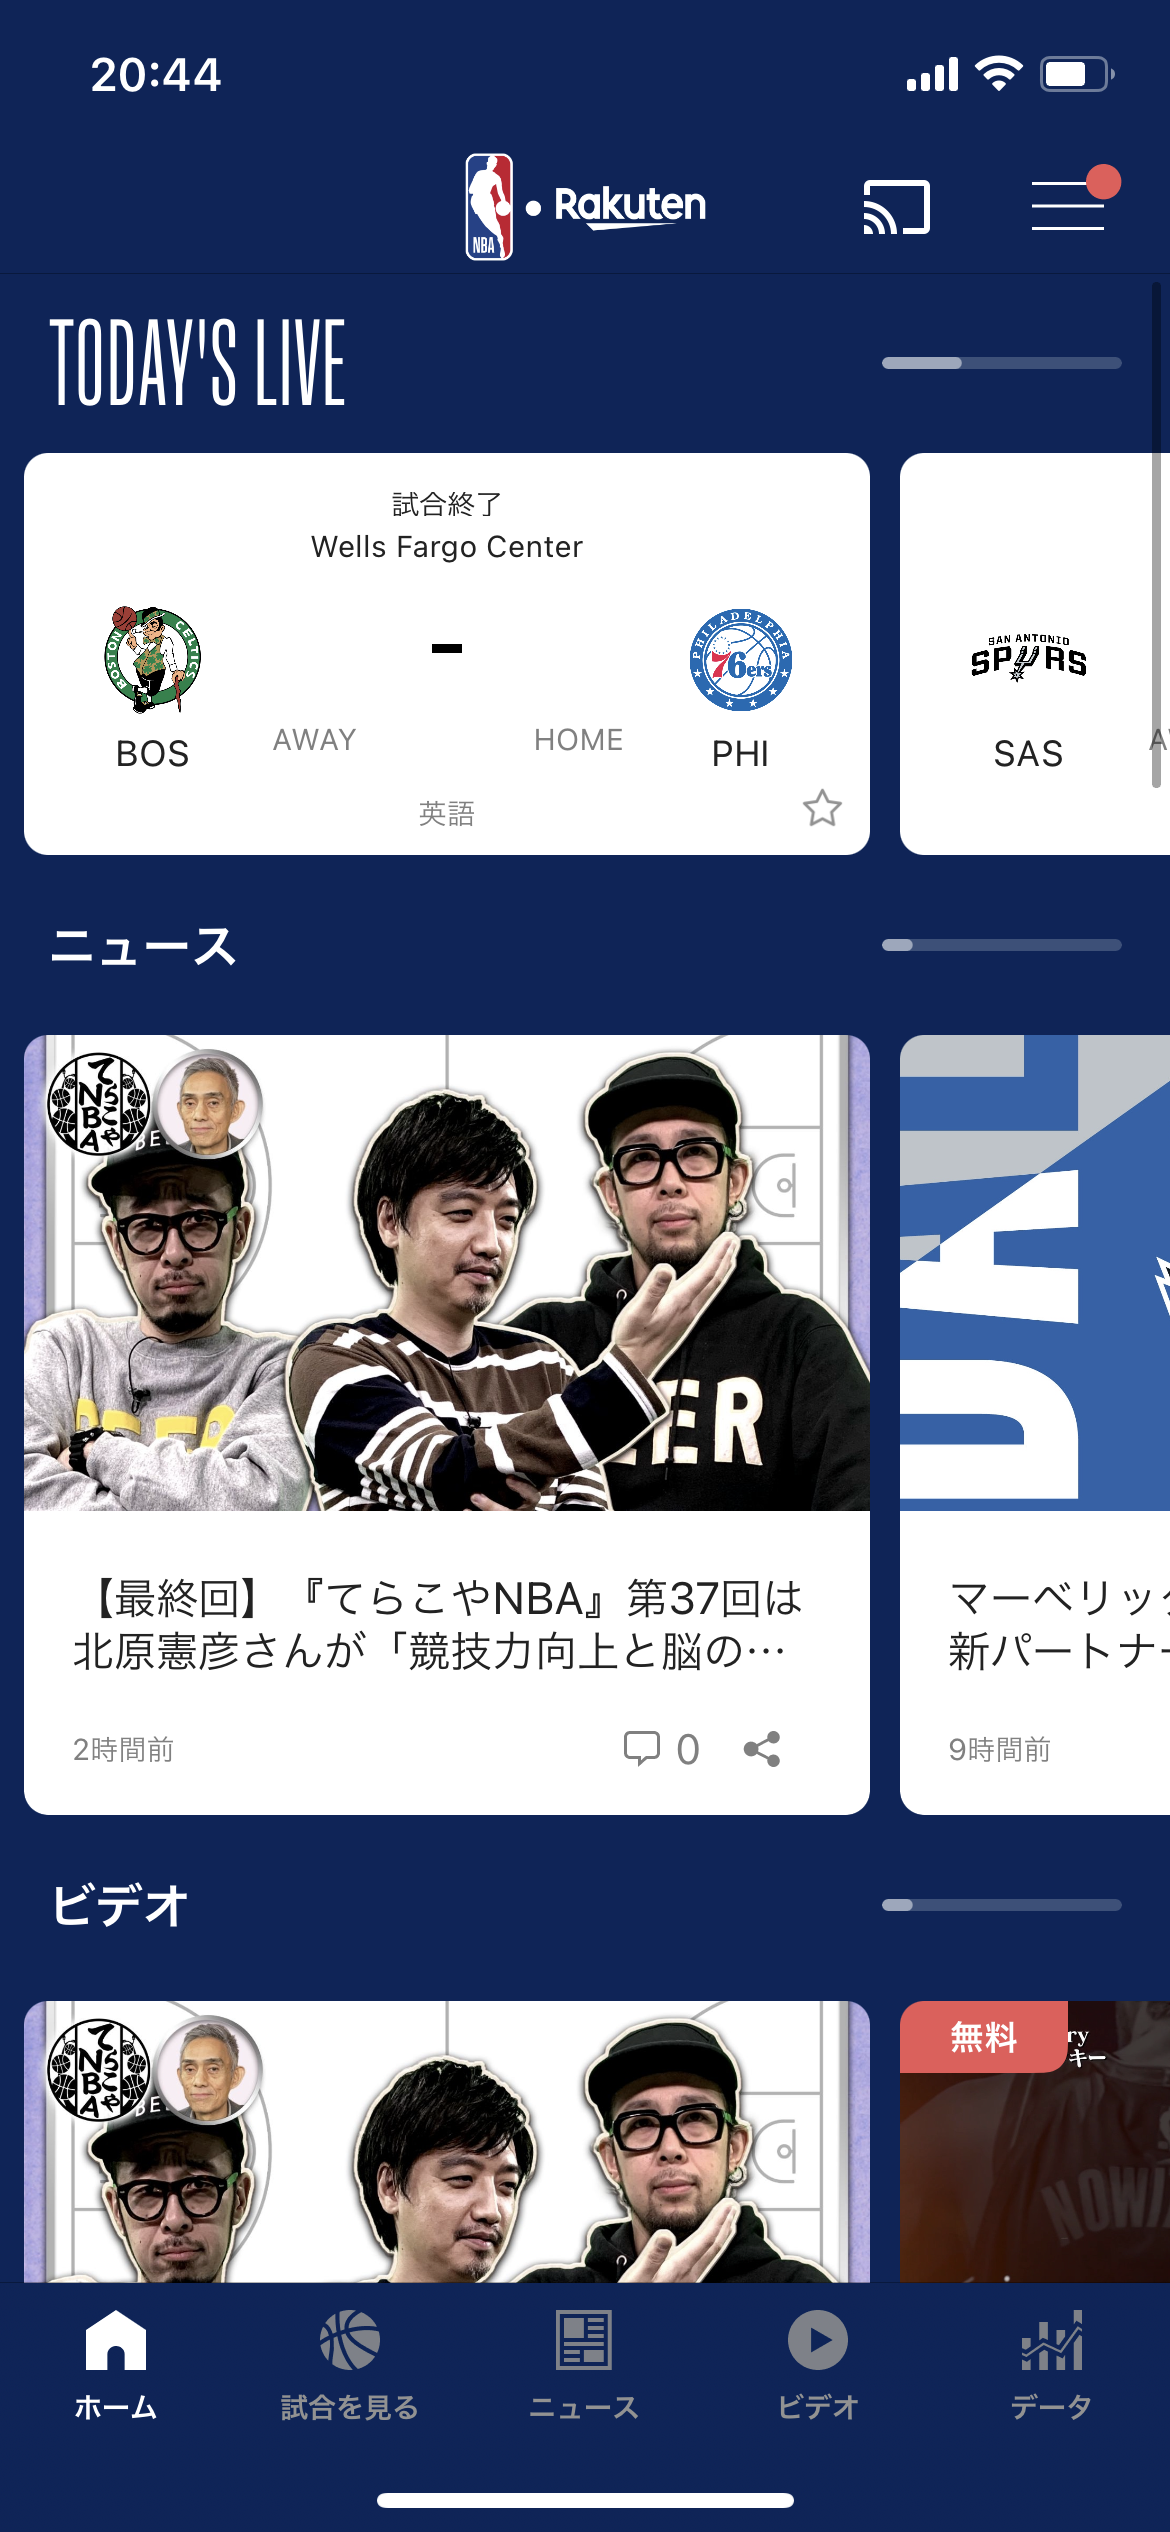
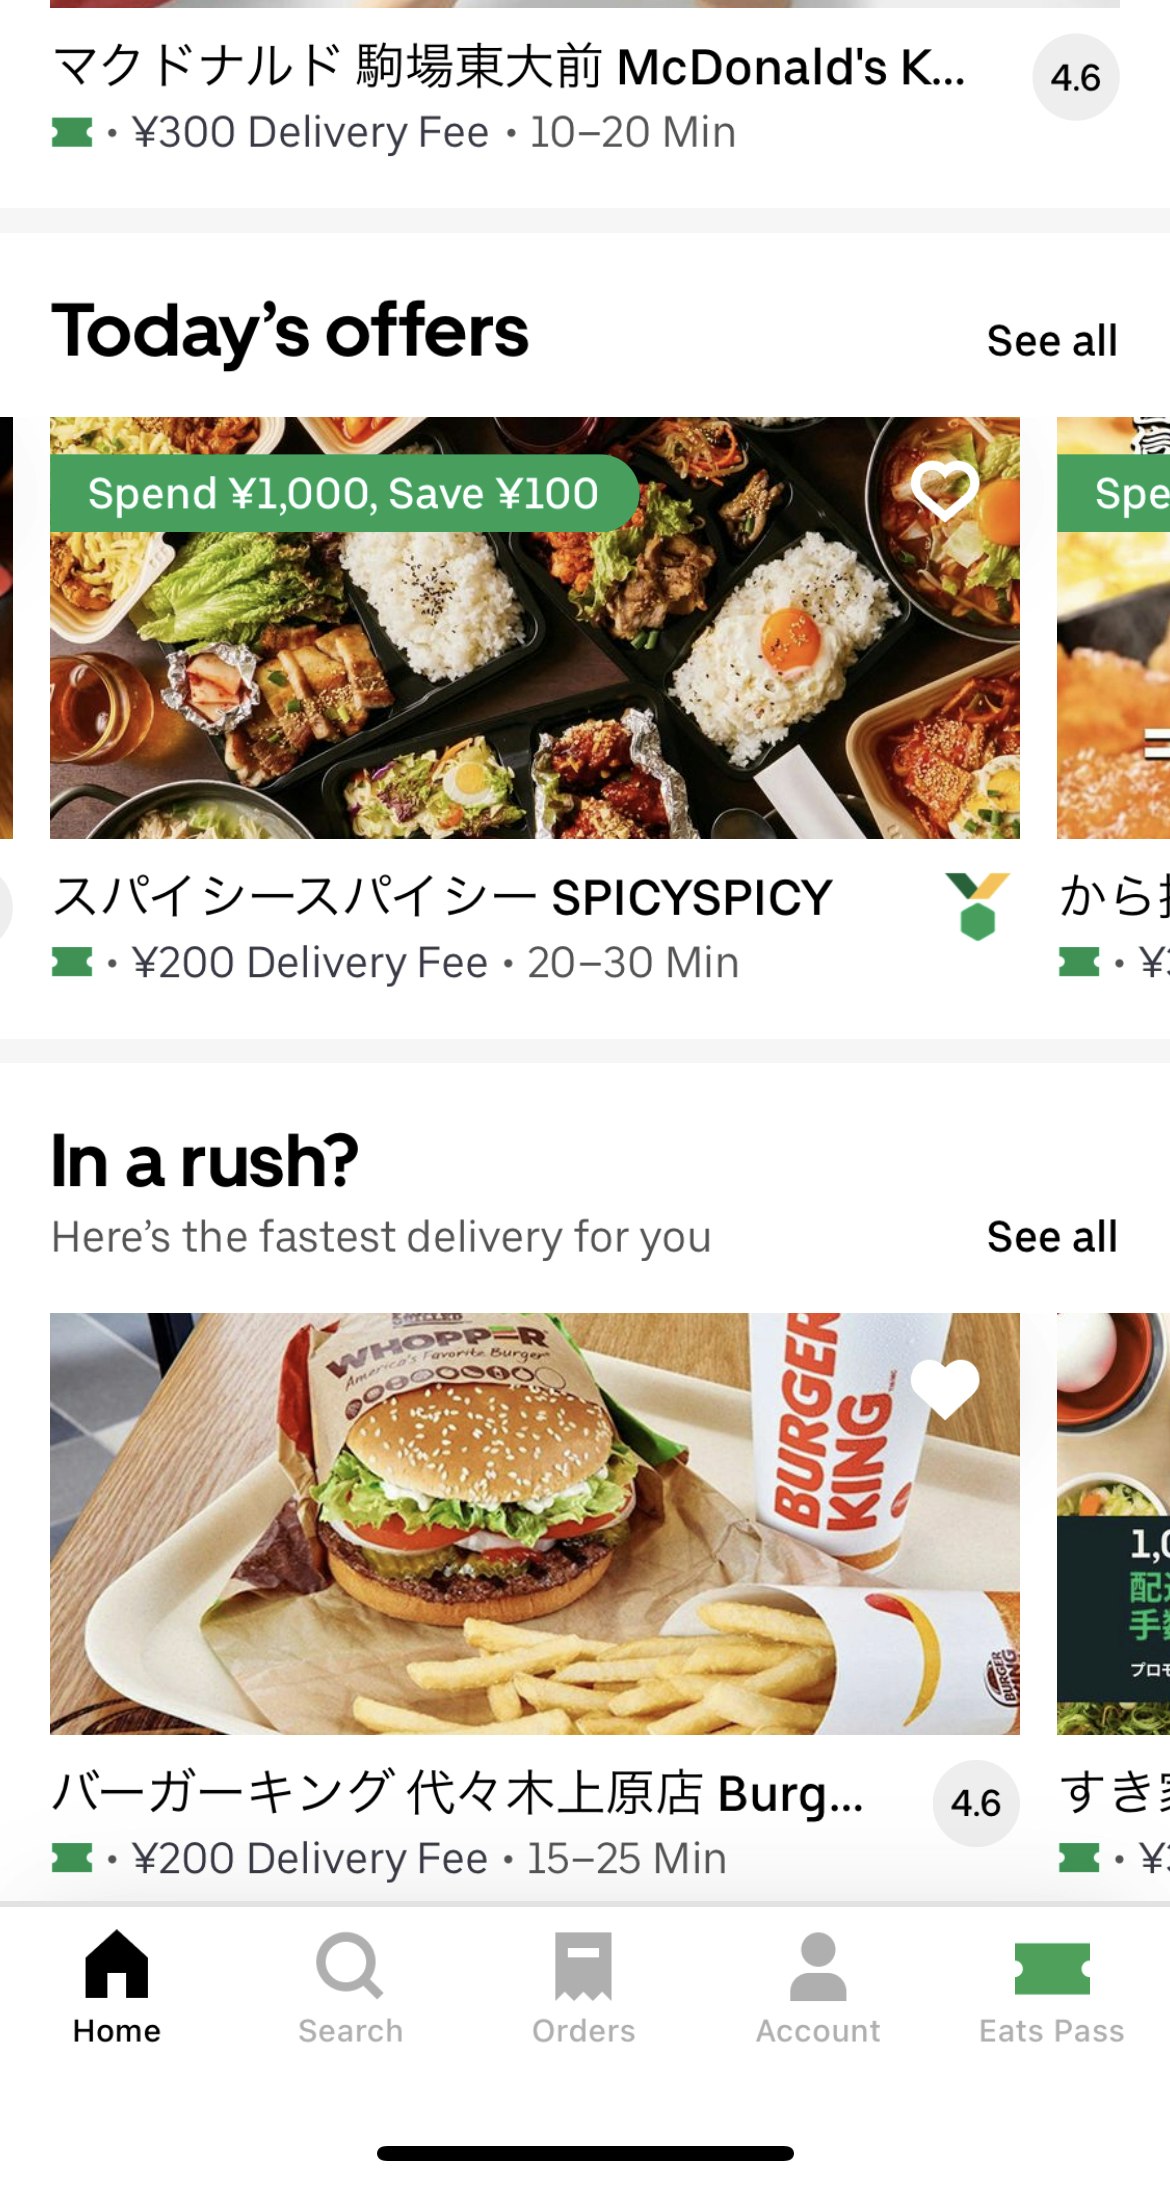
ただ、皆さん薄々感づいているように、アプリのUIは依然と比べて、ますます複雑なものになってきています。
以下例
| AbemaTV | RakutenNBA | UberEats | AppleStore |
|---|---|---|---|
 |
 |
 |
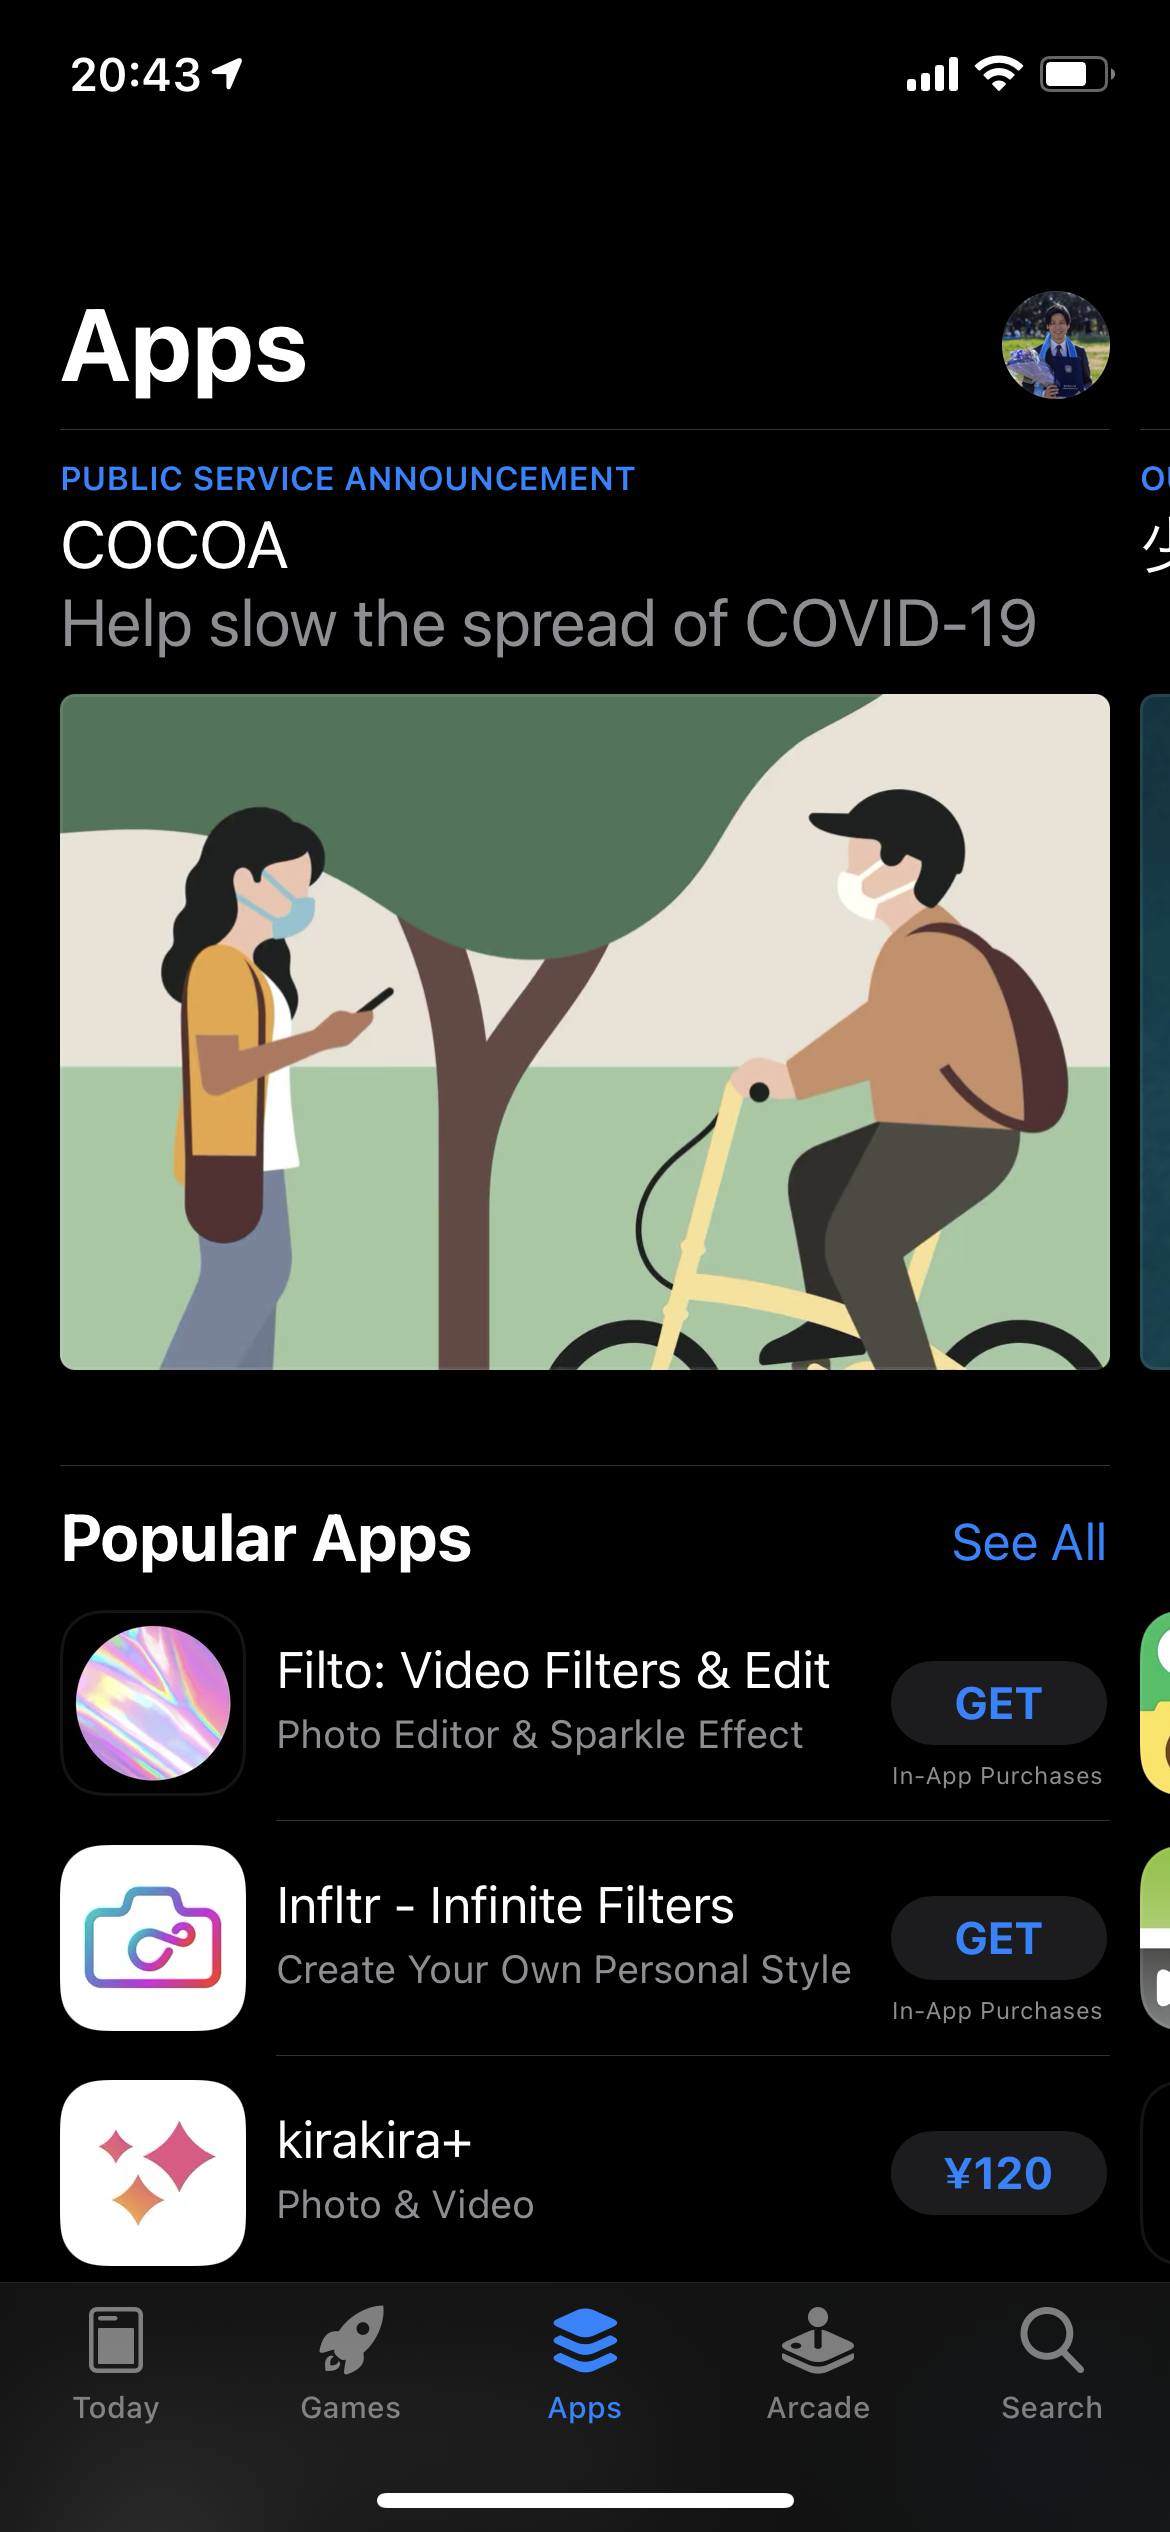 |
エンジニアからしたら、これらを実装するのに、まず、全体をTableViewでおいて、そのCellのなかにCollectionViewをおいて、その中でHorizontalになるように全体をLayoutって...難しいですよね。
そして何より、どんどん中身をネストしていくっていうのはやっぱり大変。
Apple様も薄々そんなことには気づいており、WWDC19では、CompositionalLayoutを新しく発表しました。
しかし、、、対応しているのはiOS13以降。業務だとiOS12を切るという選択肢はなかなか難しく、結局、力技で実装することになる。
そんな皆様に朗報です!弊社技術顧問の岸川さんが、iOS12でもCompositionalLayoutを使用できる、ライブラリを作成してくれていました!
https://github.com/kishikawakatsumi/IBPCollectionViewCompositionalLayout
ということで、この記事では、実際に運用する上で、どのような設計で作成するとうまく使用しやすいのかを紹介していきたいと思います〜
ちなみに、AppStoreでも使用されているバナーを中央で止める方法はCookPadさんが紹介をしていますが、まあ大変。。。
前提
- CollectionViewを普段から使用している人
- 最適な設計を探している人
- CompositionalLayoutに初めて挑戦する人
CompositionaLayoutの基本概念
詳しい内容については、こちらを参考にしてください。
https://developer.apple.com/documentation/uikit/views_and_controls/collection_views/layouts
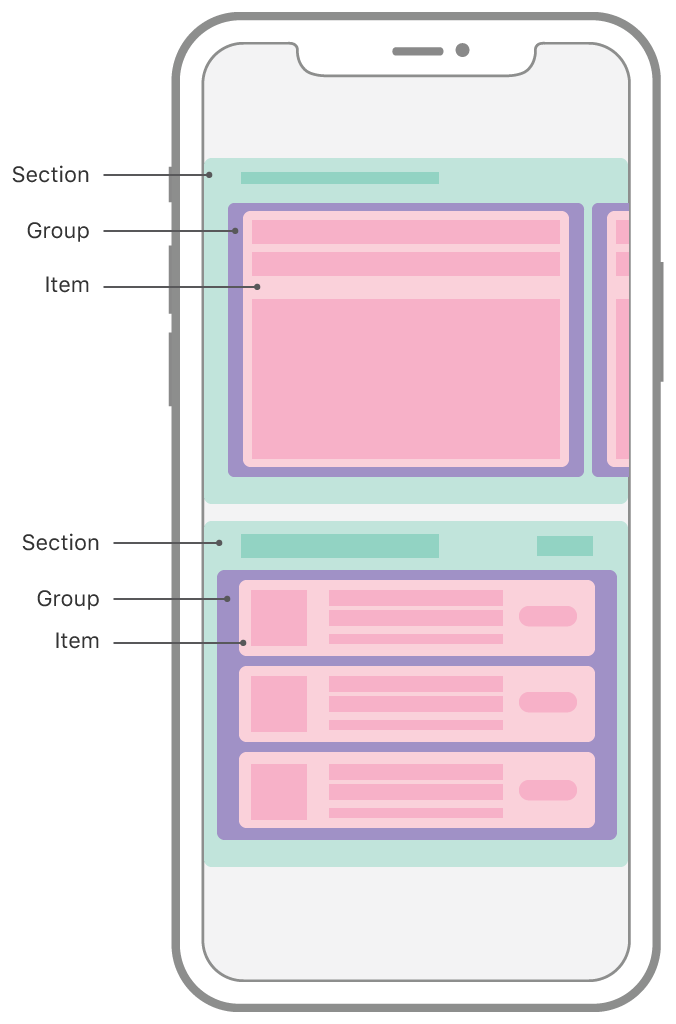
*Appleのホームページより引用
特にカスタムItemにUIcollectionViewCellを乗せていくイメージでいいと思います。
実装方法
では、実際に実装をしていきましょう。
各セクションの設定
まずは、セクションのProtocolを作成します。
protocol Section {
    // 各セクションにおくアイテムの数
    var numberOfItems: Int { get }
    // 各セクションのアイテムがタップされた際の処理
    // クロージャーで設定をしておくと、VC側から処理を追加できる
    var didSelectItem: ((Int) -> Void)? { get }
    // ここで、実際にレイアウトを組んでいきます
    func layoutSection() -> NSCollectionLayoutSection
    // Itemとして使用するCellの設定はここで行います。
    func configureCell(collectionView: UICollectionView, indexPath: IndexPath) -> UICollectionViewCell
}
VC側での初期設定
VC側では、先ほど作成した、Sectionの配列を使用するイメージです。
import UIKit

final class ViewController: UIViewController {
    override func viewDidLoad() {
        super.viewDidLoad()

        collectionView.delegate = self
        collectionView.dataSource = self
    }

    @IBOutlet weak var collectionView: UICollectionView!

    // Sectionのレイアウトをここでセットできる形にする
    private var collectionViewLayout: UICollectionViewLayout {
        let sections = self.sections
        let layout = UICollectionViewCompositionalLayout { (sectionIndex, environment) -> NSCollectionLayoutSection? in
            return sections[sectionIndex].layoutSection()
        }
        return layout
    }

    private var sections: [Section] = [] {
        didSet {
            // sectionsが更新されたらレイアウトも更新する
            collectionView.collectionViewLayout = collectionViewLayout
            collectionView.reloadData()
        }
    }
}

// dataSourceの設定
extension ViewController: UICollectionViewDataSource {
    func numberOfSections(in collectionView: UICollectionView) -> Int {
        return sections.count
    }

    func collectionView(_ collectionView: UICollectionView, numberOfItemsInSection section: Int) -> Int {
        return sections[section].numberOfItems
    }

    func collectionView(_ collectionView: UICollectionView, cellForItemAt indexPath: IndexPath) -> UICollectionViewCell {
        return sections[indexPath.section].configureCell(collectionView: collectionView, indexPath: indexPath)
    }
}

// delegateの設定
extension ViewController: UICollectionViewDelegate {
    func collectionView(_ collectionView: UICollectionView, didSelectItemAt indexPath: IndexPath) {
        guard let didSelectItem = sections[indexPath.section].didSelectItem else {
            return
        }
        didSelectItem(indexPath.row)
    }
}
実際にSectionを作成する
今回、Item用のcellは予め作成しておいた前提で進めます。
// Sectionを継承します
struct ItemsSection: Section {
    var didSelectItem: ((Int) -> Void)?

    private var items: [Items] = []
    var numberOfItems: Int {
        self.items.count
    }

    func layoutSection() -> NSCollectionLayoutSection {

        // Itemについてのレイアウト設定
        let itemSize = NSCollectionLayoutSize(widthDimension: .fractionalWidth(1), heightDimension: .fractionalHeight(1))
        let item = NSCollectionLayoutItem(layoutSize: itemSize)

        // groupについてのレイアウト設定
        let groupSize = NSCollectionLayoutSize(widthDimension: .absolute(UIScreen.main.bounds.width - 40), heightDimension: .absolute(184))
        let group = NSCollectionLayoutGroup.horizontal(layoutSize: groupSize, subitems: [item])

        // Sectionについてのレイアウト設定
        let section = NSCollectionLayoutSection(group: group)
        section.interGroupSpacing = 10
        section.contentInsets = NSDirectionalEdgeInsets(top: 0, leading: 20, bottom: 0, trailing: 20)
        // ここでスクロールストップするのか、しないのかの設定を行う
        section.orthogonalScrollingBehavior = .groupPaging

        return section
    }

    func configureCell(collectionView: UICollectionView, indexPath: IndexPath) -> UICollectionViewCell {
        let cell = collectionView.dequeueReusableCell(withReuseIdentifier: String(describing: ItemCollectionViewCell.self), for: indexPath) as! ItemCollectionViewCell
       // ここでCellの設定を行う

        return cell
    }
}

extension BannerSection {
    // Initializerが必要な場合は、Extensionに切り出すと良いでしょう
    init() {
    }
}
各セクションごとに、セクションのStructを一つ作成すると良いでしょう。
実際に、VC側に追加する
それでは先ほど作成した、Sectionを追加していきましょう。
func viewDidLoad() {
    ~~省略~~

    collectionView.register(ItemCollectionViewCell.self,
                            forCellWithReuseIdentifier: String(describing: ItemCollectionViewCell.self))

    var itemsSection = ItemsSection()
    itemsSection.didSelectItem = { index in
        // ここで、cell選択時の処理を行う
    }
    sections.append(itemsSection)
}
これで、横にスクロースしながら、中央で止まるCollectionViewを作成することができました。
これらをうまく使用すると下記画像のようなレイアウトも作成することができます!(すみません、時間がなくて図でのイメージになります汗)
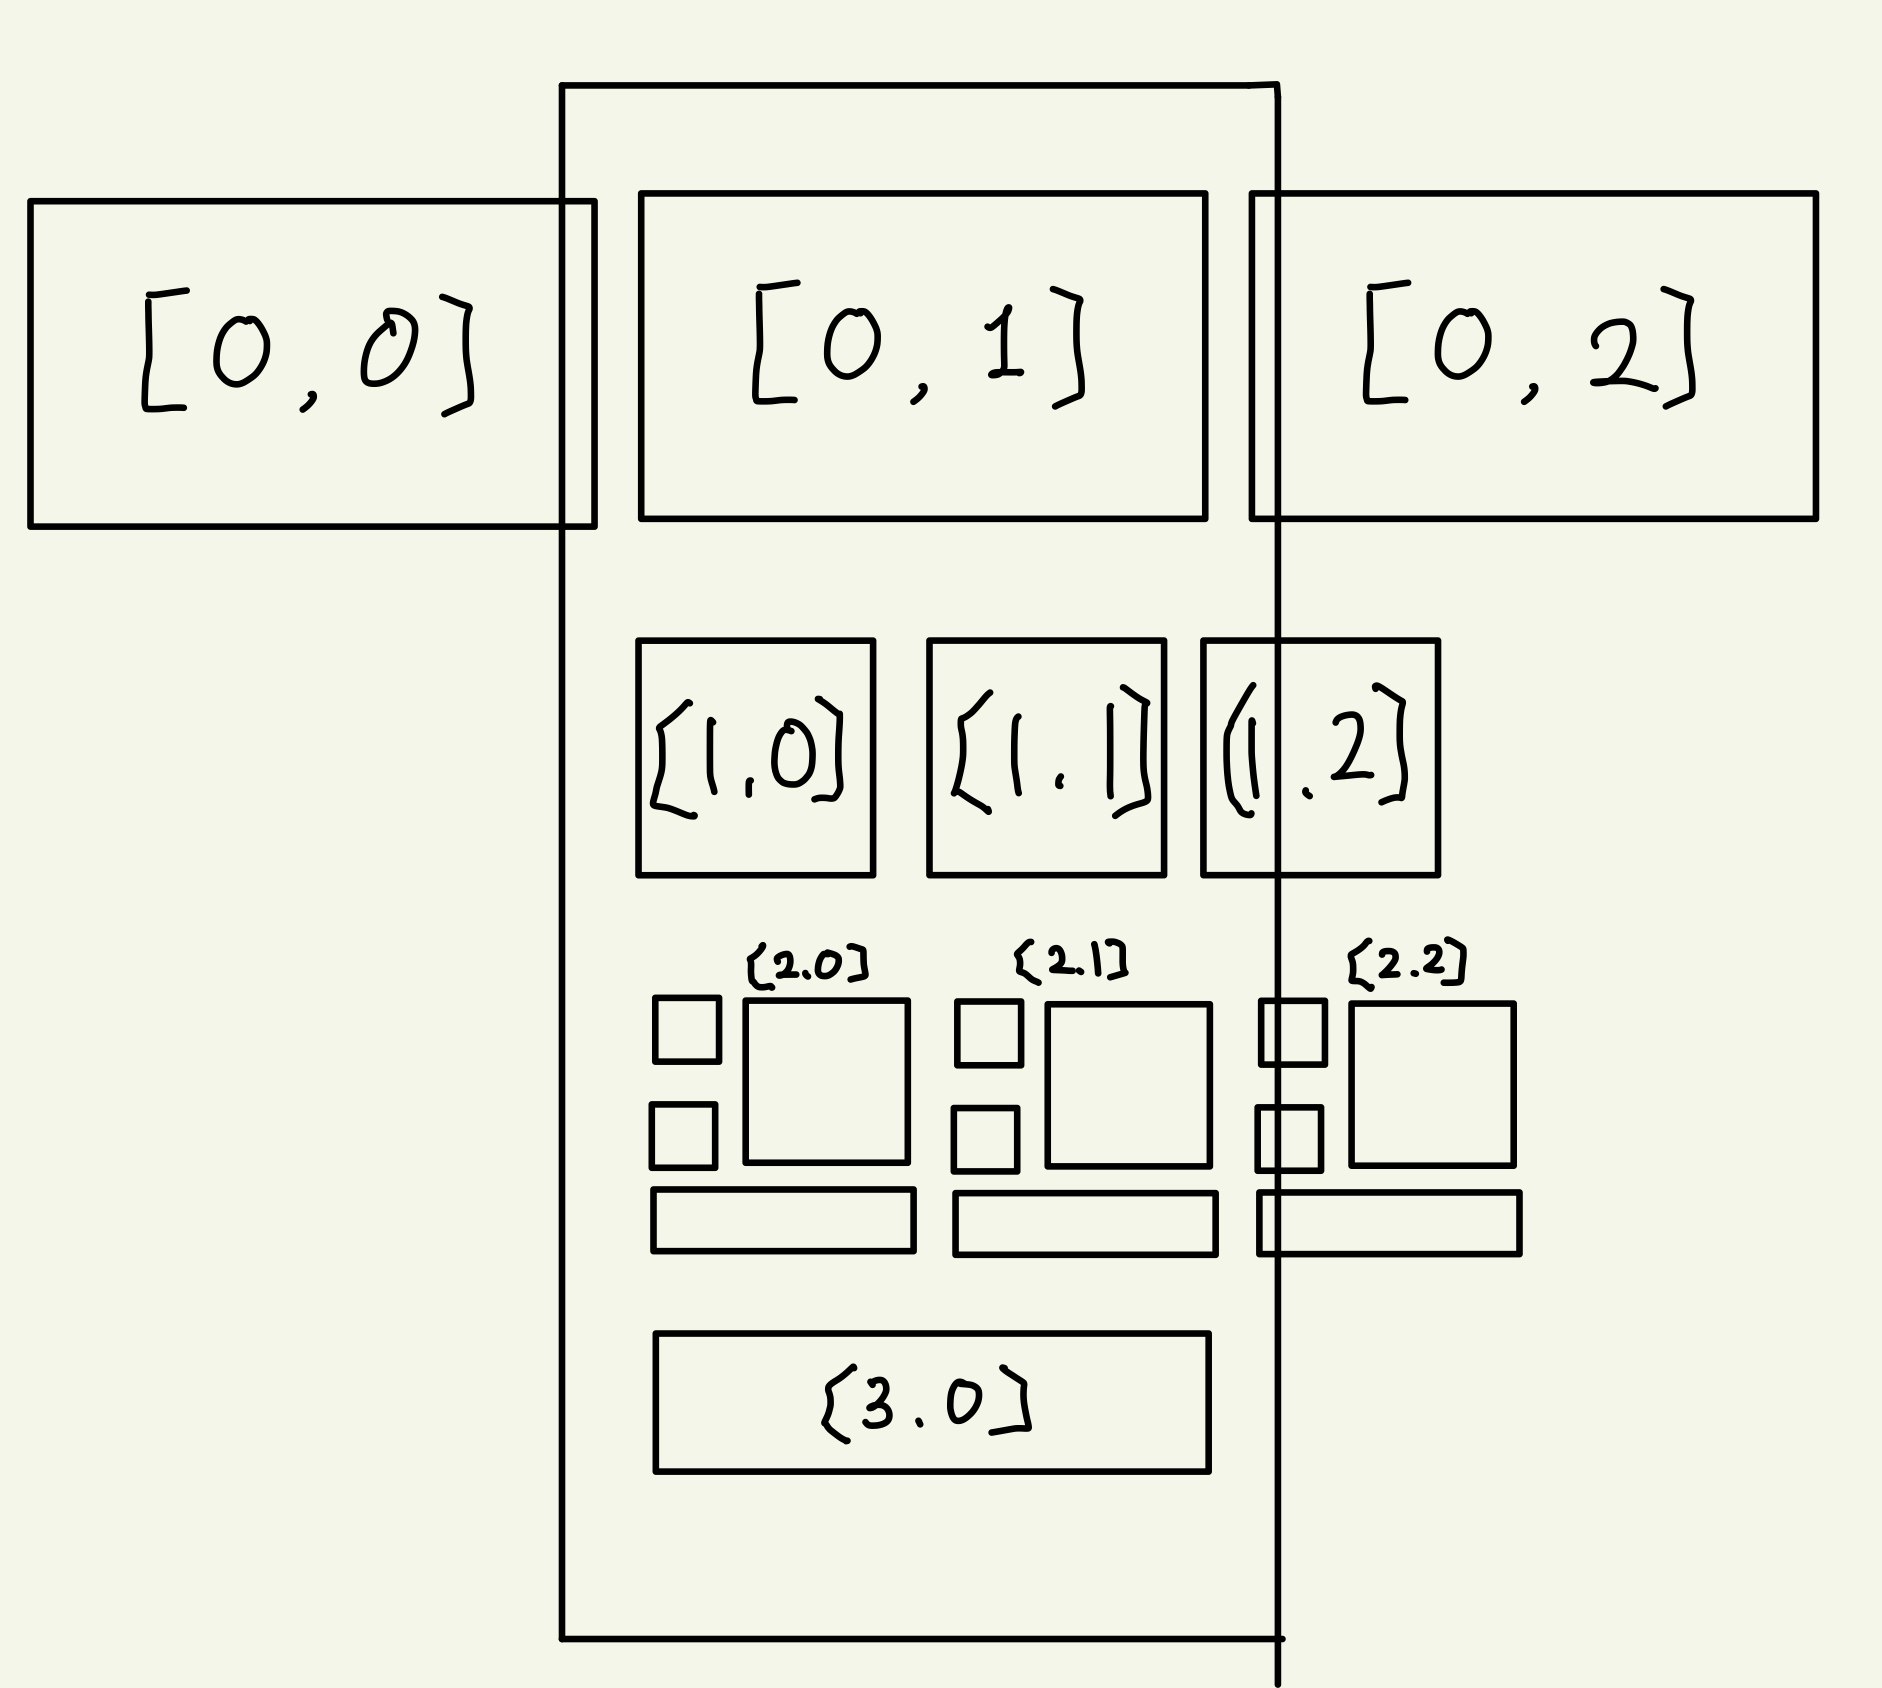
[]の中の数字は、[Section番号、 row番号]になります。
これの大事なメリットとしては、TableViewのなかにCollectionViewのようなネストをすることなく、すべて一つのCollectionViewの上で管理することができるというのが大きなメリットかなと思います!
複雑なレイアウトでも、管理しやすい形で、設計を行うことができます!
おまけ
各SectionにHeader,Footerを付けたい!という人も多いかと思います。
Header,Footerを作成する方法は大きく分けて二通りあります。
- Sectionに対して、Header,Footerを設定する
- Sectionの上下にHeader, FooterとなるSectionを追加する。
これらの方法にはメリットデメリットがあると思いますが、Header, Footerに対して、複雑なタッチイベントを追加したい場合は2の方法がよく、特にタッチイベントを使用しないまたは、タップによってアコーディオンのような処理のみしか行わない場合であれば、1の方法の方が楽なのかなと思います。
1の方法の実装方法
先ほどのSectionに対して、もう一つメソッドを追加します。
Protocol Section {
    ~~省略~~

    // HeaderやFooterを使用しない場合は、UICollectionReusableView()を返す
    func configureHeaderFooter(_ collectionView: UICollectionView, viewForSupplementaryElementOfKind kind: String, at indexPath: IndexPath) -> UICollectionReusableView
}
次にItemsSectionにも新しく追加したメソッドを足しましょう!
struct ItemsSection: Section {
    func layoutSection() -> NSCollectionLayoutSection {
           ~~省略~~
            // header
            let headerSize = NSCollectionLayoutSize(
                widthDimension: .fractionalWidth(1.0),
                heightDimension: .estimated(95))
            let sectionHeader = NSCollectionLayoutBoundarySupplementaryItem(
                layoutSize: headerSize,
                elementKind: "section-header-element-kind",
                alignment: .top)

            // footer
            let footerSize = NSCollectionLayoutSize(
                widthDimension: .fractionalWidth(1.0),
                heightDimension: .estimated(45))
            let sectionFooter = NSCollectionLayoutBoundarySupplementaryItem(
                layoutSize: footerSize,
                elementKind: "section-footer-element-kind",
                alignment: .bottom)

            // header, footerを追加
            section.boundarySupplementaryItems = [sectionHeader, sectionFooter]
          ~~省略~~
    }

    func configureHeaderFooter(_ collectionView: UICollectionView, viewForSupplementaryElementOfKind kind: String, at indexPath: IndexPath) -> UICollectionReusableView {
        // ここでの文字列は固定
        switch kind {
        // header
        case "section-header-element-kind":
            let header = collectionView.dequeueReusableSupplementaryView(ofKind: kind, withReuseIdentifier: String(describing: ItemHeaderCell.self), for: indexPath) as! ItemHeaderCell
            // Headerのセットアップ
            return header
        // footer
        case "section-footer-element-kind":
            let footer = collectionView.dequeueReusableSupplementaryView(ofKind: kind, withReuseIdentifier: String(describing: ItemFooterCell.self), for: indexPath) as! ItemFooterCell
        // Footerのセットアップ
        return footer
        default:
            // HeaderやFooterを設定しない場合には、UICollectionReusableView()を返す
            return UICollectionReusableView()
        }
    }
}
最後に、VC側
final class ViewController: UIViewController {
    override func viewDidLoad() {
    ~~省略~~
        collectionView.register(itemHeaderCell.self, forSupplementaryViewOfKind: "section-header-element-kind", withReuseIdentifier: String(describing: itemHeaderCell.self))
        collectionView.register(itemFooterCell.self, forSupplementaryViewOfKind: "section-footer-element-kind", withReuseIdentifier: String(describing: itemFooterCell.self))
    ~~省略~~
    }
}

extension ViewController: UIViewControllerDataSource {
    func collectionView(_ collectionView: UICollectionView, viewForSupplementaryElementOfKind kind: String, at indexPath: IndexPath) -> UICollectionReusableView {
        let view = sections[indexPath.section].configureHeaderFooter(collectionView, viewForSupplementaryElementOfKind: kind, at: indexPath)
        // viewにタップジェスチャを追加したい場合にはここで行う
        return view
    }
}
まとめ
こんな感じで、ViewControllerとSectionに分けて実装するとなかなかいい設計になるのではないでしょうか?
先ほどのべたライブラリを使用するとiOS12からCompositionalLayoutが使用できるので、ぜひ少しずつ使用し始めてください〜
ちなみに、iOS12のサポート終了後でも容易に移行できます。
今回はDataSourceは通常のものを使用しましたが、CompositionalLayoutと同時に、DiffrableDataSourceも登場しているので、こちらと組み合わせるとまた別の設計も組めるのではないでしょうか?
DiffrableDataSourceについてはまた今度記事にしようと思います!
それではっ!