はじめに
皆さんはkubectlコマンドをインストールするときどのようにインストールしますか?
私は公式ドキュメントに従ってkubectlコマンドをインストールしようとしていました.
以下のコマンドを入力すればできるそうなので,こちらからインストールしました.
sudo apt-get update && sudo apt-get install -y apt-transport-https gnupg2
curl -s https://packages.cloud.google.com/apt/doc/apt-key.gpg | sudo apt-key add -
echo "deb https://apt.kubernetes.io/ kubernetes-xenial main" | sudo tee -a /etc/apt/sources.list.d/kubernetes.list
sudo apt-get update
sudo apt-get install -y kubectl
しかし上記のコマンドを実行後,apt updateを実行すると以下のWarningが出てしまいます.
Key is stored in legacy trusted.gpg keyring (/etc/apt/trusted.gpg)
$ sudo apt update

W: https://apt.kubernetes.io/dists/kubernetes-xenial/InRelease: Key is stored in legacy trusted.gpg keyring (/etc/apt/trusted.gpg), see the DEPRECATION section in apt-key(8) for details.
原因
原因はapt-keyが廃止されたことでapt-key addコマンドで追加した鍵にWarningがでるためです.
Warningの文を見ていきましょう.
see the DEPRECATION section in apt-key(8) for details.
apt-keyの8のDEPRECATIONを見てみてね.という意味です.
(数字)はmanコマンドの数字を見てね.ということを言っています.
補足:apt-keyの8のDEPRECATIONはこちら!
$ man apt-key 8
No manual entry for 8
(Alternatively, what manual page do you want from section 8?)
For example, try 'man man'.
DEPRECATION:廃止
the DEPRECATION section:非推奨セクション
DEPRECATION
       Except for using apt-key del in maintainer scripts, the use of apt-key is deprecated. This section shows how to
       replace existing use of apt-key.

       If your existing use of apt-key add looks like this:

       wget -qO- https://myrepo.example/myrepo.asc | sudo apt-key add -

       Then you can directly replace this with (though note the recommendation below):

       wget -qO- https://myrepo.example/myrepo.asc | sudo tee /etc/apt/trusted.gpg.d/myrepo.asc

       Make sure to use the "asc" extension for ASCII armored keys and the "gpg" extension for the binary OpenPGP format
       (also known as "GPG key public ring"). The binary OpenPGP format works for all apt versions, while the ASCII
       armored format works for apt version >= 1.4.

       Recommended: Instead of placing keys into the /etc/apt/trusted.gpg.d directory, you can place them anywhere on
       your filesystem by using the Signed-By option in your sources.list and pointing to the filename of the key. See
       sources.list(5) for details. Since APT 2.4, /etc/apt/keyrings is provided as the recommended location for keys
       not managed by packages. When using a deb822-style sources.list, and with apt version >= 2.4, the Signed-By
       option can also be used to include the full ASCII armored keyring directly in the sources.list without an
       additional file.
の下記の部分を参照すると置き換え方について書いてありました.
This section shows how to
       replace existing use of apt-key.

       If your existing use of apt-key add looks like this:

       wget -qO- https://myrepo.example/myrepo.asc | sudo apt-key add -

       Then you can directly replace this with (though note the recommendation below):

       wget -qO- https://myrepo.example/myrepo.asc | sudo tee /etc/apt/trusted.gpg.d/myrepo.asc
wget -qO- https://myrepo.example/myrepo.asc | sudo tee /etc/apt/trusted.gpg.d/myrepo.ascと書き換えることでうまくいくようです.ただ,これでは今回は上手くいかなかったのでchatGPTに手伝って修正してもらっています.
解決方法
shellscriptを以下のように書き換えます.
#!/bin/bash
set -eux

sudo apt-get update && sudo apt-get install -y apt-transport-https ca-certificates curl

curl -s https://packages.cloud.google.com/apt/doc/apt-key.gpg | gpg --dearmor | sudo tee /usr/share/keyrings/kubernetes-archive-keyring.gpg >/dev/null

echo "deb [signed-by=/usr/share/keyrings/kubernetes-archive-keyring.gpg] https://apt.kubernetes.io/ kubernetes-xenial main" | sudo tee /etc/apt/sources.list.d/kubernetes.list

sudo apt-get update
sudo apt-get install -y kubectl
公式ドキュメントの通りにやる方法(2024年1月28日追記):未検証
英語の公式ドキュメントにやり方が載っていたので,その方法のshellscriptを作成してみます.自分のやり方と鍵や鍵の変換後のディレクトリが違いますね.
#!/bin/bash
set -eux

sudo apt-get update
# apt-transport-https may be a dummy package; if so, you can skip that package
sudo apt-get install -y apt-transport-https ca-certificates curl

# If the folder `/etc/apt/keyrings` does not exist, it should be created before the curl command, read the note below.
# sudo mkdir -p -m 755 /etc/apt/keyrings
curl -fsSL https://pkgs.k8s.io/core:/stable:/v1.29/deb/Release.key | sudo gpg --dearmor -o /etc/apt/keyrings/kubernetes-apt-keyring.gpg

# This overwrites any existing configuration in /etc/apt/sources.list.d/kubernetes.list
echo 'deb [signed-by=/etc/apt/keyrings/kubernetes-apt-keyring.gpg] https://pkgs.k8s.io/core:/stable:/v1.29/deb/ /' | sudo tee /etc/apt/sources.list.d/kubernetes.list

sudo apt-get update
sudo apt-get install -y kubectl
バイナリをインストールする方法(2024年1月28日追記)
@Bacalhau さんにコメントで教えていただいた,バイナリをインストールする方法を載せます.こちらの方法はチェックサムを抜かしていますので,気になる方は公式ドキュメントを確認してください.
ちなみになぜ,aptではないかという理由ですが,kubectlコマンドのバージョンごとに鍵が異なるため,aptにこだわる必要が無いためです.ただ,v1.29とメジャーバージョンごとに鍵が異なるので,マイナーバージョンのアップデートがめんどくさい人はaptを使ったほうが良さそうですね.
以下に「チェックサムの確認を省略した最少の手順」を載せます.
#!/bin/bash
set -eux

# 前提のパッケージのインストール
sudo apt-get update && sudo apt-get install -y apt-transport-https ca-certificates curl

# kubectlコマンドのバイナリを取得
curl -LO "https://dl.k8s.io/release/$(curl -L -s https://dl.k8s.io/release/stable.txt)/bin/linux/amd64/kubectl"

# バイナリファイルをパスのあるフォルダに移動
sudo install -o root -g root -m 0755 kubectl /usr/local/bin/kubectl

# 確認用
kubectl version --client
権限の書き換え
chmod +x install_kubectl.sh
実行
./install_kubectl.sh
補足:shellscriptの実行結果はこちら!
+ sudo apt-get update
Hit:1 http://security.ubuntu.com/ubuntu jammy-security InRelease
Hit:2 http://archive.ubuntu.com/ubuntu jammy InRelease
Hit:3 http://archive.ubuntu.com/ubuntu jammy-updates InRelease
Hit:4 http://archive.ubuntu.com/ubuntu jammy-backports InRelease
Reading package lists... Done
+ sudo apt-get install -y apt-transport-https ca-certificates curl
Reading package lists... Done
Building dependency tree... Done
Reading state information... Done
ca-certificates is already the newest version (20230311ubuntu0.22.04.1).
ca-certificates set to manually installed.
curl is already the newest version (7.81.0-1ubuntu1.15).
curl set to manually installed.
The following NEW packages will be installed:
  apt-transport-https
0 upgraded, 1 newly installed, 0 to remove and 2 not upgraded.
Need to get 1510 B of archives.
After this operation, 170 kB of additional disk space will be used.
Get:1 http://archive.ubuntu.com/ubuntu jammy-updates/universe amd64 apt-transport-https all 2.4.11 [1510 B]
Fetched 1510 B in 0s (3058 B/s)
Selecting previously unselected package apt-transport-https.
(Reading database ... 31932 files and directories currently installed.)
Preparing to unpack .../apt-transport-https_2.4.11_all.deb ...
Unpacking apt-transport-https (2.4.11) ...
Setting up apt-transport-https (2.4.11) ...
+ curl -s https://packages.cloud.google.com/apt/doc/apt-key.gpg
+ gpg --dearmor
+ sudo tee /usr/share/keyrings/kubernetes-archive-keyring.gpg
+ echo 'deb [signed-by=/usr/share/keyrings/kubernetes-archive-keyring.gpg] https://apt.kubernetes.io/ kubernetes-xenial main'
+ sudo tee /etc/apt/sources.list.d/kubernetes.list
deb [signed-by=/usr/share/keyrings/kubernetes-archive-keyring.gpg] https://apt.kubernetes.io/ kubernetes-xenial main
+ sudo apt-get update
Hit:2 http://security.ubuntu.com/ubuntu jammy-security InRelease
Hit:3 http://archive.ubuntu.com/ubuntu jammy InRelease
Hit:4 http://archive.ubuntu.com/ubuntu jammy-updates InRelease
Get:1 https://packages.cloud.google.com/apt kubernetes-xenial InRelease [8993 B]
Get:5 https://packages.cloud.google.com/apt kubernetes-xenial/main amd64 Packages [69.9 kB]
Hit:6 http://archive.ubuntu.com/ubuntu jammy-backports InRelease
Fetched 78.9 kB in 1s (76.2 kB/s)
Reading package lists... Done
+ sudo apt-get install -y kubectl
Reading package lists... Done
Building dependency tree... Done
Reading state information... Done
The following NEW packages will be installed:
  kubectl
0 upgraded, 1 newly installed, 0 to remove and 2 not upgraded.
Need to get 0 B/10.3 MB of archives.
After this operation, 49.9 MB of additional disk space will be used.
Selecting previously unselected package kubectl.
(Reading database ... 31936 files and directories currently installed.)
Preparing to unpack .../kubectl_1.28.2-00_amd64.deb ...
Unpacking kubectl (1.28.2-00) ...
Setting up kubectl (1.28.2-00) ...
解説
apt-keyの非推奨化に伴い,APTリポジトリの鍵を管理する方法が変更されました.従来はapt-key addコマンドを使って直接鍵を追加していましたが,これはセキュリティ上の理由から非推奨となっています.
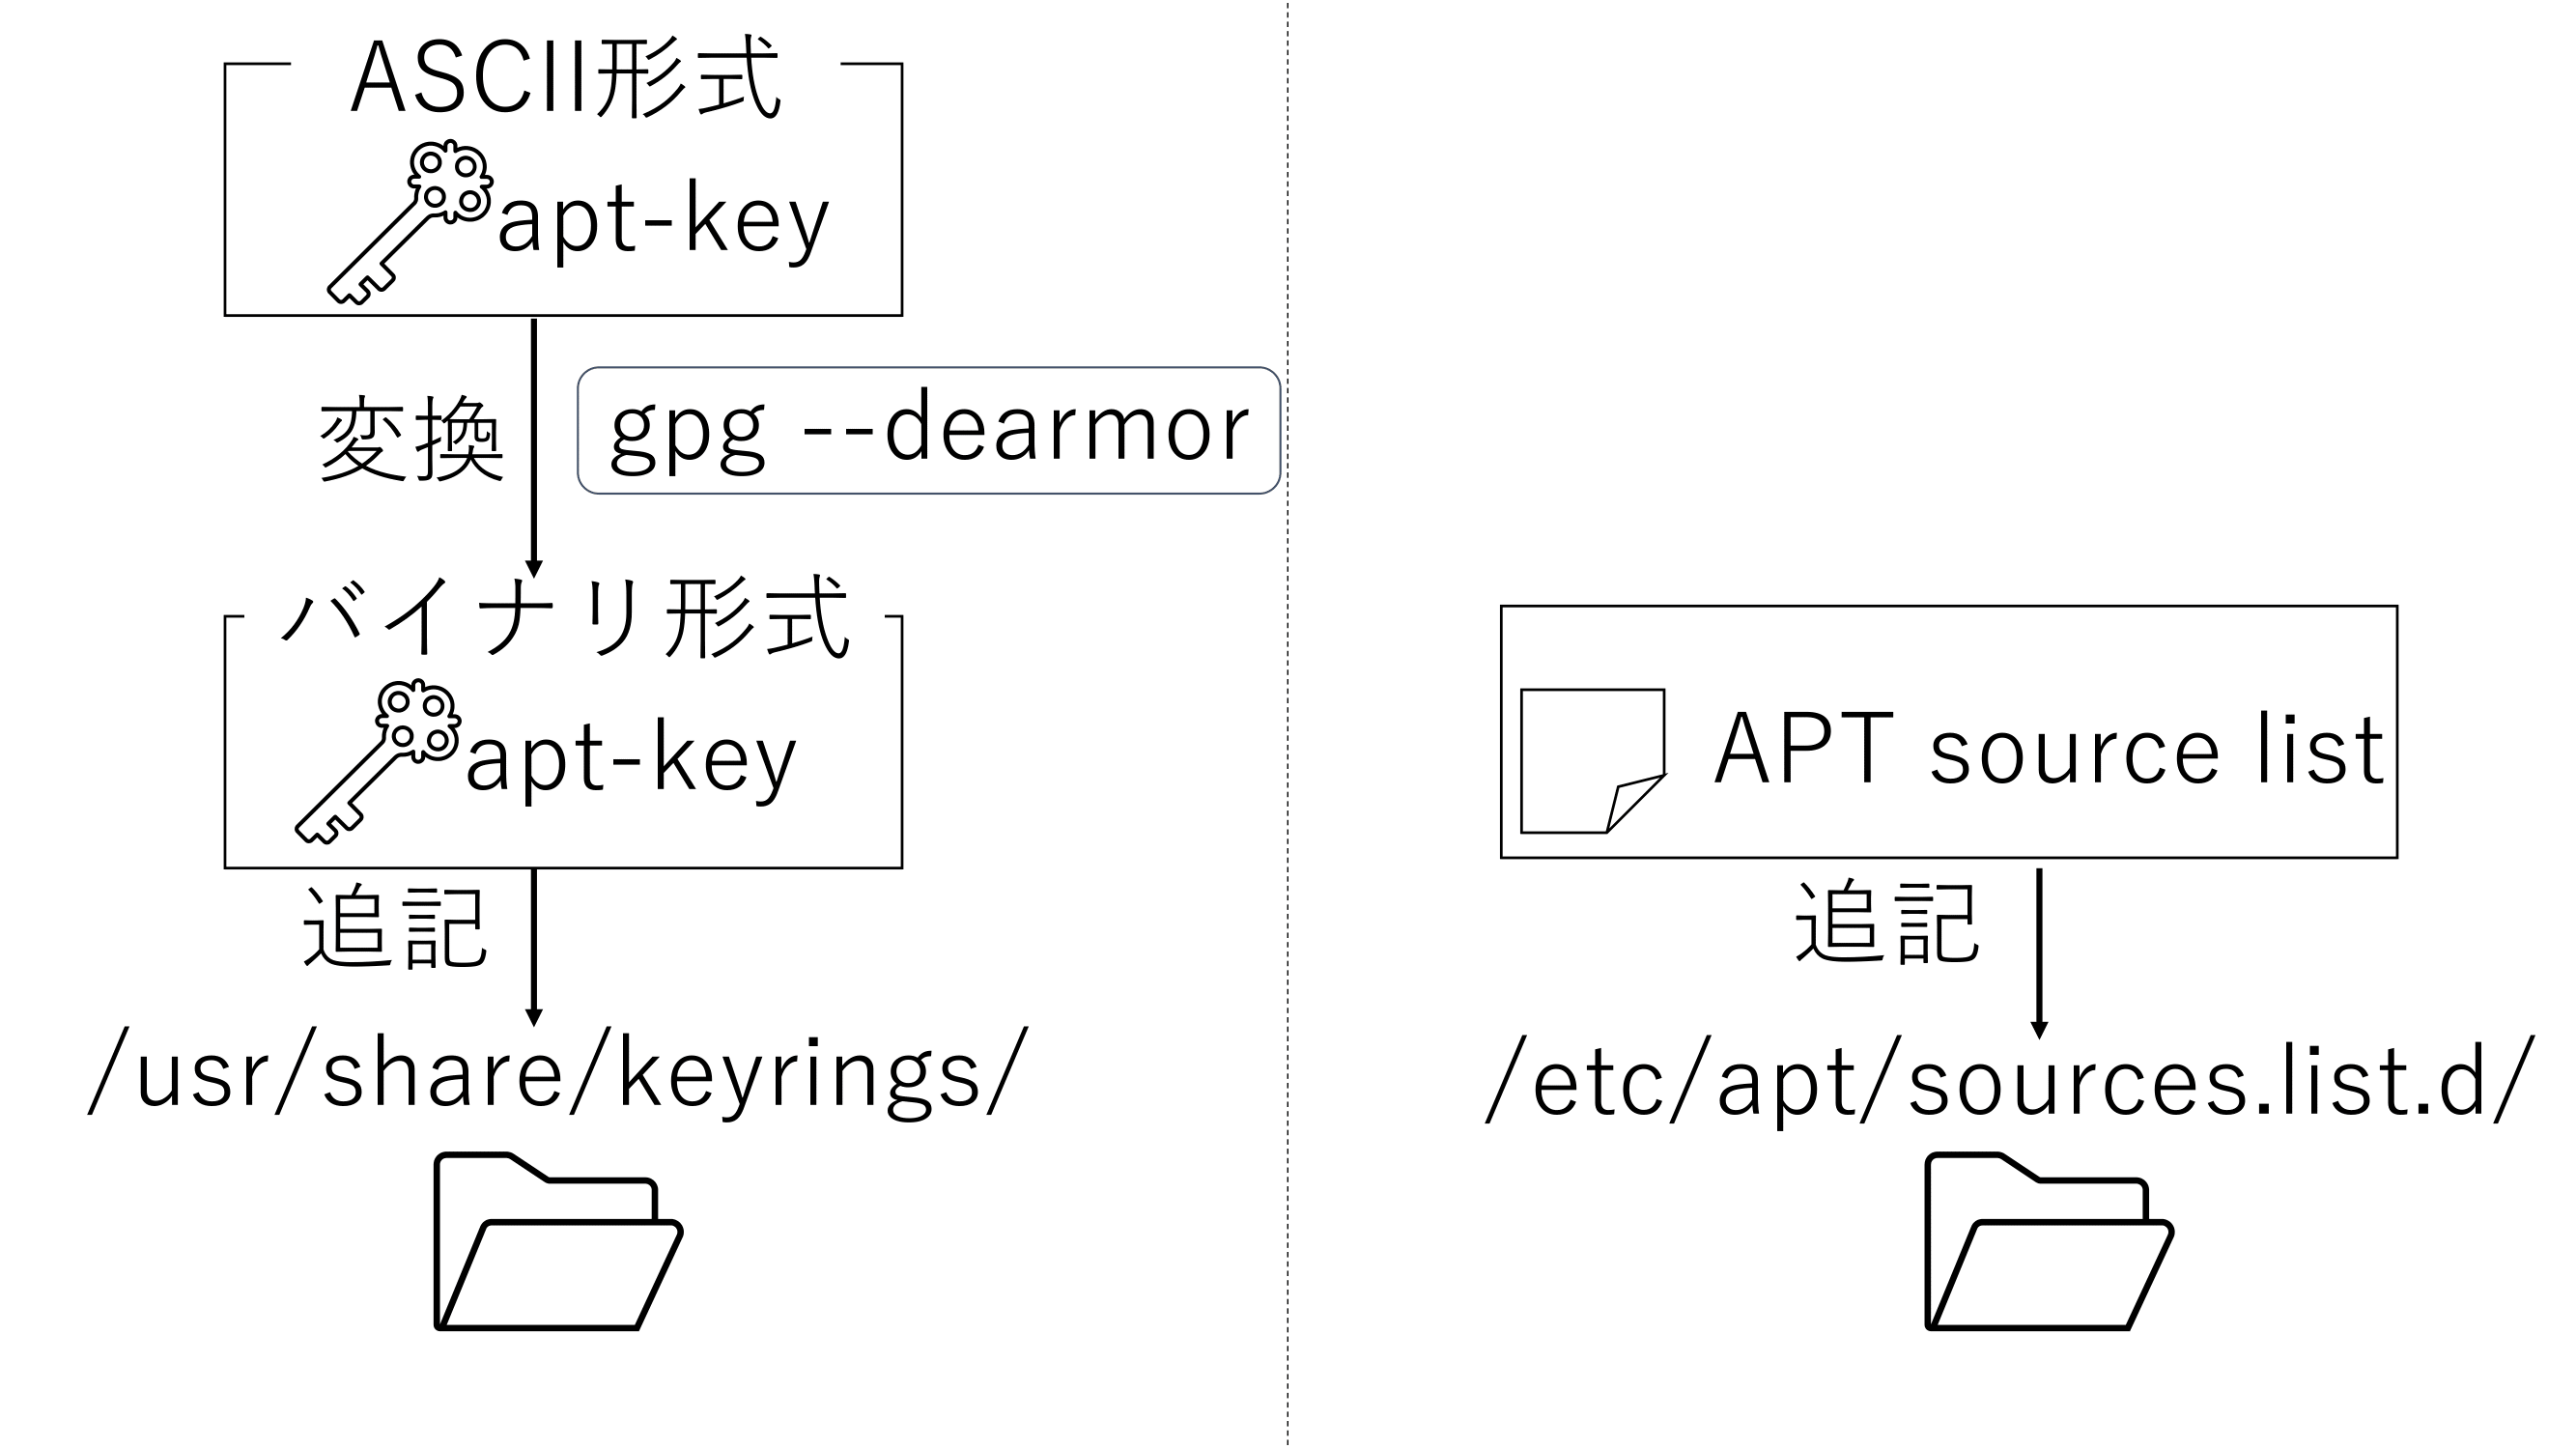
今回は、gpg --dearmorを使用してASCII形式のGPG鍵をバイナリ形式に変換し,それを/usr/share/keyringsに追加しています.
GPG鍵はバイナリ形式の鍵なのですが,リンクを踏んで確認したところASCII形式だったためバイナリ形式に変換しています.
/etc/apt/trusted.gpgを使う方法が他の記事に載っていますが,ここに鍵を保存する場合はAPTが既定で信頼する鍵として扱うことを意味します.サードパーティ製のAPTパッケージリポジトリを追加する際に使うのは不適切ですね.実際,Warning: apt-key is deprecated. Manage keyring files in trusted.gpg.d insteadというWarningが出るみたいです.APT2.4 以降で推奨される新しいディレクトリが/usr/share/keyringsになります.
/usr/share/keyringsはシステムのAPTソースリストに対してSigned-Byオプションで指定されたGPGキーを保存するためのディレクトリです.今回は/etc/apt/sources.list.d/に保存するsource listに[signed-by=/usr/share/keyrings/kubernetes-archive-keyring.gpg]と指定していますね.ここで鍵を指定することで,apt update実行時にSigned-Byオプションを参照して鍵を取得し,アップデートをしてくれます.
これにより,apt-keyコマンドを使用する際に表示される非推奨の警告が出ないようになります.
補足:解説の補足はこちら!
kubernetes-archive-keyring.gpgという名前は好きに決めてかまいません.KubernetesパッケージのアーカイブからのGPGキーリングファイルであることを示した名前に今回はしています.
同様にkubernetes.listも好きに決めてかまいません.
感想
apt-keyの廃止に伴ってインストール方法が変わったみたいですが,使っている自分自身からしてみると何が変わったのかさっぱりですね.こっちの方が鍵を信頼できるものと信頼できないものを分けているため安全らしいので,これからは対応していこうと思います.
