つい先日、ユーザー向けに案内メールを一斉配信する仕組みの設計、実装を担当することになりました。
が、これまでSendGridを使ってお問い合わせに対する無機質な返信メールくらいしか作ったことがなく、実装するための設計イメージが全く湧きませんでした。
というところから実装に至るまで色々思考錯誤(大袈裟)したため、せっかくなので振り返りも兼ねて記事にしました!
対象読者
主に次のフロントエンジニアさん向けです
- 問い合わせ以外にメール配信サービスを活用したことがない方
- メールの本文をHTMLではなく、Reactコンポーネントで実装したい方
- これから実務で使おうと検討中の方
ゴール
- 本文が装飾された案内メールを一斉配信する。
- 本文は使い回ししやすいようテンプレート管理する。
タスクの洗い出し
案内メールを送るにあたり、『どうやって本文を装飾』して『どのメール配信サービスを使うのか』を考える必要があります。
1 本文の装飾
最終的にHTMLやCSSなどで装飾しないといけないことは承知しつつ、Reactに慣れ親しみすぎた身としてはできればReactで実装したいところ。
ということで、なんとかReactコンポーネントで実装できないか探してみたところ、『React Email』というライブラリがあることを発見。
使い勝手も良さそうなので、こちらで実装することとしました。
2 メールの配信サービス
React EmailはSendGridにも対応している模様。
その他色々対応しているようですが、中でも『Resend』というサービスがとっても便利そう。
説明ページに以下の英文が書いてあるのですが、
When integrating with other services, you need to convert your React template into HTML before sending. Resend takes care of that for you.
要はResendだとReactをHTMLにコンバートすることなくそのまま使えますよ、とのことらしいです。
React Emailと同じチームが構築したものなので利便性も抜群なので、即採用です。
※ResendはVercelと親和性が高そうなので、そのうちデフォルトになったりするのかな?
React Email
React Emailのテンプレートを用いた本文作成
React Emailには様々なテンプレートがあります。
ここから実装したい案内メールに一番近いものを選び、転用しながらオリジナルのテンプレートを用意するのが良さそうです。
React Emailのインストール
既存のリポジトリにセットアップするならこちらのマニュアルセットアップを使ってパッケージをインストールしましょう。
基本的には説明のとおりですが、メールのテンプレートには
@react-email/components
も使用するのでこちらもインストールしておきましょう。
Resend
続いてはResendの設定です。
大まかに
ログイン(GitHub認証でいいと思います)
API Keysの作成
DNSレコードの設定
が必要です。
この中でDNSレコードについてですが、これをメールの送信元となる自身のドメインに関して設定を行うものです。
信頼性をあげた状態でメールを送信するためです。
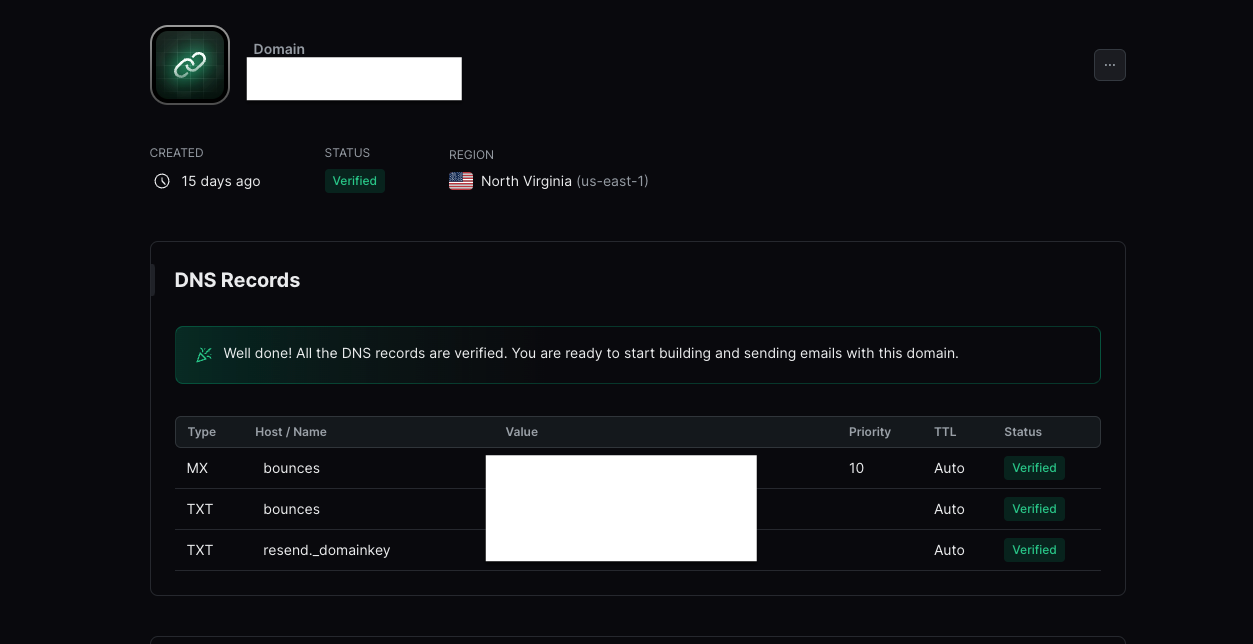
ダッシュボードのDomainsからAdd Dommainボタンを押して、表示された三行を自身のドメイン管理先で設定します。

すると、ドメイン管理先に設定すべきレコードが三行(MX,TXT,TXT)表示されます。

※この画面は設定完了後のものです。この時点ではステータスが「Verified」とはなっていません。すいません。。。
私はエックスサーバーですので、エックスサーバーのサーバーパネルからDNSレコード設定を選択し、三行全て設定します。

正しく設定がされると、2つ上の画像のように、Resendのダッシュボード上のステータスが「Verified」となります。
Resendのインストール、APIKEYの設定
下記コマンドでインストールを行いましょう。
npm install resend
yarn add resend
その後、.envファイルには下記のようにResendのAPIKEYを設定しましょう。
RESEND_API_KEY=re_XXXXXXXXXX
コードの実装
ここまで終わったら、コードの実装です。
本文のテンプレートをコンポーネント化する
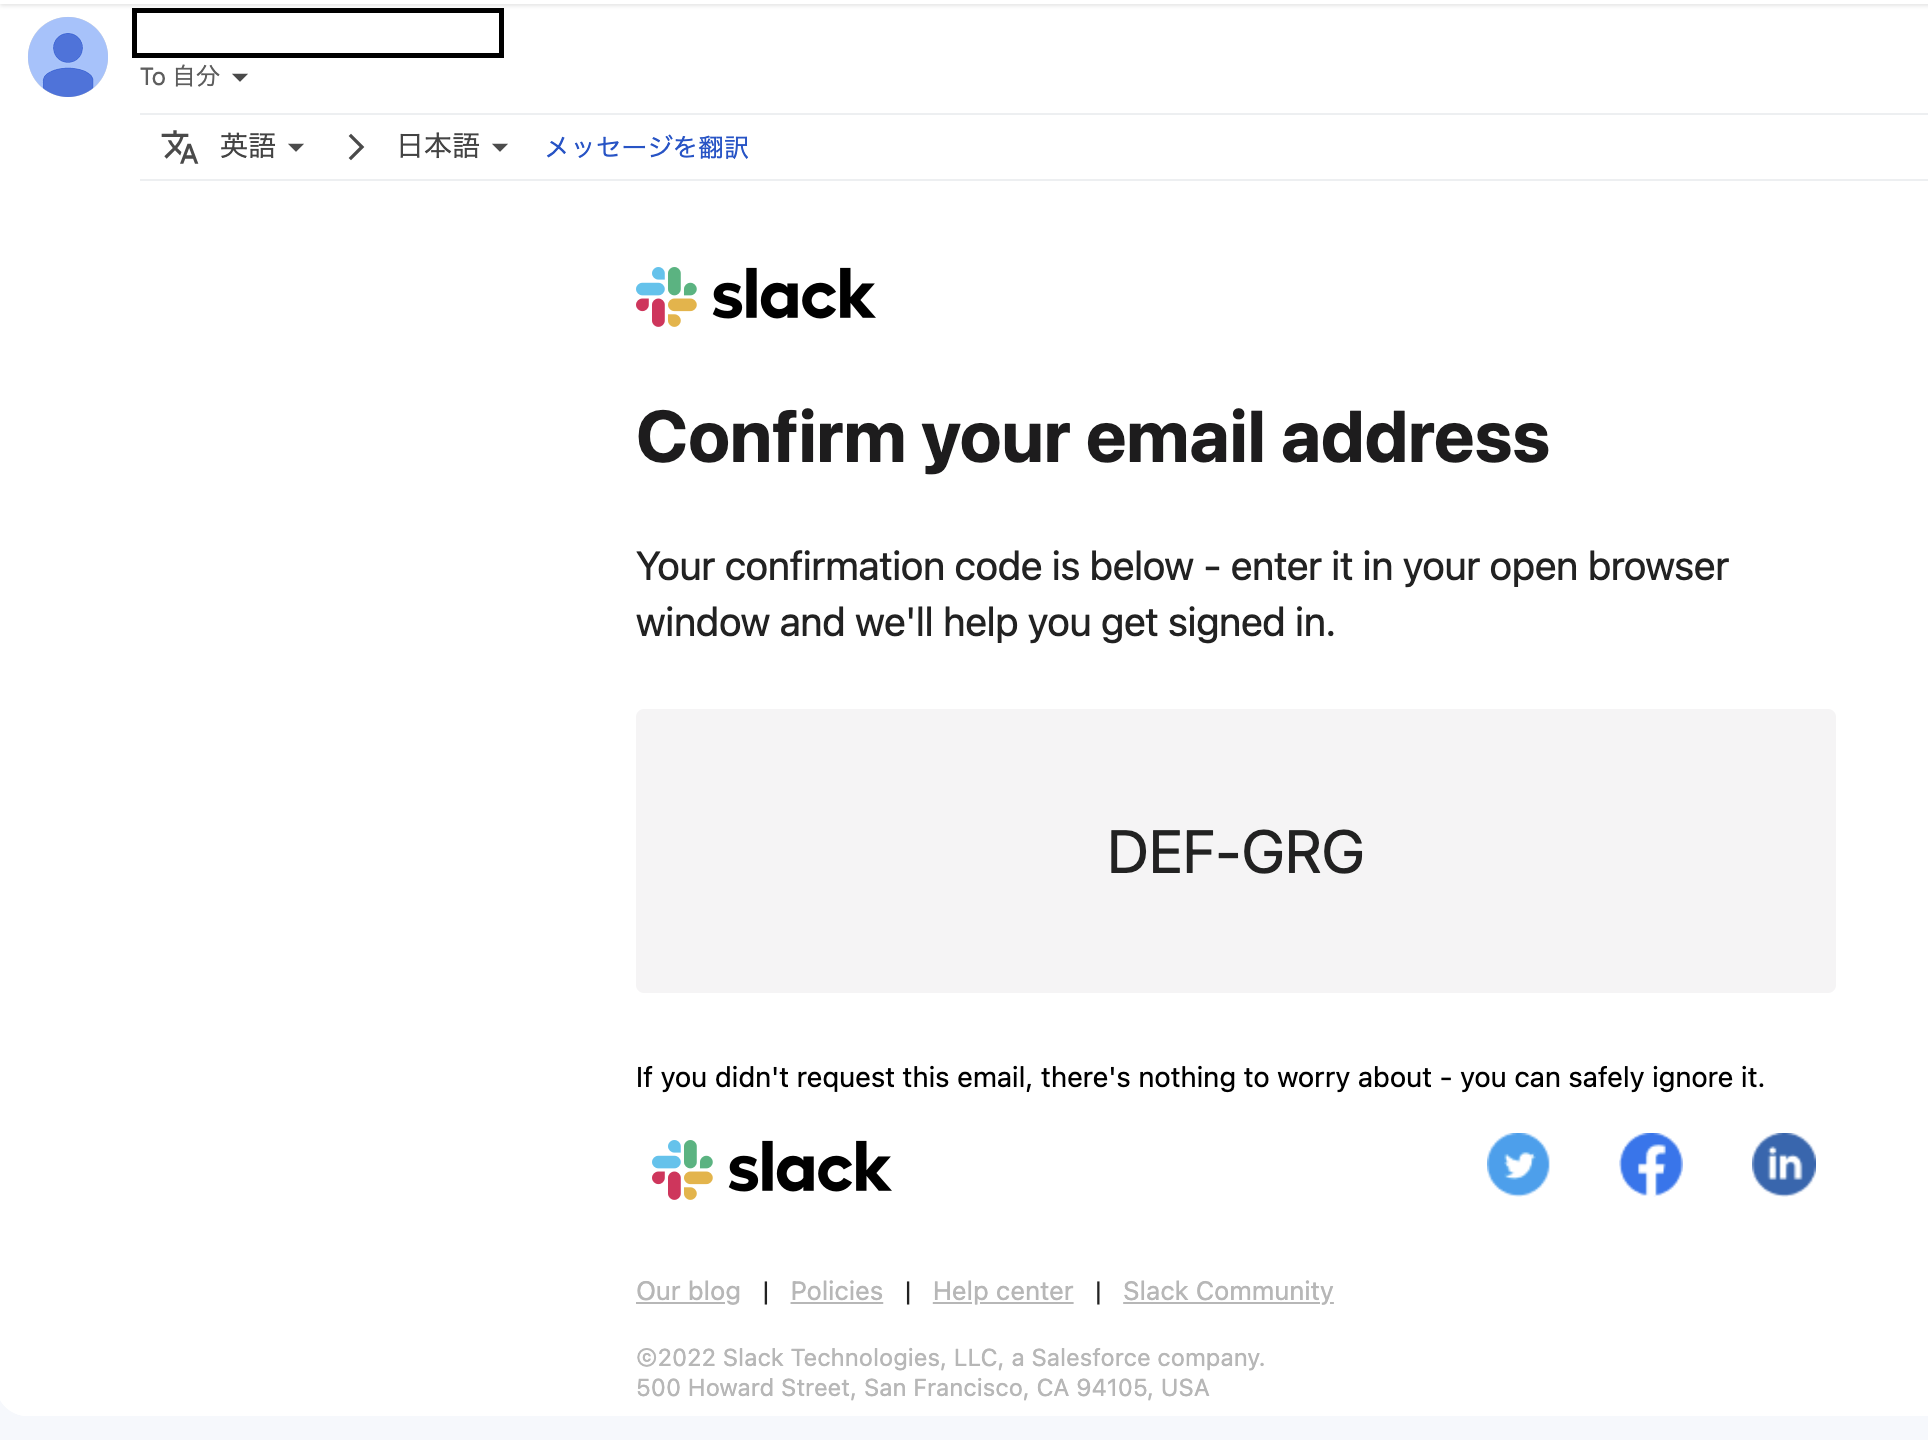
今回は試行なので、テンプレートの中からSlackの確認画面をそのまま用います。これをそのままコンポーネント化してしまいましょう。
components/mail/Slack.tsx
import {
Body,
Container,
Column,
Head,
Heading,
Html,
Img,
Link,
Preview,
Row,
Section,
Text,
} from '@react-email/components';
import * as React from 'react';
interface SlackConfirmEmailProps {
validationCode?: string;
}
const baseUrl = process.env.VERCEL_URL
? `https://${process.env.VERCEL_URL}`
: '';
export const SlackConfirmEmail = ({
validationCode = 'DJZ-TLX',
}: SlackConfirmEmailProps) => (
<Html>
<Head />
<Preview>Confirm your email address</Preview>
<Body style={main}>
<Container style={container}>
<Section style={logoContainer}>
<Img
src={`${baseUrl}/static/slack-logo.png`}
width="120"
height="36"
alt="Slack"
/>
</Section>
<Heading style={h1}>Confirm your email address</Heading>
<Text style={heroText}>
Your confirmation code is below - enter it in your open browser window
and we'll help you get signed in.
</Text>
<Section style={codeBox}>
<Text style={confirmationCodeText}>{validationCode}</Text>
</Section>
<Text style={text}>
If you didn't request this email, there's nothing to worry about - you
can safely ignore it.
</Text>
<Section>
<Row style={footerLogos}>
<Column style={{ width: '66%' }}>
<Img
src={`${baseUrl}/static/slack-logo.png`}
width="120"
height="36"
alt="Slack"
/>
</Column>
<Column>
<Row>
<Column>
<Link href="/">
<Img
src={`${baseUrl}/static/slack-twitter.png`}
width="32"
height="32"
alt="Slack"
style={socialMediaIcon}
/>
</Link>
</Column>
<Column>
<Link href="/">
<Img
src={`${baseUrl}/static/slack-facebook.png`}
width="32"
height="32"
alt="Slack"
style={socialMediaIcon}
/>
</Link>
</Column>
<Column>
<Link href="/">
<Img
src={`${baseUrl}/static/slack-linkedin.png`}
width="32"
height="32"
alt="Slack"
style={socialMediaIcon}
/>
</Link>
</Column>
</Row>
</Column>
</Row>
</Section>
<Section>
<Link
style={footerLink}
href="https://slackhq.com"
target="_blank"
rel="noopener noreferrer"
>
Our blog
</Link>
|
<Link
style={footerLink}
href="https://slack.com/legal"
target="_blank"
rel="noopener noreferrer"
>
Policies
</Link>
|
<Link
style={footerLink}
href="https://slack.com/help"
target="_blank"
rel="noopener noreferrer"
>
Help center
</Link>
|
<Link
style={footerLink}
href="https://slack.com/community"
target="_blank"
rel="noopener noreferrer"
data-auth="NotApplicable"
data-linkindex="6"
>
Slack Community
</Link>
<Text style={footerText}>
©2022 Slack Technologies, LLC, a Salesforce company. <br />
500 Howard Street, San Francisco, CA 94105, USA <br />
<br />
All rights reserved.
</Text>
</Section>
</Container>
</Body>
</Html>
);
export default SlackConfirmEmail;
const footerText = {
fontSize: '12px',
color: '#b7b7b7',
lineHeight: '15px',
textAlign: 'left' as const,
marginBottom: '50px',
};
const footerLink = {
color: '#b7b7b7',
textDecoration: 'underline',
};
const footerLogos = {
marginBottom: '32px',
paddingLeft: '8px',
paddingRight: '8px',
width: '100%',
};
const socialMediaIcon = {
display: 'inline',
marginLeft: '32px',
};
const main = {
backgroundColor: '#ffffff',
margin: '0 auto',
fontFamily:
"-apple-system, BlinkMacSystemFont, 'Segoe UI', 'Roboto', 'Oxygen', 'Ubuntu', 'Cantarell', 'Fira Sans', 'Droid Sans', 'Helvetica Neue', sans-serif",
};
const container = {
maxWidth: '600px',
margin: '0 auto',
};
const logoContainer = {
marginTop: '32px',
};
const h1 = {
color: '#1d1c1d',
fontSize: '36px',
fontWeight: '700',
margin: '30px 0',
padding: '0',
lineHeight: '42px',
};
const heroText = {
fontSize: '20px',
lineHeight: '28px',
marginBottom: '30px',
};
const codeBox = {
background: 'rgb(245, 244, 245)',
borderRadius: '4px',
marginRight: '50px',
marginBottom: '30px',
padding: '43px 23px',
};
const confirmationCodeText = {
fontSize: '30px',
textAlign: 'center' as const,
verticalAlign: 'middle',
};
const text = {
color: '#000',
fontSize: '14px',
lineHeight: '24px',
};
埋め込んだコンポーネントは画面で確認します。テンプレートとはいえ、すでに装飾されているのはいい感じですね🎵

テンプレートをサーバーに送信する
サーバーはAPI Routes、Route Handlers (Next.js App Router)、または独自のバックエンドから選ぶこととなりますが、
今回はAPI Routes(/api/send)を選択します。
上の画像のようにテンプレートの下に「メッセージを送る」ボタンを作成し、ボタン押下時のonClickイベントでサーバー側にテンプレートを送信します。
以下がボタン押下時のonClickイベントで実行される関数コード(handleButtonClick)の例です。
任意のページ内のコンポーネント
// ボタンの制御用
 const [isButtonClicked, setIsButtonClicked] = useState(false)

  const handleButtonClick = (templateName: string, code?: string) => {
    setIsButtonClicked(true)

    // 宛先のメールアドレスの配列
    const recipients = [
      "hoge@gmail.com",
      "hoge@yahoo.co.jp",
      "hogehoge@gmail.com",
    ]
    // APIルートへのフェッチ用
    fetch("/api/send", {
      method: "POST",
      headers: {
        "Content-Type": "application/json",
      },
      body: JSON.stringify({
        react: templateName,
        to: recipients,
      }),
    })

      .then((response) => response.json())
      .then((data) => {
        console.log(data)
        setIsButtonClicked(false)
      })
      .catch((error) => {
        console.error("Error:", error)
        setIsButtonClicked(false)
      })
  }
この中のパラメータでrecipientsというものを持たせていますが、これが複数のメールアドレスを保有した配列です。
これを渡すことで、一斉配信を実現することができます。
サーバーからメールの一斉配信
api/send.ts
/* eslint-disable no-await-in-loop */
/* eslint-disable no-restricted-syntax */
/* eslint-disable import/no-anonymous-default-export */
import type { NextApiRequest, NextApiResponse } from "next"
import { Resend } from "resend"
import Slack from "../../components/mail/Slack"

const resend = new Resend(process.env.RESEND_API_KEY)

export default async (req: NextApiRequest, res: NextApiResponse) => {
  try {
    const { react, to: recipients } = req.body // ここでリクエストボディからデータを取得
    // reactの値によってコンポーネントを選択
    let selectedComponent
    if (react === "Slack") selectedComponent = Slack()
    else throw new Error("Invalid react value")

    for (const recipient of recipients) {
      const data = await resend.emails.send({
        from: "demo-mail@hogehoge.com",
        to: recipient,
        subject: "テストメール",
        html: "<strong>TEST</strong>",
        react: selectedComponent,
      })
    }

    res.status(200).json({ message: "Emails sent successfully." })
  } catch (error) {
    if (error instanceof Error) {
      res.status(400).json({ message: error.message })
    } else {
      res.status(400).json({ message: "An unknown error occurred." })
    }
  }
}
なお、一斉配信は上記コード内の
    for (const recipient of recipients) {
      const data = await resend.emails.send({
        from: "demo-mail@hogehoge.com",
        to: recipient,
        subject: "テストメール",
        html: "<strong>TEST</strong>",
        react: selectedComponent,
      })
    }
の繰り返し部分で実装しています。
ここまで実装し、画面上からメッセージを送るボタンを押すと、
無事指定したそれぞれのメールボックスにメールが到着しました。

テンプレートとはいえ、こんなに簡単に装飾した案内メールが一斉配信できるのは感動しました。。。
これで、一応今回の目的は達成です!
もしユーザーごとの固有情報を本文に埋め込みたい場合は・・・?
ここまでやっておいて今更なんですが、プロモーションなどの一斉配信メールは全てのユーザーに同じテンプレートを用いてもいいですが、参考に用いたSlackの確認コード用テンプレートのような場合だと、個別ユーザーに対して本文中に動的な値を埋め込んだ状態で配信する必要があります。
(テンプレートの例をGoogle規約変更のお知らせにすればよかった。。。)
その場合はバックエンド側で保有しているユーザー情報が必要になるため、プロジェクトにもよりますがPythonなどの独自のバックエンドで配信処理をした方が良さそうです。
ちなみに、ResendはPythonやGoで使うこともできるようです。
この辺りも追々試してみようかと思っています。
終わりに
今回は調べながら実装したので時間を要しましたが、慣れればサクッと実装ができるかと思います。
Reactコンポーネントを使ってシームレスに本文作成からメール配信まで一気通貫できるのは効率を追及したいエンジニアにはかなりありがたいです。
機会がありましたら一度お試しください。
参考
自分は具体的な実務を念頭に書いてしまい、少々内容が断片的になってしまいましたが、
React Email x Resend で次世代メールサービスを体験の記事の方が全体網羅的に書かれています。
是非こちらも参考にしてください。