fairy support jsの特徴
仮想DOM使わない
簡単に使えて学習コストが少ない(仮想DOMではないのでJavaScriptの知識だけで使える)
昔ながらの伝統的なつくりのWebシステムに途中から導入可能
詳しくはhttps://doc.fairysupport.com/js/ja/index.html
インストール
1.ここから(https://github.com/fairysupport/js_start/archive/refs/heads/master.zip)zipファイルをダウンロード
2.解凍する
3.解凍したフォルダ内のpackage.jsonのある場所にコマンドラインで移動
npm install
(npmは事前に使えるようにしておいてください)
完了
起動
npm run watch_local
これがビルドです
src配下のソースに変更があると、自動でビルドしてdistWorkにビルド結果を格納してくれます
開発中は起動しっぱなしでいいです
止めるときはCtrl+Cです
動かなくなったら、Ctrl+Cして再度npm run watch_localしてください
動作確認
コマンドラインをもう一つ起動して
npm run server
これで確認用の簡易サーバーが起動します
http://localhost:8000/page/index.html
にブラウザでアクセス
sampleボタンだけの簡単な画面が表示されるので、このボタン押下→Hello fairysupportがalertされればOK
基本的な書き方
とりあえず、書いて動かしてみる
src\page\sample.html作成
<!DOCTYPE html>
<html>
<head>
<meta http-equiv="Content-Type" content="text/html; charset=utf-8"/>
<title>
sample
</title>
<script id="fs-js" src="http://localhost:8000/js/fairysupport.min.js" data-page-root="http://localhost:8000/page"></script>
</head>
<body>
    <div data-obj="field1"></div>
    <div data-list="field2"></div>
    <div data-list="field2"></div>

    <div><input type="text" data-name="txt1"></div>
    <div><input type="text" data-obj="txt2"><input type="button" data-name="btn1" value="btn1"></div>
</body>
</html>
src\js\modules\sample.js作成
export class Sample {

    field1;
    field2;
    txt2;

    constructor() {
    }

    init() {
        /* 初期処理実装したい場合ここ */
    }

    txt1_input(event) {
        this.field1.textContent = event.currentTarget.value;
    }

    btn1_click(event) {
        this.field2.forEach(item => item.textContent = this.txt2.value);
    }

}
ファイルの構成
|-- Gruntfile.js
|-- package.json
`-- src
    |-- js
    |   `-- modules
    |       `-- sample.js
    `-- page
        `-- sample.html
http://localhost:8000/page/sample.html
にアクセス

上のテキストフィールドに何か入力

下のテキストフィールドに何か入力してbtn1押下
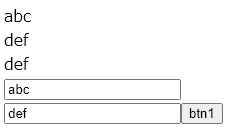
このような動きになります
src\js\modules配下にURLと同名jsファイル作成
クラス名をファイル名先頭大文字キャメルにする
そうすると、クラスフィールドとdata-obj、data-listを持つタグをひもづけしてくれる
クラスメソッドとdata-nameを持つタグをひもづけしてくれる
ビュー
ビューを出力する
js\templates\view1.html作成
これがビュー
<div data-text='v.key1'></div>

<div data-prop='{"style": {"color" : v.propTest.key1, "backgroundColor": v.propTest.key2}, "title" : "sample"}'>data-prop</div>

<div data-if='v.ifTest.val === 1'>
    v.ifTest.val === 1
</div>
<div data-elseif='v.ifTest.val === 2'>
    v.ifTest.val === 2
</div>
<div data-else=''>
    v.ifTest.val else
</div>

<select>
    <option data-for-start='l.i = 0' data-for-end='l.i < v.selectLimit' data-for-step='l.i++' data-text='l.i'></option>
</select>

<ol>
    <li data-foreach='v.forTest' data-foreach-key='k' data-foreach-value='v' data-foreach-skip='l.k === "str2"' data-foreach-end='l.k === "str4"'>
        <span data-text='l.k'></span><span>:</span><span data-text='l.v'></span>
    </li>
</ol>
src\page\sample.html修正
<!DOCTYPE html>
<html>
<head>
<meta http-equiv="Content-Type" content="text/html; charset=utf-8"/>
<title>
sample
</title>
<script id="fs-js" src="http://localhost:8000/js/fairysupport.min.js" data-page-root="http://localhost:8000/page"></script>
</head>
<body>
    <div data-obj="field1"></div>
    <div data-list="field2"></div>
    <div data-list="field2"></div>

    <div><input type="text" data-name="txt1"></div>
    <div><input type="text" data-obj="txt2"><input type="button" data-name="btn1" value="btn1"></div>

    <div><input type="button" data-name="btn2" value="btn2"></div>
    <div data-obj="field3"></div>

</body>
</html>
src\js\modules\sample.js修正
export class Sample {

    field1;
    field2;
    field3;
    txt2;

    constructor() {
    }

    init() {
        /* 初期処理実装したい場合ここ */
    }

    txt1_input(event) {
        this.field1.textContent = event.currentTarget.value;
    }

    btn1_click(event) {
        this.field2.forEach(item => item.textContent = this.txt2.value);
    }

    btn2_click(event) {
        let param = {'key1'       : 'aaa',
                     'propTest'   : {'key1': '#ffffff', 'key2': '#000000'},
                     'ifTest'     : {'val': 2},
                     'selectLimit': 10,
                     'forTest'    : {'str1': 'val1',
                                     'str2': 'val2',
                                     'str3': 'val3',
                                     'str4': 'val4',
                                     'str5': 'val5'}
                    };
        $f.loadTemplate(this.field3, 'view1', param)
        .then((nodeList) => console.log('load view1'))
        .catch((e) => console.error(e));
    }

}
loadTemplateがビューの呼び出し
第2引数にjs\templates配下のhtmlファイル名を渡す(拡張子書かずに)
第3引数に渡したparamは、ビュー内でvという変数でアクセスできる
lという変数がビュー内のみで使える。lはオブジェクト
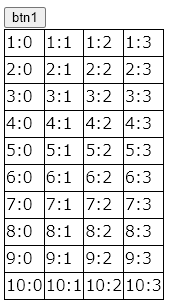
btn2押下でビューが表示される
data-textは値出力
data-propはプロパティに値をセット
data-if、data-elseif、data-elseはif、else if、else
data-for-start、data-for-end、data-for-stepは必ずセットで使うfor文
data-for-skipはループ処理をスキップする条件
data-for-startを使う際、data-for-skipは無くてもいい
data-foreach、data-foreach-key、data-foreach-valueは必ずセットで使うforeach文
data-foreachを使う際、data-foreach-skip、data-foreach-endは無くてもいい
data-foreach-skipはループ処理をスキップする条件
data-foreach-endはループ処理を終わる条件
ビューからビュー呼ぶ
js\templates\view2.html作成
<div>view2</div>
<div data-text='v.propTest.key1'></div>
<div data-text='v.propTest.key2'></div>
js\templates\view1.html修正
<div data-text='v.key1'></div>

<div data-prop='{"style": {"color" : v.propTest.key1, "backgroundColor": v.propTest.key2}, "title" : "sample"}'>data-prop</div>

<div data-if='v.ifTest.val === 1'>
    v.ifTest.val === 1
</div>
<div data-elseif='v.ifTest.val === 2'>
    v.ifTest.val === 2
</div>
<div data-else=''>
    v.ifTest.val else
</div>

<select>
    <option data-for-start='l.i = 0' data-for-end='l.i < v.selectLimit' data-for-step='l.i++' data-text='l.i'></option>
</select>

<ol>
    <li data-foreach='v.forTest' data-foreach-key='k' data-foreach-value='v' data-foreach-skip='l.k === "str2"' data-foreach-end='l.k === "str4"'>
        <span data-text='l.k'></span><span>:</span><span data-text='l.v'></span>
    </li>
</ol>

<div data-template='view2' data-template-variable='v'></div>
ビューを追加していく形
js\templates\add.html作成
<tr data-foreach='v.row' data-foreach-key='rowKey' data-foreach-value='rowVal'>
    <td data-foreach='l.rowVal' data-foreach-key='colKey' data-foreach-value='colVal' data-text='l.colVal' data-name='cell' style='border: 1px solid #000000;'></td>
</tr>
src\page\sample.html修正
<!DOCTYPE html>
<html>
<head>
<meta http-equiv="Content-Type" content="text/html; charset=utf-8"/>
<title>
sample
</title>
<script id="fs-js" src="http://localhost:8000/js/fairysupport.min.js" data-page-root="http://localhost:8000/page"></script>
</head>
<body>
    <div><input type="button" data-name="btn1" value="btn1"></div>
    <div>
        <table style="border-collapse:collapse">
            <tbody data-obj="field1">
            </tbody>
        </table>
    </div>
</body>
</html>
src\js\modules\sample.js修正
export class Sample {

    counter = 1;

    constructor() {
    }

    btn1_click(event) {
        let param = {'row': []};
        for (let i = 0; i < 10; i++, this.counter++) {
            let row = [];
            for (let ii = 0; ii < 4; ii++) {
                row.push(this.counter + ':' + ii);
            }
            param['row'].push(row);
        }

        $f.appendLoadTemplate(this.field1, 'add', param)
        .then((nodeList) => console.log('load add'))
        .catch((e) => console.error(e));
    }

    cell_click(event) {
        let cell = event.currentTarget;
        alert(cell.parentNode.sectionRowIndex + " : " + cell.cellIndex);
    }

}
ビュー独自処理
ビューに独自の処理をつける
src\page\sample.html修正
<!DOCTYPE html>
<html>
<head>
<meta http-equiv="Content-Type" content="text/html; charset=utf-8"/>
<title>
sample
</title>
<script id="fs-js" src="http://localhost:8000/js/fairysupport.min.js" data-page-root="http://localhost:8000/page"></script>
</head>
<body>
    <div data-obj="field1"></div>
    <div data-list="field2"></div>
    <div data-list="field2"></div>

    <div><input type="text" data-name="txt1"></div>
    <div><input type="text" data-obj="txt2"><input type="button" data-name="btn1" value="btn1"></div>

    <div><input type="button" data-name="btn2" value="btn2"></div>
    <div data-obj="field3"></div>

</body>
</html>
src\js\modules\sample.js修正
export class Sample {

    field1;
    field2;
    field3;
    txt2;

    constructor() {
    }

    init() {
        /* 初期処理実装したい場合ここ */
    }

    txt1_input(event) {
        this.field1.textContent = event.currentTarget.value;
    }

    btn1_click(event) {
        this.field2.forEach(item => item.textContent = this.txt2.value);
    }

    btn2_click(event) {
        let param = {'key1'       : 'aaa',
                     'propTest'   : {'key1': '#ffffff', 'key2': '#000000'},
                     'ifTest'     : {'val': 2},
                     'selectLimit': 10,
                     'forTest'    : {'str1': 'val1',
                                     'str2': 'val2',
                                     'str3': 'val3',
                                     'str4': 'val4',
                                     'str5': 'val5'}
                    };
        $f.loadUniqueComponent(this.field3, 'sample1', param)
        .then((nodeList) => console.log('load sample1'))
        .catch((e) => console.error(e));
    }

}
src\js\components\sample1\controller.js作成
export class Sample1 {

    field1;
    field2;
    txt2;

    constructor() {
    }

    init(data) {
        /* 初期処理実装したい場合ここ */
    }

    txt1_input(event) {
        this.field1.textContent = 'component Sample1:' + event.currentTarget.value;
    }

    btn1_click(event) {
        this.field2.forEach(item => item.textContent = 'component Sample1:' + this.txt2.value);
    }

}
src\js\components\sample1\view.html作成
<div>component sample1</div>

<div data-sample1-obj="field1"></div>
<div data-sample1-list="field2"></div>
<div data-sample1-list="field2"></div>

<div><input type="text" data-sample1-name="txt1"></div>
<div><input type="text" data-sample1-obj="txt2"><input type="button" data-sample1-name="btn1" value="btn1"></div>

<div data-text='v.key1'></div>
<div data-if='v.ifTest.val === 1'>
    v.ifTest.val === 1
</div>
<div data-else=''>
    v.ifTest.val else
</div>

<div data-unique-component='sample2' data-unique-component-variable='v'></div>
src\js\components\sample2\controller.js作成
export class Sample2 {

    field1;
    field2;
    txt2;

    constructor() {
    }

    init(data) {
        /* 初期処理実装したい場合ここ */
    }

    txt1_input(event) {
        this.field1.textContent = 'component Sample2:' + event.currentTarget.value;
    }

    btn1_click(event) {
        this.field2.forEach(item => item.textContent = 'component Sample2:' + this.txt2.value);
    }

}
src\js\components\sample2\view.html作成
<div>component sample2</div>

<div data-sample2-obj="field1"></div>
<div data-sample2-list="field2"></div>
<div data-sample2-list="field2"></div>

<div><input type="text" data-sample2-name="txt1"></div>
<div><input type="text" data-sample2-obj="txt2"><input type="button" data-sample2-name="btn1" value="btn1"></div>

<div data-text='v.propTest.key1'></div>
<div data-text='v.propTest.key2'></div>
ファイルの構成
|-- Gruntfile.js
|-- package.json
`-- src
    |-- js
    |   |-- components
    |   |   |-- sample1
    |   |   |   |-- controller.js
    |   |   |   `-- view.html
    |   |   `-- sample2
    |   |       |-- controller.js
    |   |       `-- view.html
    |   `-- modules
    |       `-- sample.js
    `-- page
        `-- sample.html
http://localhost:8000/page/sample.html
にアクセス
btn2押下でsrc\js\components配下のsample1とsample2が出てる
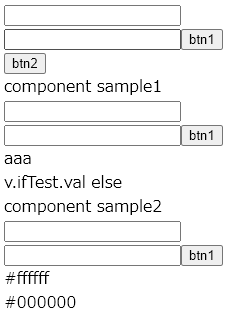
src\js\modules\sample.jsでloadUniqueComponentを実行している
第2引数にjs\components配下のフォルダ名を渡す
これでsrc\js\components配下を呼び出せる
src\js\components配下のcontroller.jsのクラス名はフォルダ名先頭大文字キャメル
src\js\components配下のview.htmlはdata-obj、data-list、data-nameではなく、data-フォルダ名-obj、data-フォルダ名-list、data-フォルダ名-name
data-obj、data-list、data-nameにしてしまうとsrc\js\modules\sample.jsにひもづく
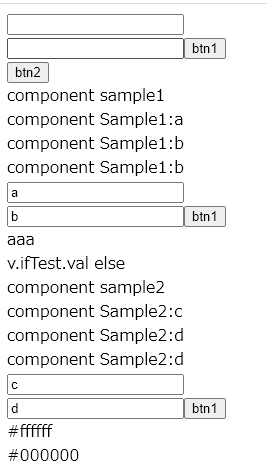
値を入力、ボタン押下するとsrc\js\components配下につくったcontroller.jsの処理が実行される
Ajax
src\page\sample.html修正
<!DOCTYPE html>
<html>
<head>
<meta http-equiv="Content-Type" content="text/html; charset=utf-8"/>
<title>
sample
</title>
<script id="fs-js" src="http://localhost:8000/js/fairysupport.min.js" data-page-root="http://localhost:8000/page"></script>
</head>
<body>
    <div data-obj="obj"></div>
    <div><button data-name="sample">sample</button></div>
</body>
</html>
src\js\modules\sample.js修正
export class Sample {

    obj;

    constructor() {
    }

    sample_click(event) {
        $f.ajax($f.envValue('apiRoot') + '/sample.json', {'sample_key': 'sample_value'}, 'GET')
        .setLoadend(200, this.success.bind(this))
        .setLoadend(404, this.error.bind(this))
        .setLoadend(null, this.error.bind(this))
        .send();
    }

    success(event, xhr) {
        this.obj.textContent = JSON.stringify(xhr.response);
    }

    error(event, xhr) {
        this.obj.textContent += xhr.status;
    }

}
src\js\env\envValue.local.json作成
{
    "apiRoot" : "http://localhost:8000/dummy"
}
src\dummy\sample.json作成
{
    "key1": "value1",
    "key2": "value2",
    "key3": "value3"
}
sampleボタン押下でjsonが出ます

\$f.envValue('apiRoot')でenvValue.local.jsonの値が取れます。拡張子がlocal.jsonなのはpackage.jsonのscriptsで引数にlocalを与えているため
\$fはフレームワークのインスタンス。グローバル変数です
\$f.ajax第1引数がURL、第2引数がリクエストパラメーター、第3引数がhttpメソッド
この簡易サーバーがPOSTに対応していないので、第3引数をGETにしてます
setLoadend(200, this.success.bind(this))はhttpステータスが200の場合の処理
setLoadend(null, this.error.bind(this))は設定していないhttpステータスの場合の処理。今回の場合だと、200でもない404でもない場合の処理
エラーチェック
基本的な使い方
src\env\envValue.local.json修正
{
     "jsServer" : "http://localhost:8000"
    ,"pageRoot" : "http://localhost:8000/page"
    ,"version" : (new Date()).getTime()
}
↑修正したのはsrc\js\env\envValue.local.jsonではなく、src\env\envValue.local.json
src\js\util\sampleValidator.js作成
export class SampleValidator {

    constructor() {
    }

    init (target, property, newValue, oldValue, arg, event) {
        arg.msgObj.textContent = '';
        return true;
    }

    require (target, property, newValue, oldValue, arg, event) {
        if (this.isEmpty(newValue)) {
            arg.msgObj.textContent += ' require';
            return false;
        }
        return true;
    }

    intType (target, property, newValue, oldValue, arg, event) {
        if (this.isEmpty(newValue)) {
            return true;
        }
        let reg = new RegExp('(^[-]{0,1}[1-9]{1}[0-9]*$|^[0]{1}$)', 'g');
        if (!(reg.test(newValue))) {
            arg.msgObj.textContent += ' int';
            return false;
        }
        return true;
    }

    minMaxLength (target, property, newValue, oldValue, arg, event) {
        if (this.isEmpty(newValue)) {
            return true;
        }
        if (newValue.length < arg.min || arg.max < newValue.length) {
            arg.msgObj.textContent += ' min:' + arg.min + ' max:' + arg.max;
            return false;
        }
        return true;
    }

    isEmpty(value){
        if (value === '' || value === null || value === undefined) {
            return true;
        }
        return false;
    }

}
src\js\modules\sample.js修正
import {SampleValidator} from '../util/sampleValidator.js?$envValue(version)';

export class Sample {

    constructor() {
    }

    init() {

        let v = new SampleValidator();

        $f.validate('group1', this.text, 'value', ['blur'], [v.init.bind(v), v.require.bind(v), v.intType.bind(v), v.minMaxLength.bind(v)], {"min": 2, "max": 4, "msgObj": this.bind1});

    }

    btn_click(event) {
        console.log(this.text.value);
    }

}
src\page\sample.html修正
<!DOCTYPE html>
<html>
<head>
<meta http-equiv="Content-Type" content="text/html; charset=utf-8"/>
<title>
sample
</title>
<script id="fs-js" src="http://localhost:8000/js/fairysupport.min.js" data-page-root="http://localhost:8000/page"></script>
</head>
<body>
    <div data-obj="bind1"></div>
    <div><input type='text' data-obj='text' value='22'></div>
    <div><button data-name="btn">btn</button></div>
</body>
</html>
動作確認してみます
テキストフィールドのblurイベントの時にValidatorが実行されます


\$f.validateの第2引数に第4引数イベントが発生すると、第5引数に指定したValidatorが実行されます
Validatorの引数はtarget, property, newValue, oldValue, arg, event
target::\$f.validateの第2引数
property:\$f.validateの第3引数
newValue:\$f.validateの第2引数の第3引数プロパティに新たに入れようとしている値
oldValue:focusされたときの値
arg:\$f.validateの第6引数
event:発生したイベント
全てのValidatorがtrueを返すとnewValueが格納される。Validatorが1つでもfalseを返すとoldValueが格納される
入力中のエラーチェック
blurイベントだけでなく、入力中もエラーチェックが実行されるようにしてみます
src\js\util\sampleValidator.js修正
export class SampleValidator {

    constructor() {
    }

    init (target, property, newValue, oldValue, arg, event) {
        arg.msgObj.textContent = '';
        return true;
    }

    require (target, property, newValue, oldValue, arg, event) {
        if (this.isEmpty(newValue)) {
            arg.msgObj.textContent += ' require';
            return false;
        }
        return true;
    }

    intType (target, property, newValue, oldValue, arg, event) {
        if (this.isEmpty(newValue)) {
            return true;
        }
        let reg = new RegExp('(^[-]{0,1}[1-9]{1}[0-9]*$|^[0]{1}$)', 'g');
        if (!(reg.test(newValue))) {
            arg.msgObj.textContent += ' int';
            return false;
        }
        return true;
    }

    minMaxLength (target, property, newValue, oldValue, arg, event) {
        if (this.isEmpty(newValue)) {
            return true;
        }
        if (newValue.length < arg.min || arg.max < newValue.length) {
            arg.msgObj.textContent += ' min:' + arg.min + ' max:' + arg.max;
            return false;
        }
        return true;
    }

    isEmpty(value){
        if (value === '' || value === null || value === undefined) {
            return true;
        }
        return false;
    }

    textFinalize (target, property, newValue, oldValue, arg, event, valid, validResult) {
        let result = {};
        if (event && 'type' in event && 'input' === event.type) {
            result['oldValue'] = newValue;
        }
        return result;
    }

}
src\js\modules\sample.js修正
import {SampleValidator} from '../util/sampleValidator.js?$envValue(version)';

export class Sample {

    constructor() {
    }

    init() {

        let v = new SampleValidator();

        $f.validate('group1', this.text, 'value', ['input', 'blur'], [v.init.bind(v), v.require.bind(v), v.intType.bind(v), v.minMaxLength.bind(v)], {"min": 2, "max": 4, "msgObj": this.bind1}, v.textFinalize.bind(v));

    }

    btn_click(event) {
        console.log(this.text.value);
    }

}
\$f.validateの第4引数にinputを追加
\$f.validateの第7引数に全てのValidator実行後に実行される終了処理を指定できます
終了処理はnewValue、oldValueの書き換えができます
inputイベント時はまだ入力している途中なので、終了処理内でエラー時でもnewValueに戻るようにしています
inputイベント時はまだ入力している途中なので、エラーメッセージは表示されますが、不正値であってもテキストフィールドに出力してます
blurイベント時は不正値の場合、focusされたときの値に戻ります
入力中でも正しい値だったら有効にする
先ほどの修正ですと、入力中に有効値だったとしても、最終的に不正値だったら、blurイベント時のValidatorによって、focusされたときの値に戻りました
フレームワークでoldValueがイベントごとに管理されているためです
inputイベント時有効値だったら、blurイベント時のValidatorのoldValueを書き換えるように修正します
src\js\util\sampleValidator.js修正
export class SampleValidator {

    constructor() {
    }

    init (target, property, newValue, oldValue, arg, event) {
        arg.msgObj.textContent = '';
        return true;
    }

    require (target, property, newValue, oldValue, arg, event) {
        if (this.isEmpty(newValue)) {
            arg.msgObj.textContent += ' require';
            return false;
        }
        return true;
    }

    intType (target, property, newValue, oldValue, arg, event) {
        if (this.isEmpty(newValue)) {
            return true;
        }
        let reg = new RegExp('(^[-]{0,1}[1-9]{1}[0-9]*$|^[0]{1}$)', 'g');
        if (!(reg.test(newValue))) {
            arg.msgObj.textContent += ' int';
            return false;
        }
        return true;
    }

    minMaxLength (target, property, newValue, oldValue, arg, event) {
        if (this.isEmpty(newValue)) {
            return true;
        }
        if (newValue.length < arg.min || arg.max < newValue.length) {
            arg.msgObj.textContent += ' min:' + arg.min + ' max:' + arg.max;
            return false;
        }
        return true;
    }

    isEmpty(value){
        if (value === '' || value === null || value === undefined) {
            return true;
        }
        return false;
    }

    textFinalize (target, property, newValue, oldValue, arg, event, valid, validResult) {
        let result = {};
        if (event && 'type' in event && 'input' === event.type) {
            result['oldValue'] = newValue;
            if (valid) {
                result['oldValueAllEvent'] = newValue;
            }
        }
        return result;
    }

}
終了処理でoldValueAllEventを返すと、全てのイベントのoldValueが書き換えられます
終了処理の第7引数validはValidatorの結果です。全てのValidatorがtrueの場合true、Validatorが1つでもfalseの場合falseが渡されます
=演算子で直接格納時のエラーチェック
src\js\modules\sample.js修正
import {SampleValidator} from '../util/sampleValidator.js?$envValue(version)';

export class Sample {

    constructor() {
    }

    init() {

        let v = new SampleValidator();

        $f.validate('group1', this.text, 'value', ['input', 'blur', null], [v.init.bind(v), v.require.bind(v), v.intType.bind(v), v.minMaxLength.bind(v)], {"min": 2, "max": 4, "msgObj": this.bind1}, v.textFinalize.bind(v));

    }

    btn_click(event) {
        this.text.value = this.text2.value;
    }

}
src\page\sample.html修正
<!DOCTYPE html>
<html>
<head>
<meta http-equiv="Content-Type" content="text/html; charset=utf-8"/>
<title>
sample
</title>
<script id="fs-js" src="http://localhost:8000/js/fairysupport.min.js" data-page-root="http://localhost:8000/page"></script>
</head>
<body>
    <div data-obj="bind1"></div>
    <div><input type='text' data-obj='text' value='22'></div>
    <div><input type='text' data-obj='text2' value=''></div>
    <div><button data-name="btn">btn</button></div>
</body>
</html>
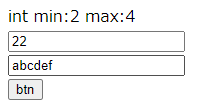
text2を追加してbtnがクリックされるとtext2.valueをtext.valueに格納するようにしました
\$f.validateの第4引数にnullを追加。nullを指定すると=演算子の時にValidatorを実行させるということになります
手動実行エラーチェック
イベント発生時や=演算子の時にエラーチェックを実行してきましたが、任意のタイミングでエラーチェックを手動で実行します
src\page\sample.html修正
<!DOCTYPE html>
<html>
<head>
<meta http-equiv="Content-Type" content="text/html; charset=utf-8"/>
<title>
sample
</title>
<script id="fs-js" src="http://localhost:8000/js/fairysupport.min.js" data-page-root="http://localhost:8000/page"></script>
</head>
<body>
    <form action="index.html" data-name='form1'>
        <div data-obj="bind1"></div>
        <div><input type='text1' data-obj='text1' value='22'></div>
        <div data-obj="bind2"></div>
        <div><input type='text2' data-obj='text2' value='22'></div>
        <input type='submit' value='submit'>
    </form>
    <form action="index.html" data-name='form2'>
        <div data-obj="bind3"></div>
        <div><input type='text3' data-obj='text3' value='22'></div>
        <div data-obj="bind4"></div>
        <div><input type='text4' data-obj='text4' value='22'></div>
        <input type='submit' value='submit'>
    </form>
</body>
</html>
src\js\modules\sample.js修正
import {SampleValidator} from '../util/sampleValidator.js?$envValue(version)';

export class Sample {

    constructor() {
    }

    init() {

        let v = new SampleValidator();

        $f.validate('group1', this.text1, 'value', ['input', 'blur', null], [v.init.bind(v), v.require.bind(v), v.intType.bind(v), v.minMaxLength.bind(v)], {"min": 2, "max": 4, "msgObj": this.bind1}, v.textFinalize.bind(v));
        $f.validate('group1', this.text2, 'value', ['input',         null], [v.init.bind(v), v.require.bind(v), v.intType.bind(v), v.minMaxLength.bind(v)], {"min": 2, "max": 4, "msgObj": this.bind2}, v.textFinalize.bind(v));
        $f.validate('group2', this.text3, 'value', ['input', 'blur', null], [v.init.bind(v), v.require.bind(v), v.intType.bind(v), v.minMaxLength.bind(v)], {"min": 2, "max": 4, "msgObj": this.bind3}, v.textFinalize.bind(v));
        $f.validate('group2', this.text4, 'value', ['input',         null], [v.init.bind(v), v.require.bind(v), v.intType.bind(v), v.minMaxLength.bind(v)], {"min": 2, "max": 4, "msgObj": this.bind4}, v.textFinalize.bind(v));

    }

    form1_submit(event) {
        let vaild = $f.execGroupValidator('group1');
        if (!vaild) {
            console.log('error form1');
            event.preventDefault();
            event.stopImmediatePropagation();
        }
    }

    form2_click(event) {
        let vaild = $f.execGroupValidator('group2');
        if (!vaild) {
            console.log('error form2');
            event.preventDefault();
            event.stopImmediatePropagation();
        }
    }

}
手動実行の時エラー値つくるため、わざとtext2、text4のvalidateからblurイベント外しました
\$f.execGroupValidatorで\$f.validateの第1引数が同じ値のエラーチェックを一括実行できます
全てのValidatorがtrueの場合true、Validatorが1つでもfalseの場合falseが返ってきます
クラスフィールドへのエラーチェック
src\js\util\sampleValidator.js修正
export class SampleValidator {

    constructor() {
    }

    init (target, property, newValue, oldValue, arg, event) {
        if (arg && 'msgObj' in arg) {
            arg.msgObj.textContent = '';
        }
        return true;
    }

    require (target, property, newValue, oldValue, arg, event) {
        if (this.isEmpty(newValue)) {
            if (arg && 'msgObj' in arg) {
                arg.msgObj.textContent += ' require';
            }
            return false;
        }
        return true;
    }

    intType (target, property, newValue, oldValue, arg, event) {
        if (this.isEmpty(newValue)) {
            return true;
        }
        let reg = new RegExp('(^[-]{0,1}[1-9]{1}[0-9]*$|^[0]{1}$)', 'g');
        if (!(reg.test(newValue))) {
            if (arg && 'msgObj' in arg) {
                arg.msgObj.textContent += ' int';
            }
            return false;
        }
        return true;
    }

    minMaxLength (target, property, newValue, oldValue, arg, event) {
        if (this.isEmpty(newValue)) {
            return true;
        }
        if (newValue.length < arg.min || arg.max < newValue.length) {
            if (arg && 'msgObj' in arg) {
                arg.msgObj.textContent += ' min:' + arg.min + ' max:' + arg.max;
            }
            return false;
        }
        return true;
    }

    isEmpty(value){
        if (value === '' || value === null || value === undefined) {
            return true;
        }
        return false;
    }

    textFinalize (target, property, newValue, oldValue, arg, event, valid, validResult) {
        let result = {};
        if (!event && !valid) {
            throw 'invalid';
        } else if (event && 'type' in event && 'input' === event.type) {
            result['oldValue'] = newValue;
            if (valid) {
                result['oldValueAllEvent'] = newValue;
            }
        }
        return result;
    }

}
src\page\sample.html修正
<!DOCTYPE html>
<html>
<head>
<meta http-equiv="Content-Type" content="text/html; charset=utf-8"/>
<title>
sample
</title>
<script id="fs-js" src="http://localhost:8000/js/fairysupport.min.js" data-page-root="http://localhost:8000/page"></script>
</head>
<body>
    <div><input type='text1' data-obj='text1' value='22'></div>
    <input type='button' value='button' data-name='button'>
</body>
</html>
src\js\modules\sample.js修正
import {SampleValidator} from '../util/sampleValidator.js?$envValue(version)';

export class Sample {

    intField = 20;

    constructor() {
    }

    init() {

        let v = new SampleValidator();

        $f.validate('group1', this, 'intField', [null], [v.init.bind(v), v.require.bind(v), v.intType.bind(v), v.minMaxLength.bind(v)], {"min": 2, "max": 4}, v.textFinalize.bind(v));

    }

    button_click(event) {
        try {
            this.intField = this.text1.value;
            console.log('success');
        } catch (e) {
            console.error(e);
        }
    }

}
SampleValidatorでarg.msgObj.textContentはif文で囲みました
終了処理でif (!event && !valid) 追加
sample.jsでbutton_clickでクラスフィールドに値入れました
多言語対応
src\js\msg\msg.jsonをコピーして
src\js\msg\msg.en.json作成
src\js\msg\msg.en.json修正
{
     "invalidValue"  : "en Invalid value"
    ,"errorRequired" : "en Required"
    ,"errorIntValue" : "en Please enter an integer"
    ,"errorMinValue" : "en Please enter value less than or equal to ${min}"
    ,"errorMaxValue" : "en Please enter value more than or equal to ${max}"
}
src\js\msg\msg.jsonをコピーして
src\js\msg\msg.en-US.json作成
src\js\msg\msg.en-US.json修正
{
     "invalidValue"  : "en-US Invalid value"
    ,"errorRequired" : "en-US Required"
    ,"errorIntValue" : "en-US Please enter an integer"
    ,"errorMinValue" : "en-US Please enter value less than or equal to ${min}"
    ,"errorMaxValue" : "en-US Please enter value more than or equal to ${max}"
}
src\page\sample.html修正
<!DOCTYPE html>
<html>
<head>
<meta http-equiv="Content-Type" content="text/html; charset=utf-8"/>
<title>
sample
</title>
<script id="fs-js" src="http://localhost:8000/js/fairysupport.min.js" data-page-root="http://localhost:8000/page"></script>
</head>
<body>
    <div data-obj='obj'></div>
    <input type='button' value='button' data-name='button'>
</body>
</html>
src\js\modules\sample.js修正
export class Sample {

    constructor() {
    }

    button_click(event) {
        this.obj.textContent = $f.msg('errorMinValue', {'min': 10});
    }

}
ブラウザの設定→言語で英語をトップにする
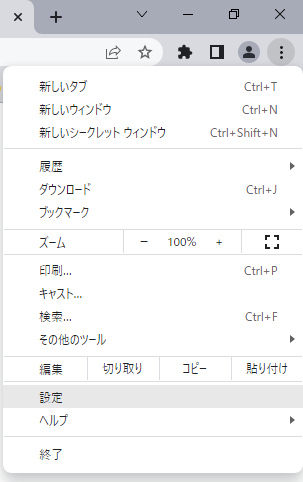
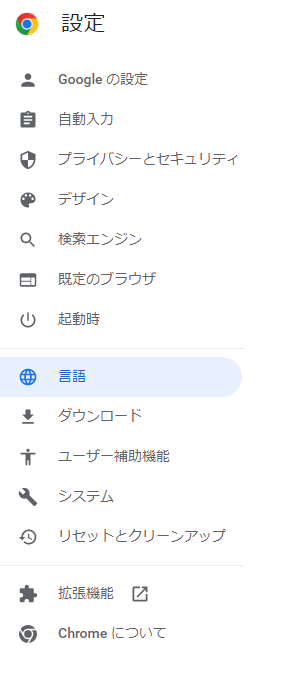
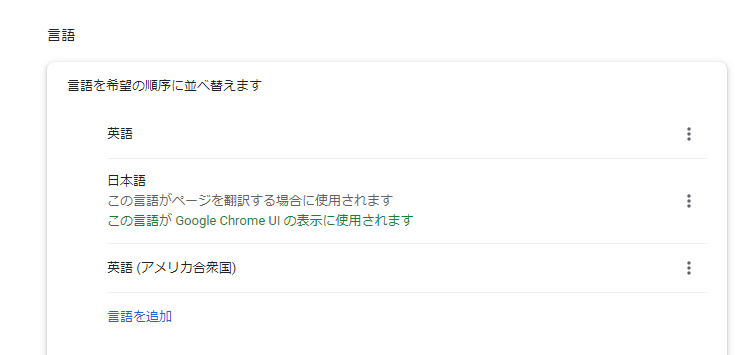
http://localhost:8000/page/sample.html
でbuttonクリック

ブラウザの設定→言語で英語(アメリカ合衆国)をトップにする
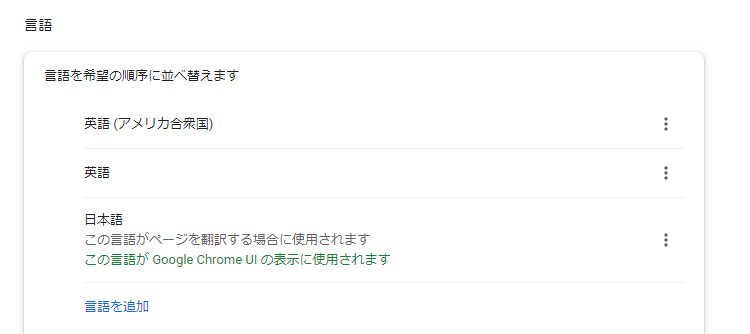
http://localhost:8000/page/sample.html
再読み込みしてbuttonクリック

ブラウザの設定→言語で日本語をトップにする
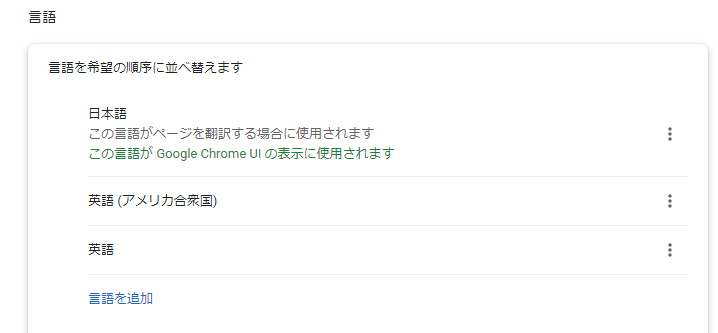
http://localhost:8000/page/sample.html
再読み込みしてbuttonクリック

Laravelで使ってみる
PHP+Laravelにfairy support jsを使ってみる
Laravelの説明はここでは省略します
フォルダ構成はこんな感じ
Laravelプロジェクト(LaravelPJDir)とfairy support jsプロジェクト(fairysupportjsPJDir)が同階層にある
|-- LaravelPJDir
|   |-- app
|   |-- public
|   |-- resources
|   |-- routes
|   |-- vendor
|   |-- composer.json
|   |  ・・・・・いろいろ省略
|   `-- webpack.mix.js
`-- fairysupportjsPJDir
    |-- Gruntfile.js
    |-- package.json
    |-- distWork
    |-- node_modules
    `-- src
        |-- js
        |   `-- modules
        |       `-- sample.js
        `-- page
            `-- sample.html
fairy support jsの簡易確認サーバーはCtrl+Cで止めていいです
fairy support jsのビルドはとめないでください
fairysupportjsPJDir直下のGruntfile.js修正
module.exports = function(grunt){
  grunt.initConfig({
    copy: {
      dist: {
        files: [
          {
            cwd: 'distWork',
            src: ['img/**/*', 'js/**/*.json', 'js/**/*.min.js', 'favicon.ico'],
            expand: true,
            dest: 'dist'
          }
        ]
      },
      customize: {
        files: [
          {
            cwd: 'distWork',
            src: ['css/**/*', 'img/**/*', 'js/**/*', 'page/**/*', 'favicon.ico'],
            expand: true,
            dest: '../LaravelPJDir/public/frontResources'
          }
        ]
      }
    },
・・・・・省略
↑copyのcustomizeのdestを修正しています
fairysupportjsPJDir直下のpackage.json修正
・・・・・省略
  "scripts": {
    "minify": "grunt default",
    "build_prd": "fairysupport_js prd",
    "build_stg": "fairysupport_js stg",
    "build_dev": "fairysupport_js dev",
    "build_local": "fairysupport_js local",
    "watch_local": "watch \"npm run build_local\" ./src",
    "server": "http-server ./distWork -a localhost -p 8000 -o page/index.html",
    "copy_dist_work": "grunt watch:customize"
    ,"copy_laravel": "grunt copy:customize"
  },
・・・・・省略
↑copy_laravelを追加しています
コマンドラインでfairysupportjsPJDirに移動し
npm run copy_laravel
これでLaravelPJDir/public配下にfrontResourcesディレクトリができ、その中にfairy support jsの成果物がコピーされているのを確認
確認できたらコマンドラインで
npm run copy_dist_work
これを起動しっぱなしにしておけば、distWork配下に変更があると自動的にコピーが実行される
自動コピーをとめるときはCtrl+C
fairy support js側の実装
fairysupportjsPJDir\src\js\modules\sample\fairysupport.js作成
export class Fairysupport {

    constructor() {
    }

    text1_input(event) {
        this.obj1.textContent = event.currentTarget.value;
    }

}
Laravel側の実装
LaravelPJDir/app/Http/Controllers/SampleController.php作成
<?php

namespace App\Http\Controllers;

use Illuminate\Http\Request;

class SampleController extends Controller
{
    /**
     * @return \Illuminate\Http\Response
     */
    public function fairysupport()
    {
        return view('sample.fairysupport');
    }

}
LaravelPJDir/resources/views/layout.blade.php作成
<html>
    <head>
        <title>sample</title>
    </head>
    <script id="fs-js" src="{{ asset('/frontResources/js/fairysupport.min.js') }}" data-page-root="{{ url('/') }}"></script>
    <script>
        function fairysupportInitFail(retryCount, error){
            return false;
        }
    </script>
    <body>
        <div>
            @yield('content')
        </div>
    </body>
</html>
↑scriptタグでfairysupport.min.js読み込み
fairysupport jsはURLに対応するmodules配下のjsファイルを見つけられない時、fairysupportInitFailを実行するので、実装しておく
LaravelPJDir/resources/views/sample/fairysupport.blade.php作成
@extends('layout')
<div data-obj='obj1'></div>
<div><input type='text' data-name='text1'></div>
LaravelPJDir/routes/web.php修正
・・・・・・省略
Route::get('sample/fairysupport', 'App\Http\Controllers\SampleController@fairysupport');
↑'sample/fairysupport'追加
Laravelをデプロイしてあるwebサーバーを起動
先ほどweb.phpで追加したsample/fairysupportにアクセス

inputイベントでfairysupportjsPJDir\src\js\modules\sample\fairysupport.jsのメソッドが動いていることを確認
