背景
仕事でhttps化したjupyterサーバを立てる必要があるけども、サーバ証明でお金も手続きの時間もかけたくなかったのでLet's Encryptというサービスを使って無料サーバ証明で構築したメモ。
因みに、最初は無料のサーバ証明で記事が結構見つかった、AWS Certificate Managerというサービスを利用しようとしてみたけど、これはAWSの環境でしか使えないみたいで、今回はGCP(Google Cloud Platform)上にサーバ構築することにしていたため断念。
構築した環境概要
- サーバ環境: Google Cloud Platform
- OS: debian 9 stretch
- webサーバ: nginx
- appサーバ: jupyter
構築手順:
step.1 インスタンスの作成
Compute Engine > VM インスタンス > インスタンスを作成 にアクセスしてインスタンスを作成します。
ミニマムな環境とするためマシンタイプはmicroですが用途や好みで設定します. 重要なのは赤枠の部分です。

httpsにするのであればHTTPトラフィックを許可しなくてもよさそうですが、let's encriptで自動設定するときにHTTP使うので穴をあけておきます。
因みに、料金は、上記の東京リージョンのmicroインスタンスで$5.22/1ヵ月 ≒ 600円弱/1ヵ月。
次に固定IPを設定します。上記のサーバ設定の外部IPはエフェメラルと言ってサーバ起動ごとにIPは変更されてしまうので固定IPにします。サーバ作成時にも設定できますが、後から設定した方が分かり易いので私はいつも後から設定します。
VPCネットワーク > 外部IPアドレス にアクセスし、「タイプ」列の「エフェメラル」を「静的」に変更します。

ポップアップで名前と説明を要求されますが、GCP上の分かり易さのためなので適当なものを設定して「予約」をクリックします。次の設定でこのIPを使うのでメモしておきます。
※ 1行目は別用途で使っているもので、2行目が今回設定した外部IP
step.2 DNS設定
DNSの設定は反映されるまでに時間を要すので、一旦サーバ構築は中断して、先にDNS設定をしておきます。
私のドメインはお名前.comで取得しているのですが、お名前.comのDNSは反映までに時間がかかるように感じる(経験上半日くらい)ので、Google Cloud DNSで設定できるようにします。
先ずはお名前.comでネームサーバの設定を変更します(Google Cloud DNSの設定が参照されるようにします)。お名前.comのUIはちょっと分かりづらいので頑張って以下の画面にたどり着いたら以下の設定をします.

画面では分かりづらいので設定値を以下にも書いておきます。
- ns-cloud-a1.googledomains.com.
- ns-cloud-a2.googledomains.com.
- ns-cloud-a3.googledomains.com.
- ns-cloud-a4.googledomains.com.
※ 順序は違っていても問題ないです
反映されるまでは気長に待つしかないですが、名前解決ができないだけでできる作業もあるので続けて以下作業しています。
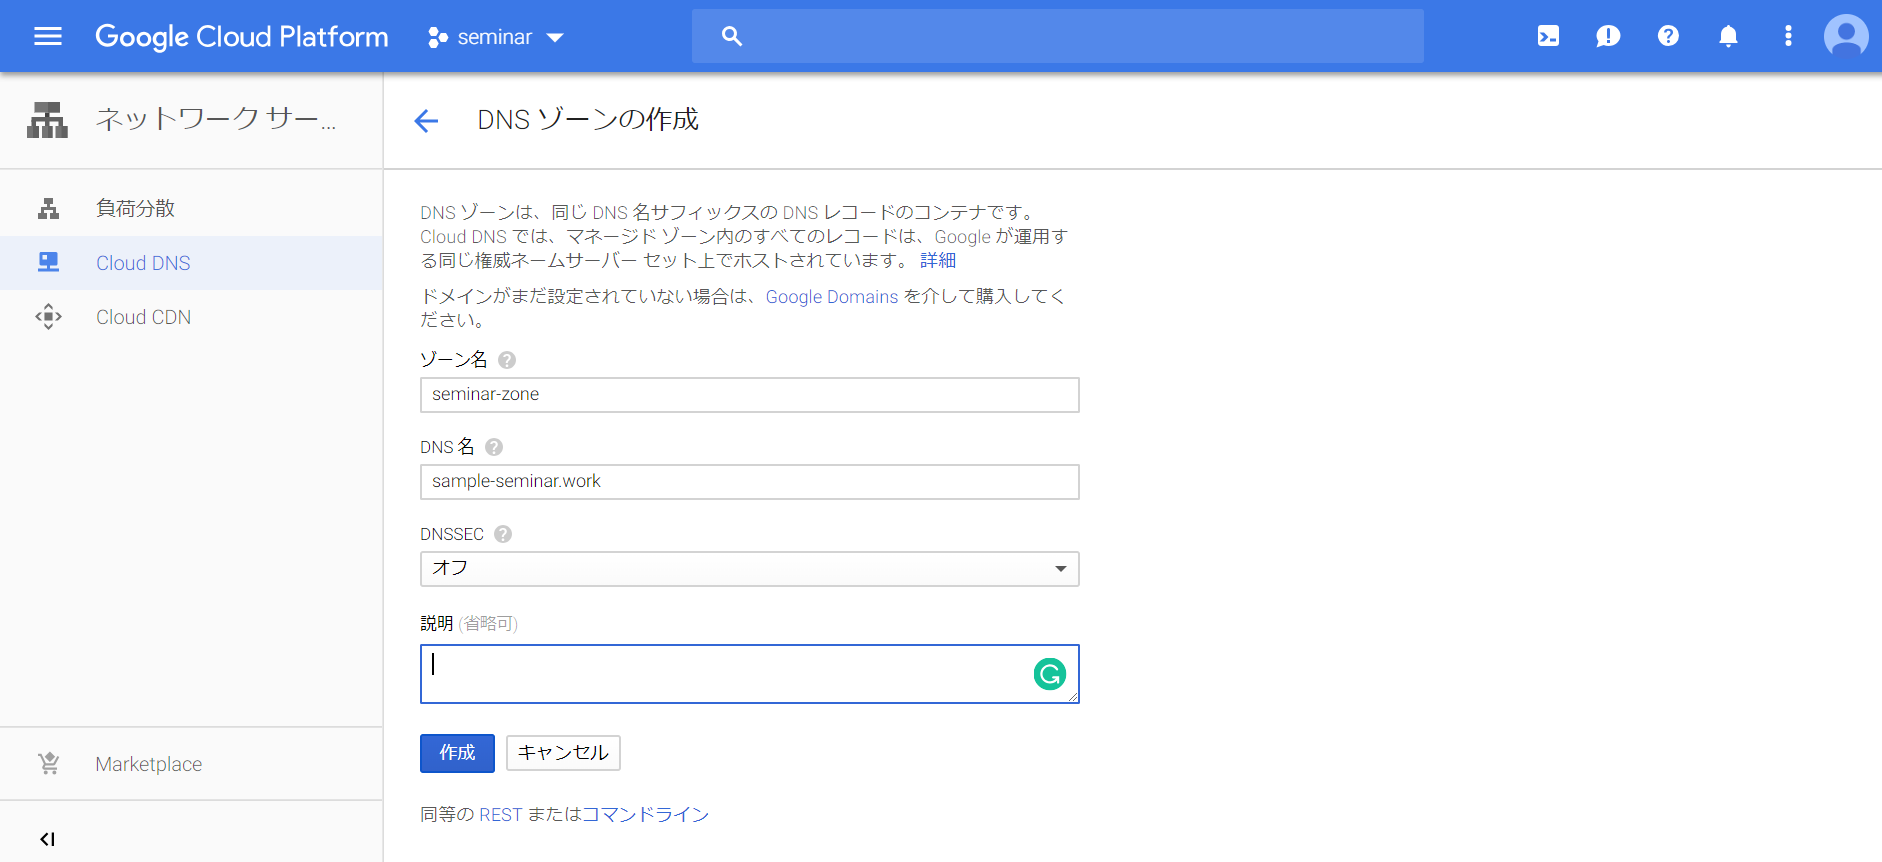
次にGoogle Cloud DNSを設定します。ネットワーキング > Cloud DNS にアクセスし、「ゾーンの作成」をクリックして以下の通り入力します。ゾーン名は分かり易いものを、DNS名に所有しているdomain名の入力します。

次に固定IPとドメインを紐づけていきます。IPv4アドレスに先ほどメモしたサーバのIPを入力します。リソースレコードのタイプがAとなっていることも確認してください。

step3. OSの事前設定
Google Cloud PlatformではブラウザでSSH接続する方法が提供されているでそれを使っていきます。
VMインスタンス画面の「SSH」をクリックしてOSにアクセスします。

Nginxの導入
デフォルトでは導入されていなかったのでaptコマンドでインストールします。
各種設定はあとにします。
sudo apt install nginx
Anacondaの導入
Pythonの環境管理したいので導入しますが、Pythonの環境分離が不要であればスキップして構いません。URLはサイトのダウンロードボタンのURLをコピーします(以下の赤枠)。

そのままインストールしようとするとbunzip2が無いといわれるのでaptでbzip2をあらかじめインストールしたうえでインストーラを実行します。
$ sudo apt install bzip2
$ wget https://repo.anaconda.com/archive/Anaconda3-5.2.0-Linux-x86_64.sh
$ chmod +x Anaconda3-5.2.0-Linux-x86_64.sh
$ ./Anaconda3-5.2.0-Linux-x86_64.sh
インストール中に色々聞かれますが基本はそのままEnterで進めます。
ライセンス条項への同意部分はyesとタイプします。
Do you accept the license terms? [yes|no]
[no] >>> yes`
また以下の通りPathの追加を確認されるので追加(yesとタイプ)しておくと便利です。
Do you wish the installer to prepend the Anaconda3 install location
to PATH in your /home/<user>/.bahsrc ? [yes/no]
[no] >>  yes
Visual Studio Codeをインストールするか聞かれますがとりあえずは不要なのでnoとしておきます。
Visual Studio Code License: https://code.visualstudio.com/license
Do you wish to proceed with the installation of Microsoft VSCode? [yes|no]
>>> Please answer 'yes' or 'no':
>>> no
Jupyterの導入
seminarという環境名でにJupyterを導入します。
$ conda create -n seminar
$ source activate seminar
$ conda install jupyter
※ 実際にはデフォルトでjupyterが導入されていたので3行目は不要
Jupyterの設定
jupyter自身はhttpをport:8888で待ち受けるように設定しタイと思いますが、
設定するには先ずは設定ファイルを作成する必要があります。
$ Jupyter notebook --generate-config
上記を実行すると/home/<user>/.jupyter/jupyter_notebook_config.pyが作成されます。
このファイルを編集して設定を変更していきます。
設定項目がコメントアウトされているので、必要な項目だけコメントアウトを解除しながら設定していくのが一般的ですが、設定項目が決まっていればファイルの上部か下部に追記してしまって問題ないです。
c.NotebookApp.open_browser = False
c.NotebookApp.port = 8888
2つ目の設定がport:8888で待ち受ける設定です。1つ目は設定しなくても大丈夫ですが、ローカルで実行する時の設定なのでFalseにしておくのが無難です。
step.4 certbotの導入
DNSによる名前解決が完了している必要があるので事前にdigやnslookupで名前解決されるか確認してから次の手順を実行してください。
certbotの導入は解説サイトの通りに実施します.
今回はdebian 9 stretchで構築しているので「その他の UNIX 系 OS」に従います.
$ wget https://dl.eff.org/certbot-auto
$ chmod a+x certbot-auto
$ sudo ./certbot-auto
3行目だけ解説サイトと異なりsudoで実行しています。sudoを付けないと管理者権限が必要の旨が表示された為変更してます。
certbot-auto実行時にapache関連のエラーが表示されますが無視して問題ないです。
続けてメールアドレス、ドメイン名の入力を要求されるので続けて入力します。
次にドメインの検証が行われ、これに成功するとhttp通信を全てhttpsにリダイレクトするか、何も設定しないかを聞かれます特にリダイレクト不要なので1を選択します。
Please choose whether or not to redirect HTTP traffic to HTTPS, removing HTTP access.
- - - - - - - - - - - - - - - - - - - - - - - - - - - - - - - - - - - - - - - -
1: No redirect - Make no further changes to the webserver configuration.
2: Redirect - Make all requests redirect to secure HTTPS access. Choose this for
new sites, or if you're confident your site works on HTTPS. You can undo this
change by editing your web server's configuration.
- - - - - - - - - - - - - - - - - - - - - - - - - - - - - - - - - - - - - - - -
Select the appropriate number [1-2] then [enter] (press 'c' to cancel): 1
step.5 nginx設定変更,Jupyterの起動
ここまでの設定でhttpsでアクセスできるようになっています。
しかし、まだnginxの起動画面が表示されるだけですのでJupyterに接続するための設定をしていきます。
先ずはnginx設定ファイルからcertbotで自動的に追記された部分を切り出しておきます。(以下ファイルからは記載削除します)
    listen [::]:443 ssl ipv6only=on; # managed by Certbot
    listen 443 ssl; # managed by Certbot
    ssl_certificate /etc/letsencrypt/live/<domain>/fullchain.pem; # managed by Certbot
    ssl_certificate_key /etc/letsencrypt/live/<domain>/privkey.pem; # managed by Certbot
    include /etc/letsencrypt/options-ssl-nginx.conf; # managed by Certbot
    ssl_dhparam /etc/letsencrypt/ssl-dhparams.pem; # managed by Certbot
次にjupyter用の設定ファイルを作成し、先ほど切り出した設定および追加の設定を行います。managed by Cerbotと書かれれている行が先ほど切り出した設定です。その他設定事項がjupyterへ接続するための各種設定です。
server {
    listen [::]:443 ssl ipv6only=on; # managed by Certbot
    listen 443 ssl; # managed by Certbot
    ssl_certificate /etc/letsencrypt/live/<domain>/fullchain.pem; # managed by Certbot
    ssl_certificate_key /etc/letsencrypt/live/<domain>/privkey.pem; # managed by Certbot
    include /etc/letsencrypt/options-ssl-nginx.conf; # managed by Certbot
    ssl_dhparam /etc/letsencrypt/ssl-dhparams.pem; # managed by Certbot

    location / {
        proxy_pass http://localhost:8888;
        proxy_set_header X-Forwarded-For $proxy_add_x_forwarded_for;
        proxy_set_header X-Real-IP $remote_addr;
        proxy_set_header Host $http_host;
        proxy_http_version 1.1;
        proxy_redirect off;
        proxy_buffering off;
        proxy_set_header Upgrade $http_upgrade;
        proxy_set_header Connection "upgrade";
        proxy_read_timeout 86400;
    }
}
設定が終わったらnginxを再起動します。
$ sudo systemctl restart nginx
jupyterを起動します。nohupと&はjupyterプロセスをバックグラウンドで実行させる(ログアウトしても継続実行させる)ためです。
$ source activate seminar
$ nohup jupyter notebook &


