GOSTとは
Go言語でかかれたトンネリングツールです.GOSTの概要は以下の記事を参照してください.
コマンド2つで簡易ゲートウェイ
HTTP ProxyとDNS ForwarderをGOSTで作ります.
環境/バージョン
- Ubuntu 18.04.3 LTS
- RAM 1GB
- CPU v1コア
- Storage 50GB
- gost 2.9.2 (go1.13.3 linux/amd64)
構築(Quick)
インストールと実行は以下の2コマンドで終わります.
sudo snap install gost
sudo gost -L=udp://:53/1.1.1.1:53,1.0.0.1:53 -L=:8080
ファイアウォール
ufwが有効な場合,ufwで8080/tcpと53/udpを許可します.
# TODO: ローカル側のインターフェースを指定
sudo ufw allow 8080/tcp
sudo ufw allow 53/udp
sudo ufw reload
永続化
永続化にはsystemdのserviceファイルを以下のとおりに書きます.
/etc/systemd/system/gost.service
[Unit]
Description=Gost Proxy
After=network.target
Wants=network.target

[Service]
Type=simple
ExecStart=/usr/local/bin/gost -L=udp://:53/1.1.1.1:53,1.0.0.1:53 -L=:8080
ExecStop=/bin/kill ${MAINPID}
Restart=always
User=root

[Install]
WantedBy=multi-user.target
systemdのサービスを読み込んで永続化します.
sudo systemctl daemon-reload
sudo systemctl enable gost
sudo systemctl start gost
検証
以下の環境で検証してみました.
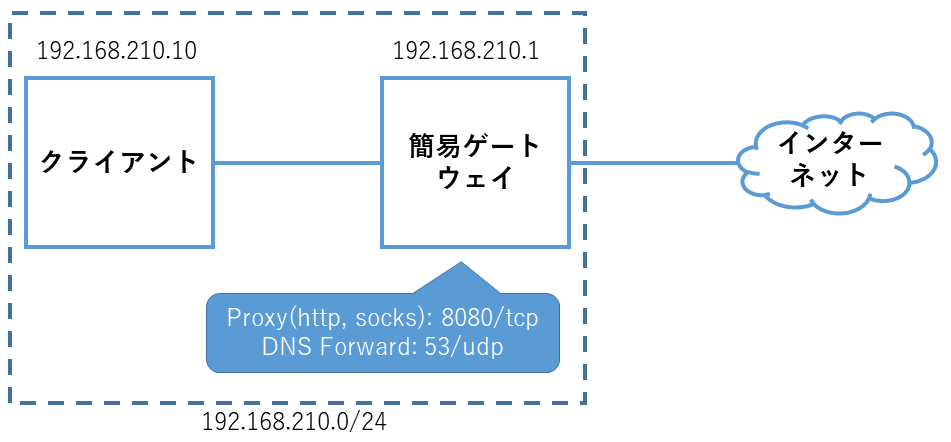
クライアントの設定
クライアントも簡易ゲートウェイと同様のスペックです.
netplanの設定ファイルでDNSサーバを指定します.
/etc/netplan/01-netcfg.yaml
network:
  version: 2
  renderer: networkd
  ethernets:
    ens160:
      addresses:
      - 192.168.210.10/24
      nameservers:
        addresses:
        - 192.168.210.1
sudo netplan applyで設定を適用させ,nslookupで確認します.
$ nslookup yahoo.co.jp
Server:         127.0.0.53
Address:        127.0.0.53#53

Non-authoritative answer:
Name:   yahoo.co.jp
Address: 182.22.59.229
Name:   yahoo.co.jp
Address: 183.79.135.206
環境変数でHTTP Proxyを指定します..bashrcなどに以下を記述するとログインのたびに入力が不要になり便利です.
export http_proxy=http://192.168.210.1:8080/
export https_proxy=$http_proxy
wgetやcurlで確認します.
$ curl -D - -s  -o /dev/null http://example.com/
HTTP/1.1 200 OK
Age: 393323
Cache-Control: max-age=604800
Content-Type: text/html; charset=UTF-8
Date: Sat, 01 Feb 2020 06:17:59 GMT
Etag: "3147526947+gzip+ident"
Expires: Sat, 08 Feb 2020 06:17:59 GMT
Last-Modified: Thu, 17 Oct 2019 07:18:26 GMT
Server: ECS (sec/96ED)
Vary: Accept-Encoding
X-Cache: HIT
Content-Length: 1256
Ubuntuのaptはプロキシ設定を/etc/apt/apt.confに記述することでプロキシサーバを参照することができます.
/etc/apt/apt.conf
Acquire::http::Proxy "http://192.168.210.1:8080";
Acquire::https::Proxy "http://192.168.210.1:8080";