この記事はTUT CDSL Advent Calendar 2019 - Adventarの18日目です.
はじめに
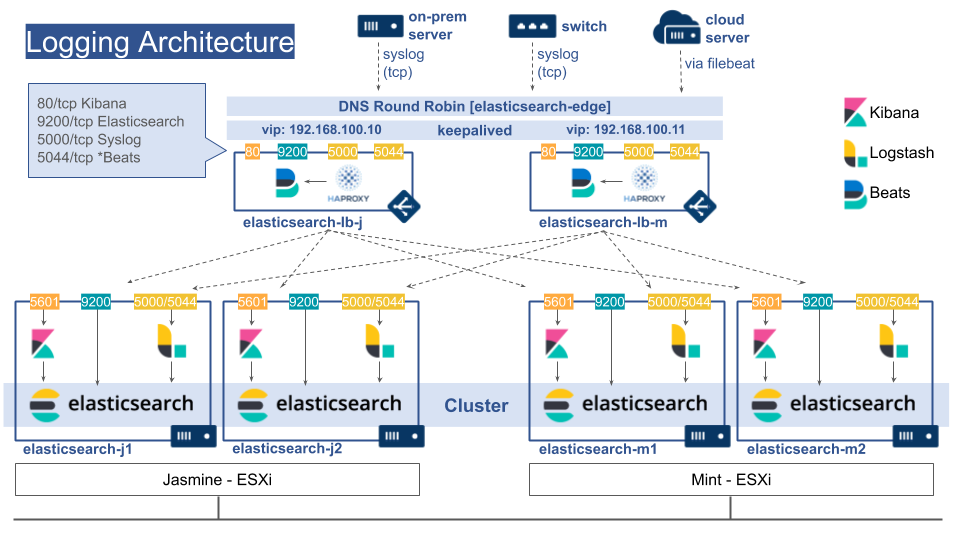
研究室内にあるESXi上にElasticsearchのクラスタを構築しました.
先生から冗長化を考慮した構築を提案されたので,SPOFの排除を目標としました.
設定ファイルは以下においてあります.
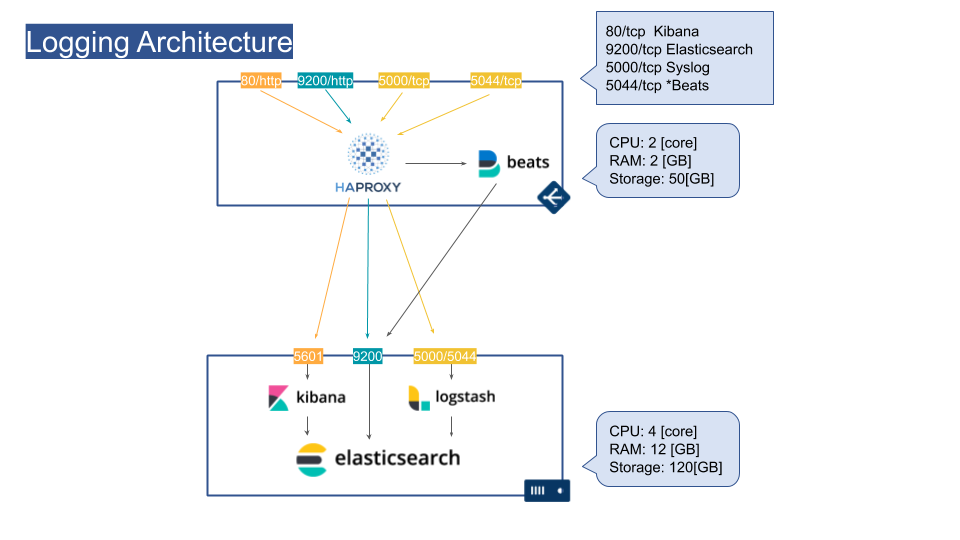
VMのスペック
ドキュメントを調べたところ以下のスペックが最小限でした.
- メモリ: 8GB以上(快適に使うなら16GB)
- CPU: 2-8コア
- ストレージ: SSDのような早いやつを使う(15k RPM)
上記を参考に以下を割り当てました.
- ロードバランサ: 2台
- CPU: 2 [core]
- RAM: 2 [GB]
- Storage: 50[GB]
- Elasticsearchノード: 4台
- CPU: 4 [core]
- RAM: 12 [GB]
- Storage: 120[GB]
ロードバランサVM
HAProxy
ロードバランサにはHAProxyを使用しました.HAProxyはヘルスチェックの条件を細かく設定可能であり,インターネット上に情報が多くあるため採用しました.また,MetricbeatによりHAProxyの統計を収集して,Elasticsearchへ送信しました.
以下はHAProxyのElasticsearch向け設定です.
##
# Elasticsearch
##

defaults
    timeout connect  5000
    timeout client  10000
    timeout server  10000

frontend elastic
    bind :9200
    mode http
    acl is_delete method DELETE
    http-request deny if is_delete
    default_backend elastic

backend elastic
    mode http
    option forwardfor
    balance roundrobin
    option httpclose
    server elasticsearch-j1 elasticsearch-j1.a910.tak-cslab.org:9200 weight 1 check inter 1000 rise 5 fall 1
    server elasticsearch-j2 elasticsearch-j2.a910.tak-cslab.org:9200 weight 1 check inter 1000 rise 5 fall 1
    server elasticsearch-m1 elasticsearch-m1.a910.tak-cslab.org:9200 weight 1 check inter 1000 rise 5 fall 1
    server elasticsearch-m2 elasticsearch-m2.a910.tak-cslab.org:9200 weight 1 check inter 1000 rise 5 fall 1
keepalived
ロードバランサの冗長化のためにkeepalivedを導入しました.ホットスタンバイであるとリソース効率が悪いため,常に2台を稼働させています.以下の記事を参考にしました.
keepalivedによるサーバ冗長化について | GMOアドパートナーズグループ TECH BLOG byGMO
! Configuration File for keepalived
vrrp_script chk_haproxy {
    script "systemctl is-active haproxy"
}

vrrp_instance VI_1 {
    state MASTER
    ! もう1台では以下を50に設定
    priority 100
    interface ens160
    garp_master_delay 10
    virtual_router_id 31
    advert_int 1
    authentication {
        auth_type PASS
        auth_pass XXXXXXXXXX
    }
    virtual_ipaddress {
        192.168.100.10
    }
}

vrrp_instance VI_2 {
    state BACKUP
    ! もう1台では以下を100に設定
    priority 50
    interface ens160
    virtual_router_id 32
    advert_int 1
    authentication {
        auth_type PASS
        auth_pass XXXXXXXXXX
    }
    virtual_ipaddress {
        192.168.100.11
    }
    track_script {
        chk_haproxy
    }
}
さらに,単一のFQDNで複数のリソースを参照可能なようDNSラウンドロビンを導入しました.
$ nslookup elasticsearch-edge
192.168.100.11
$ nslookup elasticsearch-edge
192.168.100.10
ElasticsearchノードVM
各ノードごとにKibana, Elasticsearch, Logstashを導入しました.Logstashでは*BeatsからのデータとSyslogからのデータを許可しています.
Elasticsearch
各ノードはMaster Eligible NodeとData Nodeを兼ねています.
cluster.name: logging-main
node.name: ${HOSTNAME}
node.master: true
node.data: true
path.data: /var/lib/elasticsearch
path.logs: /var/log/elasticsearch
bootstrap.memory_lock: true
network.host: 0.0.0.0
http.port: 9200
discovery.seed_hosts:
- elasticsearch-m1.a910.tak-cslab.org
- elasticsearch-m2.a910.tak-cslab.org
- elasticsearch-j1.a910.tak-cslab.org
- elasticsearch-j2.a910.tak-cslab.org
cluster.initial_master_nodes:
- elasticsearch-m1
- elasticsearch-m2
- elasticsearch-j1
- elasticsearch-j2

http.cors.enabled: true
http.cors.allow-origin: "*"
Logstash
SyslogをLogstashで受けるよう以下のConfig(抜粋)を作成しました.
input {
  tcp {
    port => 5000
    type => syslog
  }
  udp {
    port => 5000
    type => syslog
  }
}

filter {
  if [type] == "syslog" {
    grok {
      patterns_dir => ["/etc/logstash/pattern.d"]
      match => { "message" => "%{MYSYSLOG}" }
      add_field => [ "received_at", "%{@timestamp}" ]
      add_field => [ "received_from", "%{host}" ]
    }
    date {
      match => [ "syslog_timestamp", "MMM  d HH:mm:ss", "MMM dd HH:mm:ss" ]
    }
  }
}

output {
  if [type] == "syslog" {
    elasticsearch {
      hosts => ["localhost:9200"]
      index => "syslog-%{+YYYY.MM.dd}"
    }
  }
}
grokパターンは以下です.
MYSYSLOG %{SYSLOGTIMESTAMP:syslog_timestamp} %{SYSLOGHOST:syslog_hostname} %{DATA:syslog_program}(?:\[%{POSINT:syslog_pid}\])?: %{GREEDYDATA:syslog_message}

