AWSは、AWSのサービスを活用した実践的なハンズオンコンテンツを多数公開しており、
日本語化もされています。
アマゾン ウェブ サービス (AWS) の実践的チュートリアル https://aws.amazon.com/jp/getting-started/hands-on/
社内向けにコンテナやAPI Gateway初学者向けのハンズオン教材を探していたところ、
ちょうどいいチュートリアルをみつけました。
現代的なウェブアプリケーションの構築 https://aws.amazon.com/jp/getting-started/hands-on/build-modern-app-fargate-lambda-dynamodb-python/
このチュートリアル、
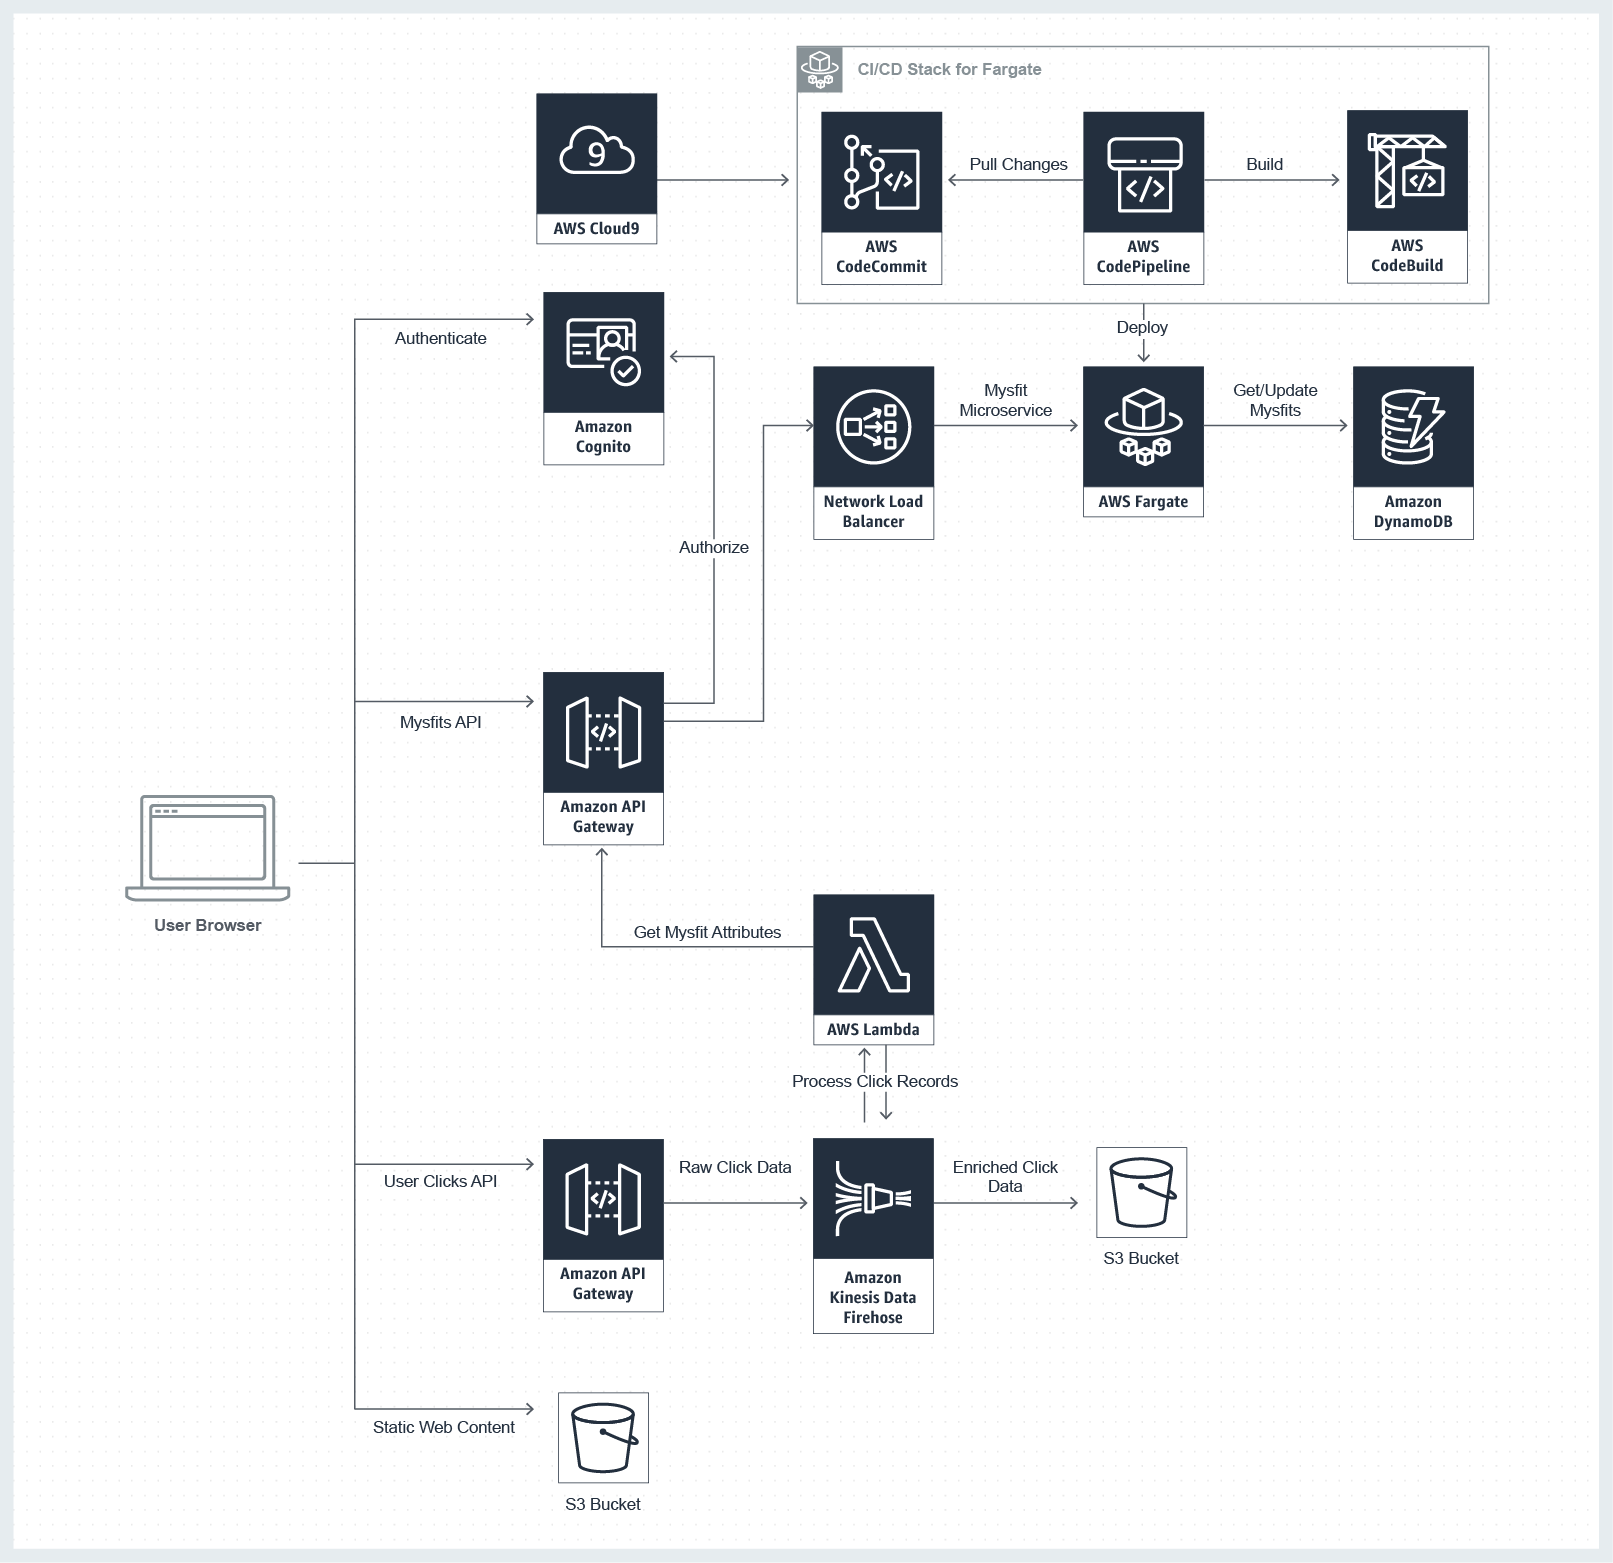
- ECS/Fargateを活用したコンテナアプリケーションの公開
- Codeサービスを活用したCI/CDパイプラインの構築
- Amazon API Gatewayを活用したAPIの公開
- データストアとしてDynamoDBの利用
- Cognitoを活用した認証処理の追加
- Kinesis Firehoseを活用したクリックストリームの分析
などなど、モダンなアプリケーション実行基盤の構築をステップバイステップで体験できる、
非常に良いコンテンツです。

出典:https://aws.amazon.com/jp/getting-started/hands-on/build-modern-app-fargate-lambda-dynamodb-python/
良いコンテンツ・・非常に良いコンテンツなのですが・・・
チュートリアルの手順どおりに試してもうまく動かないところが何点かありましたので、
メモしておきたいと思います。
.NET、Go、Java用のリソースも用意されていますが、本記事はPythonで試した際のメモとなります。
モジュール 2B: AWS Fargate を使用したサービスのデプロイ
ステップ1: Flaskサービスを作成する
A: Docker イメージをビルドする
Cloud9 IDE上でdocker buildしますが・・
docker build . -t REPLACE_ME_AWS_ACCOUNT_ID.dkr.ecr.REPLACE_ME_REGION.amazonaws.com/mythicalmysfits/service:latest
python-pipやpipのインストールでコケます。
Building dependency tree...
Reading state information...
E: Unable to locate package python-pip
The command '/bin/sh -c apt-get install -y python-pip python-dev build-essential' returned a non-zero code: 100
Step 5/13 : RUN pip install --upgrade pip
 ---> Running in 944121289de0
/bin/sh: 1: pip: not found
The command '/bin/sh -c pip install --upgrade pip' returned a non-zero code: 127
2020年8月時点では、ubuntu:latestのPythonはv3系なので、
Dockerfileをpython3対応しましょう。
python-pipはpython3-pipに、
pipはpip3に、
ENTRYPOINTのpythonはpython3に変更します。
FROM ubuntu:latest
RUN echo Updating existing packages, installing and upgrading python and pip.
RUN apt-get update -y
RUN apt-get install -y python3-pip python-dev build-essential
RUN pip3 install --upgrade pip
RUN echo Copying the Mythical Mysfits Flask service into a service directory.
COPY ./service /MythicalMysfitsService
WORKDIR /MythicalMysfitsService
RUN echo Installing Python packages listed in requirements.txt
RUN pip3 install -r ./requirements.txt
RUN echo Starting python and starting the Flask service...
ENTRYPOINT ["python3"]
CMD ["mythicalMysfitsService.py"]
module-3以降で用意されているDockerfileについても、同様に修正しましょう。
C: Docker イメージを Amazon ECR にプッシュする
ECRへのdocker push前にログインする必要がありますが・・
$(aws ecr get-login --no-include-email)
get-loginはdeprecatedしてますので、get-login-passwordを使いましょう。
※AWS_ACCOUNT_IDはご自身のAWSアカウント番号と置換して下さい。
aws ecr get-login-password --region ap-northeast-1 | docker login --username AWS --password-stdin AWS_ACCOUNT_ID.dkr.ecr.ap-northeast-1.amazonaws.com
モジュール 2C: AWS のコードサービスを使用したデプロイの自動化
ステップ1: CI/CDパイプラインを作成する
C: CodeBuild プロジェクトを作成する
用意されたAWS CLIを実行するとCodeBuildプロジェクトは作成されますが、
ステップ2でCI/CDパイプラインを動かすとビルドでコケます。
原因は、buildspec.yml中で前述のdeprecatedになったget-loginが使われているためです。
代わりに、aws ecr get-login-passwordを使いましょう。
file://~/environment/aws-modern-application-workshop/module-2/aws-cli/ecr-policy.json を開き、
pre_buildフェーズの
- $(aws ecr get-login --no-include-email --region $AWS_DEFAULT_REGION)
を
- aws ecr get-login-password --region $AWS_DEFAULT_REGION) | docker login --username AWS --password-stdin $AWS_ACCOUNT_ID.dkr.ecr.$AWS_DEFAULT_REGION.amazonaws.com
に修正しましょう。
※$AWS_ACCOUNT_IDと$AWS_DEFAULT_REGIONは、環境変数定義でご自身の環境に合った値を設定して下さい。
モジュール 3: Mysfit 情報の保存
ステップ2: 最初の実際のコード変更をコミットする
A: 更新されたFlaskサービスコードをコピーする
CodeCommitにPushするリソースは予め用意されており、
リポジトリ用のディレクトリにコピーします。
cp -r ~/environment/aws-modern-application-workshop/module-2/app/* ~/environment/MythicalMysfitsService-Repository/
このリソースをCodeCommitにPushするとアプリがECSにデプロイされますが、
タスクが落ちます。
2020-08-30 16:22:28Traceback (most recent call last):
2020-08-30 16:22:28File "mythicalMysfitsService.py", line 3, in <module>
2020-08-30 16:22:28import mysfitsTableClient
2020-08-30 16:22:28File "/MythicalMysfitsService/mysfitsTableClient.py", line 104
2020-08-30 16:22:28print 'filter is '+args.filter
2020-08-30 16:22:28^
2020-08-30 16:22:28SyntaxError: Missing parentheses in call to 'print'. Did you mean print('filter is '+args.filter)?
ECSタスクのログを見ると、mysfitsTableClient.py中のprint関数のところで落ちています。
本チュートリアルは、どうやらPython2.7を使って開発されたようです。
Dockerfileで指定したPython3ではprint関数の記述が異なりますので、
アプリを修正します。
修正前
    if args.filter and args.value:
        print 'filter is '+args.filter
        print 'value is '+args.value

        print "Getting filtered values"
        items = queryMysfitItems(args.filter, args.value)
    else:
        print "Getting all values"
        items = getAllMysfits()

    print items
修正後
※print関数の引数は()で囲う
    if args.filter and args.value:
        print('filter is '+args.filter)
        print('value is '+args.value)

        print("Getting filtered values")
        items = queryMysfitItems(args.filter, args.value)
    else:
        print("Getting all values")
        items = getAllMysfits()

    print(items)
モジュール4: ユーザー登録の設定
ステップ2: 新しいREST APIとAmazon API Gatewayを追加する
B: Swaggerを使用してREST APIを作成する
Swagger定義からAPI定義をインポートしてREST APIを作成しようとしますが・・
aws apigateway import-rest-api --parameters endpointConfigurationTypes=REGIONAL --body file://~/environment/aws-modern-application-workshop/module-4/aws-cli/api-swagger.json --fail-on-warnings
チュートリアルの手順にあるようなJSONレスポンスが返ってきません。
シェルの戻り値は255、API Gatewayも作成されません。
まず、Swagger定義を疑いました。
https://editor.swagger.io/ でもVSCodeのOpenAPI Editorプラグインでもいいですが、
api-swagger.jsonの定義内容を確認すると、
POST /mysfits/{mysfitId}/like 定義、x-amazon-apigateway-integration部分の
responsesが重複していることがわかります。

やっぱりねーということで重複しているresponsesを消しますが、
aws apigateway import-rest-apiの結果は変わらず・・なぜなのか。
こういう時は、--debugオプションを付けて実行しましょう。
aws apigateway import-rest-api --parameters endpointConfigurationTypes=REGIONAL --body file://~/environment/aws-modern-application-workshop/module-4/aws-cli/api-swagger.json --fail-on-warnings --debug
すると~???
2020-08-31 06:39:10,907 - MainThread - awscli.clidriver - DEBUG - CLI version: aws-cli/2.0.11 Python/3.7.3 Linux/4.14.181-142.260.amzn2.x86_64 botocore/2.0.0dev15
(中略)
2020-08-31 06:39:10,994 - MainThread - awscli.clidriver - DEBUG - Exception caught in main()
Traceback (most recent call last):
  File "awscli/customizations/binaryformat.py", line 59, in _visit_scalar
  File "base64.py", line 87, in b64decode
binascii.Error: Invalid base64-encoded string: number of data characters (6953) cannot be 1 more than a multiple of 4
(中略)
  File "awscli/customizations/binaryformat.py", line 34, in base64_decode_input_blobs
  File "awscli/shorthand.py", line 389, in visit
  File "awscli/shorthand.py", line 394, in _visit
  File "awscli/shorthand.py", line 401, in _visit_structure
  File "awscli/shorthand.py", line 394, in _visit
  File "awscli/customizations/binaryformat.py", line 61, in _visit_scalar
awscli.customizations.binaryformat.InvalidBase64Error: Invalid base64: "{
    "swagger": 2.0,
    "info": {
        "title": "MysfitsApi"
Invalid base64?
AWS CLI v1からv2への変更点を確認しましょう。
重要な変更 – AWS CLI バージョン 1 からバージョン 2 への移行 - AWS Command Line Interface https://docs.aws.amazon.com/ja_jp/cli/latest/userguide/cliv2-migration.html#cliv2-migration-binaryparam
お!!!
AWS CLI バージョン 2 は、デフォルトではすべてのバイナリ入力パラメータとバイナリ出力パラメータを base64 エンコード文字列として渡すようになりました。
(中略)
また、コマンドラインにパラメータ --cli-binary-format raw-in-base64-out を含めることで、アクティブなプロファイル設定を上書きして、個々のコマンドの設定を元に戻すこともできます。
なるほど。Swagger定義ファイルは特にbase64エンコードとかしてませんので、
--cli-binary-format raw-in-base64-outパラメータを付けましょう。
aws apigateway import-rest-api --cli-binary-format raw-in-base64-out --parameters endpointConfigurationTypes=REGIONAL --body file://~/environment/aws-modern-application-workshop/module-4/aws-cli/api-swagger.json --fail-on-warnings --debug
通った。
{
    "id": "6xxxxxxxx3",
    "name": "MysfitsApi",
    "createdDate": "2020-08-31T07:29:58+00:00",
    "version": "2017-04-20T04:08:08Z",
    "apiKeySource": "HEADER",
    "endpointConfiguration": {
        "types": [
            "REGIONAL"
        ]
    }
}
残りの手順については特にはまることなく実行できました。
AWS CLIやDockerfile等の更新が必要な箇所はGithubにissueはあげてみようと思いますが、
チュートリアルのWebサイト(特に日本語版)の方に反映されるのには時間がかかりそうなので、
補助ドキュメントとしてご参照下さい。
ステップバイステップでクラウドネイティブなアプリ構築を体験できますので、
ECSやAPI Gateway、Cognito、Kinesis Firehose等を手を動かしながら学びたいという方、
ぜひお試し下さい!!!