基本的なNotificatationを作成する
基礎知識
Verごとの動作の違いについて
・Android 8.0(API26)以下 ⇨ 通知チャンネルの作成は必要なし
・上記以上 ⇨ 通知チャンネルの作成が必要
・権限について
Android 13.0(API33)以上 ⇨ android.permission.POST_NOTIFICATIONSのパーミッションリクエストが必要
実装する
1.通知チャンネルの作成
  private fun createChannel(){
        //通知チャンネルの名前を指定
        val name = "Web notification"
        //チャンネルの説明文を指定
        val description = "this notification is notify when you access web site"
        //通知の重要度を指定
        val importance = NotificationManager.IMPORTANCE_DEFAULT
        //チャンネルの作成と説明文のセット
        val channel = NotificationChannel(channelId,name,importance).apply {
            setDescription(description)
        }
        //システムにチャンネルを追加
        val notificationManager = getSystemService(Context.NOTIFICATION_SERVICE) as NotificationManager
         notificationManager.createNotificationChannel(channel)
    }
・channelIdはこの後作成する通知本体に使用する値と同じにする必要がある
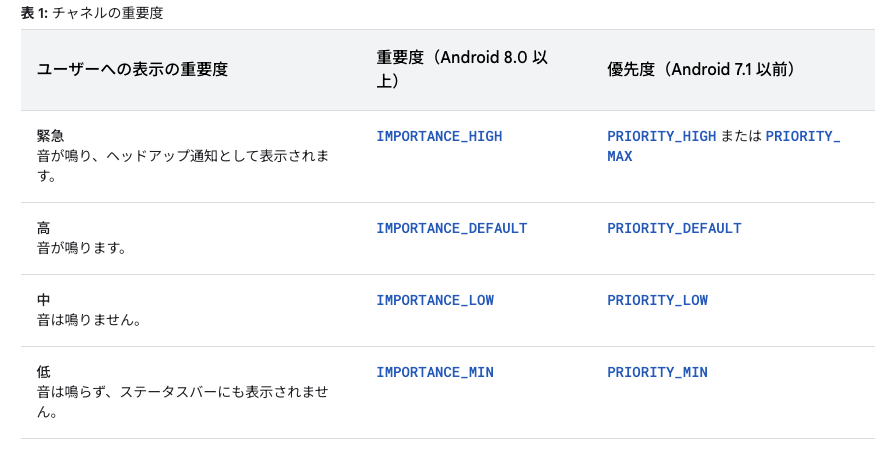
・この時、設定した重要度と動作の関係は以下の通り
(公式サイト https://developer.android.com/training/notify-user/channels?hl=ja#importance より)
2.通知の作成
 private fun createNotification(){
        //通知ごとに別々のidを指定
        val notificationId = 1
        //通知の作成
        val notification = NotificationCompat.Builder(this,channelId)
            //通知に表示されるアイコンを指定
            .setSmallIcon(R.drawable.ic_launcher_foreground)
            //通知に使用されるテキストを指定
            .setContentText("https://www.google.com/")
            //通知のタイトルを指定
            .setContentTitle("Open web site")
            //通知の優先度(ただしAndroid 8.0以降はこの値は無視されchannelの重要度が使用される)
            .setPriority(NotificationCompat.PRIORITY_DEFAULT)
            .build()
通知の発行
・Android 13.0以上の場合
→最初に書いたように、権限が許可されている必要があります。そのため、通知を発行するコードに権限が許可されているかを確認するコードが必要になります。(13.0以下のデバイスが対象の場合は、if文の箇所を抜けばOKです)
//前のコード(createNotificationメソッドの続き)
 with(NotificationManagerCompat.from(this)){
 //パーミッションが認められていることを確認
            if (ActivityCompat.checkSelfPermission(
                    this@MainActivity,
                    Manifest.permission.POST_NOTIFICATIONS
                ) != PackageManager.PERMISSION_GRANTED
            ) {

                return
            }
            //通知を発行
            notify(notificationId,notification)
        }
    }
作成例
・以下の作成例は、画面にあるボタンを押すと、googleのwebページに移動するとともにその旨を示す通知を発行するプログラムです。
class MainActivity : AppCompatActivity() {
  private val channelId = "channel1"
    private lateinit var binding: ActivityMainBinding
    override fun onCreate(savedInstanceState: Bundle?) {
        super.onCreate(savedInstanceState)
        binding = ActivityMainBinding.inflate(layoutInflater)
        setContentView(binding.root)
        createChannel()
        permissionLauncher.launch(android.Manifest.permission.POST_NOTIFICATIONS)
        val uri = Uri.parse("https://www.google.com/")
        binding.button.setOnClickListener {
            val intent = Intent(Intent.ACTION_VIEW,uri)
            startActivity(intent)
            createNotification()
        }
    }
    private val permissionLauncher = registerForActivityResult(ActivityResultContracts.RequestPermission()){}

    private fun createChannel(){
        val name = "Web notification"
        val description = "this notification is notify when you access web site"
        val importance = NotificationManager.IMPORTANCE_DEFAULT
        val channel = NotificationChannel(channelId,name,importance).apply {
            setDescription(description)
        }
        val notificationManager = getSystemService(Context.NOTIFICATION_SERVICE) as NotificationManager
         notificationManager.createNotificationChannel(channel)
    }
    private fun createNotification(){
        val notificationId = 1
        val notification = NotificationCompat.Builder(this,channelId)
            .setSmallIcon(R.drawable.ic_launcher_foreground)
            .setContentText("https://www.google.com/")
            .setContentTitle("Open web site")
            .setPriority(NotificationCompat.PRIORITY_DEFAULT)
            .build()
        with(NotificationManagerCompat.from(this)){
            if (ActivityCompat.checkSelfPermission(
                    this@MainActivity,
                    Manifest.permission.POST_NOTIFICATIONS
                ) != PackageManager.PERMISSION_GRANTED
            ) {

                return
            }
            notify(notificationId,notification)
        }

    }
}
まとめ
・通知も様々なタイプのものを作ることができますが、今回は基本のただ通知を表示するまでのやり方を紹介させていただきました。
android developesサイトも参考にぜひ実装してみてください!
リンク https://developer.android.com/training/notify-user/build-notification?hl=ja