1. はじめに
1.1. 動機
- 以下の記事を拝見し、Daggerの存在を知りました。その効果や使いどころを勉強するため、Getting Startedを実施した内容をまとめます。
- 本記事は、4/23現在のv0.2.7時点での内容となります。
1.2. 開発環境
- OS: Ubuntu 20.04
- CPU: Core(TM) i5-1145G7 (4コア分)
- RAM: 16GB
- pre-installed S/W:
- CURL: 7.68.0
- Docker: 20.10.14
1.3. 参考資料
-
Docker創始者らが開発、ビルド/テスト/デプロイの自動化をポータブルにするツール「Dagger」登場。そのままローカルでもGitHubでもCircleCIでも実行可能に
- 私が「Dagger」を知った紹介記事
-
dagger.io
- 「Dagger」の公式サイト
-
docs.dagger.io
- 「Dagger」公式サイトにあるDocument。Getting Started等の情報はこちらにあります。
2. Getting Startedの実施
2.1. ローカル環境にDaggerインストール
# 公式の手順でインストーラ(スクリプト)を実行する。
# /usr/localはroot領域なので、sh処理はsudoをつける必要がある。(おそらくrootユーザ前提で記載されている)
$ cd /usr/local
$ curl -L https://dl.dagger.io/dagger/install.sh | sudo sh
  % Total    % Received % Xferd  Average Speed   Time    Time     Time  Current
                                 Dload  Upload   Total   Spent    Left  Speed
100  7649  100  7649    0     0   100k      0 --:--:-- --:--:-- --:--:--  100k
sh debug downloading files into /tmp/tmp.DdtefRbV7K
sh debug http_download https://dagger-io.s3.amazonaws.com/dagger/releases/0.2.7/dagger_v0.2.7_linux_amd64.tar.gz
sh debug http_download https://dagger-io.s3.amazonaws.com/dagger/releases/0.2.7/checksums.txt
sh info installed ./bin/dagger

# 4/23時点でバージョン指定しなかった場合は、0.2.7がインストールされた。
$ dagger version
dagger 0.2.7 (18c19174) linux/amd64
※daggerサンプルプログラムを実行する前に、docker engineが稼働していない場合はdockerをインストールする必要がある。
2.2. サンプルプログラムの実行
※公式では、todoappを実施しているが、ここではhelloworldを実施します。
# (任意のディレクトリで)サンプルプログラムのclone
$ git clone https://github.com/dagger/dagger
$ cd dagger

# 各Ver.ごとにtagがついているので、tag checkoutする
$ git checkout v0.2.7

# サンプル:helloworldを実行する
$ cd pkg/universe.dagger.io/examples/helloworld

# ファイルはhelloworld.cueのみ
$ ls *
helloworld.cue

# コマンドの確認
$ dagger do --help
Usage:
  dagger do  [flags]

Options


Available Actions:
 hello Hello world


Flags:
      --cache-from stringArray   External cache sources (eg. user/app:cache, type=local,src=path/to/dir)
      --cache-to stringArray     Cache export destinations (eg. user/app:cache, type=local,dest=path/to/dir)
  -h, --help                     help for do
      --no-cache                 Disable caching
  -p, --plan string              Path to plan (defaults to current directory) (default ".")
      --platform string          Set target build platform (requires experimental)
  -w, --with stringArray
Global Flags:
      --experimental        Enable experimental features
      --log-format string   Log format (auto, plain, tty, json) (default "auto")
  -l, --log-level string    Log level (default "info")

# 実行
$ dagger do hello --log-format=plain
WARN[0005] commandConn.CloseRead: commandconn: failed to wait: signal: terminated
8:53PM INF actions._alpine | computing
8:53PM INF actions._alpine | completed    duration=2.7s
8:53PM INF actions.hello | computing
8:53PM INF actions.hello | #3 0.115 hello, world!
8:53PM INF actions.hello | completed    duration=200ms
↑ helloworld.cueで規定されたjob内で規定された、hello, worldをechoする処理が実行されているようです。3章で何が行われているのかを確認していきます。
3. helloworldを読み解く
- 2.ではサンプルをそのまま実行した
daggerの設定ファイルは、CUEと呼ばれる言語で記述されている。この文法を覚える必要がある。
3.1. helloworld.cueの内容
- helloworld.cueの記載は以下の通り。
- C言語風に、
//でコメントとなります。
- C言語風に、
// dagger do hello --log-format=plain
//
// 9:06AM INF actions._alpine | computing
// 9:06AM INF actions._alpine | completed    duration=1s
// 9:06AM INF actions.hello | computing
// 9:06AM INF actions.hello | #3 0.073 hello, world!
// 9:06AM INF actions.hello | completed    duration=100ms
package helloworld

import (
	"dagger.io/dagger"
	"dagger.io/dagger/core"
)

dagger.#Plan & {
	actions: {
		_alpine: core.#Pull & {source: "alpine:3"}
		// Hello world
		hello: core.#Exec & {
			input: _alpine.output
			args: ["echo", "hello, world!"]
			always: true
		}
	}
}
3.2. Actionの構成
- ActionにはCore ActionsとComposite Actionsの2種類が存在します。
- Core Actions : Daggerエンジンに実装されている処理。dagger.io/dagger/coreパッケージをimportすることで使用できる。
- Composite Actions : Core Actionsや自分で作成したActionsを合わせた処理。
- CUEファイルにComposite Actionsを規定することになります。
※CUEファイルで書かれていること(helloworld.cueコメント付き)
package "パッケージ名"

// ここにインポートしたいCore Actions or Composite Actionsのパスを書く
// https://github.com/dagger/dagger/tree/main/pkgの対応するバージョンのものが読み込まれている
// Coreパッケージ以外にもUniverseパッケージ等も提供されている。
// 自作のcueファイルもインポートできる
import (
    "dagger.io/dagger"
    "dagger.io/dagger/core"
)

// 実際のAction(処理)はPlanのところに書く
// Planのところには、client(daggerを実行する環境との共有設定など)とaction(実際の処理)を記述する。
dagger.#Plan & {
    // helloworldではclient設定はない。
    // actionsのところに処理が記載されている。
	actions: {
        // 先頭にアンダーバーがあるのは、Private属性を表す。
		_alpine: core.#Pull & {source: "alpine:3"}
		// Hello world
        // 先頭にアンダーバーがないものは、Public属性を表す。実行可能なActionである。
        // 入力でPrivateの_alpineのPull処理を呼び、echo処理を実行する。
		hello: core.#Exec & {
			input: _alpine.output
			args: ["echo", "hello, world!"]
			always: true
		}
	}
}
3.3. 挙動を確認する(手探り)
※dagger処理を読み込んだわけではなく、コンテナの動き等を見て調べています。ここでは、処理を見える化しやすくするために、以下のようにecho処理をsleep処理に修正しています。
// 修正前
args: ["echo", "hello, world!"]
↓↓↓↓↓↓↓↓↓↓↓↓↓↓↓
// 修正後
args: ["sleep", "100"]
- 上記修正を加えたhelloworldを実行したときのログは以下の通りとなります。
# 実行
$ dagger do hello --log-format plain
10:24PM INF actions._alpine | computing
10:24PM INF actions._alpine | completed    duration=1.9s
10:24PM INF actions.hello | computing
10:26PM INF actions.hello | completed    duration=1m40.2s
- このとき、はじめにinput処理の_alpine処理が始まり、コンテナをPullするためにbuildkitコンテナが起動する。
# dagger実行中、docker container lsを実行するとbuildkitコンテナが起動しているのが確認できる
$ docker container ls
CONTAINER ID   IMAGE                   COMMAND       CREATED       STATUS       PORTS     NAMES
9beb25a875a9   moby/buildkit:v0.10.1   "buildkitd"   2 hours ago   Up 2 hours             dagger-buildkitd
- そのコンテナ内に入り、psコマンドを実行すると、以下のようにaction処理が実行されるのが確認できます。
- sleep処理にしたのは、処理を見やすくするためです。
- buildkitコンテナ内でActionが実施されるから、コンテナが稼働する環境だったらどこでもActionが実施できる、ということなのでしょう。
$ docker container exec -it dagger-buildkitd sh
/ # ps
PID   USER     TIME  COMMAND
    1 root      0:01 buildkitd
  190 root      0:00 sh
  343 root      0:00 buildctl dial-stdio
  382 root      0:00 buildkit-runc --log /var/lib/buildkit/runc-overlayfs/executor/runc-log.json --log-format json run --bundle /var/lib/buildkit/runc-overlayf
  393 root      0:00 sleep 100
  400 root      0:00 ps
3.4. Github Actionsで動かす
※上記のhelloworld処理をgithubにサンプルプロジェクトを作成して実行する。
- 空リポジトリを作成します。今回は、https://github.com/tomoten-umino/my-dagger-testを作成しました。
- 以下のようにhelloworld.cueをコミット&pushします。
- リポジトリにコミットするときに、忘れずに
dagger project initしましょう。
- リポジトリにコミットするときに、忘れずに
$ git clone https://github.com/tomoten-umino/my-dagger-test.git
Cloning into 'my-dagger-test'...
remote: Enumerating objects: 3, done.
remote: Counting objects: 100% (3/3), done.
remote: Total 3 (delta 0), reused 0 (delta 0), pack-reused 0

$ cd my-dagger-test/

# cue.modフォルダが生成されている
$ dagger project init
Project initialized! To install dagger packages, run `dagger project update`

# 先程のhelloworld.cueをコピーしてくる
$ cp (ファイルのある場所)/helloworld.cue .

$ ls
cue.mod  helloworld.cue  README.md

# github actionsファイルの格納
$ mkdir -p .github/workflows
$ touch .github/workflows/helloworld.yml
# helloworld.ymlの中身を書く

# commit and push
# このあたりは皆さんのお作法があると思うので、適宜読み替えること
$ git config --local user.name ◯◯◯
$ git config --local user.email ◯◯◯
$ git commit -m "first commit"
$ git push origin main
# helloworld.yml
name: helloworld

on:
  workflow_dispatch:

jobs:
  dagger:
    runs-on: ubuntu-20.04
    steps:
      - name: Clone repository
        uses: actions/checkout@v2

      - name: Do helloworld
        uses: dagger/dagger-for-github@v2
        with:
          version: 0.2
          cmds: |
            project update
            do hello
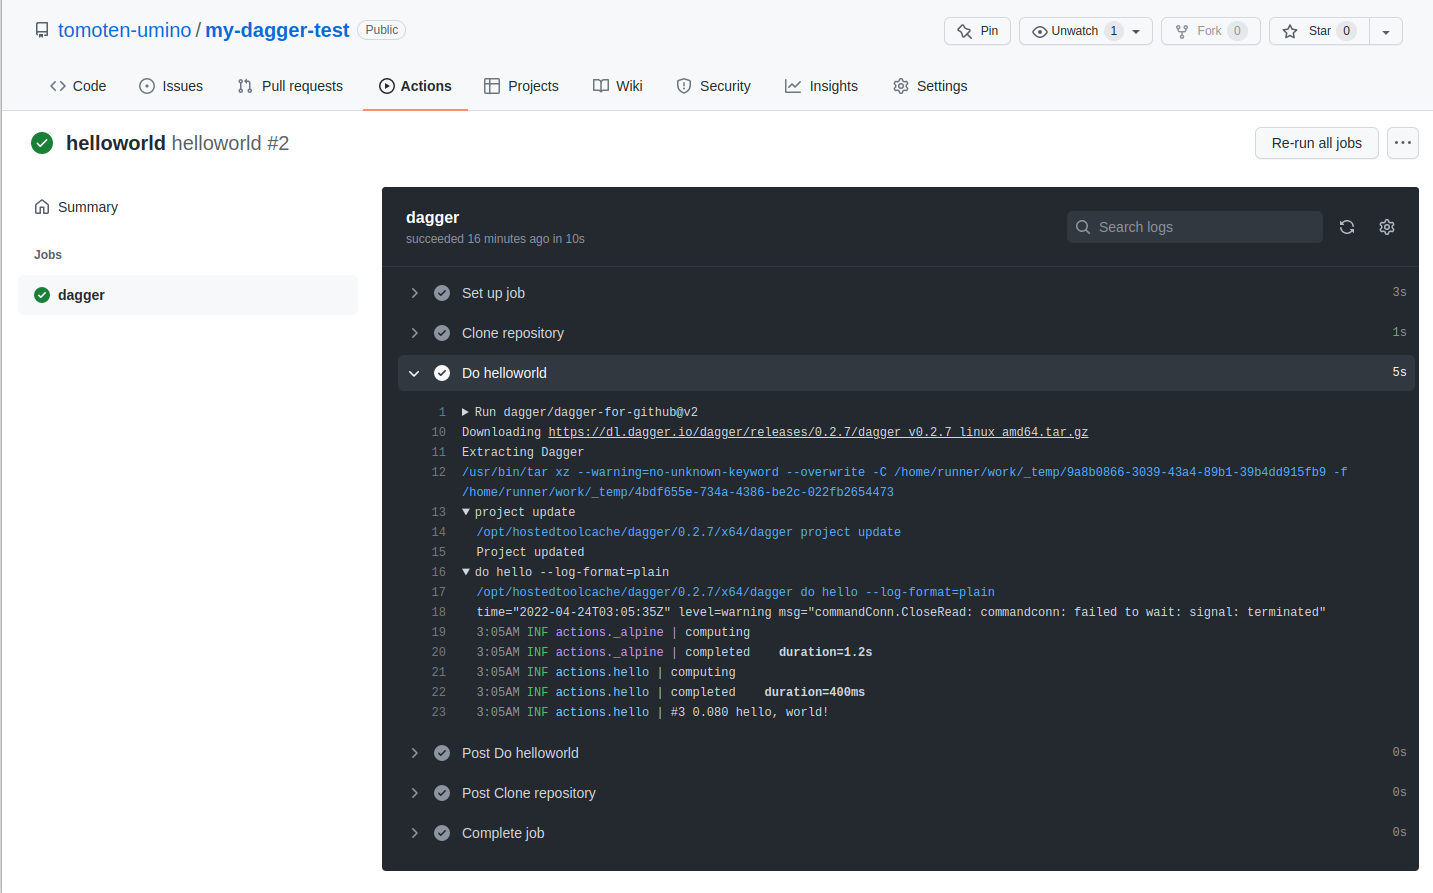
- Github Actionsを稼働させると、以下のようなログとなります。
- self hosted runnerにしないと、挙動の詳細を調べにくいところがあります。
4. おわりに
- CICD環境をポータブルにする≒Actionの実行環境をbuildkitで実現する、というところの触りがわかりました。
- Docを見ると、もっと凝った使い方ができそうなので継続して勉強したいと思います。
- 所感としては以下の通りです。
- メリット:
- パイプライン処理をローカルで確認できるのは便利。
- Github ActionsやGitLab CIだとブランチにpushしてブランチCIを回しながら動作確認したりするので。
- パイプライン処理をローカルで確認できるのは便利。
- 疑問:
- CI環境を頻繁に置き換えるのでしょうか?
- 各種CI環境には、処理をパラレルに実施するとか処理をインクルードするとか、それぞれ特長があります。そのため、Daggerで汎化して書いた場合、逆に各CI環境の機能はフルに使えなくなる、ことになる気がします。
- まだ0版なので今後の動向に注視していきたいと思います。