1. はじめに
1.1. 動機
- 自分で作成しているmy-cpp-cmake-sampleリポジトリについて、buildやunit testなどのworkflowのpass情報やカバレッジ情報をREADMEに表示したい、と思いました。
- workflowのバッジ表示は、検索すると数々の知見がでてくるので、本記事では扱いません。
- 参照:ワークフロー状態バッジの追加
- カバレッジ表示については、cmakeプロジェクトで単体テストを組み込みました、に関する記事は多くありましたが、カバレッジ率の表示に関しては、あまり多くの情報はありませんでした。
- そのため、自分なりに咀嚼した内容を本記事にまとめます。また、なるべくGithubで閉じたいため、Coverallsについても扱いません。
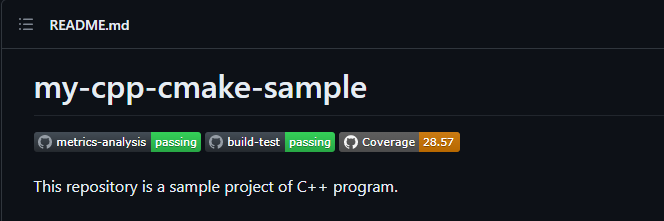
↓ 目指した表示 ( https://github.com/tomoten-umino/my-cpp-cmake-sample/blob/main/README.md )
1.2. 開発環境
- OS: Windows 11 Pro 21H2 (WSL Ubuntu22.04)
- CPU: Core(TM) i7-12700
- RAM: 32GB
- 利用ツール
- VS Code
- Docker (devcontainer利用)
1.3. リポジトリ
1.4. 参考資料
| No. | URL | 説明 |
|---|---|---|
| [1] | GoogleTest + CMakeでC++の実践的なユニットテスト環境を構築する:その1 | my-cpp-cmake-sampleにGoogle Testを組み込む方法を参考にしました。 |
| [2] | GoogleTest + CMakeでC++の実践的なユニットテスト環境を構築する:その2(カバレッジ表示) | 同じくmy-cpp-cmake-sampleにGoogle Testを組み込みに加え、カバレッジの取得方法についても参考にしました。 |
| [3] | gcovの使い方 | test実行時に作成されるgcdaファイルの読み込みについて参照させていただきました。 |
| [4] | Github Actions+Gistでカバレッジ可視化~無課金プライベートリポジトリでもカバレッジバッジが欲しい~ | GIST + Dynamic Badgesでのバッジ情報の保存方法について参考にしました。 |
2. 準備:サンプルプログラム
devcontainer構築後の操作は、明示しない限りdevcontainer内で実施します。
2.1. 環境構築
- サンプルプログラムはdevcontainerで環境構築しているため、git cloneした後、VS Codeを開きます。
- VSCode左下にある「><」みたいなボタンを押下して、「Reopen in Container」を押下します。押下すると、VSCodeがc++開発用のdockerコンテナを生成します。
$ git clone https://github.com/tomoten-umino/my-cpp-cmake-sample.git
$ cd my-cpp-cmake-sample
$ code .
2.2. python系のインストール
- サンプルプロジェクトには、プロジェクトルートディレクトリにrequirements.txtが格納されているので、ファイル指定でpipインストールしてください。
$ pip3 install -r requirements.txt
$ export PATH=$HOME/.local/bin:$PATH
2.3. サンプルプログラムの構成
- includeが提供ライブラリのヘッダ、libが提供ライブラリの中身、testsがlibの単体テストを格納するディレクトリとなります。
my-cpp-cmake-sample
├── README.md
├── LICENSE
├── CMakeLists.txt
├── requirements.txt
├── cmake
│   ├── cpplint.cmake
│   └── metrixpp.cmake
├── examples
│   ├── CMakeLists.txt
│   └── main.cpp
├── include
│   └── mylib
│       └── mylib.hpp
├── lib
│   └── mylib
│       ├── CMakeLists.txt
│       └── mylib.cpp
└── tests
    ├── CMakeLists.txt
    └── unit-test.cpp
2.3. サンプルプログラムのビルド
- cmakeのお作法にのっとってビルドします。詳細はリポジトリのREADME.mdを参照願います。
- ビルドすると、build以下のディレクトリにライブラリやテストドライバが生成されます。
- build/lib/mylib 以下に、ライブラリのlibmylib.a or libmylib.soが生成されます。(オプションで切り替わる)
- build/test/ 以下に、テストドライバのunit-testが生成されます。
$ mkdir build; cd build
$ cmake ..
-- The CXX compiler identification is GNU 11.3.0
-- Detecting CXX compiler ABI info
-- Detecting CXX compiler ABI info - done
-- Check for working CXX compiler: /usr/bin/c++ - skipped
-- Detecting CXX compile features
-- Detecting CXX compile features - done
-- Configuring done
-- Generating done
-- Build files have been written to: /workspaces/my-cpp-cmake-sample/build
$ make all
[ 20%] Building CXX object lib/mylib/CMakeFiles/mylib.dir/mylib.cpp.o
[ 40%] Linking CXX static library libmylib.a
[ 40%] Built target mylib
[ 60%] Building CXX object tests/CMakeFiles/unit-test.dir/unit-test.cpp.o
[ 80%] Building CXX object tests/CMakeFiles/unit-test.dir/__/lib/mylib/mylib.cpp.o
[100%] Linking CXX executable unit-test
[100%] Built target unit-test
-
主なコマンドは以下の通りです。
- 本記事で使用するものに制限しています。ほかのコマンドは
make helpで参照できます。
- 本記事で使用するものに制限しています。ほかのコマンドは
# build lib
make
# clean
make clean
# run test
make run-test
3. tests以下のunit-testについて
3.1. testsを構成するcmakeの注意
- tests以下のCMakeLists.txtの記載の仕方は、参考資料[1]や参考資料[2]をもとに作成しています。
- 以下が注意点となります。
- 単体テストカバレッジを取りたいのはlib以下のコードとなります。tests以下でテストドライバの実行ファイルを作るとき、
テストドライバにlibをリンクさせるだけではカバレッジが取得できません。(テストはできます) - カバレッジを取得したい場合は、テストドライバ(本サンプルプログラムではunit-test)のビルド時に、
テスト対象のソースコードもビルドする必要があります。
- 単体テストカバレッジを取りたいのはlib以下のコードとなります。tests以下でテストドライバの実行ファイルを作るとき、
### tests/CMakeLists.txt ###
# add coverage option
set(CMAKE_CXX_FLAGS  "${CMAKE_CXX_FLAGS} --coverage")
set(CMAKE_EXE_LINKER_FLAGS "${CMAKE_EXE_LINKER_FLAGS} --coverage")

# Generate executable file
add_executable(unit-test
  ${CMAKE_CURRENT_SOURCE_DIR}/unit-test.cpp
)

# add test targets
target_sources(unit-test
  PRIVATE
  ${MYLIB_SOURCE}   <---------これがlib以下のソース一覧
)
target_include_directories(unit-test
  PUBLIC
  ${GTEST_INCLUDE_PATH}
  ${GMOCK_INCLUDE_PATH}
  ${MY_INCLUDE_PATH}   <---------これがlibに関するヘッダ
)
target_link_libraries(unit-test
  gtest
  gtest_main
  pthread
)

# add make command
add_custom_target(
  run-test
  COMMAND ${CMAKE_CURRENT_BINARY_DIR}/unit-test
)
3.2. テストの実施とカバレッジ情報
-
make run-testを実行することで、単体テストを実行する(unit-testを実行する)ことができる。 - google testを実行すると、tests以下に結果が格納されます。
# buildディレクトリにて、make allが終了した状態で
$ make run-test
[==========] Running 1 test from 1 test suite.
[----------] Global test environment set-up.
[----------] 1 test from SumTest
[ RUN      ] SumTest.Value
[       OK ] SumTest.Value (0 ms)
[----------] 1 test from SumTest (0 ms total)

[----------] Global test environment tear-down
[==========] 1 test from 1 test suite ran. (0 ms total)
[  PASSED  ] 1 test.
Built target run-test
- 参考資料[2]のように、lcovを用いることでビジュアライズされたカバレッジ情報を取得できます。ただし、テキスト情報でカバレッジ情報が欲しい場合、lcovが読み込む元データを調べるとよいです。
-
find . -name "*gcda"でテスト結果のファイルを探すと、ヒットします。- このとき、
テストドライバにlibをリンクさせるだけではmylib.cpp.gcdaが生成されません。
- このとき、
- gcdaはファイル単位でのカバレッジ情報を含んでいます。unit-test.cppはテストドライバのため、カバレッジ情報としては不要です。
# tests以下で検索する
$ find . -name "*gcda"
./CMakeFiles/unit-test.dir/__/lib/mylib/mylib.cpp.gcda
./CMakeFiles/unit-test.dir/unit-test.cpp.gcda
- 参考資料[3]より、gcdaファイルはgcovで情報を確認できます。
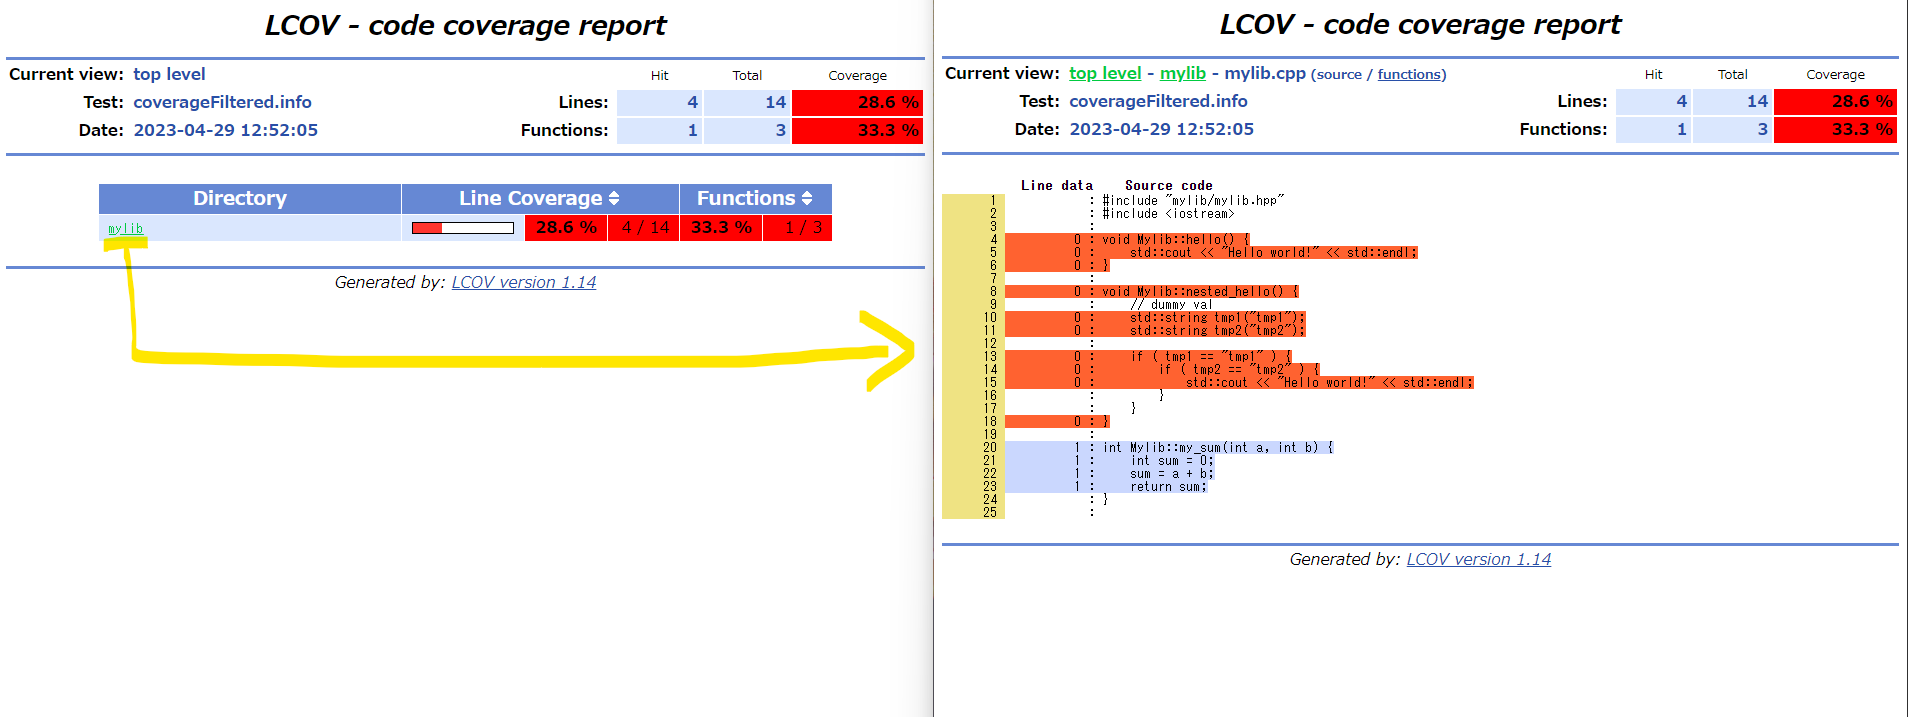
- 本サンプルプログラムでは、行カバレッジ率が28.57%と分かります。
$ gcov ./CMakeFiles/unit-test.dir/__/lib/mylib/mylib.cpp.gcda
File '/workspaces/my-cpp-cmake-sample/lib/mylib/mylib.cpp'
Lines executed:28.57% of 14
Creating 'mylib.cpp.gcov'

File '/usr/include/c++/11/iostream'
No executable lines
Removing 'iostream.gcov'

(以下略)

Lines executed:14.29% of 42
- また、htmlで結果を出力したい場合は、参考資料[2]と同様、lcov -> genhtmlを実施します。
- このとき、lcovのディレクトリ指定でmylib以下を指定することで、テストドライバのカバレッジ情報をはじめから除外することもできます。
- その場合でも、mylibがリンクするライブラリなどの結果が含まれるため、lcovでのフィルタが必要です。
$ lcov -d ./CMakeFiles/unit-test.dir/__/lib/mylib/ -c -o coverage.info
Capturing coverage data from ./CMakeFiles/unit-test.dir/__/lib/mylib/
Subroutine read_intermediate_text redefined at /usr/bin/geninfo line 2623.
Subroutine read_intermediate_json redefined at /usr/bin/geninfo line 2655.
Subroutine intermediate_text_to_info redefined at /usr/bin/geninfo line 2703.
Subroutine intermediate_json_to_info redefined at /usr/bin/geninfo line 2792.
Subroutine get_output_fd redefined at /usr/bin/geninfo line 2872.
Subroutine print_gcov_warnings redefined at /usr/bin/geninfo line 2900.
Subroutine process_intermediate redefined at /usr/bin/geninfo line 2930.
Found gcov version: 11.3.0
Using intermediate gcov format
Scanning ./CMakeFiles/unit-test.dir/__/lib/mylib/ for .gcda files ...
Found 1 data files in ./CMakeFiles/unit-test.dir/__/lib/mylib/
Processing mylib.cpp.gcda
Finished .info-file creation

$ lcov -r coverage.info */c++/* ext -o coverageFiltered.info
Reading tracefile coverage.info
Removing /usr/include/c++/11/bits/basic_string.h
Removing /usr/include/c++/11/bits/basic_string.tcc
Removing /usr/include/c++/11/bits/char_traits.h
Removing /usr/include/c++/11/bits/stl_iterator_base_funcs.h
Removing /usr/include/c++/11/bits/stl_iterator_base_types.h
Removing /usr/include/c++/11/ext/new_allocator.h
Removing /usr/include/c++/11/ext/type_traits.h
Deleted 7 files
Writing data to coverageFiltered.info
Summary coverage rate:
  lines......: 28.6% (4 of 14 lines)
  functions..: 33.3% (1 of 3 functions)
  branches...: no data found

$ genhtml coverageFiltered.info -o ./html
Reading data file coverageFiltered.info
Found 1 entries.
Found common filename prefix "/workspaces/my-cpp-cmake-sample/lib"
Writing .css and .png files.
Generating output.
Processing file mylib/mylib.cpp
Writing directory view page.
Overall coverage rate:
  lines......: 28.6% (4 of 14 lines)
  functions..: 33.3% (1 of 3 functions)
4. Github ActionsのCIでカバレッジ情報取得
4.1. カバレッジ情報は、gcdaファイルからgcovコマンドで取得
- 3.2.節で示したように、gcovコマンドを実行したときに表示されるカバレッジ率を取得するのが簡単だと思われます。
-FileとLinesと2行ずつ情報が表示されるため、bashのwhile readで2行ずつ読み込んでカバレッジ情報を取得することができます。
- 本サンプルプログラムでは、mylibの情報だけ取得します。 - 以下は、github actionsのテスト実施とカバレッジ情報取得処理の実装例となります。
### build-test.yamlの抜粋 ###
- name: run unit-test
  run: |
  (前省略)
  # run unit-test
  build/tests/unit-test
  # get coverage rate  ※tmpファイルにカバレッジ情報をdumpしている
  gcov -n ./build/tests/CMakeFiles/unit-test.dir/__/lib/mylib/mylib.cpp.gcda |
  while read -r FILE; read -r LINE;
  do
    if echo "${FILE}" | grep "mylib" >/dev/null; then
      echo "${LINE}" | sed -n 's/Lines executed://p' | sed -n 's/%.*//p' >tmp
    fi
  done
  (後省略)
4.2. カバレッジ情報のGist保存+README参照
- 本節の設定は、参考資料[4]の通り、Dynamic Badgeのactionsを用いて、バッジ情報をGistに保存しております。
- 参考元ではpythonコードに対してのカバレッジ情報の表示になっております。本ページは、C++コードに適用した場合の適用例となります。カバレッジ情報をどう取得するか、が肝でした。
- Logoやカラーリングについては、Dynamic Badgeのoptionを参照ください。カバレッジ率により、0(赤)~100(緑)で変わるように設定しています。
### build-test.yamlの抜粋 ###
- name: create coverage badge
  if: github.event_name == 'schedule' || ( github.event_name == 'workflow_dispatch' && github.ref_name == 'main' )
  uses: schneegans/dynamic-badges-action@v1.3.0
  with:
    auth: ${{ secrets.MY_GIST_TOKEN }}
    gistID: 6f275fbd0ca79af67c1d90f9ba524212
    filename: my-coverage.json
    label: Coverage
    message: ${{ env.COVERAGE }}
    namedLogo: github
    valColorRange: ${{ env.COVERAGE }}
    maxColorRange: 100
    minColorRange: 0
- READMEの設定についても、参考資料[4]の通りとなります。
- 1.1. 動機 のところに載せたキャプチャ部は以下のような記述となります。
# my-cpp-cmake-sample

[](https://github.com/tomoten-umino/my-cpp-cmake-sample/actions/workflows/build-test.yaml)
[](https://github.com/tomoten-umino/my-cpp-cmake-sample/actions/workflows/build-test.yaml)
This repository is a sample project of C++ program.
おわりに
- READMEにカバレッジ率を表示できるようになりました。
- ただ、テストコードを超テキトーにしか書いていないため、カバレッジ率が激低い状態です。
- my_sumという関数のテストしかしていないため、カバレッジ率28%しかありません。
- testコードを追加コミットしたとき、カバレッジ率が更新されることを確認したいと思います。
- 参考資料[4]が示したGist + Dynamic Badgeの方法は、他にも応用が効くので、他のバッジネタにも応用したいと思います。
### tests/unit-test.cppの中身 ###
#include "mylib/mylib.hpp"
#include "gtest/gtest.h"

int main(int argc, char* argv[]) {
    // initialize Google Test
    ::testing::InitGoogleTest(&argc, argv);

    return RUN_ALL_TESTS();
}

TEST(SumTest, Value){

    // create instance
    Mylib* hoge = nullptr;
    hoge = new Mylib();

    // case 1
    EXPECT_EQ(2, hoge->my_sum(1, 1));

    delete hoge;
    hoge = nullptr;
}