ESP32のBLE環境の構築が終わったのでBLEライブラリを使ってみる
ベースにするのは、サンプルスケッチの”BLE_notify”、ボードはArduino Uno v3.0コネクタ互換のUnopuino32Sを使用する
やってみる事
- ボタンを押すと温度センサの値をBLE経由でスマホに”Notify”で通知する
- 送信中にLEDを光らせる
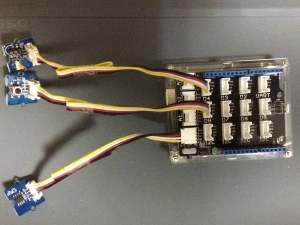
ハードウエア構成
- Seeed StudioのGrove Starter kit for Arduinoを使って半田付けなしで構成する
- 使用するモジュール
- Base Shield (VCC SWは3.3Vに設定)
- Grove_Temperature Sensor (A0に接続)
- Grove_Button (D8に接続)
- Grove_LED (D4に接続)
スケッチの修正内容
サンプルスケッチのダウンロードはこちら
- Unopuino32ピン配置を記載した定義ファイルを”スケッチ”->”ファイル追加”でスケッチに追加
 // Include Unopuino32 pin definition
 #include "Unopuino32.h"
- UUIDを”environmental_sensing”, “temperature”に変更
# define SERVICE_UUID "0000181a-0000-1000-8000-00805f9b34fb" // org.bluetooth.service.environmental_sensing
# define CHARACTERISTIC_UUID "00002a6e-0000-1000-8000-00805f9b34fb" // org.bluetooth.characteristic.temperature
- 接続したGroveモジュールのピン番号を指定
const int inputButton = GP8; // IO12
const int outputLed = GP4; // IO18
const int pinTemp = AD0; // pin of temperature sensor
- ボタン状態の判定及び温度検出用の変数を定義
bool outputState = true;  // 出力状態フラグ
unsigned long t = 0; // Time

float temperature;
int B=3975; // B value of the thermistor
float resistance;
- setup()関数のBLE初期化関数でPeripheralで表示する名前を指定
void setup() {
 Serial.begin(115200);

// Create the BLE Device
 BLEDevice::init("Unopuino32s");

// Create the BLE Server
 BLEServer *pServer = BLEDevice::createServer();
 pServer->setCallbacks(new MyServerCallbacks());
- setup()関数にボタン及びLEDのpinMode設定を追加
pinMode(outputLed, OUTPUT);
pinMode(inputButton, INPUT);
- loop()関数を以下に変更
void loop() {
  uint8_t data_buff[2];  // データ通知用バッファ

  int val = analogRead(pinTemp); // get analog value
  resistance=(float)(4095-val)*10000/val; // get resistance (12bit AD)
  temperature=1/(log(resistance/10000)/B+1/298.15)-273.15; // calc temperature

  // デバイスが接続された時の処理
  if(deviceConnected){
    // ボタンが押された時の処理
    if (digitalRead(inputButton) == HIGH) {
      // チャタリング防止
      if (!outputState && millis() - t >= 1000) {
        digitalWrite(outputLed, HIGH);
        outputState = true;
        Serial.println(temperature);
        // 値を設定してNotifyを発行
        data_buff[0] = (int16_t)(temperature * 100.0) & 0xff;
        data_buff[1] = ((int16_t)(temperature * 100.0) >> 8);
        Serial.printf("*** NOTIFY: %d, %d ***\n", data_buff[0], data_buff[1]);
        pCharacteristic->setValue(data_buff, 2);
        pCharacteristic->notify();
        t = millis();
      }
    }else{
      digitalWrite(outputLed, LOW);  // 送信後LEDを消灯
      outputState = false;
    }
  }
  delay(10);
}
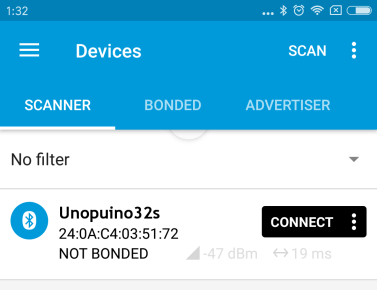
スマートフォンへのBLEスキャナのインストール
以下のアプリをインストールする
- iPhone: “LightBlue”
- Android: “nRF connect”
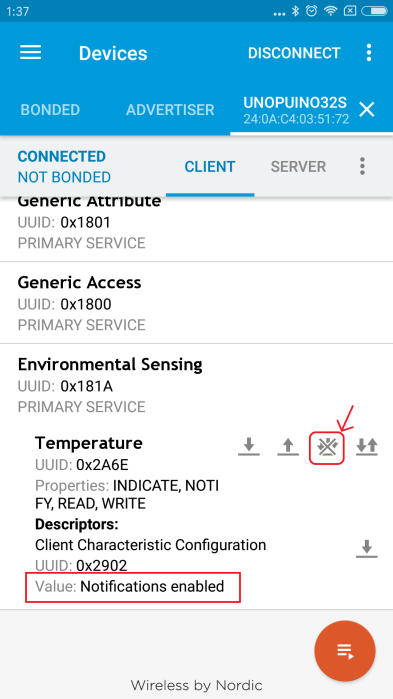
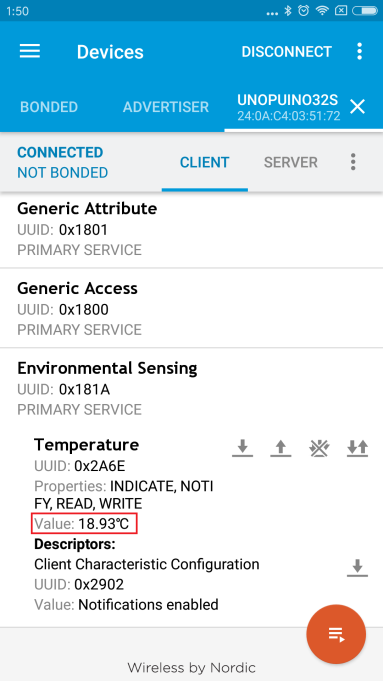
BLEスキャナで通知を受信 (“nRF connect”の例)
- PeripheralをスキャンしてESP32(上記例では”Unopuino32s”)に接続する
- “Environmental Sensing”を開き、”Temperature”で”Notification enabled”にする
- Grove_Buttonボタンを押すと温度が通知される
参考
- Yengawa Lab さんのBLEスタートアップ