始めてElasticSearchを利用しましたので、記録として残しておきます、
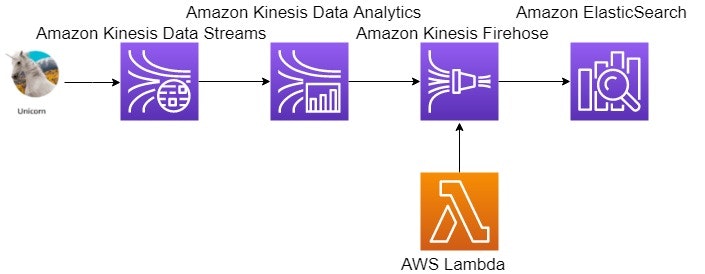
チュートリアルのデータを利用して、Amazon Kinesis FirehoseでReal-time log 整形を行い、Amazon ElasticSearchで可視化を行いました。
チュートリアル
リアルタイムデータ処理を行うサーバーレスアプリケーションを構築する
(1)Amazon Kinesis Data Streams → (2)Amazon Kinesis Data Analytics → (3)Amazon Kinesis Firehose → (4)Amazon ElasticSearchへ出力して、可視化しようと試みました。
(1),(2)は上記のチュートリアルを参考に構築してください。
躓いた点
(3)から(4)へデータを出力する際に、Amazon Kinesis AnalyticsのtimestampカラムとElasticSearchのfieldの形式が一致せずにLambdaでLogの整形が必要になった点です。
Amazon Kinesis Analyticへの入力データ
{
    "Distance": 30.68079984685547,
    "HealthPoints": -326,
    "Latitude": -7.8471452457495126,
    "Longitude": 63.946930336591194,
    "MagicPoints": -254,
    "Name": "unicorn3",
    "StatusTime": "2019-08-06 00:33:50.706"
}
Real-time analytics SQL
CREATE OR REPLACE STREAM "DESTINATION_SQL_STREAM" (
"Name" VARCHAR(16),
"StatusTime" TIMESTAMP,
"Distance" SMALLINT,
"MinMagicPoints" SMALLINT,
"MaxMagicPoints" SMALLINT,
"MinHealthPoints" SMALLINT,
"MaxHealthPoints" SMALLINT
);

CREATE OR REPLACE PUMP "STREAM_PUMP" AS
INSERT INTO "DESTINATION_SQL_STREAM"
SELECT STREAM "Name", "ROWTIME", SUM("Distance"), MIN("MagicPoints"), MAX("MagicPoints"), MIN("HealthPoints"), MAX("HealthPoints")
FROM "SOURCE_SQL_STREAM_001"
GROUP BY FLOOR("SOURCE_SQL_STREAM_001"."ROWTIME" TO MINUTE), "Name";
source data

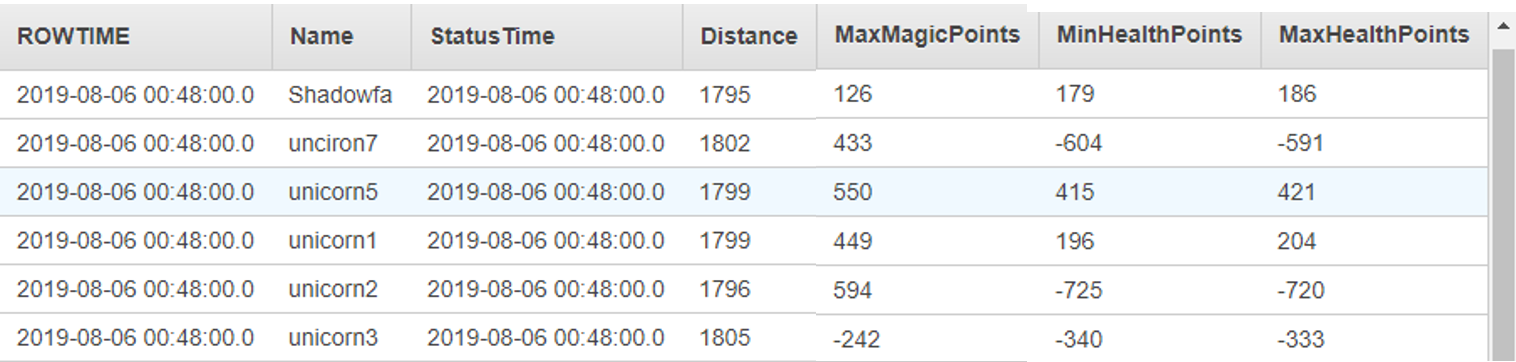
real-time analytics
Amazon Kinesis Firehose Transform source records with AWS Lambda 設定
ElasticSearchのTimeStampのフォーマットは日付T時間で、スペースだと下記のエラーが発生しました。
```
{"type":"mapper_parsing_exception","reason":"failed to parse field [StatusTime] of type [date] in document with id \u002749598119027046677940487811470072065833912927359973982210.0\u0027","caused_by":{"type":"illegal_argument_exception","reason":"Invalid format: \"2019-08-01 06:42:00.000\" is malformed at \"00\""}}
Analyticsから出力されるStatus Time:2019-08-06 00:48:00.0を2019-08-06T00:48:00へ変換します。
##LambdaDesigner

##function
まだpythonを身につけられておらず、スマートではありませんが、
```Lambda_function.py
from __future__ import print_function
import json
import base64
print('Loading function')
def lambda_handler(event, context):
output = []
for record in event['records']:
payload = base64.b64decode(record['data'])
payload = json.loads(payload)
s = payload['StatusTime']
s = s.replace(' ', 'T')
s = s[:-4]
data = {
'Name': payload['Name'],
'StatusTime': s,
'Distance': payload['Distance'],
'MinMagicPoints': payload['MinMagicPoints'],
'MaxMagicPoints': payload['MaxMagicPoints'],
'MinHealthPoints': payload['MinHealthPoints'],
'MaxHealthPoints': payload['MaxHealthPoints'],
}
data = json.dumps(data)
b_data=data.encode()
b64encoded=base64.b64encode(b_data)
b64encoded = b64encoded.decode()
print(b64encoded)
output_record = {
'recordId': record['recordId'],
'result': 'Ok',
'data': b64encoded,
'approximateArrivalTimestamp': record['approximateArrivalTimestamp']
}
output.append(output_record)
print('Successfully processed {} records.'.format(output))
return {'records': output}
ポイントとしてはoutput_record = {'result': 'Ok',を含まないといけないということです。
これで、StatusTimeのフォーマットを変換できます。
テストイベントの設定
{
  "records": [
    {
      "recordId": "49598119027046677940487811666676045100381312741455953922000000",
      "data": "eyJOYW1lIjoidW5jaXJvbjciLCJTdGF0dXNUaW1lIjoiMjAxOS0wOC0wMSAwNzowMzowMC4wMDAiLCJEaXN0YW5jZSI6MTc3NCwiTWluTWFnaWNQb2ludHMiOjE4MSwiTWF4TWFnaWNQb2ludHMiOjE4OSwiTWluSGVhbHRoUG9pbnRzIjotMTkwLCJNYXhIZWFsdGhQb2ludHMiOi0xODN9",
      "approximateArrivalTimestamp": 1564642980052
    },
    {
      "recordId": "49598119027046677940487811666677254026200927370630660098000000",
      "data": "eyJOYW1lIjoidW5pY29ybjUiLCJTdGF0dXNUaW1lIjoiMjAxOS0wOC0wMSAwNzowMzowMC4wMDAiLCJEaXN0YW5jZSI6MTc3MCwiTWluTWFnaWNQb2ludHMiOjgwLCJNYXhNYWdpY1BvaW50cyI6ODksIk1pbkhlYWx0aFBvaW50cyI6NjYxLCJNYXhIZWFsdGhQb2ludHMiOjY2N30=",
      "approximateArrivalTimestamp": 1564642980054
    }
}
Lambdaのeventに渡されるdataはbase64でエンコードされ、zipで圧縮されています。
Amazon Elasticsearch Service destination 設定
Amazon ElasticSearchを起動して、Domain、Indexを指定し、指定したIndexがなければ、自動的に新しく作成されますが、マッチングされた多くのfeildがlong型となってしまうため、StatusTimeをTimeStampとして有効にできません。
そこで、Amazon ElasticSerchのKibanaエンドポイントへアクセスして、Indexを作成して、マッピングを行います。
Amazon ElasticSearch 設定
ElElasticSearchの使い方について、インターネットで検索しても、どのようにcurlでRESTを送っているかわからず、手間取りましたが、KibanaのConsoleから簡単にコマンドを送ることができました。
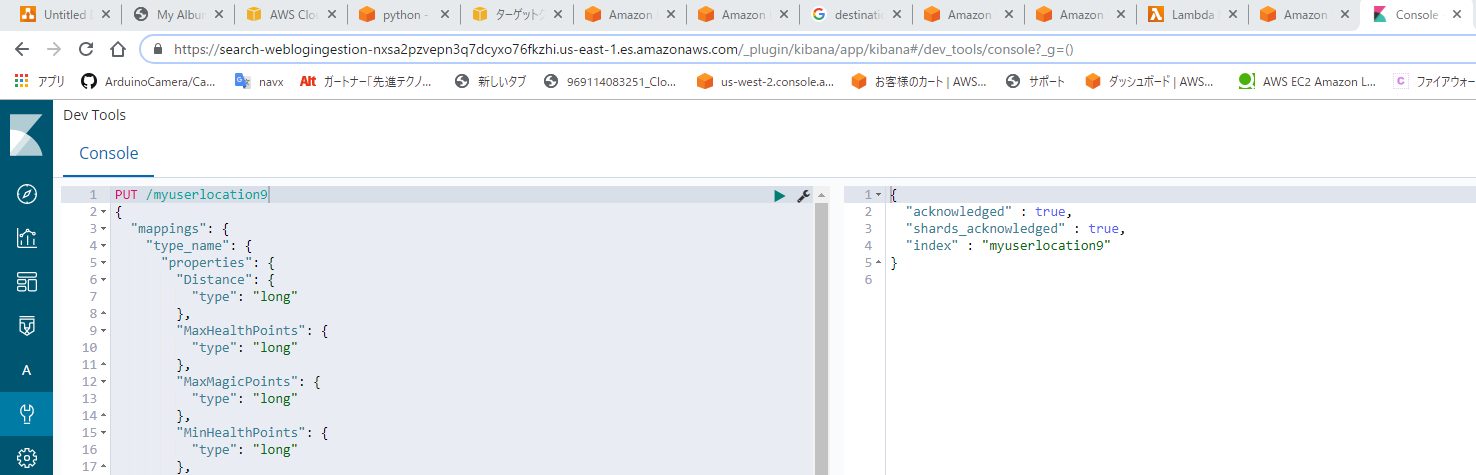
インデックス作成コマンド
PUT /myuserlocation9
{
  "mappings": {
    "type_name": {
      "properties": {
        "Distance": {
          "type": "long"
        },
        "MaxHealthPoints": {
          "type": "long"
        },
        "MaxMagicPoints": {
          "type": "long"
        },
        "MinHealthPoints": {
          "type": "long"
        },
        "MinMagicPoints": {
          "type": "long"
        },
        "Name": {
          "type": "text",
          "fields": {
            "keyword": {
              "type": "keyword",
              "ignore_above": 256
            }
          }
        },
        "StatusTime": {
          "type": "date",
          "format": "yyyy-MM-dd'T'HH:mm:ss",
          "fields": {
            "keyword": {
              "type": "keyword",
              "ignore_above": 256
            }
          }
        },
        "change": {
          "type": "float"
        },
        "price": {
          "type": "long"
        },
        "sector": {
          "type": "text",
          "fields": {
            "keyword": {
              "type": "keyword",
              "ignore_above": 256
            }
          }
        },
        "ticker_symbol": {
          "type": "text",
          "fields": {
            "keyword": {
              "type": "keyword",
              "ignore_above": 256
            }
          }
        }
      }
    }
  }
}
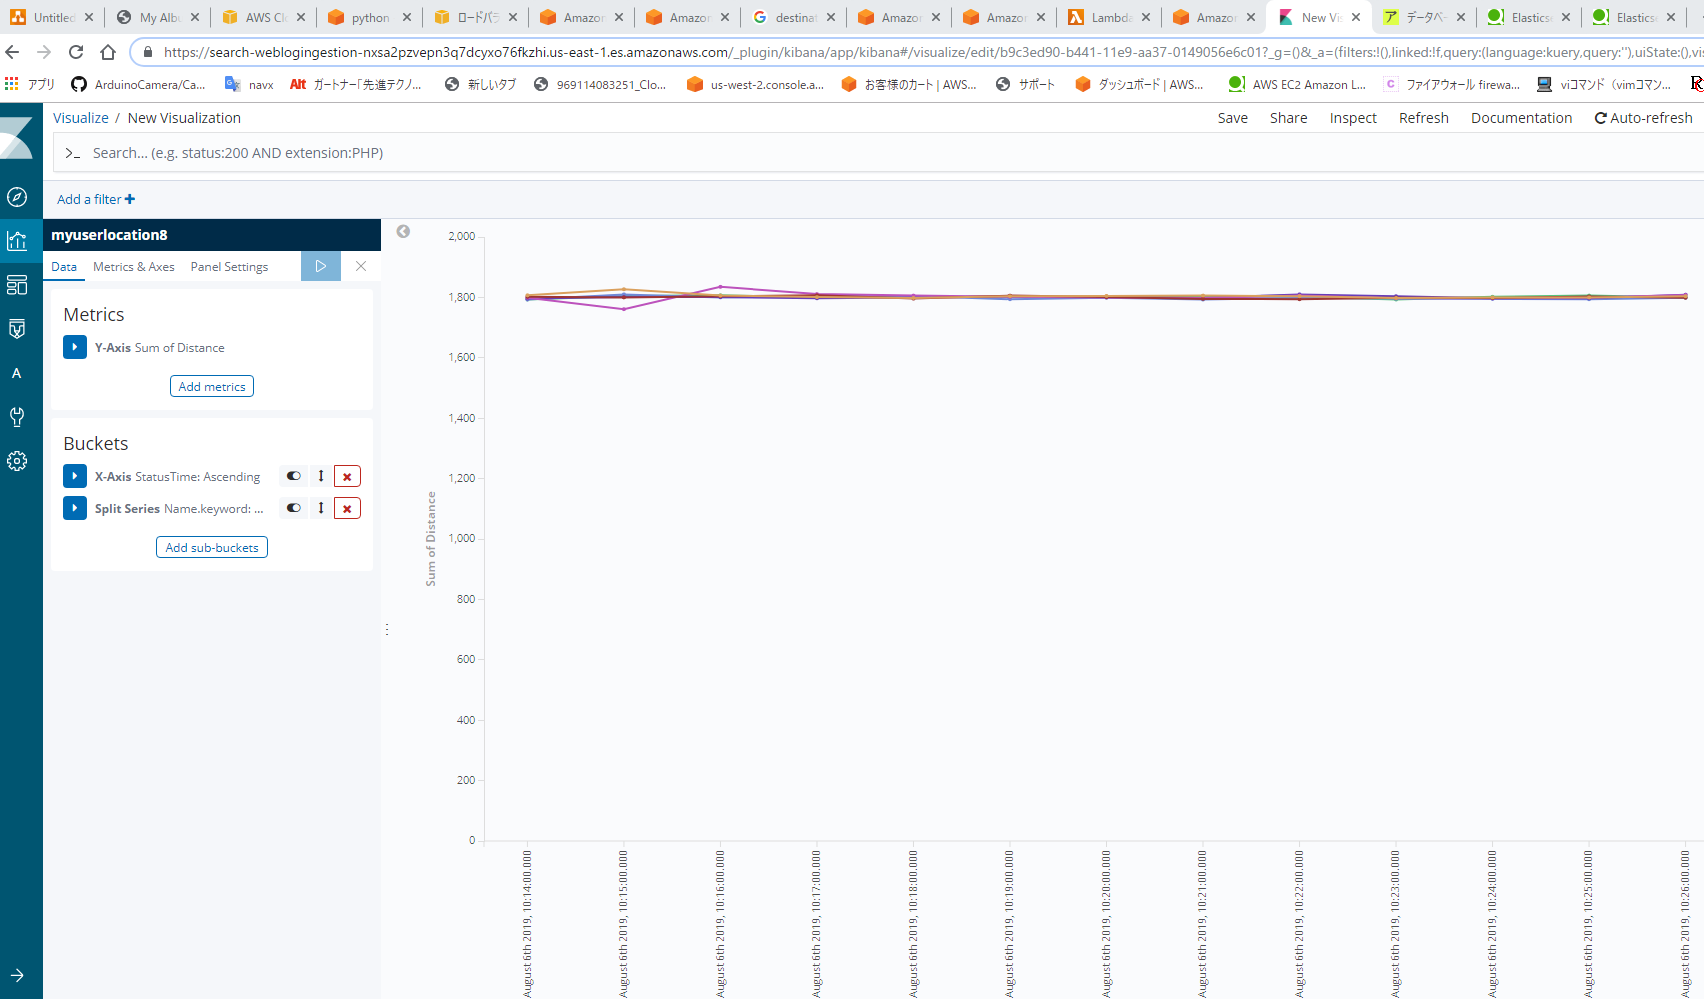
ElasticSearch 可視化
これで簡単ではありますが、無事にTimeStampを利用して可視化を行うことができした。
ヘルスチェックの取得
GET myuserlocation8/_cluster/health?pretty=true
reaponce
{
  "_index" : "myuserlocation8",
  "_type" : "_cluster",
  "_id" : "health",
  "found" : false
}
ドメインからunicorn1と一致するものを検索する
GET myuserlocation8/_search?q=Name:unicorn5
responce
{
  "took" : 21,
  "timed_out" : false,
  "_shards" : {
    "total" : 5,
    "successful" : 5,
    "skipped" : 0,
    "failed" : 0
  },
  "hits" : {
    "total" : 6726,
    "max_score" : 1.6273899,
    "hits" : [
      {
        "_index" : "myuserlocation8",
        "_type" : "type_name",
        "_id" : "49598119027046677940487813128631247686172627365223464962.0",
        "_score" : 1.6273899,
        "_source" : {
          "Name" : "unicorn5",
          "StatusTime" : "2019-08-01T09:38:00",
          "Distance" : 1804,
          "MinMagicPoints" : 113,
          "MaxMagicPoints" : 119,
          "MinHealthPoints" : 731,
          "MaxHealthPoints" : 738
        }
      }
    ]
  }
}
インデックスを削除する
DELETE <index_name>?pretty=true
response
{
  "acknowledged" : true
}
参考
サーバーレスのリアルタイムデータ処理アプリケーションを構築する
はじめての Elasticsearch
Kibana 4.1.0 + ElasticSearch 1.6.0 でデータビジュアライズ
Class DateTimeFormatter
elastic Gsub Provessor
elastic format