はじめに
この度研究室で深層学習をテーマに研究を進めることとなり、主にPytorchを使うことになったので本記事からPyTorchの基本的なメソッドをまとめます。
PyTorchとは
PyTorchとは、FaceBookのAI Researchグループが主体となって作られた機械学習のライブラリです。ニューラルネットワークを実装する際に役立ちます。シンプルな記述から高機能なプログラムを実装することができるという点からかなりの人気を博しています。
今回は重要な概念であるTensorについてまとめていきます。
torch.Tensor
Tensorとはスカラー、ベクトル、行列を一般化した多次元配列です。すでにNumpyを触ったことのある方はndarray型とほぼ一緒だと思ってもらえるといいです。違う点はTensor型はGPUを使った演算が可能です。
実際のプログラム例です。
import torch
a = torch.zeros([2, 4], dtype=torch.int32)
b = torch.ones([2, 2, 3])
r = torch.rand([2, 3, 4])
c = torch.tensor([[[1, 2, 3],
                    [2, 3, 4],
                    [5, 6, 7]],
                   [[3, 4, 5],
                    [4, 5, 6],
                    [8, 9, 10]]])
d = torch.tensor([[1, 2, 3],
                    [4, 5, 6]])
print(a)
print(b)
print(r)
print(c)
print(c[0, 2, 2])
print(d[0, 2])
tensor([[0, 0, 0, 0],
        [0, 0, 0, 0]], dtype=torch.int32)
tensor([[[1., 1., 1.],
         [1., 1., 1.]],

        [[1., 1., 1.],
         [1., 1., 1.]]])
tensor([[[0.1545, 0.1611, 0.1005, 0.5967],
         [0.6941, 0.3958, 0.7072, 0.1464],
         [0.0488, 0.4942, 0.3892, 0.3905]],

        [[0.5453, 0.5177, 0.6561, 0.3694],
         [0.6230, 0.4963, 0.7278, 0.6693],
         [0.8061, 0.5002, 0.2964, 0.3545]]])
tensor([[[ 1,  2,  3],
         [ 2,  3,  4],
         [ 5,  6,  7]],

        [[ 3,  4,  5],
         [ 4,  5,  6],
         [ 8,  9, 10]]])
tensor(7)
tensor(3)
torch.zerosやtorch.onesはそれぞれ指定した次元のテンソルを0または1で埋めるメソッドです。特に型指定をしなければbのようにfloatTensorになります。
tensor.randは指定した次元のテンソルの値をランダム値で埋めるメソッドです。
自分で値を指定する場合はtorch.tensorを使います。
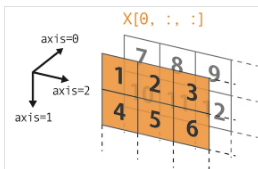
cは3次元、dは2次元のテンソルです。ここで特定の要素を取り出すときの注意点です。
下の画像のように2次元と3次元ではaxisの順序が変わってきます。
指定するときはaxis0から指定するので、2次元と3次元でのaxisの順序には注意しておきましょう。


特定の列や行、奥行きを取り出す
特定の列や行、奥行きを取りたい場合はそれ以外の成分を「:」にして取り出します。
c = torch.tensor([[[1, 2, 3],
                    [2, 3, 4],
                    [5, 6, 7]],
                   [[3, 4, 5],
                    [4, 5, 6],
                    [8, 9, 10]]])
print(c[:, 1, :])
print(c[:, :, 2])
tensor([[2, 3, 4],
        [4, 5, 6]])
tensor([[ 3,  4,  7],
        [ 5,  6, 10]])
print(c[:, 1, :])では縦軸の1番目を取り出し、print(c[:, :, 2])では横軸の2番目を取り出しています。
shape(要素数)とデータの中身を確認
要素数を確認する場合はshapeメソッドを使います。また、単純にデータの中身を見る場合にはdataメソッドを使用します。上のテンソルcに適用すると
print(c.shape)
>>>torch.Size([2, 3, 3])
print(c.data)
>>>tensor([[[ 1,  2,  3],
         [ 2,  3,  4],
         [ 5,  6,  7]],

        [[ 3,  4,  5],
         [ 4,  5,  6],
         [ 8,  9, 10]]])
print(c.data)についてはprint(c)と全く同じです。ですが、matplotlibでの描画の際にdataメソッドしか使えないという場合があるので覚えておくと良いです。
次元を変化させる(view関数)
Numpyを使用している方はreshape関数を使って次元を変化させたことがあると思います。PyTorchにおいてはview関数がその機能に当たります。
以下は2x3x3のテンソルcを2次元、1次元に変換するコードです。
print(c.view(2, -1))
>>>tensor([[ 1,  2,  3,  2,  3,  4,  5,  6,  7],
        [ 3,  4,  5,  4,  5,  6,  8,  9, 10]])
print(c.view(-1))
>>>tensor([ 1,  2,  3,  2,  3,  4,  5,  6,  7,  3,  4,  5,  4,  5,  6,  8,  9, 10])
上のように要素数に-1を指定すると、要素数に応じて自動調整してくれます。テンソルcは要素数が18なので2x9の2次元テンソルが生成されています。