#0. 前提
#1. プロジェクトの作成
###1-1. プロジェクト作成ボタンを押して、任意のプロジェクト名にする


###1-2. メッセージタブから、確認型テンプレートメッセージを選択
確認型テンプレートメッセージとは、一つの質問に対して二択の答えを選択できる形式
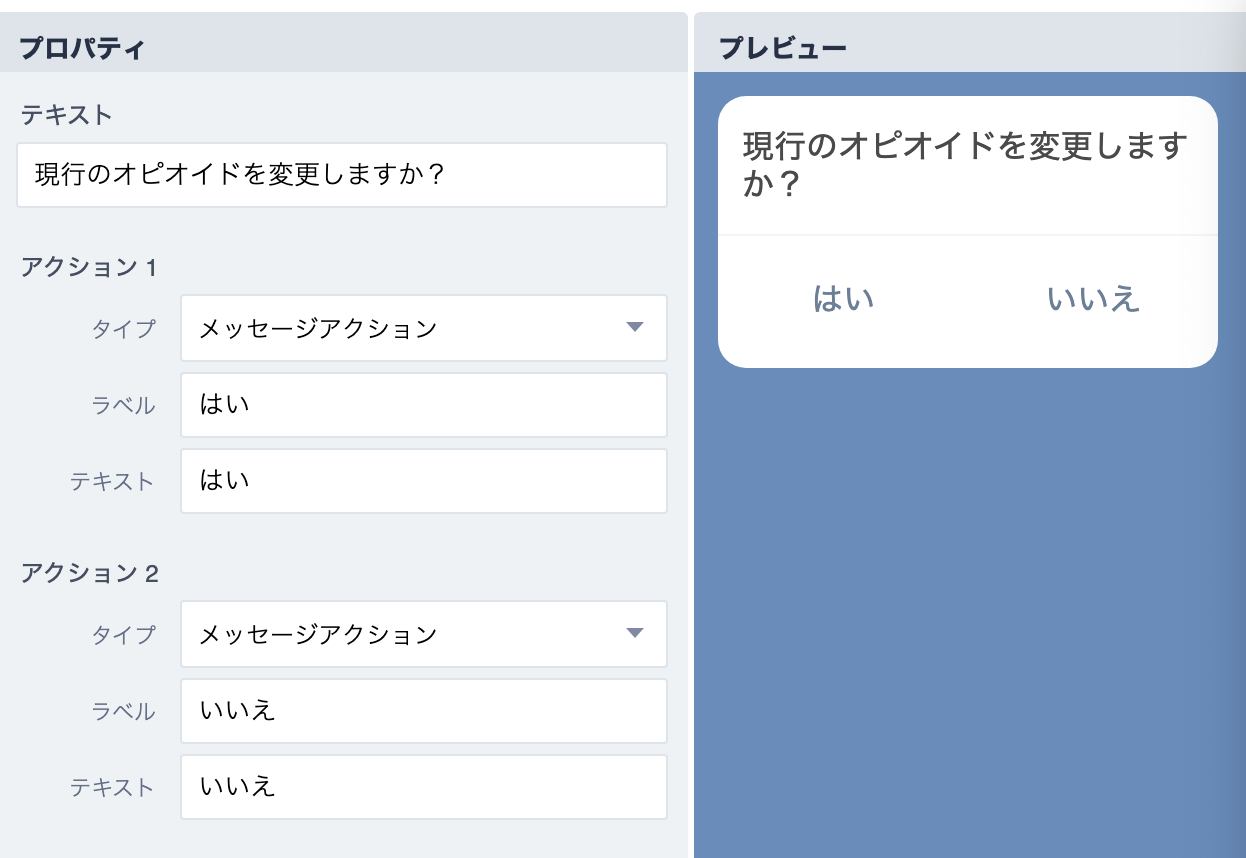
###1-3.プロパティの選択とメッセージオブジェクトの作成
ラベル: ボタンの表示
テキスト:ユーザーが送信する内容
すると、右下にメッセージオブジェクトが生成された
{
  "type": "template",
  "altText": "this is a confirm template",
  "template": {
    "type": "confirm",
    "actions": [
      {
        "type": "message",
        "label": "はい",
        "text": "はい"
      },
      {
        "type": "message",
        "label": "いいえ",
        "text": "いいえ"
      }
    ],
    "text": "現行のオピオイドを変更しますか?"
  }
}
###1-4.メッセージオブジェクトの挿入
これをコピーしておいて、以下のオウム返しBotのコードを修正
+変更前
'use strict';

const express = require('express');
const line = require('@line/bot-sdk');
const PORT = process.env.PORT || 3000;

const config = {
    channelSecret: '*********',
    channelAccessToken: '*********'
};

const app = express();

app.get('/', (req, res) => res.send('Hello LINE BOT!(GET)')); //ブラウザ確認用(無くても問題ない)
app.post('/webhook', line.middleware(config), (req, res) => {
    console.log(req.body.events);

    //ここのif分はdeveloper consoleの"接続確認"用なので削除して問題ないです。
    if(req.body.events[0].replyToken === '00000000000000000000000000000000' && req.body.events[1].replyToken === 'ffffffffffffffffffffffffffffffff'){
        res.send('Hello LINE BOT!(POST)');
        console.log('疎通確認用');
        return;
    }

    Promise
      .all(req.body.events.map(handleEvent))
      .then((result) => res.json(result));
});

const client = new line.Client(config);

async function handleEvent(event) {
  if (event.type !== 'message' || event.message.type !== 'text') {
    return Promise.resolve(null);
  }
  return client.replyMessage(event.replyToken, {
    type: 'text',
    text: event.message.text //実際に返信の言葉を入れる箇所
  });
}

app.listen(PORT);
console.log(`Server running at ${PORT}`);
- 変更後
'use strict';

const express = require('express');
const line = require('@line/bot-sdk');
const PORT = process.env.PORT || 3000;

const config = {
    channelSecret: '*********',
    channelAccessToken: '*********'
};

const app = express();

app.get('/', (req, res) => res.send('Hello LINE BOT!(GET)')); //ブラウザ確認用(無くても問題ない)
app.post('/webhook', line.middleware(config), (req, res) => {
    console.log(req.body.events);

    //ここのif分はdeveloper consoleの"接続確認"用なので削除して問題ないです。
    if(req.body.events[0].replyToken === '00000000000000000000000000000000' && req.body.events[1].replyToken === 'ffffffffffffffffffffffffffffffff'){
        res.send('Hello LINE BOT!(POST)');
        console.log('疎通確認用');
        return;
    }

    Promise
      .all(req.body.events.map(handleEvent))
      .then((result) => res.json(result));
});

const client = new line.Client(config);

async function handleEvent(event) {
  if (event.type !== 'message' || event.message.type !== 'text') {
    return Promise.resolve(null);
  }

  // ===================================ここから
  let message = {
    type: 'text',
    text: event.message.text
  };

  if (event.message.text === '確認') {
    message = {}; // ←ここにBot Designerで生成したメッセージオブジェクトを貼り付ける
  }

  return client.replyMessage(event.replyToken, message);
  // ===================================ここまで変更
}

app.listen(PORT);
console.log(`Server running at ${PORT}`);
とした上で、←ここにBot Designerで生成したメッセージオブジェクトを貼り付ける
async function handleEvent(event) {
  if (event.type !== 'message' || event.message.type !== 'text') {
    return Promise.resolve(null);
  }

  // ===================================ここから
  let message = {
    type: 'text',
    text: event.message.text
  };

  if (event.message.text === '確認') {
    message = {
        "type": "template",
        "altText": "this is a confirm template",
        "template": {
          "type": "confirm",
          "actions": [
            {
              "type": "message",
              "label": "はい",
              "text": "はい"
            },
            {
              "type": "message",
              "label": "いいえ",
              "text": "いいえ"
            }
          ],
          "text": "現行のオピオイドを変更しますか?"
      }
    }; // ここにBot Designerで生成したメッセージオブジェクトを貼り付ける
  }

  return client.replyMessage(event.replyToken, message);
  // ===================================ここまで変更
}
★注★ control+C でserver.js を一時停止して、node server.jsで再実行
###1-5.結果

確認と入力すると、1-3で生成した確認型メッセージテンプレートが生成された。
ここで更にメッセージアクションを設定すると、ユーザーがそのメッセージを送信したようにもできるし、URLアクションを設定すると、WEBページを開くことができる。
#2.リッチメニューを作る

から、今回、私が選択したツールは、簡単な方のLINE Official Account Manager。
開いておくページは2つ
①[公式ドキュメント] (https://www.linebiz.com/jp/manual/OfficialAccountManager/rich-menus/)

②リッチメニューを作るチャネルのLINE Official Account Manager
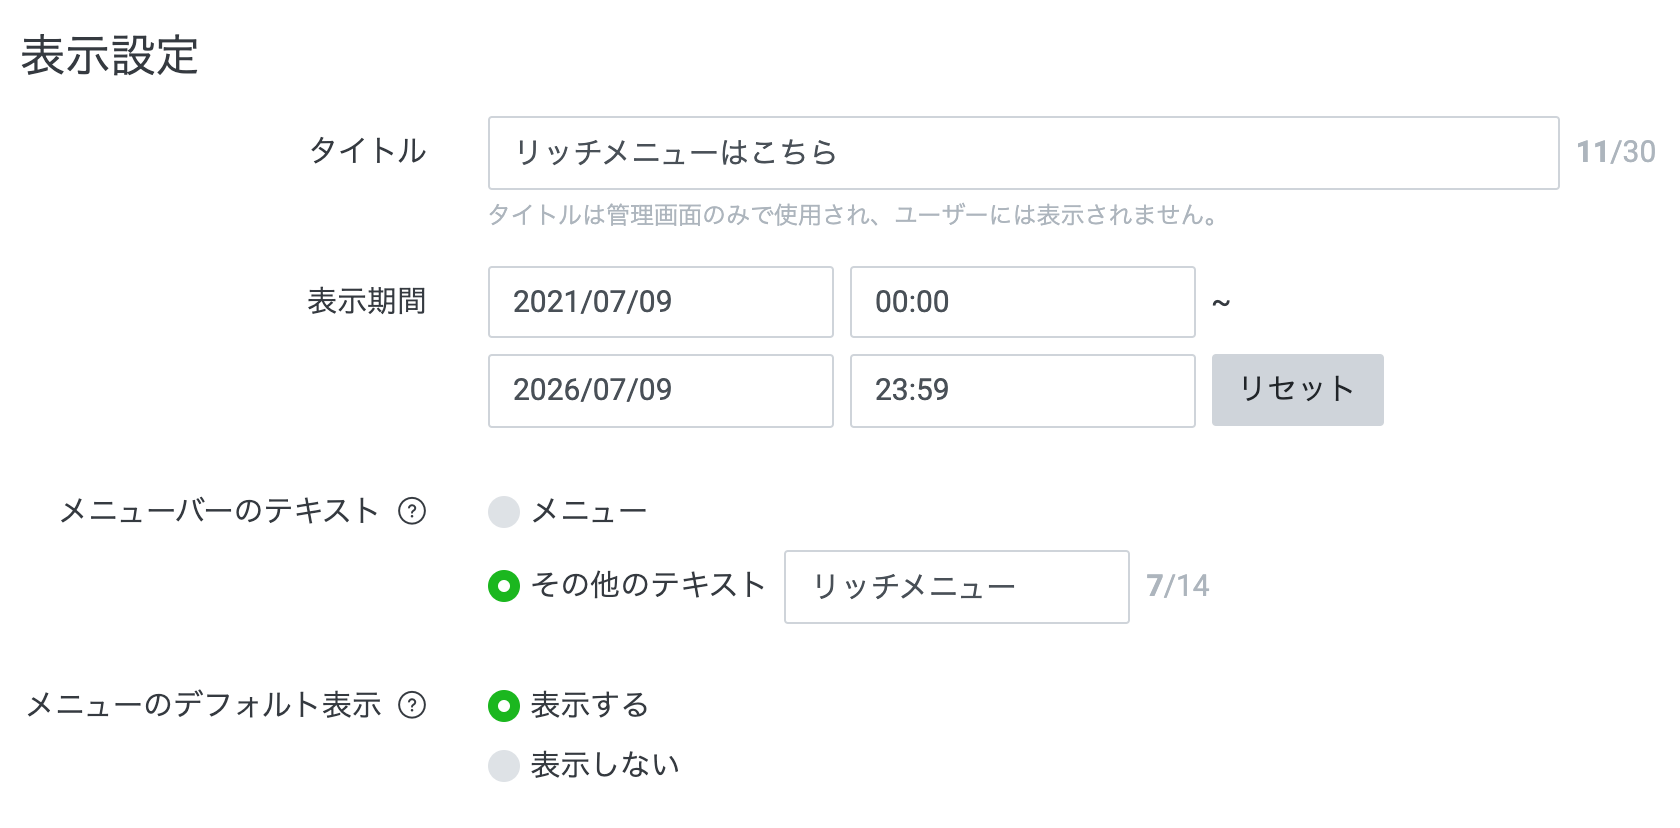
###2-1.表示設定

LINE Official Account Manager にて ホーム>トークルーム管理>リッチメニューをクリックして 作成ボタンを押すと、

入力する内容
- タイトル:ユーザー表示はされないので、作成者がわかればOK
- 表示期間:リッチメニューが表示される期間 ここでは適当に5年くらいにしておく
- メニューバーのテキスト:↓の
チェックに相当する部分

- メニューのデフォルト表示:トークルームを開いたときに、自動的にリッチメニューを表示するか否か
とりあえずは、↓のように入力
###2-2.コンテンツ設定
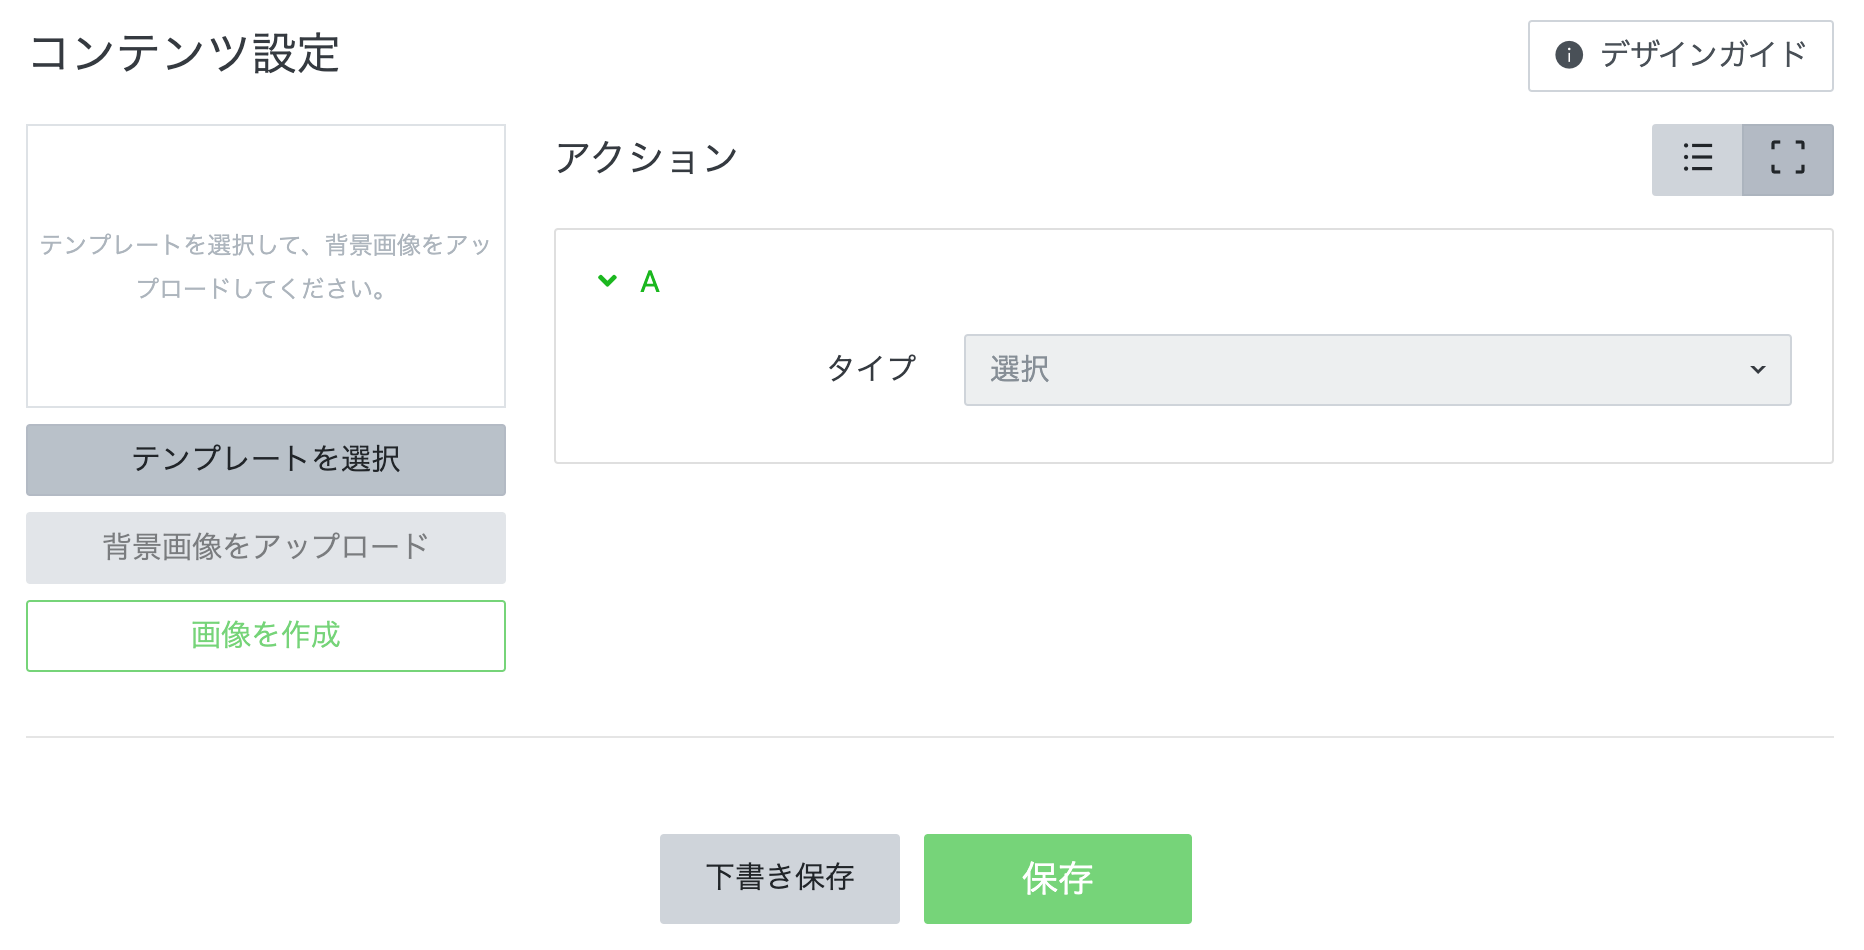
テンプレートボタンをクリックして、小2つのものを選択

画像を作成をクリック
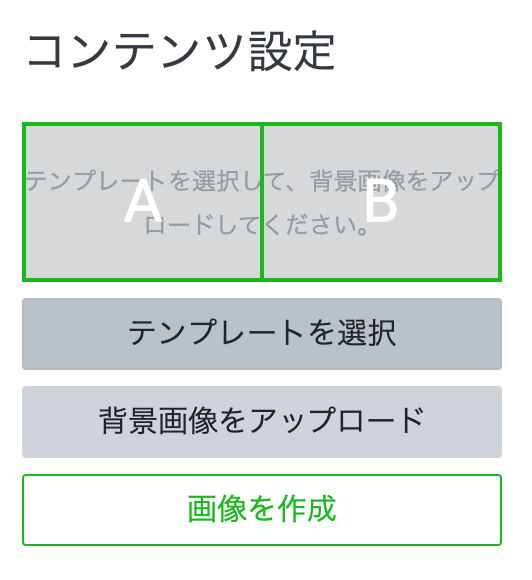
背景画像をアップロードして自前で作りたい場合は↓を参考に

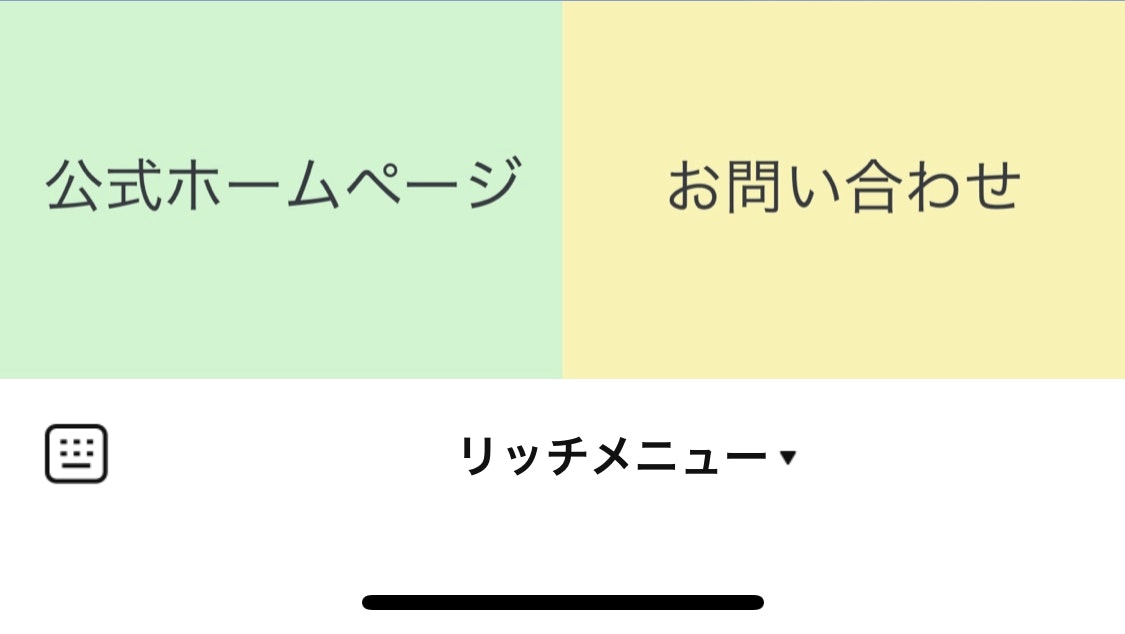
###2-3.画像を作成

パワーポイント感覚で、テキスト入力
左側を公式ホームページ 右側をお問い合わせ した。
###2-4.アクションを設定

ショップカード:スタンプラリー機能
アクションラベル:音声読みあげ機能のときに、どのように読ませるか?
#3.結果
無事、リッチメニューの表示ができた。