はじめに
こんにちは。Volare Advent Calendar 2021の7日目の記事です。
今回は、最近業務で使って知見を得たECS Blue/GreenデプロイメントのCI/CDパイプライン構築方法について、Terraformのリソース定義を見せながら紹介しようと思います。Terraformを含むGitHubのリポジトリも公開しているので、よしなに参考にしてください。
環境
- Terraform 1.0.11
- AWS Provider ~> 3.0
ステップ1. Network
まず、何はともあれネットワークリソースを作成します。具体的には以下のリソース達です。
- VPC
- Subnet
- Internet Gateway
- Route Table
図にするとこんな感じです。
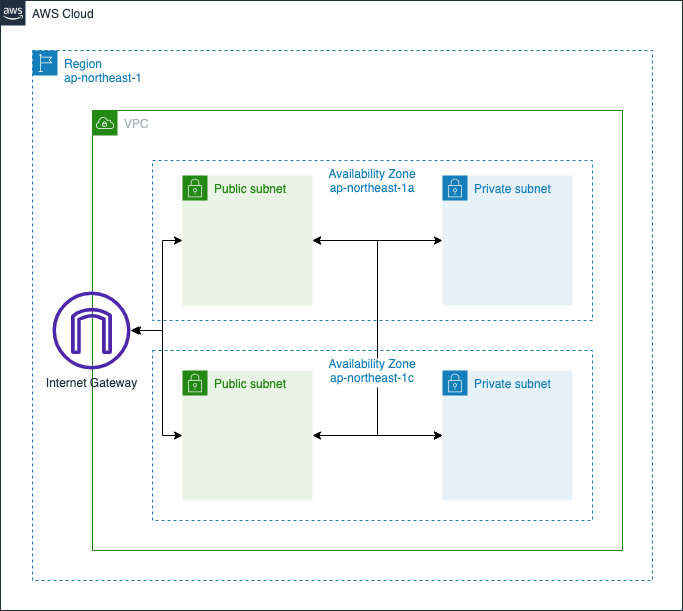
※この記事内ではプライベートサブネットは使いません。
Terraformは以下のようになります。
variable "vpc_cidr" {
  type = string
}

variable "subnet_cidr" {
  type = object({
    public_a  = string
    public_c  = string
    private_a = string
    private_c = string
  })

  default = {
    public_a  = ""
    public_c  = ""
    private_a = ""
    private_c = ""
  }
}

locals {
  az = {
    a = "${data.aws_region.current.name}a"
    c = "${data.aws_region.current.name}c"
    d = "${data.aws_region.current.name}d"
  }
}

resource "aws_vpc" "main" {
  cidr_block           = var.vpc_cidr
  enable_dns_hostnames = true

  tags = {
    Name    = "${var.project}-vpc"
  }
}

resource "aws_subnet" "public_a" {
  vpc_id                  = aws_vpc.main.id
  cidr_block              = var.subnet_cidr.public_a
  availability_zone       = local.az.a
  map_public_ip_on_launch = true

  tags = {
    Name = "${var.project}-subnet-public-a"
  }
}

resource "aws_subnet" "public_c" {
  vpc_id                  = aws_vpc.main.id
  cidr_block              = var.subnet_cidr.public_c
  availability_zone       = local.az.c
  map_public_ip_on_launch = true

  tags = {
    Name = "${var.project}-subnet-public-c"
  }
}

resource "aws_subnet" "private_a" {
  vpc_id            = aws_vpc.main.id
  cidr_block        = var.subnet_cidr.private_a
  availability_zone = local.az.a

  tags = {
    Name = "${var.project}-subnet-private-a"
  }
}

resource "aws_subnet" "private_c" {
  vpc_id            = aws_vpc.main.id
  cidr_block        = var.subnet_cidr.private_c
  availability_zone = local.az.c

  tags = {
    Name = "${var.project}-subnet-private-c"
  }
}

resource "aws_internet_gateway" "main" {
  vpc_id = aws_vpc.main.id

  tags = {
    Name = "${var.project}-internet-gateway"
  }
}

resource "aws_route_table" "public" {
  vpc_id = aws_vpc.main.id

  route {
    cidr_block = "0.0.0.0/0"
    gateway_id = aws_internet_gateway.main.id
  }

  route {
    ipv6_cidr_block = "::/0"
    gateway_id      = aws_internet_gateway.main.id
  }

  tags = {
    Name = "${var.project}-route-table-public"
  }
}

resource "aws_route_table" "private" {
  vpc_id = aws_vpc.main.id

  tags = {
    Name = "${var.project}-route-table-private"
  }
}

resource "aws_route_table_association" "public_a" {
  subnet_id      = aws_subnet.public_a.id
  route_table_id = aws_route_table.public.id
}

resource "aws_route_table_association" "public_c" {
  subnet_id      = aws_subnet.public_c.id
  route_table_id = aws_route_table.public.id
}


resource "aws_route_table_association" "private_a" {
  subnet_id      = aws_subnet.private_a.id
  route_table_id = aws_route_table.private.id
}

resource "aws_route_table_association" "private_c" {
  subnet_id      = aws_subnet.private_c.id
  route_table_id = aws_route_table.private.id
}
特段変わったことはしていないので、説明は省きます。
ステップ2. ALB
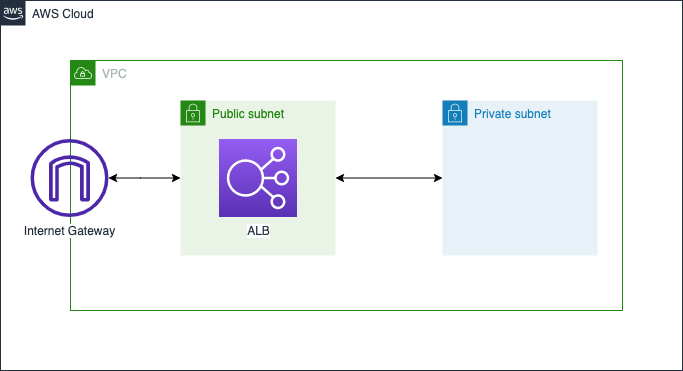
続いてECSの前段に置くALB(Application Load Balancer)を作成します。
パブリックサブネットに配置したALBでクライアントからのリクエストを受け、ECSタスクにリクエストを分散する一般的な構成です。
図にするとこんな感じです。冗長なので、ここからRegionやAvaiability Zoneの記述は省きます。
Terraformはこんな感じになります。
resource "aws_lb" "main" {
  name               = "${var.project}-alb"
  load_balancer_type = "application"
  subnets            = [aws_subnet.public_a.id, aws_subnet.public_c.id]
  security_groups    = [aws_security_group.public_alb.id]
}

resource "aws_lb_listener" "main" {
  load_balancer_arn = aws_lb.main.arn
  port              = 80
  protocol          = "HTTP"

  default_action {
    type             = "forward"
    target_group_arn = aws_lb_target_group.blue.arn
  }
}

resource "aws_lb_target_group" "blue" {
  name        = "${var.project}-tg-blue"
  vpc_id      = aws_vpc.main.id
  port        = 80
  protocol    = "HTTP"
  target_type = "ip"

  health_check {
    port = 80
    path = "/health"
  }
}

resource "aws_lb_listener" "test" {
  load_balancer_arn = aws_lb.main.arn
  port              = 80
  protocol          = "HTTP"

  default_action {
    type             = "forward"
    target_group_arn = aws_lb_target_group.green.arn
  }
}

resource "aws_lb_target_group" "green" {
  name        = "${var.project}-tg-green"
  vpc_id      = aws_vpc.main.id
  port        = 80
  protocol    = "HTTP"
  target_type = "ip"

  health_check {
    port = 80
    path = "/health"
  }
}

resource "aws_security_group" "public_alb" {
  description = "Security group for ALB"
  name        = "${var.project}-sg-alb"
  vpc_id      = aws_vpc.main.id

  egress {
    from_port        = 0
    to_port          = 0
    protocol         = "-1"
    cidr_blocks      = ["0.0.0.0/0"]
    ipv6_cidr_blocks = ["::/0"]
  }

  ingress {
    from_port        = 80
    to_port          = 80
    protocol         = "tcp"
    cidr_blocks      = ["0.0.0.0/0"]
    ipv6_cidr_blocks = ["::/0"]
  }
}
ポイントは、Blue/GreenデプロイメントのためにALBのリスナーとターゲットグループを2つずつ作っているところです。Blue/Greenデプロイメントでは、名前の通りblue, greenという2つのターゲットグループを作成し、デプロイ直後の新しいバージョンはその内の片方のターゲットグループに配置します。そして、身内のみ、もしくは一部のユーザーのみがアクセスできるテスト用のリスナーの宛先を新しいバージョンを配置したターゲットグループにすることで、新しいバージョンで障害が発生した際の被害を小さくすることができます。
デプロイ時の詳細な挙動については、後述するCI/CDのセクションにて紹介します。
ステップ3. ECS
続いてECS on Fargateのアプリケーション実行環境を作成します。
今回はHTTPリクエストに対して固定のメッセージを返すだけの簡素なアプリケーションをGoで作成し、ECS on Fargateの環境にデプロイします。また、デプロイ時にバージョンの切り替わりがわかりやすいように、メッセージはタスク定義の環境変数に渡したものを返すようにしておきます。のちの工程で、デプロイ時にGitのコミットハッシュ値を渡すことで、バージョンを特定できるようにする算段です。また、アプリケーションの前段にはNginxのWebサーバーを置いておきます。
アプリケーションの実装はこんな感じです。ヘルスチェック用のルートも忘れずに作成します。
package main

import (
	"fmt"
	"net/http"
	"os"
)

const address = "0.0.0.0:8080"

func main() {
	http.HandleFunc("/health", func(w http.ResponseWriter, r *http.Request) {
		fmt.Fprintln(w, "ok")
	})

	http.HandleFunc("/", func(w http.ResponseWriter, r *http.Request) {
		version := os.Getenv("VERSION")
		fmt.Fprintln(w, version)
	})

	fmt.Printf("Listening on %s\n", address)
	http.ListenAndServe(address, nil)
}
DockerfileはBuild your Go imageを参考にして書きました。
FROM golang:1.17.4-alpine AS build

WORKDIR /go/src/app

COPY go.mod ./
RUN go mod download

COPY main.go ./
RUN go build -o /app

FROM alpine:3.15.0

WORKDIR /

COPY --from=build /app ./

EXPOSE 8080

RUN addgroup -S app && adduser -S app -G app
USER app:app

CMD ["/app"]
ECS on Fargateは以下のような配置になります。
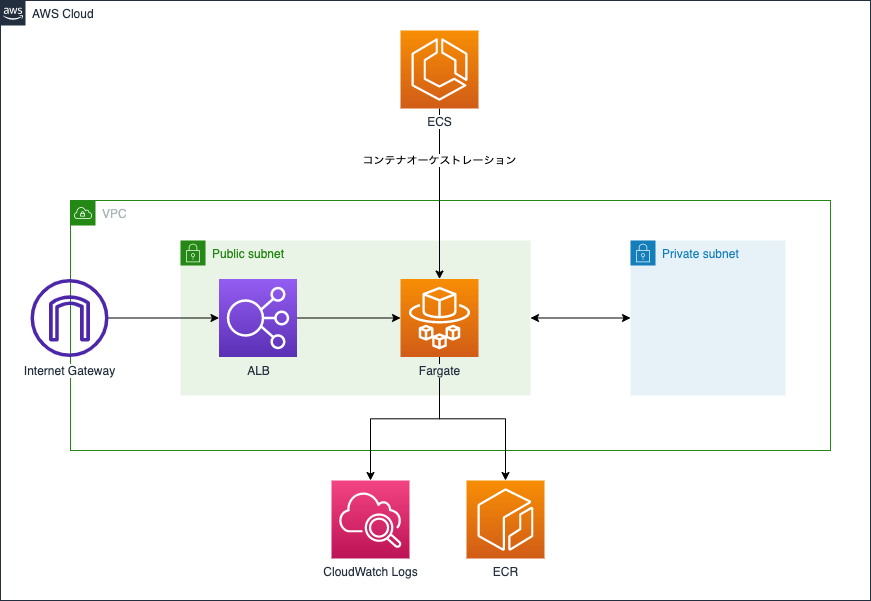
感のいい方なら気付くと思いますが、上記では何故かFargateをパブリックサブネットに配置しています。セキュリティの観点から言えばプライベートサブネットに配置してインターネットから直接アクセスできないようにした方が安全なのですが(もちろんセキュリティグループによる防御はありますが)、そうするとFargate上のECSタスクからECRやCloudWatchLogsにインターネット越しに接続できなくなってしまうので、NAT GatewayやVPC Endpointoの設定が追加で必要になります。そこまでやると少し説明が長くなってしまうので、そちらの設定は別記事のスコープにしようと思います。
さて、話がそれましたが、Terraformはこのようになります。
resource "aws_ecs_cluster" "main" {
  name = var.project
}

resource "aws_ecs_service" "main" {
  name            = var.project
  cluster         = aws_ecs_cluster.main.arn
  task_definition = "${aws_ecs_task_definition.main.family}:${max(aws_ecs_task_definition.main.revision, data.aws_ecs_task_definition.main.revision)}"
  desired_count   = 2
  launch_type     = "FARGATE"

  network_configuration {
    subnets          = [aws_subnet.public_a.id, aws_subnet.public_c.id]
    security_groups  = [aws_security_group.ecs.id]
    assign_public_ip = true
  }

  load_balancer {
    target_group_arn = aws_lb_target_group.blue.arn
    container_name   = "nginx"
    container_port   = 80
  }

  deployment_controller {
    type = "CODE_DEPLOY"
  }

  lifecycle {
    ignore_changes = [task_definition, load_balancer]
  }
}

resource "aws_security_group" "ecs" {
  description = "Security Group for ECS"
  name        = "${var.project}-sg-ecs"
  vpc_id      = aws_vpc.main.id

  egress {
    from_port        = 0
    to_port          = 0
    protocol         = "-1"
    cidr_blocks      = ["0.0.0.0/0"]
    ipv6_cidr_blocks = ["::/0"]
  }

  ingress {
    from_port       = 80
    to_port         = 80
    protocol        = "tcp"
    security_groups = [aws_security_group.alb.id]
  }
}

data "aws_ecs_task_definition" "main" {
  task_definition = aws_ecs_task_definition.main.family
}

resource "aws_ecs_task_definition" "main" {
  family                   = var.project
  requires_compatibilities = ["FARGATE"]
  network_mode             = "awsvpc"
  cpu                      = 256
  memory                   = 512
  execution_role_arn       = data.aws_iam_role.ecsTaskExecutionRole.arn

  container_definitions = jsonencode([
    {
      name      = "app"
      image     = aws_ecr_repository.app.repository_url
      essential = true
      environment = [
        { name : "VERSION", value : "initial" }
      ]
      logConfiguration = {
        logDriver : "awslogs",
        options : {
          awslogs-region : data.aws_region.current.name,
          awslogs-stream-prefix : "app",
          awslogs-group : aws_cloudwatch_log_group.ecs_app.name
        }
      },
    },
    {
      name      = "nginx"
      image     = aws_ecr_repository.nginx.repository_url
      essential = true
      portMappings = [
        {
          containerPort = 80
          hostPort      = 80
        }
      ]
      logConfiguration = {
        logDriver : "awslogs",
        options : {
          awslogs-region : data.aws_region.current.name,
          awslogs-stream-prefix : "nginx",
          awslogs-group : aws_cloudwatch_log_group.ecs_nginx.name
        }
      }
    }
  ])
}

data "aws_iam_role" "ecsTaskExecutionRole" {
  name = "ecsTaskExecutionRole"
}

resource "aws_ecr_repository" "app" {
  name = "${var.project}-app"
}

resource "aws_ecr_repository" "nginx" {
  name = "${var.project}-nginx"
}

resource "aws_cloudwatch_log_group" "ecs_app" {
  name = "/${var.project}/ecs/app"
}

resource "aws_cloudwatch_log_group" "ecs_nginx" {
  name = "/${var.project}/ecs/nginx"
}
注目すべきところは、aws_ecs_service.mainのdeployment_controllerにCODE_DEPLOYが指定されているところです。これにより、ECSのデプロイをCodeDeployのBlue/Greenデプロイメントで制御することができます。また、CodeDeployによって更新したタスク定義やロードバランサの設定をTerraformのapplyで上書きされないよう、lifecycleのignore_changesに[task_definition, load_balancer]を指定しています。
ここで一つ注意なのですが、 当然ECRには最初はイメージが登録されていません。なので、ECSタスクからECRのイメージを取ってこようとしても失敗してしまい、タスクの起動と停止を繰り返す状態になってしまいます。のちの工程でCI/CDを構築してECRにイメージをpushすればいいのですが、その前にアプリケーションがECS上で動いているかを確かめたい場合には、ECRに手動でイメージをプッシュすればOKです。やり方はAWsコンソールでECRのページを開き、リポジトリを一覧から選択して "View push commands" を押すと出てきます。
ここまでのリソースを構築すると、先程のGoのアプリケーションにALBから疎通することが確認できます。
$ curl http://ecs-blue-green-alb-<ACCOUNT_ID>.<REGION>.elb.amazonaws.com
initial
ステップ4. CI/CD
さて、それでは本題のCI/CDパイプラインの構築に入ります。AWSのCodeシリーズを活用して、先程のECSにBlue/Greenデプロイメントを行うパイプラインを作成しましょう。
パイプラインを図示するをこんな感じになります。
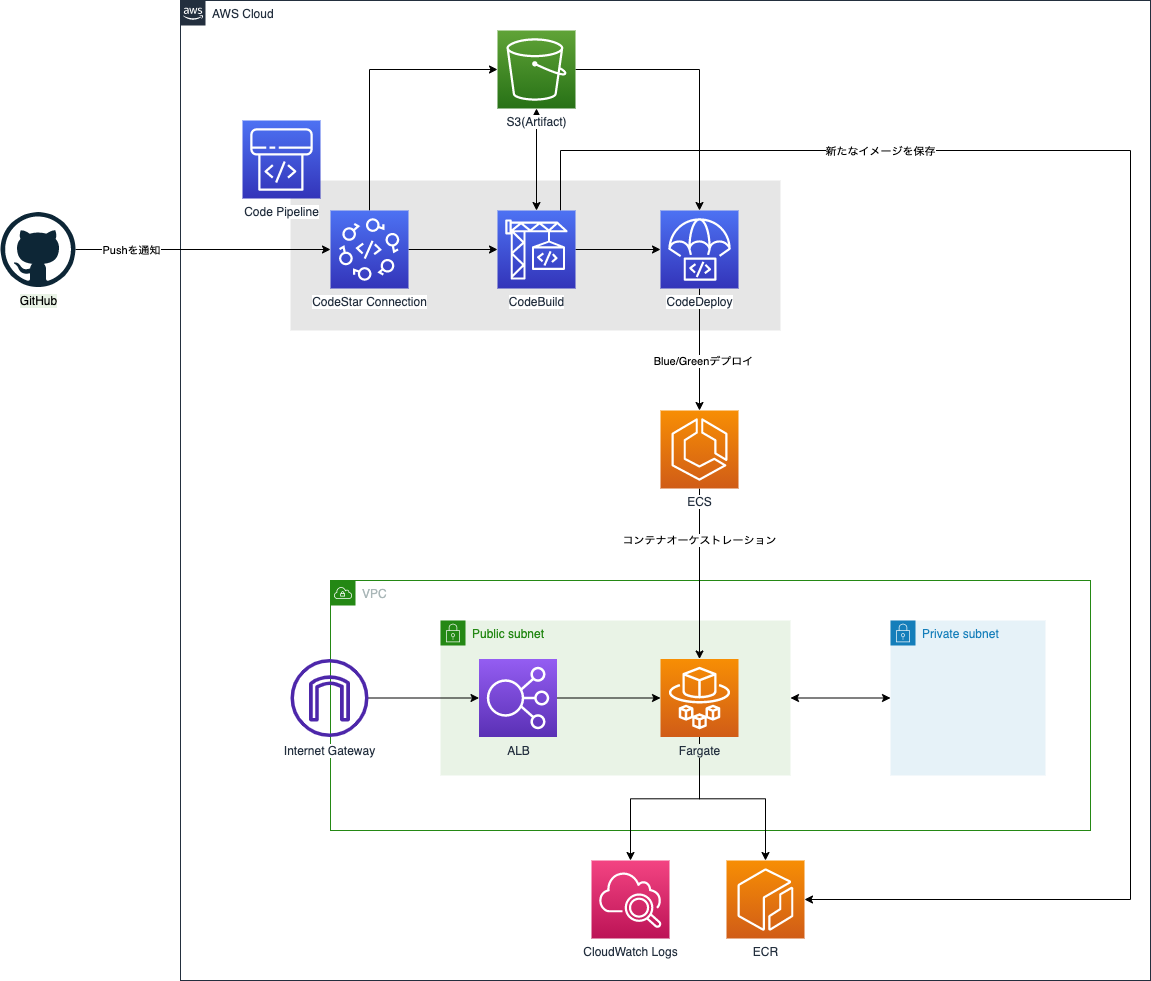
Terraformの定義はこんな感じです。
variable "github_org" {
  type = string
}

variable "github_repository" {
  type    = string
  default = "ecs-blue-green"
}

variable "github_branch" {
  type    = string
  default = "main"
}

resource "aws_codepipeline" "main" {
  name     = var.project
  role_arn = aws_iam_role.codepipeline_role.arn

  artifact_store {
    location = aws_s3_bucket.codepipeline_artifact.bucket
    type     = "S3"
  }

  stage {
    name = "Source"

    action {
      name             = "Source"
      category         = "Source"
      owner            = "AWS"
      provider         = "CodeStarSourceConnection"
      version          = "1"
      output_artifacts = ["source_output"]

      configuration = {
        ConnectionArn    = aws_codestarconnections_connection.main.arn
        FullRepositoryId = "${var.github_org}/${var.github_repository}"
        BranchName       = var.github_branch
      }
    }
  }

  stage {
    name = "Build"

    action {
      name             = "Build"
      category         = "Build"
      owner            = "AWS"
      provider         = "CodeBuild"
      input_artifacts  = ["source_output"]
      output_artifacts = ["build_output"]
      version          = "1"

      configuration = {
        ProjectName = aws_codebuild_project.main.name
      }
    }
  }

  stage {
    name = "Deploy"

    action {
      name            = "Deploy"
      category        = "Deploy"
      owner           = "AWS"
      provider        = "CodeDeployToECS"
      input_artifacts = ["source_output", "build_output"]
      version         = "1"

      configuration = {
        ApplicationName                = aws_codedeploy_app.main.name
        DeploymentGroupName            = aws_codedeploy_deployment_group.main.deployment_group_name
        TaskDefinitionTemplateArtifact = "build_output"
        AppSpecTemplateArtifact        = "source_output"
        Image1ArtifactName             = "build_output"
        Image1ContainerName            = "IMAGE1_NAME"
      }
    }
  }
}

resource "aws_s3_bucket" "codepipeline_artifact" {
  bucket = "${var.project}-codepipeline-artifact"
  acl    = "private"
}

resource "aws_iam_role" "codepipeline_role" {
  name = "${var.project}-codepipeline-role"

  assume_role_policy = jsonencode({
    Version = "2012-10-17"
    Statement = [
      {
        Effect = "Allow"
        Principal = {
          Service = "codepipeline.amazonaws.com"
        }
        Action = "sts:AssumeRole"
      }
    ]
  })
}

resource "aws_iam_role_policy" "codepipeline_policy" {
  name = "codepipeline_policy"
  role = aws_iam_role.codepipeline_role.id

  policy = jsonencode({
    Version = "2012-10-17"
    Statement = [
      {
        Effect = "Allow"
        Action = [
          "s3:GetObject",
          "s3:GetObjectVersion",
          "s3:GetBucketVersioning",
          "s3:PutObjectAcl",
          "s3:PutObject"
        ]
        Resource = [
          aws_s3_bucket.codepipeline_artifact.arn,
          "${aws_s3_bucket.codepipeline_artifact.arn}/*"
        ]
      },
      {
        Effect = "Allow"
        Action = [
          "codestar-connections:UseConnection"
        ]
        Resource = aws_codestarconnections_connection.main.arn
      },
      {
        Effect = "Allow"
        Action = [
          "codebuild:BatchGetBuilds",
          "codebuild:StartBuild"
        ]
        Resource : aws_codebuild_project.main.arn
      },
      {
        Effect = "Allow"
        Action = [
          "codedeploy:CreateDeployment",
          "codedeploy:GetApplication",
          "codedeploy:GetApplicationRevision",
          "codedeploy:GetDeployment",
          "codedeploy:GetDeploymentConfig",
          "codedeploy:RegisterApplicationRevision"
        ]
        Resource = [
          aws_codedeploy_app.main.arn,
          aws_codedeploy_deployment_group.main.arn,
          "arn:aws:codedeploy:${data.aws_region.current.name}:${data.aws_caller_identity.current.account_id}:deploymentconfig:${aws_codedeploy_deployment_group.main.deployment_config_name}"
        ]
      },
      {
        Effect   = "Allow"
        Action   = "ecs:RegisterTaskDefinition"
        Resource = "*"
      },
      {
        Effect = "Allow"
        Action = [
          "ecs:DescribeServices",
          "ecs:DescribeTaskDefinition",
          "ecs:DescribeTasks",
          "ecs:ListTasks",
          "ecs:UpdateService"
        ]
        Resource = [
          aws_ecs_cluster.main.arn,
          aws_ecs_service.main.id,
          "arn:aws:ecs:${data.aws_region.current.name}:${data.aws_caller_identity.current.account_id}:task-definition/${aws_ecs_task_definition.main.family}:*"
        ]
      },
      {
        Effect   = "Allow"
        Action   = "iam:PassRole"
        Resource = data.aws_iam_role.ecsTaskExecutionRole.arn
      }
    ]
  })
}

resource "aws_codestarconnections_connection" "main" {
  name          = var.project
  provider_type = "GitHub"
}

resource "aws_codebuild_project" "main" {
  name         = var.project
  description  = "codebuild_project for ${var.project}"
  service_role = aws_iam_role.codebuild.arn

  artifacts {
    type = "CODEPIPELINE"
  }

  source {
    type = "CODEPIPELINE"
  }

  environment {
    compute_type    = "BUILD_GENERAL1_SMALL"
    image           = "aws/codebuild/amazonlinux2-x86_64-standard:3.0"
    type            = "LINUX_CONTAINER"
    privileged_mode = true

    environment_variable {
      name  = "EXECUTION_ROLE_ARN"
      value = data.aws_iam_role.ecsTaskExecutionRole.arn
    }

    environment_variable {
      name  = "NGINX_IMAGE_URI"
      value = aws_ecr_repository.nginx.repository_url
    }
  }

  logs_config {
    cloudwatch_logs {
      group_name = aws_cloudwatch_log_group.codebuild.name
    }
  }
}

resource "aws_iam_role" "codebuild" {
  name = "${var.project}-codebuild"

  assume_role_policy = jsonencode({
    Version = "2012-10-17"
    Statement = [
      {
        Effect = "Allow"
        Principal : {
          Service = "codebuild.amazonaws.com"
        }
        Action = "sts:AssumeRole"
      }
    ]
  })
}

resource "aws_iam_role_policy" "codebuild" {
  role = aws_iam_role.codebuild.name

  policy = jsonencode({
    Version = "2012-10-17"
    Statement = [
      {
        Effect = "Allow"
        Action = [
          "logs:CreateLogGroup",
          "logs:CreateLogStream",
          "logs:PutLogEvents"
        ]
        Resource = "*"
      },
      {
        Effect = "Allow"
        Action = [
          "s3:GetObject",
          "s3:GetObjectVersion",
          "s3:GetBucketVersioning",
          "s3:PutObjectAcl",
          "s3:PutObject"
        ]
        "Resource" = [
          aws_s3_bucket.codepipeline_artifact.arn,
          "${aws_s3_bucket.codepipeline_artifact.arn}/*"
        ]
      },
      {
        Effect   = "Allow"
        Action   = "ecr:GetAuthorizationToken"
        Resource = "*"
      },
      {
        Effect = "Allow"
        Action = [
          "ecr:BatchCheckLayerAvailability",
          "ecr:CompleteLayerUpload",
          "ecr:InitiateLayerUpload",
          "ecr:PutImage",
          "ecr:UploadLayerPart"
        ]
        Resource = [
          aws_ecr_repository.app.arn,
          aws_ecr_repository.nginx.arn
        ]
      }
    ]
  })
}

resource "aws_cloudwatch_log_group" "codebuild" {
  name = "/${var.project}/codebuild"
}

resource "aws_codedeploy_app" "main" {
  name             = var.project
  compute_platform = "ECS"
}

resource "aws_codedeploy_deployment_group" "main" {
  deployment_group_name  = var.project
  app_name               = aws_codedeploy_app.main.name
  deployment_config_name = "CodeDeployDefault.ECSAllAtOnce"
  service_role_arn       = aws_iam_role.codedeploy.arn

  auto_rollback_configuration {
    enabled = true
    events  = ["DEPLOYMENT_FAILURE"]
  }

  blue_green_deployment_config {
    deployment_ready_option {
      action_on_timeout    = "STOP_DEPLOYMENT"
      wait_time_in_minutes = 30
    }

    terminate_blue_instances_on_deployment_success {
      action                           = "TERMINATE"
      termination_wait_time_in_minutes = 5
    }
  }

  deployment_style {
    deployment_option = "WITH_TRAFFIC_CONTROL"
    deployment_type   = "BLUE_GREEN"
  }

  ecs_service {
    cluster_name = aws_ecs_cluster.main.name
    service_name = aws_ecs_service.main.name
  }

  load_balancer_info {
    target_group_pair_info {
      prod_traffic_route {
        listener_arns = [aws_lb_listener.main.arn]
      }

      test_traffic_route {
        listener_arns = [aws_lb_listener.test.arn]
      }

      target_group {
        name = aws_lb_target_group.blue.name
      }

      target_group {
        name = aws_lb_target_group.green.name
      }
    }
  }
}

resource "aws_iam_role" "codedeploy" {
  name = "${var.project}-codedeploy"

  assume_role_policy = jsonencode({
    Version = "2012-10-17"
    Statement = [
      {
        Effect = "Allow"
        Principal : {
          Service = "codedeploy.amazonaws.com"
        }
        Action = "sts:AssumeRole"
      }
    ]
  })
}

resource "aws_iam_role_policy_attachment" "codedeploy" {
  role       = aws_iam_role.codedeploy.name
  policy_arn = data.aws_iam_policy.codedeploy_role.arn
}

data "aws_iam_policy" "codedeploy_role" {
  name = "AWSCodeDeployRoleForECSLimited"
}
CI/CDリソースの定義は少し長いですね。これも特に変わったことはしていませんが、CodeDeployのアクションやCodePipelineのロールの権限の設定がちょっと難しいです。詳しく知りたい方は、「Amazon Elastic Container Service and CodeDeploy Blue-Green
」や「Identity and access management for AWS CodePipeline
」を参考にしてください。
また、CodeBuildで使うbuildspec.ymlとCodeDeployで使うappspec.yaml, taskdef_template.jsonをそれぞれリポジトリのルート直下に配置する必要があります。こちらは「Build specification reference for CodeBuild」や「Tutorial: Create a pipeline with an Amazon ECR source and ECS-to-CodeDeploy deployment」が参考になります。
version: 0.2

env:
  variables:
    AWS_REGION: ap-northeast-1
    ECR_REPOSITORY: sample-app-app

phases:
  pre_build:
    commands:
      - $(aws ecr get-login --region $AWS_REGION --no-include-email)
      - AWS_ACCOUNT_ID=$(aws sts get-caller-identity --query 'Account' --output text)
      - REPOSITORY_URI=$AWS_ACCOUNT_ID.dkr.ecr.$AWS_REGION.amazonaws.com/$ECR_REPOSITORY
      - IMAGE_TAG=$(echo $CODEBUILD_RESOLVED_SOURCE_VERSION | cut -c 1-7)
  build:
    commands:
      - docker build -t $REPOSITORY_URI:$IMAGE_TAG ./app
  post_build:
    commands:
      - docker push $REPOSITORY_URI:$IMAGE_TAG
      - printf '{"ImageURI":"%s"}' $REPOSITORY_URI:$IMAGE_TAG > imageDetail.json
      - VERSION=$IMAGE_TAG
      - envsubst < taskdef_template.json > taskdef.json

artifacts:
  files:
    - imageDetail.json
    - taskdef.json
version: 0.0
Resources:
  - TargetService:
      Type: AWS::ECS::Service
      Properties:
        TaskDefinition: <TASK_DEFINITION>
        LoadBalancerInfo:
          ContainerName: "nginx"
          ContainerPort: 80
{
  "executionRoleArn": "$EXECUTION_ROLE_ARN",
  "containerDefinitions": [
    {
      "name": "app",
      "image": "<IMAGE1_NAME>",
      "essential": true,
      "environment": [
        {
          "name": "VERSION",
          "value": "$VERSION"
        }
      ],
      "logConfiguration": {
        "logDriver": "awslogs",
        "options": {
          "awslogs-group": "/ecs-blue-green/ecs/app",
          "awslogs-stream-prefix": "app",
          "awslogs-region": "ap-northeast-1"
        }
      }
    },
    {
      "name": "nginx",
      "image": "$NGINX_IMAGE_URI",
      "essential": true,
      "portMappings": [
        {
          "hostPort": 80,
          "containerPort": 80,
          "protocol": "tcp"
        }
      ],
      "logConfiguration": {
        "logDriver": "awslogs",
        "options": {
          "awslogs-group": "/ecs-blue-green/ecs/nginx",
          "awslogs-stream-prefix": "nginx",
          "awslogs-region": "ap-northeast-1"
        }
      }
    }
  ],
  "family": "ecs-blue-green",
  "requiresCompatibilities": ["FARGATE"],
  "networkMode": "awsvpc",
  "cpu": "256",
  "memory": "512"
}
それでは、Blue/Greenデプロイメントを実行してみましょう。事前にCodestarConnectionは有効にしておいてください。
GitHubへのPushをトリガーにCodePipelinega自動的に動き始めます。Sourceステージが "In progress" になっていますね。
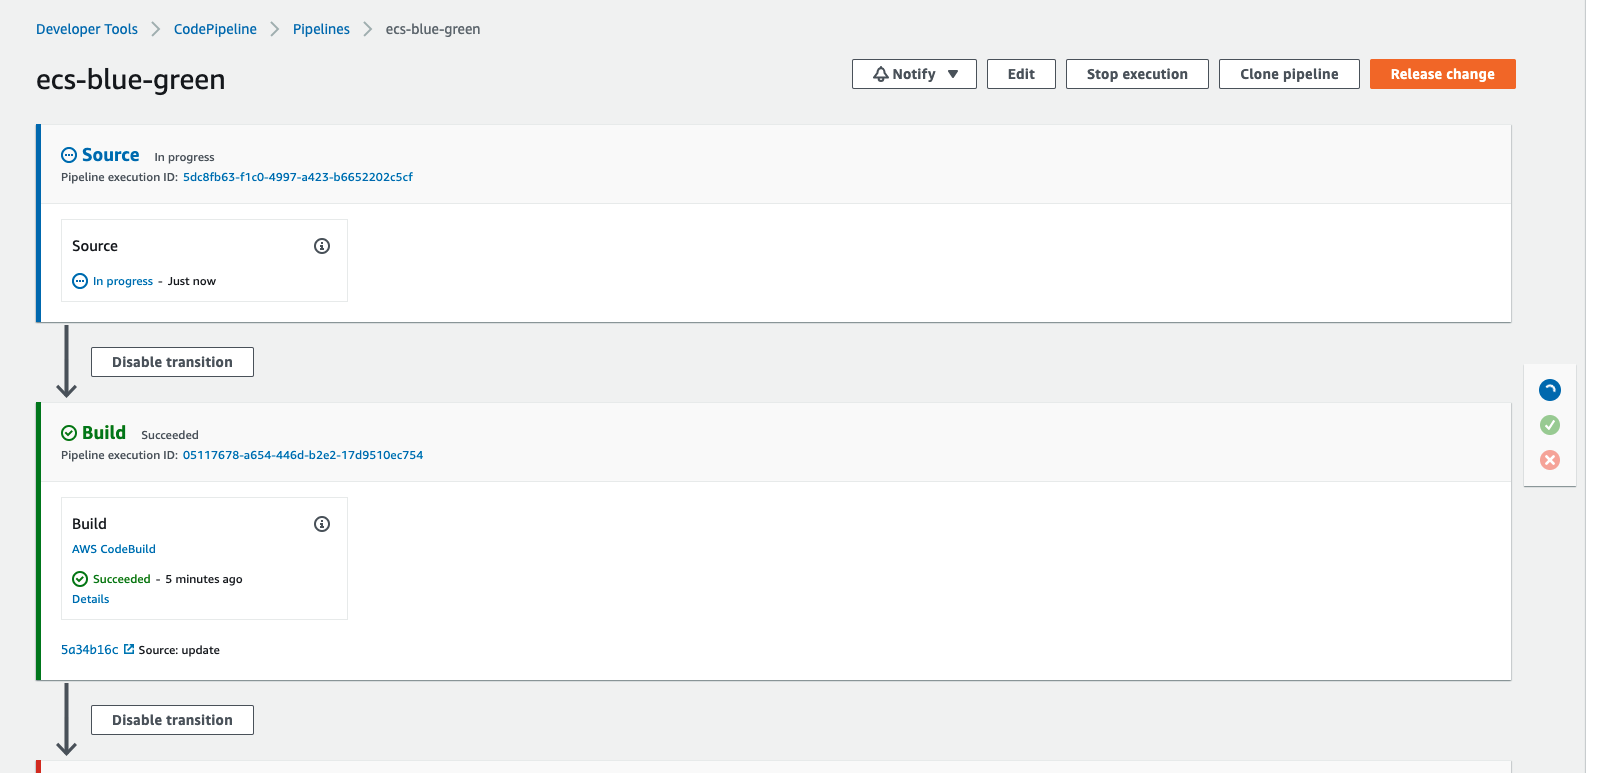
ビルドが完了したところまで飛ばし、デプロイ時の挙動を見てみましょう。新しいリビジョンのタスクが起動した時点で、ALBのプロダクション用のリスナーを新しいリビジョンに向けて際ルーティングする手前でCodeDeployが待ってくれています。試しにこの状態でプロダクション・テスト用のリスナーにリクエストしてみます。
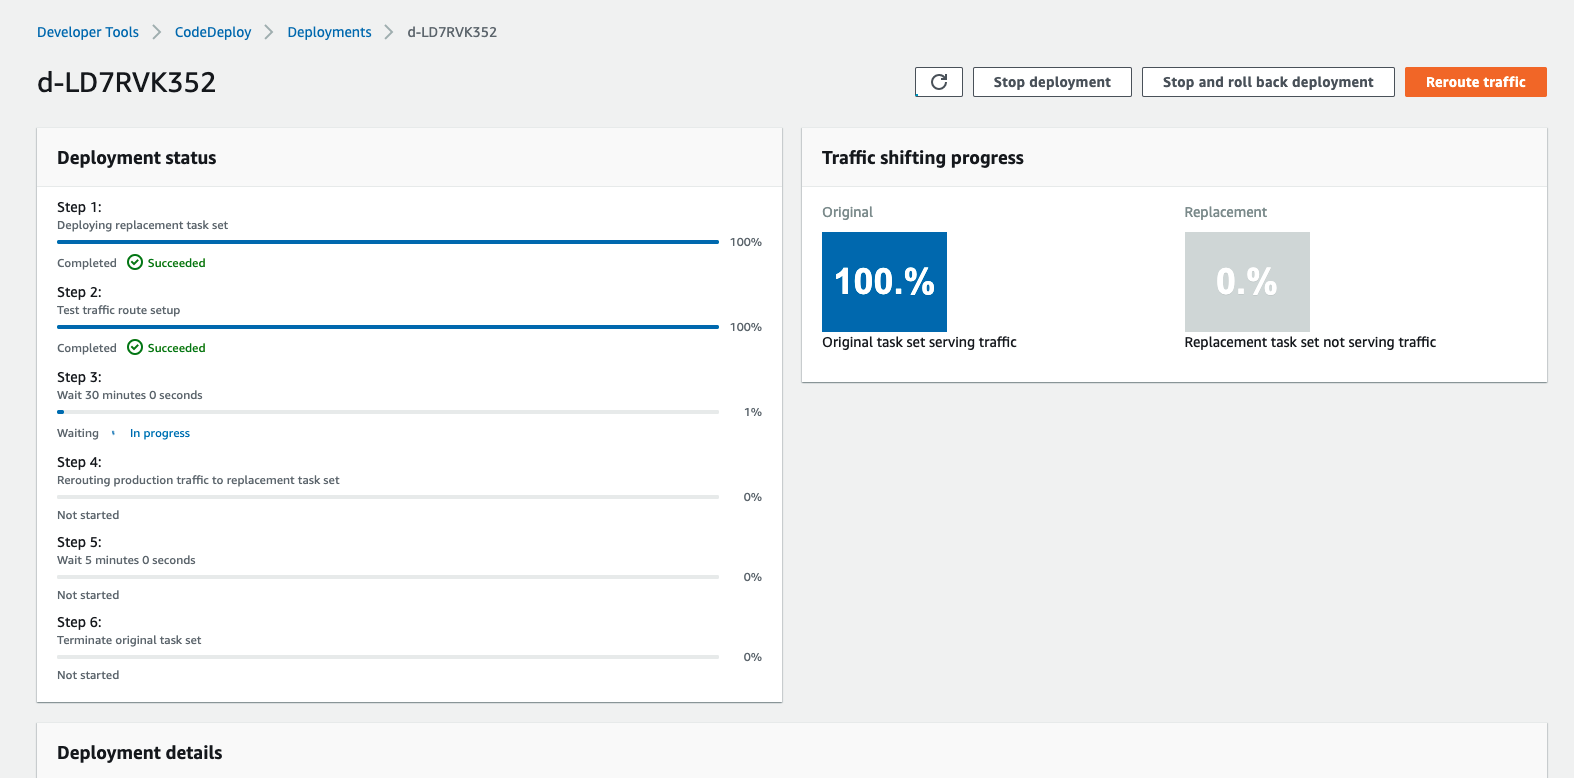
# プロダクションリスナー
$ curl curl http://ecs-blue-green-alb-1377178461.ap-northeast-1.elb.amazonaws.com
initial

# テストリスナー
$ curl http://ecs-blue-green-alb-1377178461.ap-northeast-1.elb.amazonaws.com:8080
cf78ba1
プロダクションリスナーには前のリビジョンのタスクが、テスト用のリスナーには新しいリビジョンのタスクが紐づいていることが分かりますね。これにより、新しい変更をプロダクション環境に流す前にテスト用のリスナーで確認することができます。そして、トラフィックの再ルーティングをしてあげるとプロダクションのリスナーも新しいリビジョンを向くようになります。
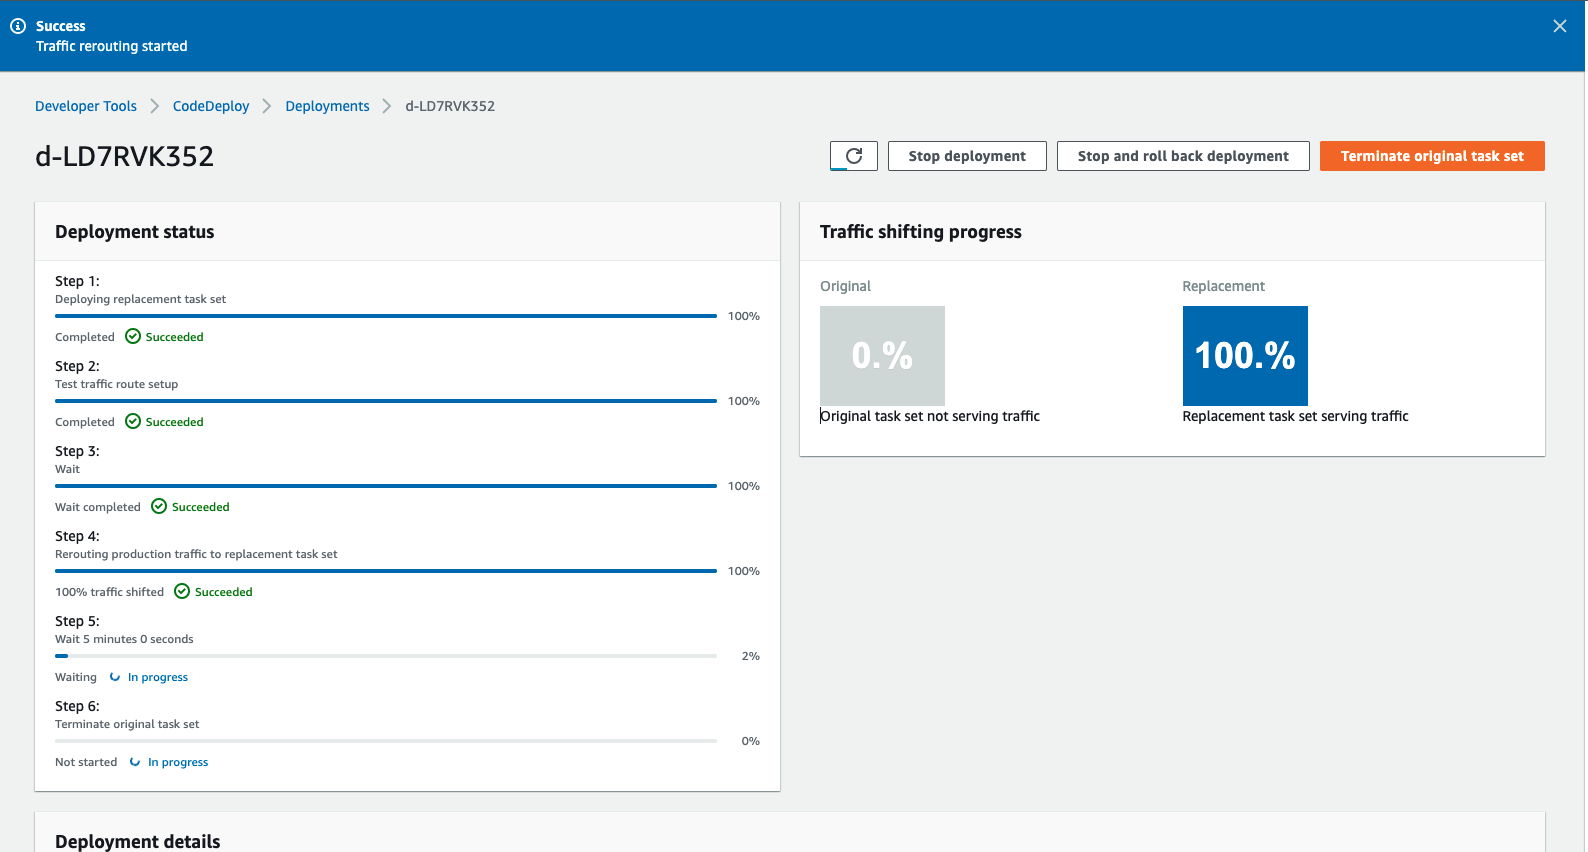
$ curl curl http://ecs-blue-green-alb-1377178461.ap-northeast-1.elb.amazonaws.com
cf78ba1
これでBlue/Greenデプロイメントの一連の流れを確認することができました。
まとめ
今回は、ECS Blue/GreenデプロイメントのCI/CDパイプライン構築を行いました。AWSのCodeシリーズを用いることで、とても簡単にBlue/Greenデプロイメントを構築できることがわかっていただけたのではないでしょうか?AWS様様です。(しかし日本語ドキュメントのクオリティくそ低いのどうにかしてほしい)
今回の記事ではセキュリティ要件としてネットワークやIAMなど最小権限になっていない部分も多く、そのまま本番環境で用いるのは厳しいですが、全体の大まかな構成は掴めたと思います。また別記事にてVPC Endpointを用いたプライベートネットワーク越しのAWSサービスの構築や、開発・検証・本番環境を意識したクロスアカウントでのCI/CD構築、デプロイの際の確認ステップの構築、またTerraformのリソースを管理しやすくするためのモジュールかなどを紹介する予定です!