はじめに
CollectionViewを用いてCalendarアプリを作る方法をいろいろググってもコピペで使えるのが無かったので今回投稿しました。
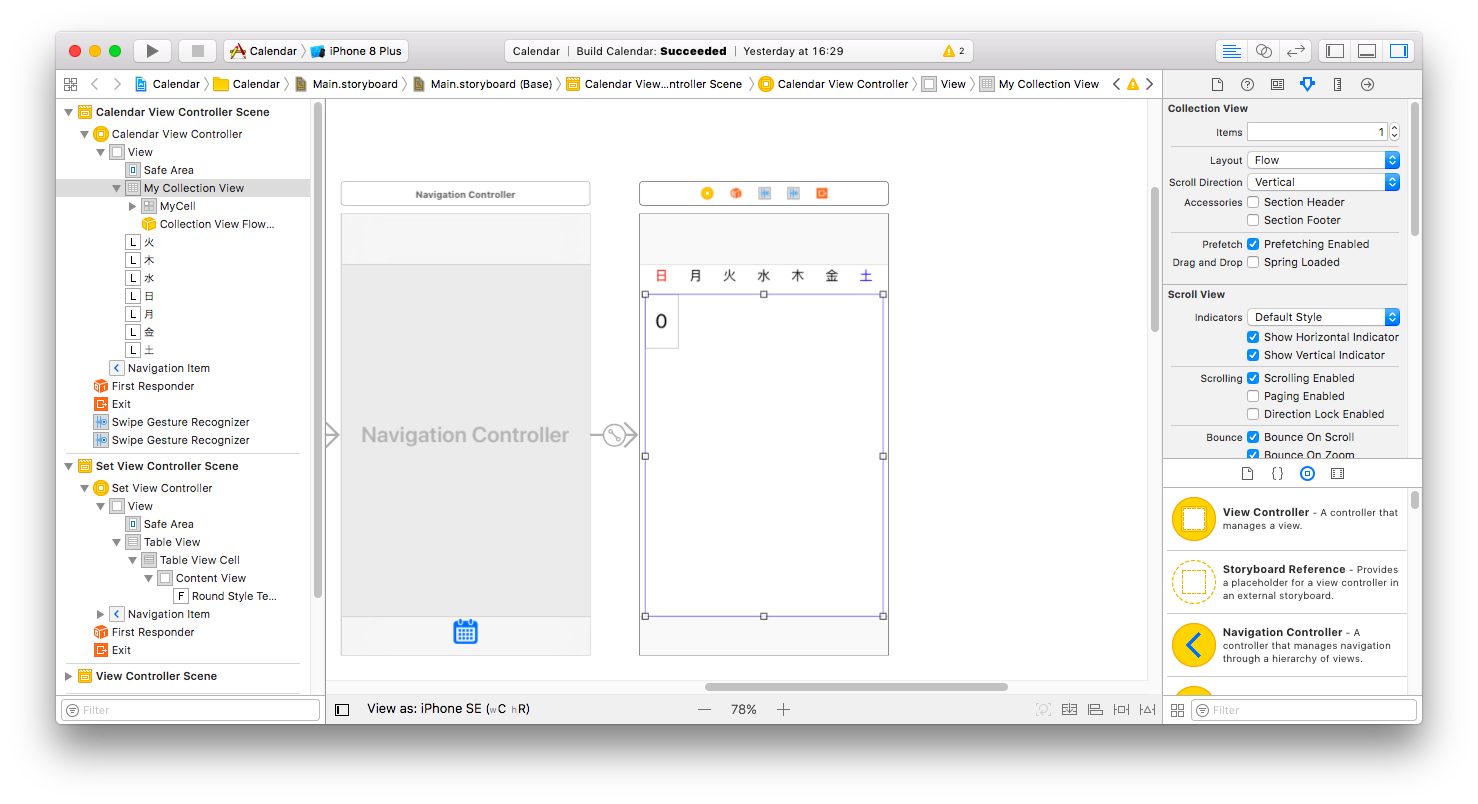
ViewControllerにCollectionViewを追加
NavigationControllerとTabBarControllerを上下に配置し、今回はCollectionViewとNavigationControllerの間に曜日を表示するLabelを配置、その下にCollectionViewを配置することにします。
Cellの中にはLabelをCellの大きさ分設置しました。
カスタムCellを作る
CellにLabelを配置したので、CalendarCollectionViewCell.swiftファイルを作成しこの用に書きます。
import UIKit

class CalendarCollectionViewCell: UICollectionViewCell {
    @IBOutlet var Label: UILabel!
}
Cellのクラスを先程作ったカスタムCellに変更し
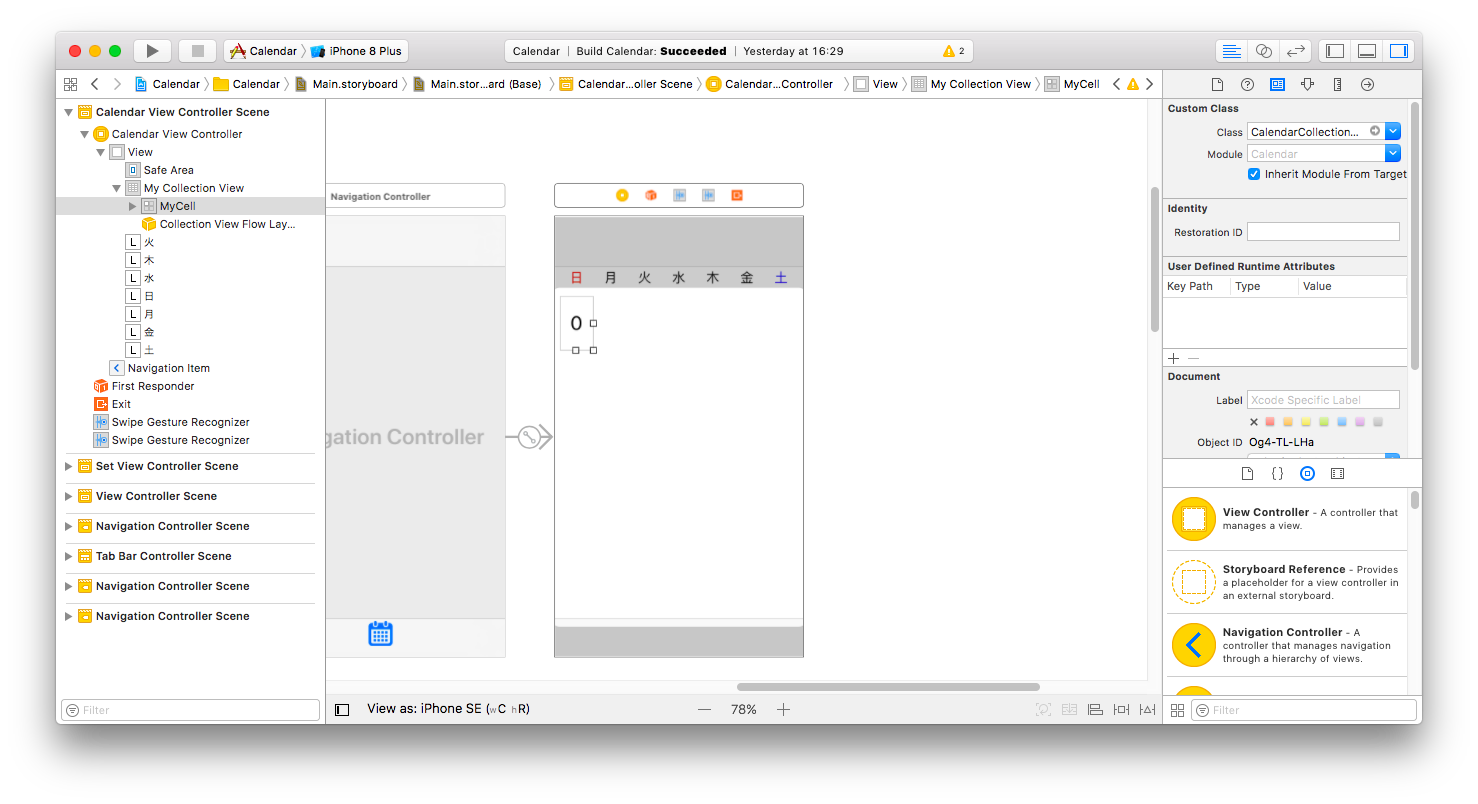
Collection Reusable ViewのidentifierをMyCellに設定する。
CollectionViewに必要なコードを書く
まずCollectionViewに必要なのは以下の通りです。
class ViewController: UIViewController, UICollectionViewDelegate, UICollectionViewDataSource {

    @IBOutlet var myCollectionView : UICollectionView!

    override func viewDidLoad() {
        super.viewDidLoad()

        myCollectionView.delegate = self
        myCollectionView.dataSource = self
    }

    //Cellが選択された際に呼び出される
    func collectionView(_ collectionView: UICollectionView, didSelectItemAt indexPath: IndexPath) {
        print("Num: \(indexPath.row)")
    }

    //Cellの総数を返す
    func collectionView(_ collectionView: UICollectionView, numberOfItemsInSection section: Int) -> Int {
        return 42
    }

    //Cellに値を設定
    func collectionView(_ collectionView: UICollectionView, cellForItemAt indexPath: IndexPath) -> UICollectionViewCell {
        return cell
    }

    override func didReceiveMemoryWarning() {
        super.didReceiveMemoryWarning()

    }
}
Cellの総数を42にしたのはひと月が最大6週、一週間は7日なので6×7で42にしました。
今の時間を調べる
    var calendar = Calendar.current
    var currentDate = Date()
    var numberOfItems: Int!
    var daysPerWeek: Int = 7
    var currntMonthOfDates = [Date]()
    var selectedDate = Date()
    var days: Int = 0

    var y: Int = 0
    var m: Int = 0
    var d: Int = 0

    override func viewDidLoad() {
        super.viewDidLoad()

        //今の年月日を取得
        let date = Date()
        let year = calendar.component(.year, from: date)
        let month = calendar.component(.month, from: date)
        let day = calendar.component(.day, from: date)
        y = year
        m = month
        d = day

        print("今は\(year)年\(month)月\(day)日です。")
        self.navigationItem.title = "\(month)月"
    }
これで年月日の取得とNavigationItemに月を表示することが出来ました。
各月の週別の日にちを調べて配列に入れる
        var Array = [String]() //日にちの情報を入れる配列
     //各週の日にちを調べる


    func firstWeek(year: Int, month: Int) {
        guard let august2017 = calendar.date(from: DateComponents(year: year, month: month)) else { return }

        let dateFormatter = DateFormatter()
        dateFormatter.dateFormat = "d"
        dateFormatter.calendar = calendar
        let yearMonthFomatter = DateFormatter()
        yearMonthFomatter.dateFormat = "yyyy 年 M 月"
        yearMonthFomatter.calendar = calendar
        Array.removeAll()
        self.navigationItem.title = "\(y)年\(month)月"

        var components = calendar.dateComponents([.year, .month], from: august2017)
        components.weekOfMonth = 1  //第1週目
        for weekday in 1...7 {
            components.weekday = weekday  // 曜日
            if let date = calendar.date(from: components) {
                Array.append(dateFormatter.string(from: date))
            }
        }
        components.weekOfMonth = 2 //第2週目
        for weekday in 1...7 {
            components.weekday = weekday  // 曜日
            if let date = calendar.date(from: components) {
                Array.append(dateFormatter.string(from: date))
            }
        }
        components.weekOfMonth = 3 //第3週目
        for weekday in 1...7 {
            components.weekday = weekday  // 曜日
            if let date = calendar.date(from: components) {
                Array.append(dateFormatter.string(from: date))
            }
        }
        components.weekOfMonth = 4 //第4週目
        for weekday in 1...7 {
            components.weekday = weekday  // 曜日
            if let date = calendar.date(from: components) {
                Array.append(dateFormatter.string(from: date))
            }
        }
        components.weekOfMonth = 5 //第5週目
        for weekday in 1...7 {
            components.weekday = weekday  // 曜日
            if let date = calendar.date(from: components) {
                Array.append(dateFormatter.string(from: date))
            }
        }
        components.weekOfMonth = 6 //第6週目
        for weekday in 1...7 {
            components.weekday = weekday  // 曜日
            if let date = calendar.date(from: components) {
                Array.append(dateFormatter.string(from: date))
            }
        }
        myCollectionView.reloadData()
    }
これで6×7のCellに入れる日にちを配列に入れることが出来ました。
取得した日にちをCellに入れていく
今回土曜日は青色、日曜日は赤色にし、その月以外の日付が入ってる場合はグレーにその他は黒の色に指定しました。
        //Cellに値を設定する
    //cellの数処理される
    func collectionView(_ collectionView: UICollectionView, cellForItemAt indexPath: IndexPath) -> UICollectionViewCell {

        let cell = collectionView.dequeueReusableCell(withReuseIdentifier: "MyCell", for: indexPath) as! CalendarCollectionViewCell
        //日にちを入れる
        cell.Label.text = Array[indexPath.row]

        //Colorの設定
        if (indexPath.row == 0) {
            //indexPath.rowが0のときは日曜日
            cell.Label.textColor = UIColor.red
        }else if (indexPath.row == 6 || indexPath.row == 13 || indexPath.row == 20 || indexPath.row == 27 || indexPath.row == 34 || indexPath.row == 41) {
            //土曜日
            cell.Label.textColor = UIColor.blue
        }else if (indexPath.row % 7 == 0) {
            //Cell番号が7の倍数の時(日曜日)
            cell.Label.textColor = UIColor.red
        }else {
            cell.Label.textColor = UIColor.black
        }

        if (indexPath.row <= 5) {
            //当月以外の日にちのカラーをグレーに変更する
            if (cell.Label.text == "25" || cell.Label.text == "26" || cell.Label.text == "27" || cell.Label.text == "28" || cell.Label.text == "29" || cell.Label.text == "30" || cell.Label.text == "31") {
                cell.Label.textColor = UIColor.gray
            }
        }else if (indexPath.row >= 28) {
            //当月以外の日にちのカラーをグレーに変更する
            if (cell.Label.text == "1" || cell.Label.text == "2" || cell.Label.text == "3" || cell.Label.text == "4" || cell.Label.text == "5" || cell.Label.text == "6" || cell.Label.text == "7" || cell.Label.text == "8" || cell.Label.text == "9" || cell.Label.text == "10" || cell.Label.text == "11" || cell.Label.text == "12" || cell.Label.text == "13" || cell.Label.text == "14") {
                cell.Label.textColor = UIColor.gray
            }
        }

        //背景の色を白にする
        cell.backgroundColor = UIColor.white

        return cell
    }
月を進むとき戻るとき
    //月を戻る時
    @IBAction func Back() {
        if m == 1 {
            y -= 1
            m = 12
        }else {
            m -= 1
        }
        firstWeek(year: y, month: m)
    }

    //月を進むとき
    @IBAction func Next() {
        if m == 12 {
            y += 1
            m = 1
        }else {
            m += 1
        }
        firstWeek(year: y, month: m)
    }
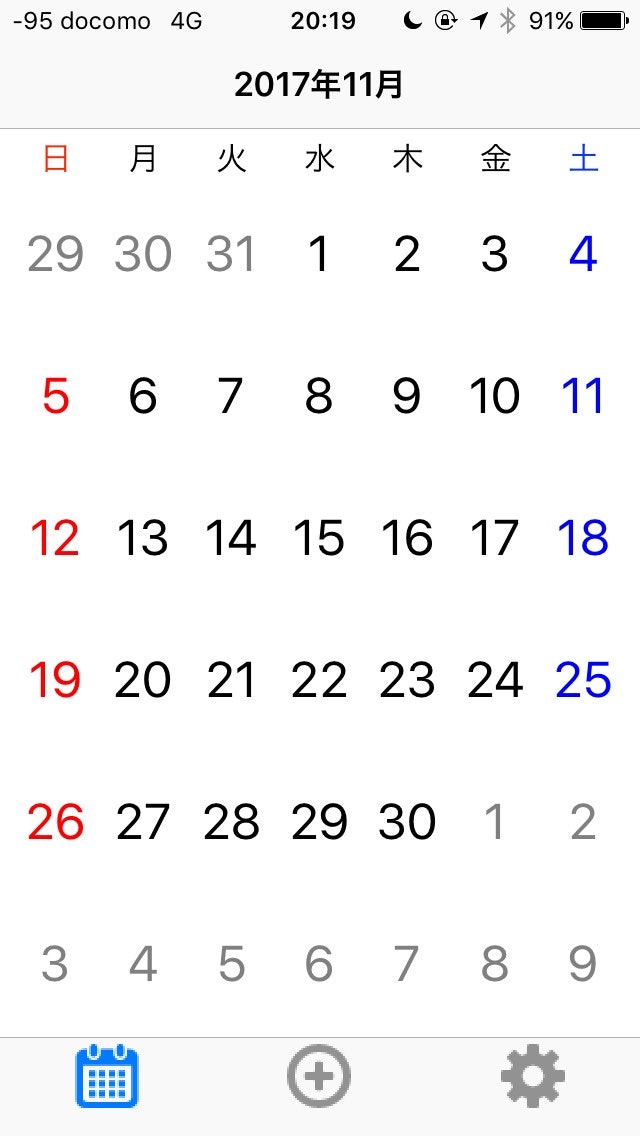
テストしてみる
実際にテストしてみると以下の用に出来るはずです。(はず)
全コード
import UIKit

class CalendarCollectionViewCell: UICollectionViewCell {
    @IBOutlet var Label: UILabel!
}
import UIKit

class CalendarViewController: UIViewController, UICollectionViewDelegate, UICollectionViewDataSource {

    @IBOutlet var myCollectionView : UICollectionView!
    @IBOutlet var yearButton: UIButton!

    var calendar = Calendar.current
    var currentDate = Date()
    var numberOfItems: Int!
    var daysPerWeek: Int = 7
    var currntMonthOfDates = [Date]()
    var selectedDate = Date()
    var days: Int = 0
    var Array = [String]()

    var y: Int = 0
    var m: Int = 0
    var d: Int = 0

    override func viewDidLoad() {
        super.viewDidLoad()

        //今の年月日を取得
        let date = Date()
        let year = calendar.component(.year, from: date)
        let month = calendar.component(.month, from: date)
        let day = calendar.component(.day, from: date)
        y = year
        m = month
        d = day

        self.navigationItem.title = "\(year)年\(month)月"

        firstWeek(year: year, month: month)

        myCollectionView.delegate = self
        myCollectionView.dataSource = self
    }

    //各週の日にちを調べる
    func firstWeek(year: Int, month: Int) {
        guard let august2017 = calendar.date(from: DateComponents(year: year, month: month)) else { return }

        let dateFormatter = DateFormatter()
        dateFormatter.dateFormat = "d"
        dateFormatter.calendar = calendar
        let yearMonthFomatter = DateFormatter()
        yearMonthFomatter.dateFormat = "yyyy 年 M 月"
        yearMonthFomatter.calendar = calendar
        Array.removeAll()
        self.navigationItem.title = "\(y)年\(month)月"

        var components = calendar.dateComponents([.year, .month], from: august2017)
        components.weekOfMonth = 1  //第1週目
        for weekday in 1...7 {
            components.weekday = weekday  // 曜日
            if let date = calendar.date(from: components) {
                Array.append(dateFormatter.string(from: date))
            }
        }
        components.weekOfMonth = 2 //第2週目
        for weekday in 1...7 {
            components.weekday = weekday  // 曜日
            if let date = calendar.date(from: components) {
                Array.append(dateFormatter.string(from: date))
            }
        }
        components.weekOfMonth = 3 //第3週目
        for weekday in 1...7 {
            components.weekday = weekday  // 曜日
            if let date = calendar.date(from: components) {
                Array.append(dateFormatter.string(from: date))
            }
        }
        components.weekOfMonth = 4 //第4週目
        for weekday in 1...7 {
            components.weekday = weekday  // 曜日
            if let date = calendar.date(from: components) {
                Array.append(dateFormatter.string(from: date))
            }
        }
        components.weekOfMonth = 5 //第5週目
        for weekday in 1...7 {
            components.weekday = weekday  // 曜日
            if let date = calendar.date(from: components) {
                Array.append(dateFormatter.string(from: date))
            }
        }
        components.weekOfMonth = 6 //第6週目
        for weekday in 1...7 {
            components.weekday = weekday  // 曜日
            if let date = calendar.date(from: components) {
                Array.append(dateFormatter.string(from: date))
            }
        }
        myCollectionView.reloadData()
    }

    //Cellが選択された際に呼び出される
    func collectionView(_ collectionView: UICollectionView, didSelectItemAt indexPath: IndexPath) {
        print("Num: \(indexPath.row)")
    }

    //Cellの総数を返す
    func collectionView(_ collectionView: UICollectionView, numberOfItemsInSection section: Int) -> Int {
        return 42
    }

    //Cellに値を設定する
    //cellの数処理される
    func collectionView(_ collectionView: UICollectionView, cellForItemAt indexPath: IndexPath) -> UICollectionViewCell {

        let cell = collectionView.dequeueReusableCell(withReuseIdentifier: "MyCell", for: indexPath) as! CalendarCollectionViewCell
        //日にちを入れる
        cell.Label.text = Array[indexPath.row]

        //Colorの設定
        if (indexPath.row == 0) {
            //indexPath.rowが0のときは日曜日
            cell.Label.textColor = UIColor.red
        }else if (indexPath.row == 6 || indexPath.row == 13 || indexPath.row == 20 || indexPath.row == 27 || indexPath.row == 34 || indexPath.row == 41) {
            //土曜日
            cell.Label.textColor = UIColor.blue
        }else if (indexPath.row % 7 == 0) {
            //Cell番号が7の倍数の時(日曜日)
            cell.Label.textColor = UIColor.red
        }else {
            cell.Label.textColor = UIColor.black
        }

        if (indexPath.row <= 5) {
            //当月以外の日にちのカラーをグレーに変更する
            if (cell.Label.text == "25" || cell.Label.text == "26" || cell.Label.text == "27" || cell.Label.text == "28" || cell.Label.text == "29" || cell.Label.text == "30" || cell.Label.text == "31") {
                cell.Label.textColor = UIColor.gray
            }
        }else if (indexPath.row >= 28) {
            //当月以外の日にちのカラーをグレーに変更する
            if (cell.Label.text == "1" || cell.Label.text == "2" || cell.Label.text == "3" || cell.Label.text == "4" || cell.Label.text == "5" || cell.Label.text == "6" || cell.Label.text == "7" || cell.Label.text == "8" || cell.Label.text == "9" || cell.Label.text == "10" || cell.Label.text == "11" || cell.Label.text == "12" || cell.Label.text == "13" || cell.Label.text == "14") {
                cell.Label.textColor = UIColor.gray
            }
        }

        //背景の色を白にする
        cell.backgroundColor = UIColor.white

        return cell
    }

    //月を戻る時
    @IBAction func 戻る() {
        if m == 1 {
            y -= 1
            m = 12
        }else {
            m -= 1
        }
        firstWeek(year: y, month: m)
    }

    //月を進むとき
    @IBAction func 進む() {
        if m == 12 {
            y += 1
            m = 1
        }else {
            m += 1
        }
        firstWeek(year: y, month: m)
    }

    override func didReceiveMemoryWarning() {
        super.didReceiveMemoryWarning()

    }
}
最後に
自分がCalendarアプリを作ろうとググっても使えるコードが少なく、苦労しましたがなんとか形にはなったと思います。
CellのLabelの表示の変更、Calendarのカラーの変更等は各自でお願いします。
説明を省かせて頂きましたが、今回自分は月の前後をSwipe Gesture Recognizerで作りました。
説明の足りない部分がある場合、コメントお願いしますm(_ _)m