OpenVPNとWindows
以前は、OpenVPNをWindowsで運用するというのは、かなり敷居が高かったのだが、今では簡単に使用開始ができるので、そのメモ。
参考URL
- WindowsをOpenVPNサーバーにする
- OpenVPNでVPNしよう
- OpenVPNの設定(その2:ブリッジモードサーバー設定)
- Openvpn24ManPage
- OpenVPNのtapブリッジングでDHCPを使う場合のTips
- OpenVPNサーバを立てて、自宅NWへアクセスするまで
- OpenVPN 2.0 Ethernet Bridging 日本語訳
- Openvpn24ManPage
- OpenVPN.JP | OpenVPN日本語情報サイト
- OpenVPN.JP | OpenVPN日本語情報サイト - サブネットの設定
- OpenVPNのインストールとセットアップからインターネット接続までのガイドブック
- ManagingWindowsTAPDrivers
- OpenVPNに必要なTAP-Windowsがインストールできなくて詰んだと思ったけど解決した件
- 【実証】第2回:OpenVPNをWindowsサーバーで設定する
- WindowsをOpenVPNサーバーにする
インストールと設定
インストール先ディレクトリを「%InstallDir%」とする
通常は、「C:\Program Files\OpenVPN」だと思う。
インストール
OpenVPN の本家より、ダウンロードして、インストールする。
インストールは特に問題なくできると思う。
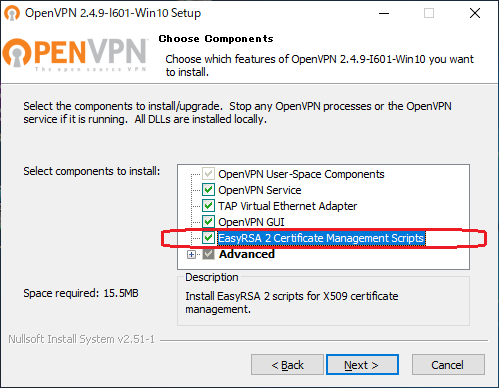
証明書の作成などが必要なら、「EasyRSA 2 Certificate Management Scrips」をチェックしてからインストールすること。
インストール後に確認すべきこと
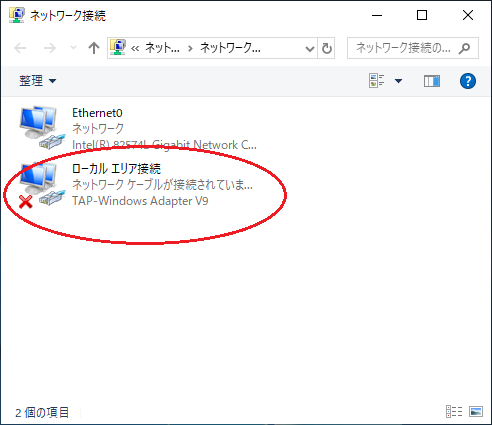
ネットワークアダプタの一覧に「TAP-Windows Adapter V9」というような OpenVPN 由来の仮想ネットワークアダプタ(仮想NIC)があるかどうか確認すること。
最近のWindows(64Bit Windows)では、デバイスドライバには正しいデジタル署名が必要であり、デジタル署名の関係でインストールできない場合は(OpenVPN由来の仮想NICがネットワークアダプタの一覧に表示されない)、そのWindowsでは使えないかもしれない。
OpenVPNサーバ側で各種証明書の作成
仮想アダプタの設定の前に(後でもいいけど)、各種証明書や、暗号鍵を作っておく。
インストール時に「EasyRSA 2 Certificate Management Scrips」をチェックしていたら、インストールディレクトリ下に「easy-rsa」というフォルダがあると思う。
つまり、「%InstallDir%\easy-rsa」というディレクトリがあると思う。
OpenVPNサーバ側で各種証明書の作成(事前準備コマンド)
- init-config.bat
- vars.bat
- clean-all.bat
の順でコマンドを実行する。
C:\Program Files\OpenVPN\easy-rsa>init-config.bat

C:\Program Files\OpenVPN\easy-rsa>copy vars.bat.sample vars.bat
        1 個のファイルをコピーしました。

C:\Program Files\OpenVPN\easy-rsa>vars.bat

C:\Program Files\OpenVPN\easy-rsa>clean-all.bat
指定されたファイルが見つかりません。
        1 個のファイルをコピーしました。
        1 個のファイルをコピーしました。
OpenVPNサーバ側で各種証明書の作成(認証局の作成)
- build-ca.bat
で認証局の秘密鍵と公開鍵と証明書が作成される。
C:\Program Files\OpenVPN\easy-rsa>build-ca.bat
Can't load C:\Program Files\OpenVPN\easy-rsa/.rnd into RNG
5960:error:2406F079:random number generator:RAND_load_file:Cannot open file:crypto/rand/randfile.c:98:Filename=C:\Program Files\OpenVPN\easy-rsa/.rnd
Generating a RSA private key
~~~省略~~~
writing new private key to 'keys\ca.key'
-----
You are about to be asked to enter information that will be incorporated
into your certificate request.
What you are about to enter is what is called a Distinguished Name or a DN.
There are quite a few fields but you can leave some blank
For some fields there will be a default value,
If you enter '.', the field will be left blank.
-----
Country Name (2 letter code) [US]:JP
State or Province Name (full name) [CA]:Tokyo
Locality Name (eg, city) [SanFrancisco]:Minatoku
Organization Name (eg, company) [OpenVPN]:Test.Part
Organizational Unit Name (eg, section) [changeme]:test
Common Name (eg, your name or your server's hostname) [changeme]:ca
Name [changeme]:ca
Email Address [mail@host.domain]:ca@example.com
「%InstallDir%\easy-rsa\keys」以下に「ca.crt」と「ca.key」が作成される
OpenVPNサーバ側で各種証明書の作成(サーバ証明書の作成)
- build-key-server.bat ≪サーバ名≫
でサーバ証明書が作成される
C:\Program Files\OpenVPN\easy-rsa>build-key-server.bat server
Ignoring -days; not generating a certificate
Generating a RSA private key
~~~省略~~~
writing new private key to 'keys\server.key'
-----
You are about to be asked to enter information that will be incorporated
into your certificate request.
What you are about to enter is what is called a Distinguished Name or a DN.
There are quite a few fields but you can leave some blank
For some fields there will be a default value,
If you enter '.', the field will be left blank.
-----
Country Name (2 letter code) [US]:JP
State or Province Name (full name) [CA]:Tokyo
Locality Name (eg, city) [SanFrancisco]:Minatoku
Organization Name (eg, company) [OpenVPN]:Test.Part
Organizational Unit Name (eg, section) [changeme]:server
Common Name (eg, your name or your server's hostname) [changeme]:server
Name [changeme]:server
Email Address [mail@host.domain]:server@example.com

Please enter the following 'extra' attributes
to be sent with your certificate request
A challenge password []:
An optional company name []:
Using configuration from openssl-1.0.0.cnf
Check that the request matches the signature
Signature ok
The Subject's Distinguished Name is as follows
countryName           :PRINTABLE:'JP'
stateOrProvinceName   :PRINTABLE:'Tokyo'
localityName          :PRINTABLE:'Minatoku'
organizationName      :PRINTABLE:'Test.Part'
organizationalUnitName:PRINTABLE:'server'
commonName            :PRINTABLE:'server'
name                  :PRINTABLE:'server'
emailAddress          :IA5STRING:'server@example.com'
Certificate is to be certified until May 30 06:20:26 2030 GMT (3650 days)
Sign the certificate? [y/n]:y


1 out of 1 certificate requests certified, commit? [y/n]y
Write out database with 1 new entries
Data Base Updated

C:\Program Files\OpenVPN\easy-rsa>dir keys\server*
 ドライブ C のボリューム ラベルがありません。
 ボリューム シリアル番号は 70A9-7487 です

 C:\Program Files\OpenVPN\easy-rsa\keys のディレクトリ

2020/06/01  15:20             8,307 server.crt
2020/06/01  15:20             1,798 server.csr
2020/06/01  15:19             3,324 server.key
               3 個のファイル              13,429 バイト
               0 個のディレクトリ  47,287,656,448 バイトの空き領域
「%InstallDir%\easy-rsa\keys」以下に「server.crt」、「server.csr」と「server.key」が作成される
OpenVPNサーバ側で各種証明書の作成(クライアント証明書の作成)
- build-key.bat ≪ユーザ名≫
でユーザ側(クライアント側)の証明書が作成される
C:\Program Files\OpenVPN\easy-rsa>build-key.bat client
Ignoring -days; not generating a certificate
Generating a RSA private key
~~~省略~~~
writing new private key to 'keys\client.key'
-----
You are about to be asked to enter information that will be incorporated
into your certificate request.
What you are about to enter is what is called a Distinguished Name or a DN.
There are quite a few fields but you can leave some blank
For some fields there will be a default value,
If you enter '.', the field will be left blank.
-----
Country Name (2 letter code) [US]:JP
State or Province Name (full name) [CA]:Tokyo
Locality Name (eg, city) [SanFrancisco]:Minatoku
Organization Name (eg, company) [OpenVPN]:Test.Part
Organizational Unit Name (eg, section) [changeme]:client
Common Name (eg, your name or your server's hostname) [changeme]:client
Name [changeme]:client
Email Address [mail@host.domain]:client@example.com

Please enter the following 'extra' attributes
to be sent with your certificate request
A challenge password []:
An optional company name []:
Using configuration from openssl-1.0.0.cnf
Check that the request matches the signature
Signature ok
The Subject's Distinguished Name is as follows
countryName           :PRINTABLE:'JP'
stateOrProvinceName   :PRINTABLE:'Tokyo'
localityName          :PRINTABLE:'Minatoku'
organizationName      :PRINTABLE:'Test.Part'
organizationalUnitName:PRINTABLE:'client'
commonName            :PRINTABLE:'client'
name                  :PRINTABLE:'client'
emailAddress          :IA5STRING:'client@example.com'
Certificate is to be certified until May 30 06:24:37 2030 GMT (3650 days)
Sign the certificate? [y/n]:y


1 out of 1 certificate requests certified, commit? [y/n]y
Write out database with 1 new entries
Data Base Updated

C:\Program Files\OpenVPN\easy-rsa>dir keys\client*
 ドライブ C のボリューム ラベルがありません。
 ボリューム シリアル番号は 70A9-7487 です

 C:\Program Files\OpenVPN\easy-rsa\keys のディレクトリ

2020/06/01  15:24             8,188 client.crt
2020/06/01  15:24             1,798 client.csr
2020/06/01  15:24             3,324 client.key
               3 個のファイル              13,310 バイト
               0 個のディレクトリ  47,287,492,608 バイトの空き領域
「%InstallDir%\easy-rsa\keys」以下に「client.crt」、「client.csr」と「client.key」が作成される
OpenVPNサーバ側で各種証明書の作成(DHパラメータの作成)
- build-dh.bat
でDHのパラメータファイルが作成される
C:\Program Files\OpenVPN\easy-rsa>build-dh.bat
Generating DH parameters, 2048 bit long safe prime, generator 2
This is going to take a long time
~~~省略~~~

C:\Program Files\OpenVPN\easy-rsa>dir keys\dh*
 ドライブ C のボリューム ラベルがありません。
 ボリューム シリアル番号は 70A9-7487 です

 C:\Program Files\OpenVPN\easy-rsa\keys のディレクトリ

2020/06/01  15:28               432 dh2048.pem
               1 個のファイル                 432 バイト
               0 個のディレクトリ  47,287,492,608 バイトの空き領域
「%InstallDir%\easy-rsa\keys」以下に「dhXXXX.pem」が作成される
OpenVPNサーバ側で各種証明書の作成(2回目以降)
一旦、各種証明書を作成しつつ、再度(クライアント)証明書が作成したくなったら、
コマンドプロンプトから
- vars.bat
- 目的のコマンドを実行
でよい
OpenVPNサーバ側で各種証明書の作成(tlsセキュリティキーの作成)
こちらは「%InstallDir%\bin\openvpn.exe」コマンドを使う
C:\Program Files\OpenVPN\bin>openvpn.exe --genkey --secret ta.key

C:\Program Files\OpenVPN\bin>dir ta.key
 Volume in drive C has no label.
 Volume Serial Number is 70A9-7487

 Directory of C:\Program Files\OpenVPN\bin

2020/06/01  15:32               657 ta.key
               1 File(s)            657 bytes
               0 Dir(s)  47,287,492,608 bytes free
「%InstallDir%\bin」以下に「ta.key」が作成される
設定(仮想NICの設定)
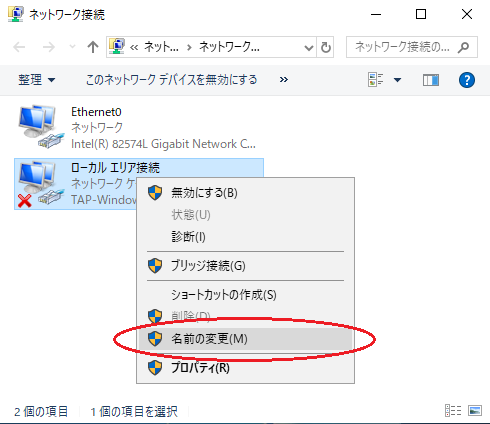
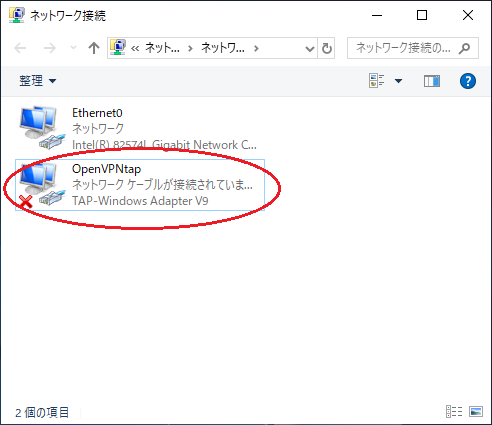
OpenVPN 由来の仮想NICの名前が、後程設定ファイルに記述するので、適当な名前に変更しておく。
ここでは「OpenVPNtap」とした。
OpenVPN を tap で使用する
同一ブロードキャストドメインの中にいる、つまりブリッジ接続ということね。
ブリッジの設定(tapの場合)
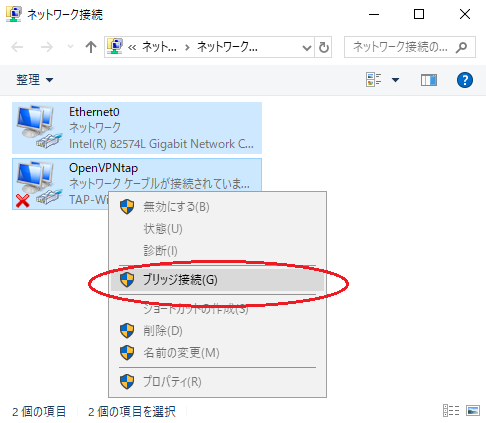
tap の場合は、Windowsの標準機能の「ブリッジ接続」をしておく。
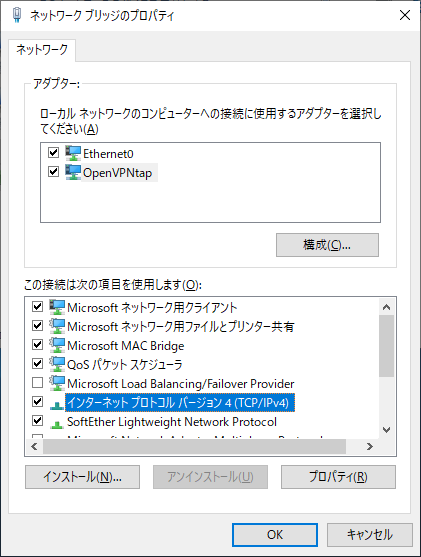
一般的には、物理的なNICとOpenVPNの仮想NICの二つを選択して、「ブリッジ接続」する
作成したブリッジに、IPアドレスを付与する
OpenVPNサーバの設定(tapの場合)
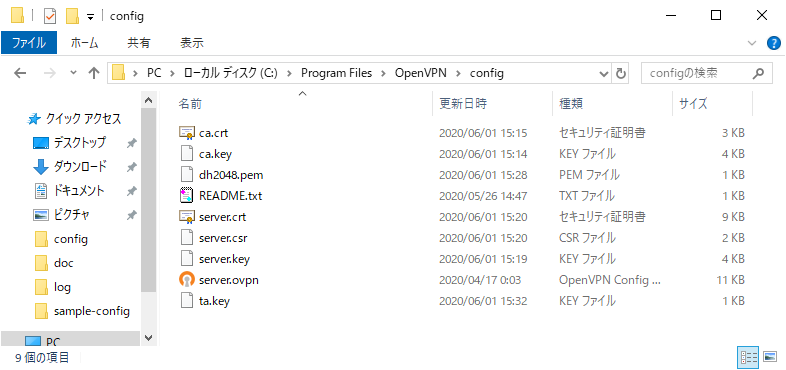
「%InstallDir%\config」下に、以下のファイルをコピーする
- %InstallDir%\bin\ta.key
- %InstallDir%\sample-config\server.ovpn
- %InstallDir%\easy-rsa\keys\ca.crt
- %InstallDir%\easy-rsa\keys\dh2048.pem
- %InstallDir%\easy-rsa\keys\server.crt
- %InstallDir%\easy-rsa\keys\server.csr
- %InstallDir%\easy-rsa\keys\server.key
ca.keyはいらない・・・スクリーンキャプチャ失敗した・・・orz
server.ovpn ファイルを以下のように修正する
# 特定のIPアドレスでlistenしたいなら設定する
;local a.b.c.d

# OpenVPNのポート番号を設定する
# 任意のポートにするといいと思う
port 1194

# TCP or UDP server?
;proto tcp
proto udp
# TCP か UDP か

dev tap
;dev tun
# 今回は tap なので、dev tap のコメントアウトを外して、dev tun をコメントアウトする

# 今回は Windows 上の OpenVPN なので
# OpenVPN の仮想 NIC の名前を指定する
dev-node OpenVPNtap

# 認証局の公開鍵/証明書を指定する
ca ca.crt
# OpenVPN のサーバとしての公開鍵/秘密鍵/証明書を指定する
cert server.crt
key server.key  # This file should be kept secret

# DH パラメータのファイルを指定する
dh dh2048.pem

# こちらはtunで使うので、コメントアウトする
;server 10.8.0.0 255.255.255.0

# これはそのままにしておく
ifconfig-pool-persist ipp.txt

# tap なので、こちらの設定をする
# OpenVPNサーバ上のLANのデフォルトゲートウェイのIPアドレスが 10.8.0.4 でサブネットが 255.255.255.0
# 接続してきたクライアントへ割り当てるIPアドレスが 10.8.0.50 ~ 100
server-bridge 10.8.0.4 255.255.255.0 10.8.0.50 10.8.0.100

# DHCP サーバとして DNSサーバを知らせたいときは、以下のコメントアウトを外す
# サンプルに書かれている二つはOpenVPNSが管理している!? オープンなDNSサーバだけど、
# 内部のDNSサーバを指定したいときはそのアドレスを指定しておく
;push "dhcp-option DNS 208.67.222.222"
;push "dhcp-option DNS 208.67.220.220"

自ネットワークの情報は書かないといけない
push "route 10.8.0.0 255.255.255.0"

# クライアントの全ての通信を OpenVPN 経由にする場合は、コメントアウトを外す
push "redirect-gateway def1 bypass-dhcp"

# TLS のセキュリティキーを指定する
tls-auth ta.key 0 # This file is secret

# クライアントの設定と合わせる
cipher AES-256-CBC

# クライアントの設定と合わせる
# lzo 圧縮を有効にする
comp-lzo

# TCP の場合は、コメントアウトする。
;explicit-exit-notify 1
# UDPの場合はこのまま有効にしておく
explicit-exit-notify 1
bypass-dhcpについて
OpenVPNのサーバ設定の「bypass-dhcp」は、DHCPパケットはOpenVPNの外部に流すという事。
OpenVPNを繋げている物理NIC側のIPアドレス取得のDHCPパケットまで、OpenVPN内部にしてしまうと、
物理NICのDHCP要求が必要になった場合(例えばISPへの接続とか)、それができなくなり、結果として物理的にネットワークが切断してしまうので、その対策としてDHCPだけはOpenVPNの外部に流したい場合は「bypass-dhcp」を設定する。
OpenVPNサーバを起動する(tapの場合)
サーバなので、Windowsサービスがいいよね。
という事で、コントロールパネルのサービスの一覧から「OpenVPNService」を「自動」にしておく、まぁとにかく実行状態する
クライアントに OpenVPN をインストールする(tapの場合)
サーバ側と同じようにインストールするので省略
クライアントの設定(tapの場合)
「%InstallDir%\config」下に、サーバで作った証明書類と、サンプルの設定ファイルをコピーする
- ta.key
- %InstallDir%\sample-config\client.ovpn
- ca.crt
- client.crt
- client.csr
- client.key
ca.keyはいらない・・・むしろクライアントにca.keyを配布してはいけない・・・絶対にしてはいけない・・・スクリーンキャプチャ失敗した・・・orz
client.ovpn ファイルを以下のように修正する
dev tap
;dev tun
# 今回は tap なので、dev tap のコメントアウトを外して、dev tun をコメントアウトする

# 今回は Windows 上の OpenVPN なので
# サーバと同じように仮想NICを設定したのなら、
# OpenVPN の仮想 NIC の名前を指定する
dev-node OpenVPNtap

# Are we connecting to a TCP or
# UDP server?  Use the same setting as
# on the server.
;proto tcp
proto udp
# TCP か UDP か

# 接続先ホスト名とポート番号を指定する
# これは、接続先ホスト名がovpn.example.comでポートが1194ということ
remote ovpn.example.com 1194
# 複数記述して分散/冗長化も可能

# Choose a random host from the remote
# list for load-balancing.  Otherwise
# try hosts in the order specified.
;remote-random
# 必要ならコメントアウトすればいいと思う

# Keep trying indefinitely to resolve the
# host name of the OpenVPN server.  Very useful
# on machines which are not permanently connected
# to the internet such as laptops.
resolv-retry infinite

# Most clients don't need to bind to
# a specific local port number.
nobind

# Try to preserve some state across restarts.
persist-key
persist-tun

# If you are connecting through an
# HTTP proxy to reach the actual OpenVPN
# server, put the proxy server/IP and
# port number here.  See the man page
# if your proxy server requires
# authentication.
;http-proxy-retry # retry on connection failures
;http-proxy [proxy server] [proxy port #]
# 必要ならコメントアウトすればいいと思う

# Wireless networks often produce a lot
# of duplicate packets.  Set this flag
# to silence duplicate packet warnings.
;mute-replay-warnings

# 認証局の公開鍵/証明書を指定する
ca ca.crt
# OpenVPN のクライアント/ユーザとしての公開鍵/秘密鍵/証明書を指定する
cert client.crt
key client.key

# Verify server certificate by checking that the
# certicate has the correct key usage set.
# This is an important precaution to protect against
# a potential attack discussed here:
#  http://openvpn.net/howto.html#mitm
#
# To use this feature, you will need to generate
# your server certificates with the keyUsage set to
#   digitalSignature, keyEncipherment
# and the extendedKeyUsage to
#   serverAuth
# EasyRSA can do this for you.
remote-cert-tls server

# If a tls-auth key is used on the server
# then every client must also have the key.
tls-auth ta.key 1

# サーバの設定と合わせる
cipher AES-256-CBC

# サーバの設定と合わせる
# サーバの設定と合わせて、コメントアウトを取る
comp-lzo
クライアントの起動と接続(tapの場合)
GUI ツール(OpenVPN GUI)が用意されているので、タスクトレイから上記の設定ファイルを指定して起動すればよい。
タスクトレイにあるやつ。
右クリックしたメニューはこんな感じ
「接続」でパスで指定された設定ファイルを読み込んで、接続を開始する。
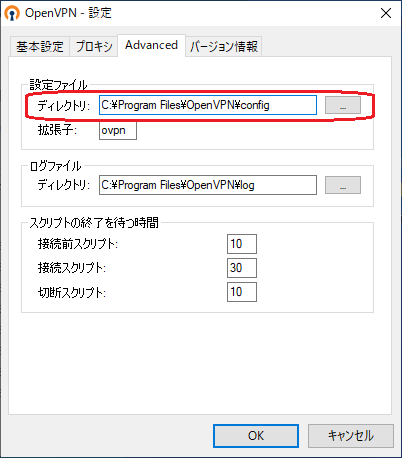
右クリックメニューの「設定」を選んだ感じ。
気にするところは、設定ファイルのパスぐらいだと思うけど、デフォルトインストール先が示されるので、まぁ確認しておくぐらいかな
OpenVPN を tun で使用する
ブロードキャストドメインではなくて、ルーティングで通信をするという形態ね。
まずは、Windowsでルーティングの設定をする
レジストリ「\HKLM\System\CurrentControlSet\Services\Tcpip\Parameters\IPEnableRouter」を「1」にするなり、RRASを起動/設定するなりして、OpenVPNサーバ(Windows)でルーティング(パケット転送)できるようにしておく。
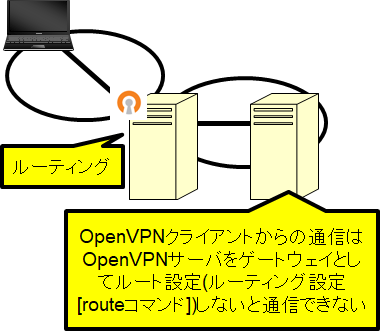
OpenVPNクライアントがアクセスする機器のルーティング情報の設定更新
OpenVPNクライアントは、新しい別のネットワークなので、そこからの通信はOpenVPNサーバをゲートウェイとするようにルーティング情報を設定しておかないと、OpenVPNクライアントとサーバ機器は通信ができないよ。
まぁ、Windowsをデフォルトゲートウェイにしていて、そいつにOpenVPN Serverをインストールしているのであれば、不要かもしれんけど、そうでない場合は、ルーティング情報をどうするのか、というのが、tunの場合の悩みどころかと思う。
OpenVPNサーバの設定(tunの場合)
tapと同じようにする。
基本的には設定ファイルの記述内容だけ異なる
server.ovpn ファイルを以下のように修正する(tapと異なる部分だけ)
;dev tap
dev tun
# tap と違う部分はまずはここ

# このコメントアウトは外さないと、
# OpenVPN内部に別のサブネットができてしまう
# なんかよく分からんが、下記に少し書いたので参照
topology subnet

# tap と違うのは「server-bridge」を使わずに「server」を使う
# 10.8.0.0/24というネットワークをOpenVPNのサーバとクライアントで構築する
# そして10.8.0.1がOpenVPNサーバ側の仮想NICのアドレスとなる
server 10.8.0.0 255.255.255.0

# tap と違うのは「server-bridge」を使わずに「server」を使う
# なので、コメントアウトする
;server-bridge 10.8.0.4 255.255.255.0 10.8.0.50 10.8.0.100

# tap と違うのは「server-bridge」を使わずに「server」を使う
# なので、コメントアウトする
;server-bridge

# 必要なネットワークのルーティング情報をOpenVPNクライアントに送る必要がある
# OpenVPNクライアントと会話するサーバ側のルーティング情報も更新しておかないと、通信ができないよ。
# (OpenVPNクライアントのアドレスは、ゲートウェイとなっているOpenVPNサーバへ)
# (転送するようにルーティング情報を設定する必要がある)
;push "route 192.168.10.0 255.255.255.0"
;push "route 192.168.20.0 255.255.255.0"
# 一応、OpenVPN間のネットワークのルーティング情報も送っておく
push "route 10.8.0.0 255.255.255.0"
OpenVPNサーバの設定(tunの場合)(「topology subnet」について)
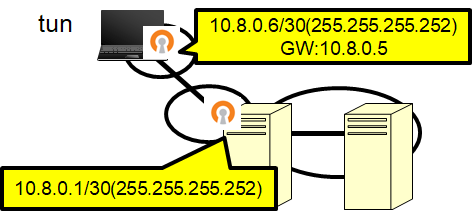
上記のserver.ovpnにて「topology subnet」のコメントアウトを外しているが、これをコメントアウトすると、下記のような 30bit のサブネットとなってしまって、OpenVPNサーバとOpenVPNクライアント間で異なるネットワークとなり、通信ができなくなる。
クライアントの設定(tunの場合)
tapと同じようにする。
設定ファイルの記述内容だけ異なる
client.ovpn ファイルを以下のように修正する
;dev tap
dev tun
# tap と違う部分ってもここぐらい
クライアントの起動と接続(tunの場合)
tapと同じなので略。
