.htaccessが効かない、動かない、使えない
以前に記載したLightsail|WordPress - bitnami|BASIC認証とDigest認証の設定方法では、
WordPressのファイル群に .htaccess を入れてもダメ
私は普段、wp-adminやwp-login.phpのある階層に.htaccessを置いてBASIC認証をかけていましたが、この方法はAWSのLightsailでは不可のようです。
と記載しました。
WordPress - bitnami においては、デフォルトで.htaccessが利用不可になっています。
でも、「どうしても.htaccess使いたいねん」「〜.confを変更の度に、いちいち再起動するのがメンドイねん」という方もいらっしゃるのではないでしょうか?
そこで、bitnamiで.htaccessを有効化する方法を記載します。難しくありません。一行を変更するだけです。
まずマニュアルの確認から
bitnami においての.htaccessファイルの扱いについては、下記をご参照ください(英語)
Understand Default .Htaccess File Configuration
その中に、下記の記載があります。
One of our main goals is to configure Bitnami applications in the most secure way. For this reason, we moved the configuration in the .htaccess files to the main application configuration files and set the AllowOverride option to None by default, if supported by the application.
(訳)Bitnami アプリケーションを最も安全な方法で設定することを主な目標の一つとしています。このため、.htaccess ファイル内の設定をメインのアプリケーション設定ファイルに移動し、アプリケーションがサポートしている場合は、AllowOverride オプションをデフォルトで None に設定しました。
AllowOverride オプションをデフォルトで None にしているので、.htaccessが使えないというわけです。
.htaccessの有効化|AllowOverride All
- 変更するファイルは
/opt/bitnami/apps/wordpress/conf/httpd-app.confです。 - ファイル中の
AllowOverride NoneをAllowOverride Allへ変更し保存してください。
# 〜省略〜

<Directory "/opt/bitnami/apps/wordpress/htdocs">
    Options +MultiViews +FollowSymLinks
    # AllowOverride None ← コレ
    AllowOverride All
    <IfVersion < 2.3 >
        Order allow,deny

# 〜省略〜
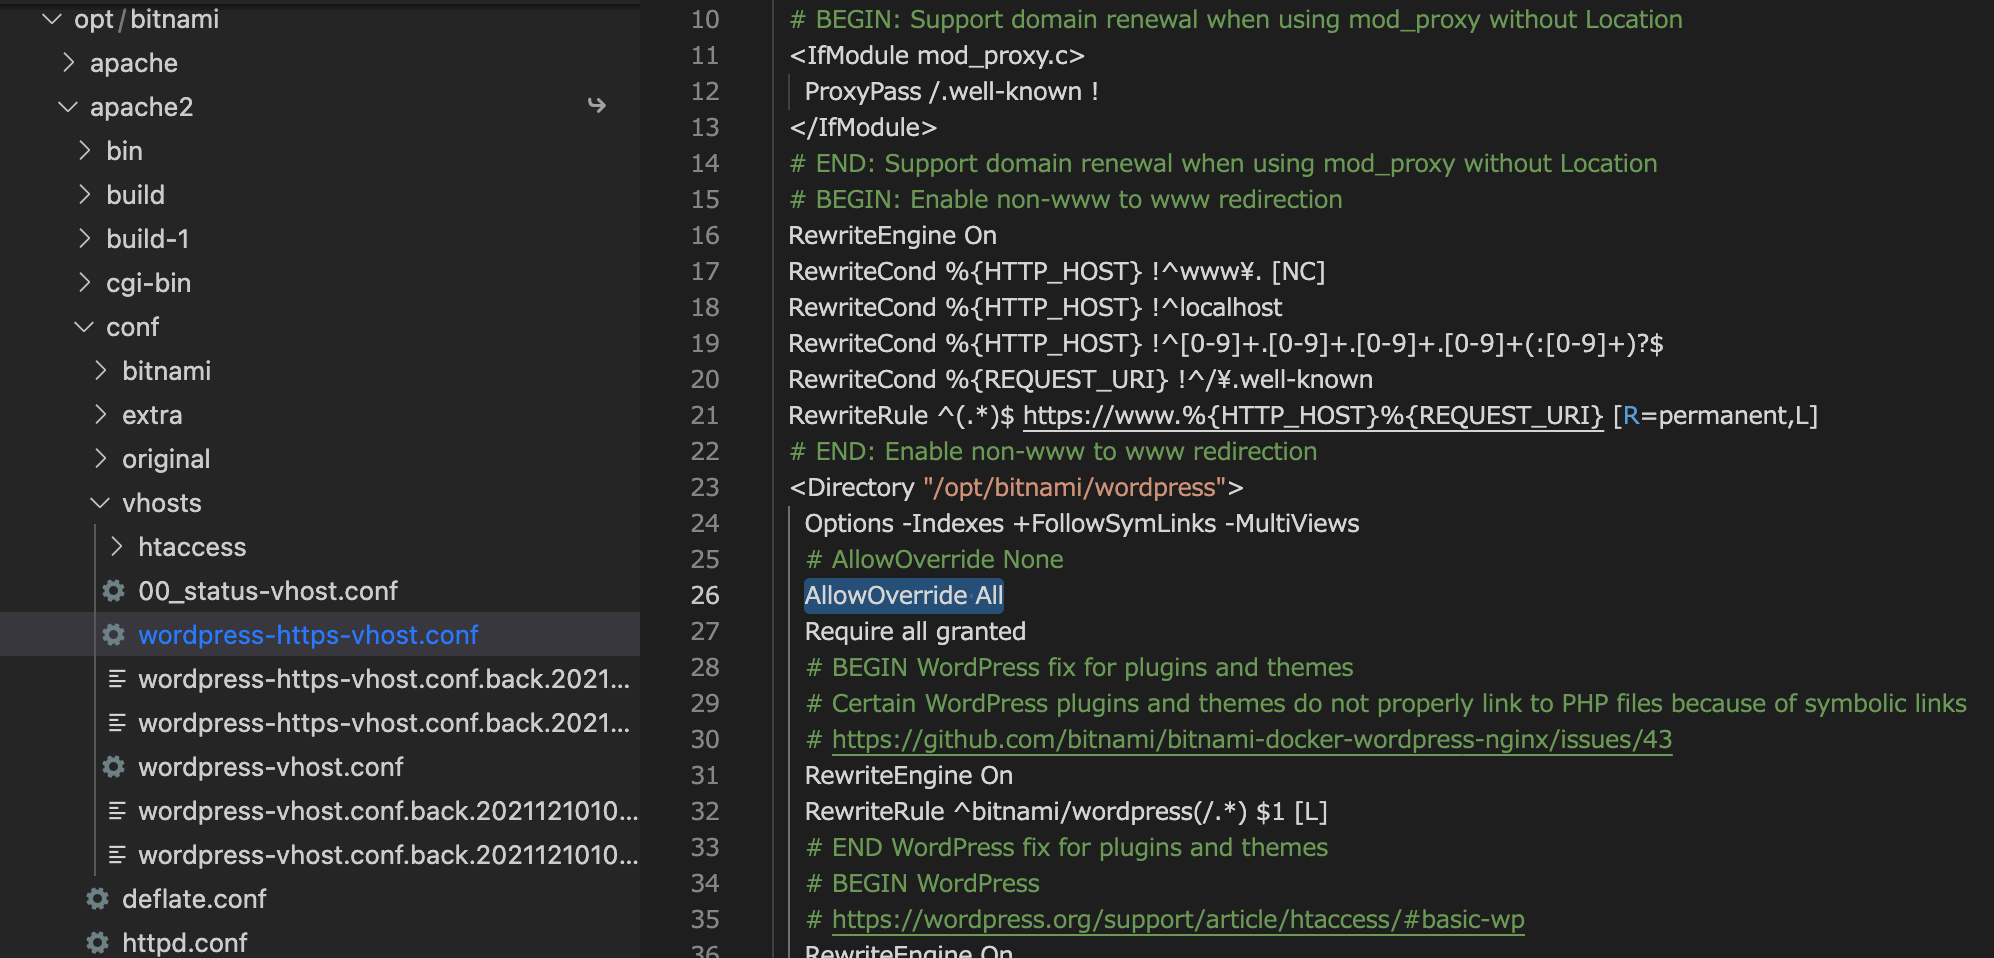
(追記) 2021年12月時点において、いじる箇所(ファイル)が変更されています
- ファイルの場所は
/opt/bitnami/apache2/conf/vhosts/wordpress-https-vhost.confです - (もしくは
/opt/bitnami/apache2/conf/vhosts/wordpress-vhost.conf) - 25行目あたりに
AllowOverride Noneがあるので、コレをコメントアウトし、AllowOverride Allを追記してください - 参考サイト:Understand Default .Htaccess File Configuration
AllowOverride とは
簡単にいえば、.htaccessの有効化/無効化です。
AllowOverride Allなら有効で
AllowOverride Noneなら無効です。
ちゃんとした解説は...
Apache コア機能 | AllowOverride ディレクティブ
Apacheの再起動
〜.confファイルを触ったあとは、Apacheを再起動します。
$ sudo /opt/bitnami/ctlscript.sh restart apache
これで、bitnamiのWordPressのディレクトリにおいて.htaccessファイルも読み込まれるようになりました。
(bitnamiの他のアプリについても、それぞれの〜.confファイルでAllowOverride AllすればOKです)
ただし、あくまでbitnamiの推奨は〜.confファイルへ記載することです。
Some plugins, during their installation, create a .htaccess file in either the /opt/bitnami/apps/APPNAME/htdocs/ or in the /opt/bitnami/apps/APPNAME/htdocs//plugins directory that cannot be read by Apache. For that reason, we recommend moving the content of that file to the /opt/bitnami/apps/APPNAME/conf/htaccess.conf file.
(訳)プラグインによっては、インストール時に /opt/bitnami/apps/APPNAME/htdocs/ または /opt/bitnami/apps/APPNAME/htdocs//plugins ディレクトリのいずれかに .htaccess ファイルが作成され、Apache が読み取れないものがあります。そのため、そのファイルの内容を/opt/bitnami/apps/APPNAME/conf/htaccess.confファイルに移動することをお勧めします。
本稿は以上となります。
