はじめに
前回は
プロジェクトの作成として
- asdf
- railsコマンド
について学びました。
今回は
ScaffoldでTaskを作成・rootを設定として
- scaffold
- MVC
- マイグレーション
- ルーティング
について学びます。
では、はじめていきましょう。
1. ScaffoldでCRUD操作の土台を作る
CRUD
CRUD とは Create(作成) Read(参照) Update(編集) Delete(削除) の頭文字をとったもので、
データー操作に欠かせない、4つの操作を表しています。
Scaffold
Scaffold とは足場という意味です。
Rails には非常に協力な実装コマンドがいくつも存在しますが、
その中でもこの scaffold は有名で、CRUD操作に必要なものを、コマンド一つで全て用意してくれます。
では、実際にやってみましょう。
プロジェクトフォルダよりコマンドを実行します。
todo_app % rails g scaffold Task title description:text start_time:datetime end_time:datetime status:integer
ここのコマンドの意味は、
Task という名前で title description status という項目を持った モデル を作成して、 CRUD 操作に必要なものを全て作ってください。
その際に、
-
titleはデフォルトのstring型 -
descriptionはtext型 -
start_timeはdatetime型 -
end_timeはdatetime型 -
statusはinteger型
としてください。という命令になります。 すると、
 todo_app % rails g scaffold Task title description:text start_time:datetime end_time:datetime status:integer
      invoke  active_record
      create    db/migrate/20231027033159_create_tasks.rb
      create    app/models/task.rb
      invoke    test_unit
      create      test/models/task_test.rb
      create      test/fixtures/tasks.yml
      invoke  resource_route
       route    resources :tasks
      invoke  scaffold_controller
      create    app/controllers/tasks_controller.rb
      invoke    erb
      create      app/views/tasks
      create      app/views/tasks/index.html.erb
      create      app/views/tasks/edit.html.erb
      create      app/views/tasks/show.html.erb
      create      app/views/tasks/new.html.erb
      create      app/views/tasks/_form.html.erb
      create      app/views/tasks/_task.html.erb
      invoke    resource_route
      invoke    test_unit
      create      test/controllers/tasks_controller_test.rb
      create      test/system/tasks_test.rb
      invoke    helper
      create      app/helpers/tasks_helper.rb
      invoke      test_unit
      invoke    jbuilder
      create      app/views/tasks/index.json.jbuilder
      create      app/views/tasks/show.json.jbuilder
      create      app/views/tasks/_task.json.jbuilder
このような沢山のファイルが作られたというログが流れてきます。
もちろん最初から全てはつかいませんが、主要なものを見ていきましょう。
2. Model View Controller の確認
MVC
MVCとは、
- モデル (
app/models/task.rb) - コントローラー (
app/controllers/tasks_controller.rb) - ビュー (
app/views/tasks)
辺りは、頻繁に参照するはずです。では、ひとつずつファイルの確認をしておきましょう。
Model
モデルは、テーブル操作をするためのロジックを書く場所となります。
現状は、何もありませんので、このように空になっています。
app/models/task.rb【確認】
class Task < ApplicationRecord
end
Controller
コントローラーは、リクエストされたURLに対応した動かすメソッドを書く場所となります。
リクエストがあって動き、レコードの操作を命令したり、次の画面に遷移したりという命令を下します。
app/controllers/tasks_controller.rb【確認】
class TasksController < ApplicationController
  before_action :set_task, only: %i[ show edit update destroy ]

  # GET /tasks or /tasks.json
  def index
    @tasks = Task.all
  end

  # GET /tasks/1 or /tasks/1.json
  def show
  end

  # GET /tasks/new
  def new
    @task = Task.new
  end

  # GET /tasks/1/edit
  def edit
  end

  # POST /tasks or /tasks.json
  def create
    @task = Task.new(task_params)

    respond_to do |format|
      if @task.save
        format.html { redirect_to task_url(@task), notice: "Task was successfully created." }
        format.json { render :show, status: :created, location: @task }
      else
        format.html { render :new, status: :unprocessable_entity }
        format.json { render json: @task.errors, status: :unprocessable_entity }
      end
    end
  end

  # PATCH/PUT /tasks/1 or /tasks/1.json
  def update
    respond_to do |format|
      if @task.update(task_params)
        format.html { redirect_to task_url(@task), notice: "Task was successfully updated." }
        format.json { render :show, status: :ok, location: @task }
      else
        format.html { render :edit, status: :unprocessable_entity }
        format.json { render json: @task.errors, status: :unprocessable_entity }
      end
    end
  end

  # DELETE /tasks/1 or /tasks/1.json
  def destroy
    @task.destroy!

    respond_to do |format|
      format.html { redirect_to tasks_url, notice: "Task was successfully destroyed." }
      format.json { head :no_content }
    end
  end

  private
    # Use callbacks to share common setup or constraints between actions.
    def set_task
      @task = Task.find(params[:id])
    end

    # Only allow a list of trusted parameters through.
    def task_params
      params.require(:task).permit(:title, :description, :start_time, :end_time, :status)
    end
end
メソッドを見てみると、
index show new edit create update destroy
というメソッドが存在しますが、これらのメソッドは アクション と呼ばれており、これらがリクエスト毎の命令を持っています。
概ねの使い方は、以下のようになっています。
| アクション名 | 役割 |
|---|---|
| index | 登録済みレコードの一覧表示画面 |
| show | 登録済みレコードの個別表示画面 |
| new | 新しいレコードの作成のための入力画面 |
| edit | 登録済みレコードの編集のための入力画面 |
| create | 新しいレコードを登録する |
| update | 登録済みレコードを編集する |
| destroy | 登録済みレコードを削除する |
一方で、 private 以下に書かれたプライベートメソッド
  private
    # Use callbacks to share common setup or constraints between actions.
    def set_task
      @task = Task.find(params[:id])
    end

    # Only allow a list of trusted parameters through.
    def task_params
      params.require(:task).permit(:title, :description, :status)
    end
これらに関しては、アクションとは呼びません。
このコントローラー内の重複するような記述をすっきりさせる為に補助的に書かれています。
View
ビューは html に当たるファイルを管理する場所となります。
アクションで言うところの、 index show new edit の表示部分のコードが書かれています。拡張子に erb が付いているのが特徴です。
それぞれ確認しておきましょう。
index
app/views/tasks/index.html.erb【確認】
<p style="color: green"><%= notice %></p>

<h1>Tasks</h1>

<div id="tasks">
  <% @tasks.each do |task| %>
    <%= render task %>
    <p>
      <%= link_to "Show this task", task %>
    </p>
  <% end %>
</div>

<%= link_to "New task", new_task_path %>
show
app/views/tasks/show.html.erb【確認】
<p style="color: green"><%= notice %></p>

<%= render @task %>

<div>
  <%= link_to "Edit this task", edit_task_path(@task) %> |
  <%= link_to "Back to tasks", tasks_path %>

  <%= button_to "Destroy this task", @task, method: :delete %>
</div>
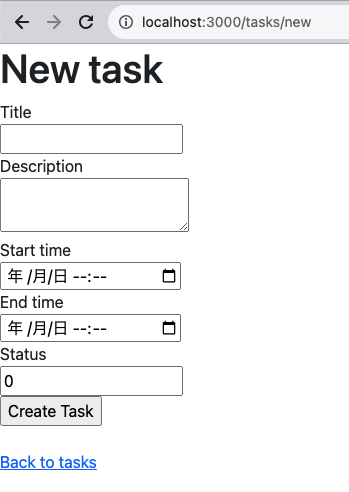
new
app/views/tasks/new.html.erb【確認】
<h1>New task</h1>

<%= render "form", task: @task %>

<br>

<div>
  <%= link_to "Back to tasks", tasks_path %>
</div>
edit
app/views/tasks/edit.html.erb【確認】
<h1>Editing task</h1>

<%= render "form", task: @task %>

<br>

<div>
  <%= link_to "Show this task", @task %> |
  <%= link_to "Back to tasks", tasks_path %>
</div>
あとは、ファイル名が _ から始まっている、
app/views/tasks/_form.html.erb
app/views/tasks/_task.html.erb
これらのファイルがありますが、これは上で紹介した index show new edit の中で、 render メソッドで呼び出されて使っていますが、これらはまた後ほど触れていきます。
これらMVC用のファイルを書き換える事によってUIやデーターベース操作に関する事を賄う事ができます。
3. migration を実行し、DBとモデルを連携させる
マイグレーションファイル
CRUD操作可能という事は、データーの保存にはDB(データーベース)を使う訳ですが、DBとアプリケーションを結ぶ為の機能として migration があります。
その設定は、今回のような Scaffold でも生成されますし、 Model 単体で作ったり、変更を行う際に生成されます。
これを マイグレーションファイル と言います。
今回は Scaffold によって、 db/migrate/20231027033159_create_tasks.rb (数字の部分は作成の日時が入るのでそれぞれ別の数値です) のようなファイルが作成されています。
db/migrate/20231027033159_create_tasks.rb【確認】
class CreateTasks < ActiveRecord::Migration[7.1]
  def change
    create_table :tasks do |t|
      t.string :title
      t.text :description
      t.datetime :start_time
      t.datetime :end_time
      t.integer :status

      t.timestamps
    end
  end
end
これらがDBにテーブルとして設定する内容となります。
現在は、まだDBにこれらの情報が登録されていません。少し確認してみましょう。
todo_app % rails s
と打ってみると、サーバーが起動し、 localhost:3000 でアクセスが可能となります。
が、
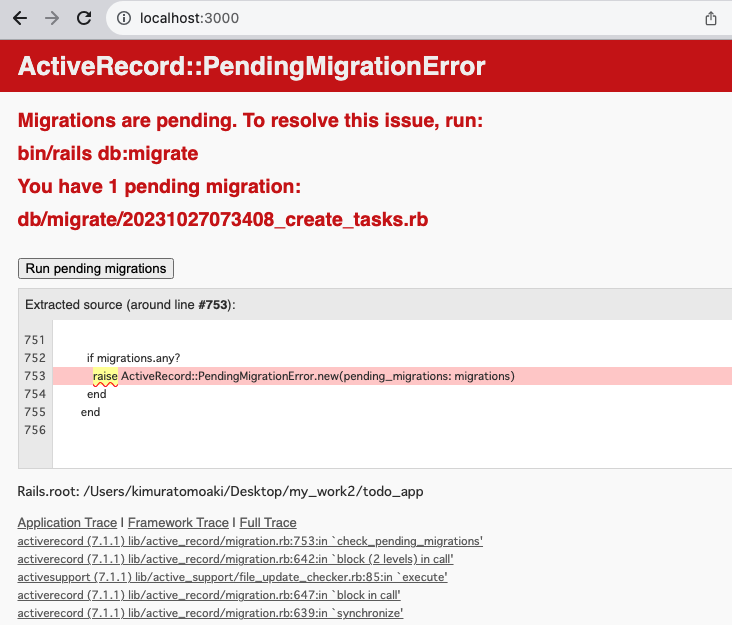
このようなエラーとなります。これは、 Migration are pending と書かれているように、
マイグレーションファイルとDBががまだ連携出来ていないという状況になります。
では、一旦サーバーを落として、マイグレーションファイルの状況も確認しましょう。
todo_app % rails db:migrate status
というコマンドを打ってみると、以下のような結果が返ってきます。
todo_app % rails db:migrate:status

database: storage/development.sqlite3

Status   Migration ID    Migration Name
--------------------------------------------------
down    20231027033159  Create tasks
現在、新しく作ったファイルは
down 20231027033159 Create tasks
down となっており、この状態であれば、ファイルの内容を書き換える事で、書き換えた内容をDBに書き込む事が出来ます。
DBの制約
DBに反映させる前に、少し設定を足しておきたいので、早速ファイルの編集をしておきましょう。
同ファイルを下記のように追記してください。
db/migrate/20231027033159_create_tasks.rb【追記】
class CreateTasks < ActiveRecord::Migration[7.1]
  def change
    create_table :tasks do |t|
      t.string :title
      t.text :description
      t.datetime :start_time, null: false #追加部分
      t.datetime :end_time
      t.integer :status, default: 0, null: false #追加部分

      t.timestamps
    end
  end
end
書き加えたコードは、該当カラムに
null: false という 絶対に入力が必要な制限 と、
default: 0 という 何も入力がない場合、初期値を0とする制限
という設定を追加しています。
実際には、title などにも制約の設定しても良いのですが、一旦この通りに進めていただくと後々の相違点が出なくなっています。
マイグレーション
では、DBとの同期を行います。ターミナルに
todo_app % rails db:migrate
と打ってみます。
 todo_app % rails db:migrate
== 20231027073408 CreateTasks: migrating ======================================
-- create_table(:tasks)
   -> 0.0010s
== 20231027073408 CreateTasks: migrated (0.0010s) =============================
このように返ってくればOKです。
-- create_table(:tasks) と表示されていますね。 tasks というテーブルが作られました。
現在のDBの状況は、migrate を行うと db/schema.rb に自動で記載されます。
db/schema.rb【確認】
# This file is auto-generated from the current state of the database. Instead
# of editing this file, please use the migrations feature of Active Record to
# incrementally modify your database, and then regenerate this schema definition.
#
# This file is the source Rails uses to define your schema when running `bin/rails
# db:schema:load`. When creating a new database, `bin/rails db:schema:load` tends to
# be faster and is potentially less error prone than running all of your
# migrations from scratch. Old migrations may fail to apply correctly if those
# migrations use external dependencies or application code.
#
# It's strongly recommended that you check this file into your version control system.

ActiveRecord::Schema[7.1].define(version: 2023_10_27_073408) do
  create_table "tasks", force: :cascade do |t|
    t.string "title"
    t.text "description"
    t.datetime "start_time", null: false
    t.datetime "end_time"
    t.integer "status", default: 0, null: false
    t.datetime "created_at", null: false
    t.datetime "updated_at", null: false
  end

end
自動で書き込みがされますので、基本的このファイルを私達が触ることはありません。
また、マイグレーションが通った事で、再び
todo_app % rails db:migrate:status
を実行してみます。すると、
 todo_app % rails db:migrate:status

database: storage/development.sqlite3

 Status   Migration ID    Migration Name
--------------------------------------------------
   up     20231027073408  Create tasks
マイグレーションファイルのステータスが、 up になっているのが確認できます。
up になっている状態のマイグレーションファイルは編集できないので、気を付けておきましょう。
間違った場合は、 rails db:rollback で、
マイグレーションファイルの新しい順から、
一つずつ down に戻す事が可能です。
4.ルーティングとトップページ
ルーティングとは
ルーティングとは リクエストされるURLに対して、どの controller の、どの action を実行するかの割り振りを行う場所です。
URLを通していないアクションは使用できない事になりますので、
極論を言えば、開発途中のコードが混入していてもルーティングさえ管理出来ていれば、実行されないので安心という事です。
では、ファイルを見てみましょう。 config/routes.rb を開きます。
config/routes.rb【確認】
Rails.application.routes.draw do
  resources :tasks
  # Define your application routes per the DSL in https://guides.rubyonrails.org/routing.html

  # Reveal health status on /up that returns 200 if the app boots with no exceptions, otherwise 500.
  # Can be used by load balancers and uptime monitors to verify that the app is live.
  get "up" => "rails/health#show", as: :rails_health_check

  # Defines the root path route ("/")
  # root "posts#index"
end
実はすでに scaffold によって書き込みが行われており、
resources :tasks
の部分がこれに当たります。たった一行ですが、ルーティングを確認するコマンド
rails routes でどういった結果を産んでいるかを確認できます。
では、調べてみましょう。
todo_app % rails routes -c tasks
ターミナルこのように打つと、
   Prefix Verb   URI Pattern               Controller#Action
    tasks GET    /tasks(.:format)          tasks#index
          POST   /tasks(.:format)          tasks#create
 new_task GET    /tasks/new(.:format)      tasks#new
edit_task GET    /tasks/:id/edit(.:format) tasks#edit
     task GET    /tasks/:id(.:format)      tasks#show
          PATCH  /tasks/:id(.:format)      tasks#update
          PUT    /tasks/:id(.:format)      tasks#update
          DELETE /tasks/:id(.:format)      tasks#destroy
このような結果が返ってきます。
これは、どのURLとアクションが繋がっているかを表示した表になります。
たったの一行の結果がCRUD操作に必要なルーティング全てを決定しているようです。
各ルートに関しては、後ほど改めて触れますので、一旦ここまでにしておきましょう。
トップページ
ただし、この状態にはトップページがありません。 routes.rb 内のコメントにも
  # Defines the root path route ("/")
  # root "posts#index"
このような記載があり、root path を定義する記述が書いてあります。
ですので、これに従い routes.rb を編集します。
config/routes.rb【編集】
Rails.application.routes.draw do
  root "tasks#index"
  resources :tasks
  # Reveal health status on /up that returns 200 if the app boots with no exceptions, otherwise 500.
  # Can be used by load balancers and uptime monitors to verify that the app is live.
  get "up" => "rails/health#show", as: :rails_health_check
end
root "tasks#index" というコードが足されています。
これは、
トップページ(root) にアクセスすると、 tasks コントローラーの index アクションを実行しますよ。
という意味になります。これでトップページがデフォルト画面から変更されているはずです。
単数形? 複数形?
ちょっと不思議なのが、task なのか tasks なのか・・・モデル名は単数でしたが、単数と複数の名称が混在していてちょっと分からなくなりそうです。
簡単な覚え方として モデル名 は 単数形 で、 コントローラー名 は 複数形、 DBのテーブル名 も 複数形 となります。
また、度々Railsでは厳密に単複を使い分ける場面がありますので、都度覚えていきましょう。
CRUD操作の確認
では、再び rails s で起動します。
今度はエラーとならず、このような画面が出てくるはずです。
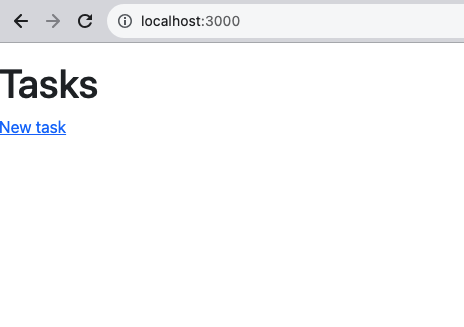
もう操作も出来ますので、
リンクから、新規作成を行ったり、
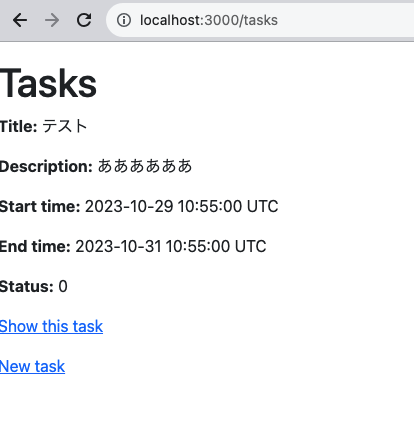
表示をしたり出来るようになっています。
この動作ができればOKです。
5. git
git
ここまでを保存しておきましょう。
todo_app % git add .
todo_app % git commit -m " ScaffoldでTaskを作成・rootを設定"
GitHub
Githubの設定ができているのであれば、同名のリポジトリを作成し、pushしておきましょう。
おわりに
本チャプターはここまでとなります。
次回は
- Bootstrap
- assets
- View
を学びます。
ここまでお疲れ様でした。