Reseaとは何か、なぜ動かしてみるのか
Resea(りーせあ)とは
『CとRustで一から作るマイクロカーネルOS』(2019/12/13)という記事で知りました。これはResea という seiyanuta (Seiya Nuta) 氏が公開した教育・研究向けマイクロカーネル自作OSを紹介したものです。実際に、さくらインターネットのIaaS上で、Webサーバとして動作させるまでを達成しています。稼動中のサーバにアクセスするだけでも、ちょっとした感動があります。
筆者は、Podcast『Turing Complete FM』を聴いて以降、低レイヤに興味が出て、OS、カーネルをちゃんと理解したいという動機付けをしばらく持っていました。しかし、Linuxのカーネルを素で読み始めるのはハードルが高く感じていました。そんな所にReseaの公開を知り、マイクロカーネルというカーネル部分が軽量、かつ教育・研究用途に機能が絞り込まれているため全体像を掴みやすいのではないか、ということで動かしつつ、コードを追い始めてみることにしました。記事によると以下のボリュームだそうです。
行数は空行やコメント行を含めて,カーネルが約5000行(コア部分は3000行),そしてユーザランドが約4500行になりました。 Unix互換性を提供しないことで,MINIXよりシンプルかつコンパクトで読みやすい物ができたと思っています。
さて、Reseaは詳細にわたるドキュメントが準備されています(Resea)。本稿では、以下の章のチュートリアルに沿って、手元のMac OSX環境で動かしてみます。
-
- Getting Started
-
- Userland Programming
本稿では紹介しませんが、以下の章では、Reseaのアーキテクチャ、設計の考え方に触れることができます。
-
- Design
-
- Servers
-
- Kernel Programming
-
- Internals
マイクロカーネルとは
Wikipediaには、 "マイクロカーネル ...(中略) OSが担う各種機能のうち、必要最小限のみをカーネル空間に残し、残りをユーザーレベルに移すことで全体の設計が簡素化でき、結果的にカスタマイズ性が向上し、性能も向上できるというOSの設計手法" とあります。
さらにReseaの盛り上がりを受け、@nullpo_head氏が、『マイクロカーネルとL4について』(2019/12/15)を公開されました。氏は、カーネル部分を(Cではなく)Rustで実装するマイクロカーネル自作OSプロジェクトを進められています。マイクロカーネルをより良く知るのにおすすめです。
Mac OS X上で動かすとは
Reseaは、カーネルはC、ユーザランドプログラムはRustで書かれています。また、一部ユーティリティがPythonで書かれています。
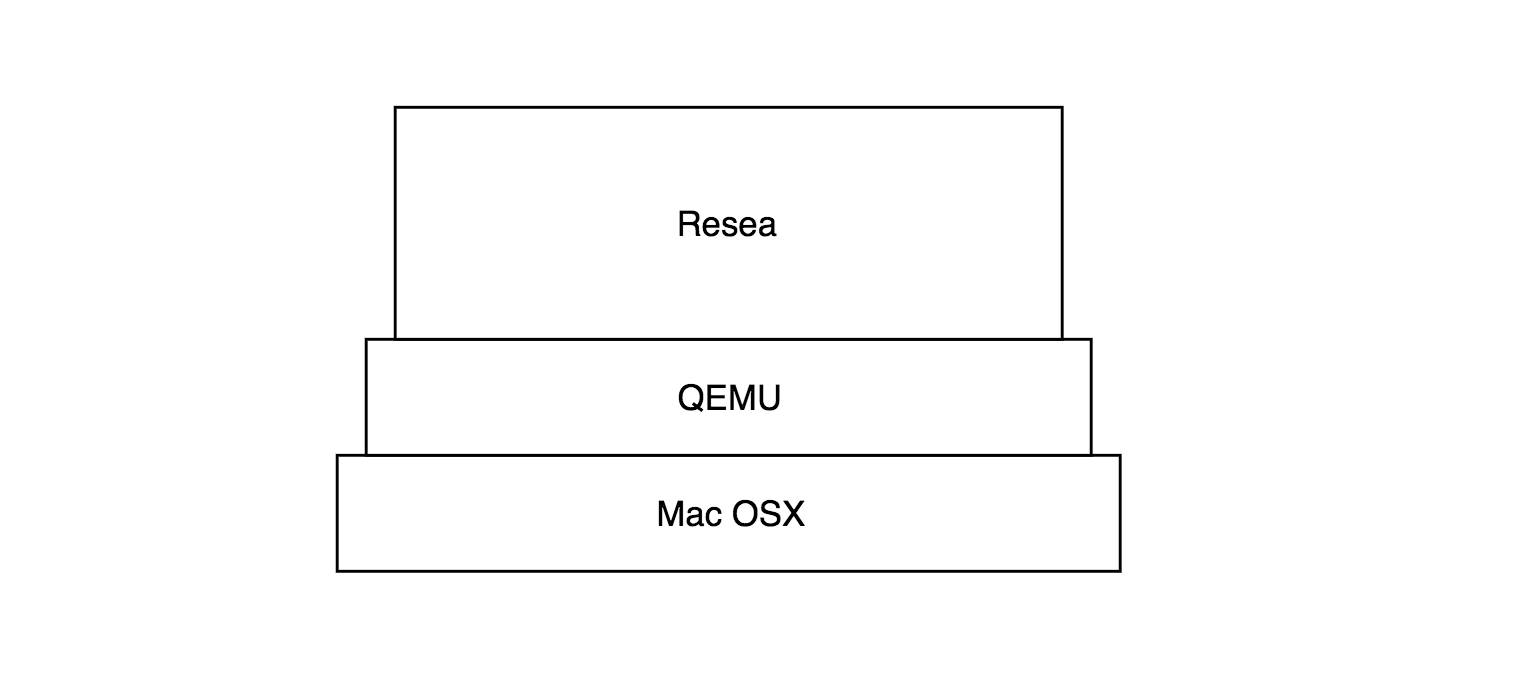
まず、Mac OSX上にビルドのための環境を一式揃えます。ビルドが終わったら、QEMUというエミュレータ上で Reseaを起動します。QEMUが「仮想のコンピュータ」となり、その上でReseaを起動し、色々と実験をしてみることができます。
コンパイル、ビルドは、 make build make run コマンドで行います。そのコマンドで行われていることの詳細は、この後クローンするReseaリポジトリの Makefile および kernel/arch/x64/arch.mk に定義されています。
それぞれのファイルに、例えば .PHONY: build .PHONY: run .PHONY: clean などに続けて、make build make run make clean などの振る舞いが定義されています。
例えば、本稿中で make runとして実行すると、QEMU qemu-system-x86_64 が立ち上がります。その仮想の64bit x86 CPU上で build/hdd.img をハードディスクとして認識し、Reseaが起動します。
本稿のゴールは一旦「動かす」ことなので、これ以上 Makefile の構成詳細は記述しません。例えば、こちら( - 自動化のためのGNU Make入門講座 - Makefileの基本:ルール)で、基本を知ることができます。
環境準備
リポジトリのclone
以下のReseaリポジトリをクローンします。
$ git clone https://github.com/seiyanuta/resea.git
$ cd resea
プロジェクトは、以下のディレクトリから構成されています。
- docs: ドキュメント
- kernel: Cで実装されたカーネル部分
- libs/resea: Rustで実装されたユーザランド部分
- servers: Rustで実装されたサーバ群
- tools: Pythonツール群
- misc: その他
必要パッケージの導入
チュートリアルに沿って、パッケージを導入します。実行環境により要否が異なります。
$ brew install llvm python3 qemu bochs i386-elf-grub xorriso mtools
- llvm: LLVMコンパイラプラットフォーム
- python3: Python3系
- qemu: プロセッサエミュレータ
- bochs: PC/AT互換機(x86系)エミュレータ
- i386-elf-grub: i386用の高機能ブートローダ
- xorriso: ISO9660ファイルシステムの操作ツール
- mtools: MSDOSファイルの操作ツール
筆者環境では以下を考慮して、一部を抜きました。
$ brew install llvm qemu i386-elf-grub xorriso mtools
-
pyenvでPython環境を作っており、Python3系はインストール済のため、今回はスキップ -
一旦動かすだけならエミュレータに
qemuを使えば良いので、bochsは入れなくても構わない -
qemuはすでにインストールしたことがあったため、エラー。brew upgrade qemuで、最新版をインストール
Pythonパッケージのインストール
$ pip install -r tools/requirements.txt
現Python3環境に応じて、pipまたはpip3コマンドを使います。
Rust Nightlyと必要パッケージのインストール
rustupを使います。rustup.rs - The Rust toolchain installerで最新の実行コマンドを確認します。
$ curl --proto '=https' --tlsv1.2 -sSf https://sh.rustup.rs | sh
上記を実行すると、以下のプロンプトが表示されます。
...
Current installation options:

   default host triple: x86_64-apple-darwin
     default toolchain: stable
               profile: default
  modify PATH variable: yes

1) Proceed with installation (default)
2) Customize installation
3) Cancel installation
>
1と答え、先に進みます。
...
  stable installed - rustc 1.39.0 (4560ea788 2019-11-04)


Rust is installed now. Great!

To get started you need Cargo's bin directory ($HOME/.cargo/bin) in your PATH
environment variable. Next time you log in this will be done
automatically.

To configure your current shell run source $HOME/.cargo/env
上記のように、インストールが完了しました。パスを通しておきます。
$ source $HOME/.cargo/env
デフォルトでは安定版が導入されています。
$ rustc --version
rustc 1.39.0 (4560ea788 2019-11-04)
Nightlyバージョンを導入し、切り替えます。
$ rustup default nightly
以下のようにインストールが完了します。
info: syncing channel updates for 'nightly-x86_64-apple-darwin'
info: latest update on 2019-12-15, rust version 1.41.0-nightly (c8ea4ace9 2019-12-14)
...
  nightly-x86_64-apple-darwin installed - rustc 1.41.0-nightly (c8ea4ace9 2019-12-14)
念のためバージョンを確認します。
$ rustc --version
rustc 1.41.0-nightly (c8ea4ace9 2019-12-14)
必要に応じて
rustup default stableコマンドで、安定版に戻すことができます。
必要パッケージをインストールします。
$ rustup component add rust-src
$ cargo install xargo
rustupは、Rust言語のインストーラです。cargoは、Rustのパッケージの取得、ビルドを行うためのツールです。
...
    Finished release [optimized] target(s) in 54.06s
  Installing /<user directory>/.cargo/bin/xargo
   Installed package `xargo v0.3.18` (executable `xargo`)
上記のように表示され、インストールが正常に終了しました。
Reseaのビルド
$ make build               # Build a kernel executable.
$ make iso                 # Build an ISO image.
(参考) ビルド時に見られるエラー等
- 安定版のRustの場合、
make buildでエラーが出ます。
...
     XARGO  servers/shell
WARNING: the sysroot can't be built for the Stable channel. Switch to nightly.
error: failed to run `rustc` to learn about target-specific information

Caused by:
  process didn't exit successfully: `rustc - --crate-name ___ --print=file-names -C lto -Z emit-stack-sizes -Z external-macro-backtrace --target user_x64 --crate-type bin --crate-type rlib --crate-type dylib --crate-type cdylib --crate-type staticlib --crate-type proc-macro --print=sysroot --print=cfg` (exit code: 1)
--- stderr
error: the option `Z` is only accepted on the nightly compiler


make: *** [build/servers/shell.elf] Error 101
Nightly Rustが入っていることを確認します。
-
make isoでwarningが出ました
$ make iso
      GRUB  build/resea.iso
i386-elf-grub-mkrescue: warning: cannot open directory `/usr/local/Cellar/i386-elf-grub/2.04/share/locale': No such file or directory.
GNU xorriso 1.5.2 : RockRidge filesystem manipulator, libburnia project.
Reseaの実行
以下を実行すると、QEMU上で動作しました。
$ make run GUI=1 # Run on QEMU.
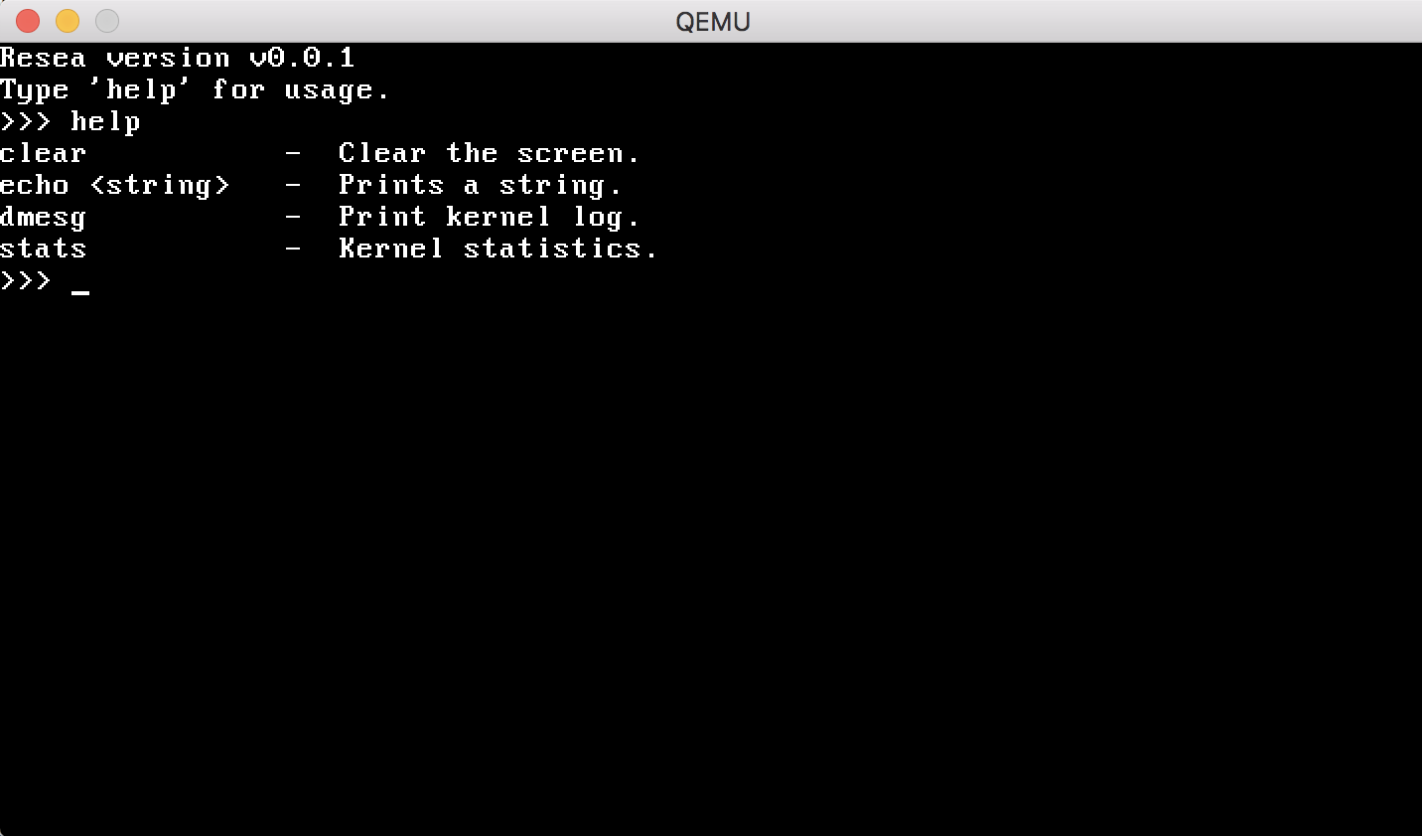
make runコマンドを実行したターミナル上では、キーボード割り込みなどのログが観察できます。
QEMU自体が終了できない状態となったので、アクティビティモニタからプロセスを強制終了しました。
ユーザランドプログラムを書いてみる
Hello, World! - Resea Documentation に沿って進めます。
$ cp -r servers/hello servers/rand
$ cd servers/rand
$ ls
Cargo.toml Xargo.toml lib.rs     main.rs
ファイルを編集して行きます。
Cargo.tomlの編集
servers/rand/Cargo.tomlを編集します。
$ code Cargo.toml # VSCodeの場合
編集前
[package]
name = "hello"
version = "0.0.0"
authors = ["Seiya Nuta <nuta@seiya.me>"]
edition = "2018"

[lib]
crate-type = ["staticlib"]
path = "lib.rs"

[dependencies]
resea = { path = "../../libs/resea" }
編集後
[package]
name = "rand" # Update here!
version = "0.0.0"
authors = ["Your Name <yourname@example.com>"]  # and here!
edition = "2018"

[lib]
crate-type = ["staticlib"]
path = "lib.rs"

[dependencies]
resea = { path = "../../libs/resea" }
main.rsの編集
servers/rand/main.rsを編集します。
$ code main.rs # VSCodeの場合
編集前
# [no_mangle]
pub fn main() {
    info!("Hello World!");
}
編集後
# [no_mangle]
pub fn main() {
    info!("Hello World from rand server!");
}
.build.mkの追記
reasea/直下の.build.mkに、環境変数STARTUPSを足します。
$ cd ../../
$ echo "STARTUPS += rand" >> .build.mk
QEMUで実行する
$ make run
例えば、Cargo.tomlファイルの編集を忘れると、以下のようなエラーが出ます。
error: two packages named `hello` in this workspace:
- /Users/tomo.masuda/code/resea/servers/hello/Cargo.toml
- /Users/tomo.masuda/code/resea/servers/rand/Cargo.toml
make: *** [build/servers/rand.elf] Error 101
以下の通り、起動に成功しました。
...
[memmgr] entering mainloop...
[kernel] sys_open: created @memmgr.5
[kernel] sys_trasnfer: transfering @memmgr.5 -> @memmgr.2
[kernel] send: @memmgr.1 -> @kernel.2 => @kernel.1 (header=0000000005011008)
[kernel] recv: @kernel.1 <- @2 (header=0000000005011008, notification=0000000000000000)
[kernel] timer_create: id=2 initial=0, interval=0
[kernel] send: @kernel.2 -> @memmgr.1 => @memmgr.1 (header=0000000005810004)
[kernel] recv: @memmgr.1 <- @1 (header=0000000005810004, notification=0000000000000000)
[rand] Hello World from rand server!
[kernel] WARN: Exception #6
[kernel] WARN: RIP = 0000000001000022    CS  = 000000000000002b    RFL = 0000000000000202
[kernel] WARN: SS  = 0000000000000023    RSP = 0000000003000000    RBP = 0000000000000000
[kernel] WARN: RAX = 0000000000000000    RBX = 0000000000000000    RCX = 0000000001013f40
[kernel] WARN: RDX = 0000000000000001    RSI = 0000000002fffd68    RDI = 0000000002fffdc8
[kernel] WARN: R8  = 0000000000000001    R9  = 0000000000000000    R10 = 0000000000000000
[kernel] WARN: R11 = 0000000000000206    R12 = 0000000000000000    R13 = 0000000000000000
[kernel] WARN: R14 = 0000000000000000    R15 = 0000000000000000    ERR = 0000000000000000
[kernel] WARN: NYI: ignoring thread_kill_current (#rand.8)
アクティビティモニタからプロセスを強制終了します。
make: *** [run] Killed: 9
$
先に進めたら、追記するかもしれません。