この記事はコネヒト Advent Calendar 2019 3日目の記事になります。
はじめに
Android Studio 4.0 Canary 4に新機能として導入されたMotion Editorについて調べてみたので、公開されているMotionLayoutのサンプルコードをベースに、どのように利用されているのか紹介します。
MotionLayoutとは?
- ConstraintLayout 2.0に含まれている機能
- 始まりと終わりのレイアウトをXMLで定義することによって簡単にアニメーションを実装することができる
Motion Editorとは?
- Android Studio 4.0 CanaryからMotion Editor導入された
- IDE内でViewの関係性やアニメーションを確認、設定できる
サンプルコードの紹介
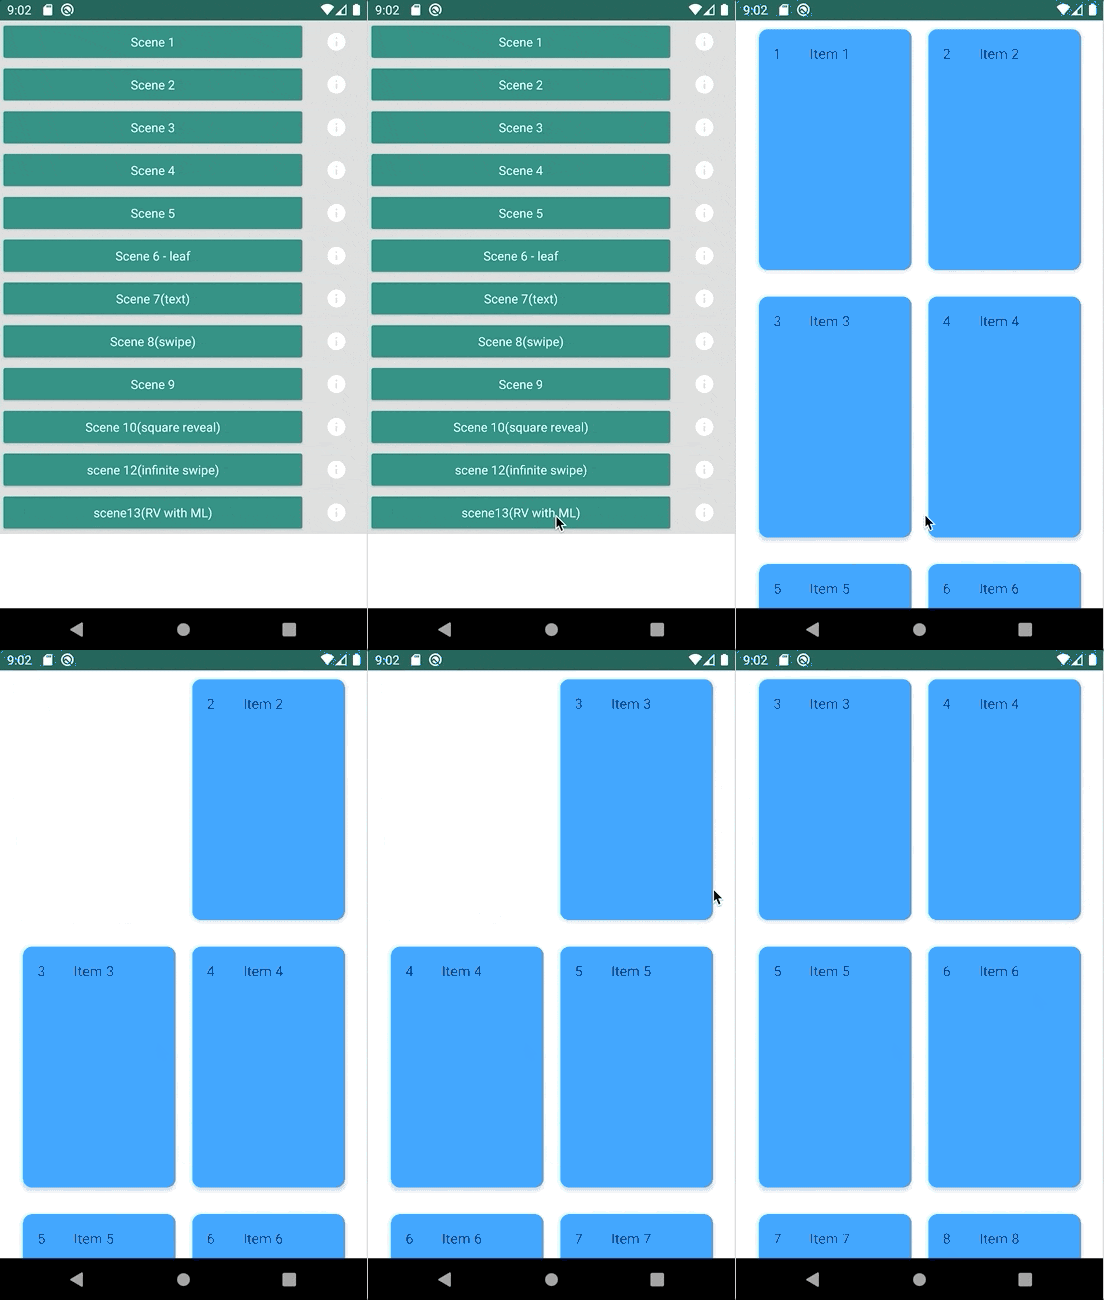
今回利用したサンプルコードはPiotrPrusさんのMotionLayoutPlaygroundリポジトリです。こちらのリポジトリでは、いくつかMotionLayoutのサンプルがありますが、「scene13(RV with ML)」のTinder風アニメーションのMotionLayoutについて紹介します。まずは以下のキャプチャを見て挙動を確認しましょう。
グリッドリスト上に複数のCardViewがあり、そのCardViewを左にスワイプする(like)と、リストから削除されます。反対に右にスワイプする(dislike)と先ほどと同様にリストから削除されるようにMotionLayoutで実装されています。
サンプルコードの解説
対象画面のコード一式は下記の通りです。
- Scene13Fragment.kt Like/DisLikeできるグリッドリスト画面
- MySceneGridItemRecyclerViewAdapter.kt グリッドリスト用のアダプター
- fragment_scene13.xml Fragmentのレイアウト
- item_scene_13_grid.xml グリッドリストのレイアウト
- ml_scene_13.xml MotionSceneのレイアウト
item_scene_13_grid.xmlの中身を見てみると、Viewの要素にCardViewとそれに対応したlike、dislike用のオーバーレイが配置されています。
<?xml version="1.0" encoding="utf-8"?>
<androidx.constraintlayout.motion.widget.MotionLayout xmlns:android="http://schemas.android.com/apk/res/android"
    xmlns:app="http://schemas.android.com/apk/res-auto"
    xmlns:tools="http://schemas.android.com/tools"
    android:layout_width="match_parent"
    android:layout_height="300dp"
    android:clipChildren="false"
    android:clipToPadding="false"
    app:layoutDescription="@xml/ml_scene_13">

    <!-- CardView -->
    <com.google.android.material.card.MaterialCardView
        android:id="@+id/cardViewScene13"
        android:layout_width="match_parent"
        android:layout_height="match_parent"
        android:background="@color/colorGrey"
        app:cardBackgroundColor="@color/colorBlue"
        app:cardCornerRadius="10dp"
        app:cardElevation="4dp">

        <LinearLayout
            android:layout_width="match_parent"
            android:layout_height="match_parent"
            android:orientation="horizontal">

            <TextView
                android:id="@+id/item_number"
                android:layout_width="wrap_content"
                android:layout_height="wrap_content"
                android:layout_margin="@dimen/text_margin"
                android:textAppearance="?attr/textAppearanceListItem"
                tools:text="1" />

            <TextView
                android:id="@+id/content"
                android:layout_width="wrap_content"
                android:layout_height="wrap_content"
                android:layout_margin="@dimen/text_margin"
                android:textAppearance="?attr/textAppearanceListItem"
                tools:text="test" />
        </LinearLayout>
    </com.google.android.material.card.MaterialCardView>

    <!-- Like用のオーバーレイ -->
    <View
        android:id="@+id/cardScene13LikeOverlay"
        android:layout_width="0dp"
        android:layout_height="0dp"
        android:background="@drawable/frame_overlay_like"
        app:layout_constraintBottom_toBottomOf="@id/cardViewScene13"
        app:layout_constraintEnd_toEndOf="@id/cardViewScene13"
        app:layout_constraintStart_toStartOf="@id/cardViewScene13"
        app:layout_constraintTop_toTopOf="@id/cardViewScene13" />

    <!-- Dislike用のオーバーレイ -->
    <View
        android:id="@+id/cardScene13DislikeOverlay"
        android:layout_width="0dp"
        android:layout_height="0dp"
        android:background="@drawable/frame_overlay_dislike"
        app:layout_constraintBottom_toBottomOf="@id/cardViewScene13"
        app:layout_constraintEnd_toEndOf="@id/cardViewScene13"
        app:layout_constraintStart_toStartOf="@id/cardViewScene13"
        app:layout_constraintTop_toTopOf="@id/cardViewScene13" />
</androidx.constraintlayout.motion.widget.MotionLayout>
Motion Editorで処理の流れを見る
では、MotionLayoutの構成を見てみましょう。

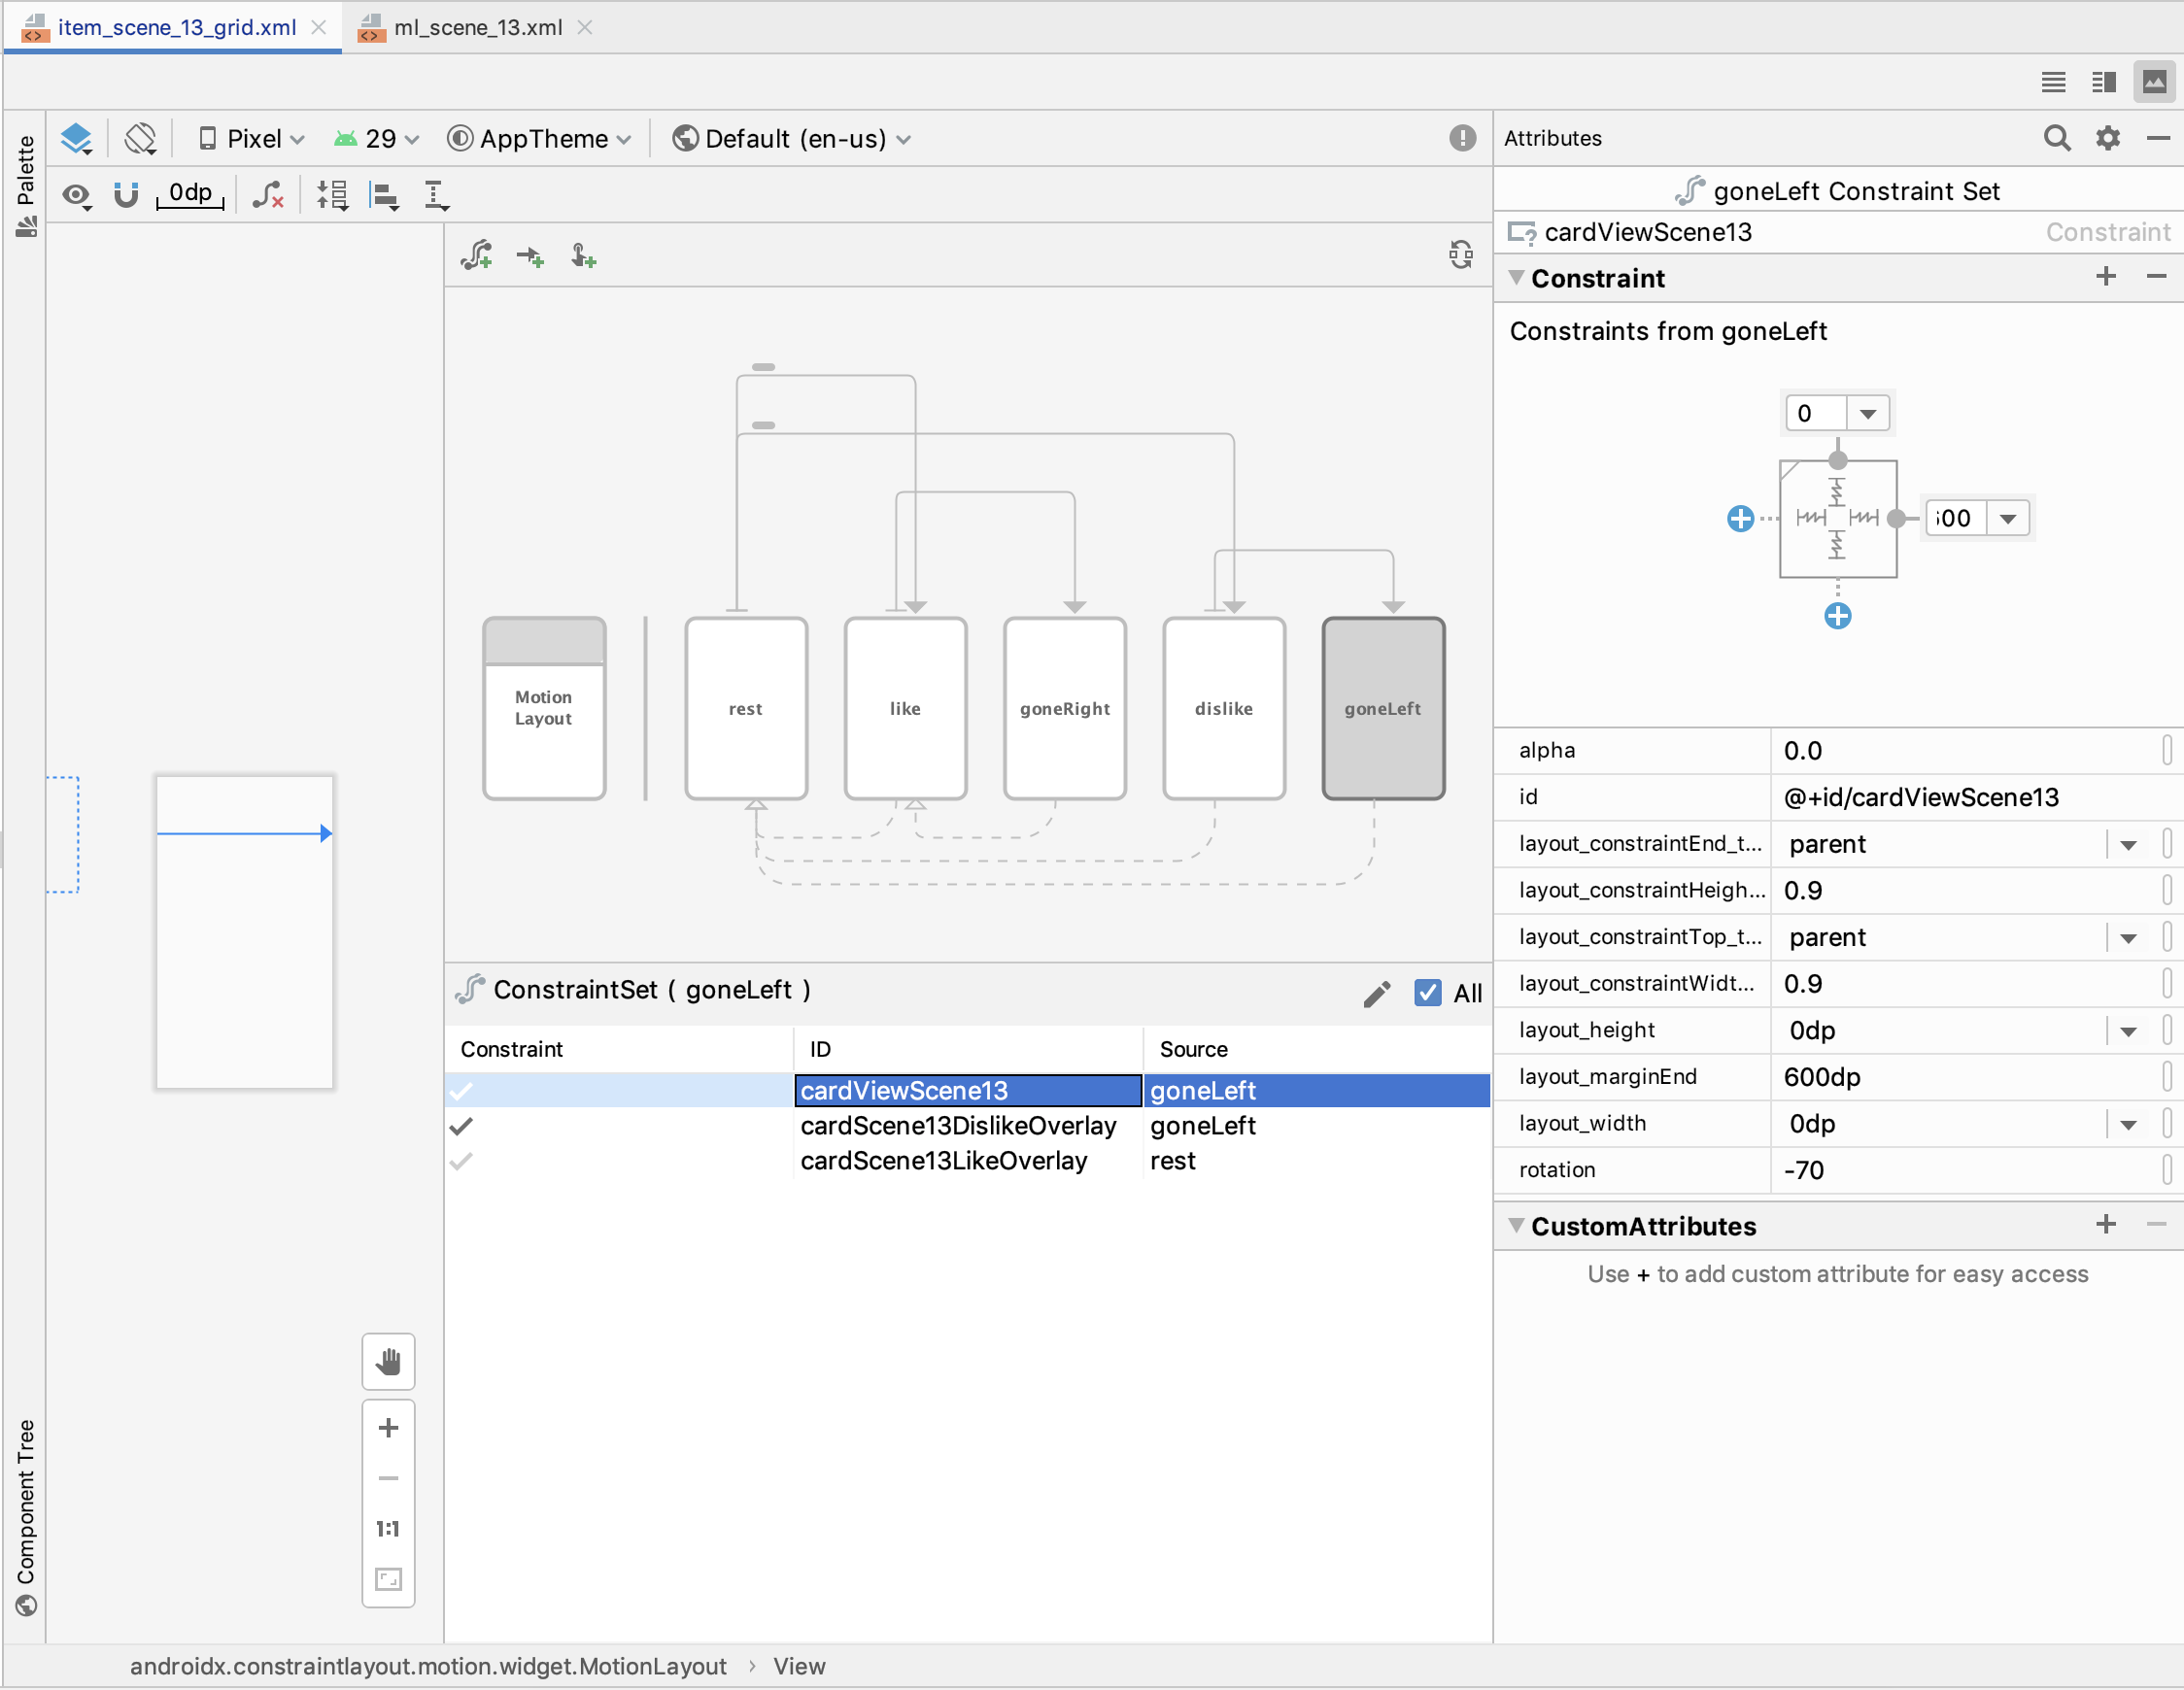
グリッドリスト部分に当たる、item_scene_13_grid.xmlをMotion Editorを開いたキャプチャです。これまではXMLで書いていたものが、GUIで表示、設定できるようになりました!Motion Editorを見てみると、5つのConstraintSetで構成されています。
- rest : 初期状態
- like : いいね
- goneRight : 右に消える
- dislike : 好まない
- goneLeft : 左に消える
ConstraintSetとは、Viewの状態を定義でき、例えば初めのViewの状態と終わりのViewの状態やアニメーションを定義することができます。これら複数のConstraintSetをどのように組み合わせてlike、dislikeの処理を行なっているのでしょうか?それぞれ確認してみたい思います。
like処理
ConstraintSet rest
CardViewを表示する部分に当たるConstraintSet restを選択すると、ConstraintSetの中に3つのConstraintが定義されていて、cardViewScene13、cardScene13LikeOverlay、cardScene13DislikeOverlayのConstraintがあります。さらにConstraint cardViewScene13を選択すると、それぞれプロパティが設定されています。
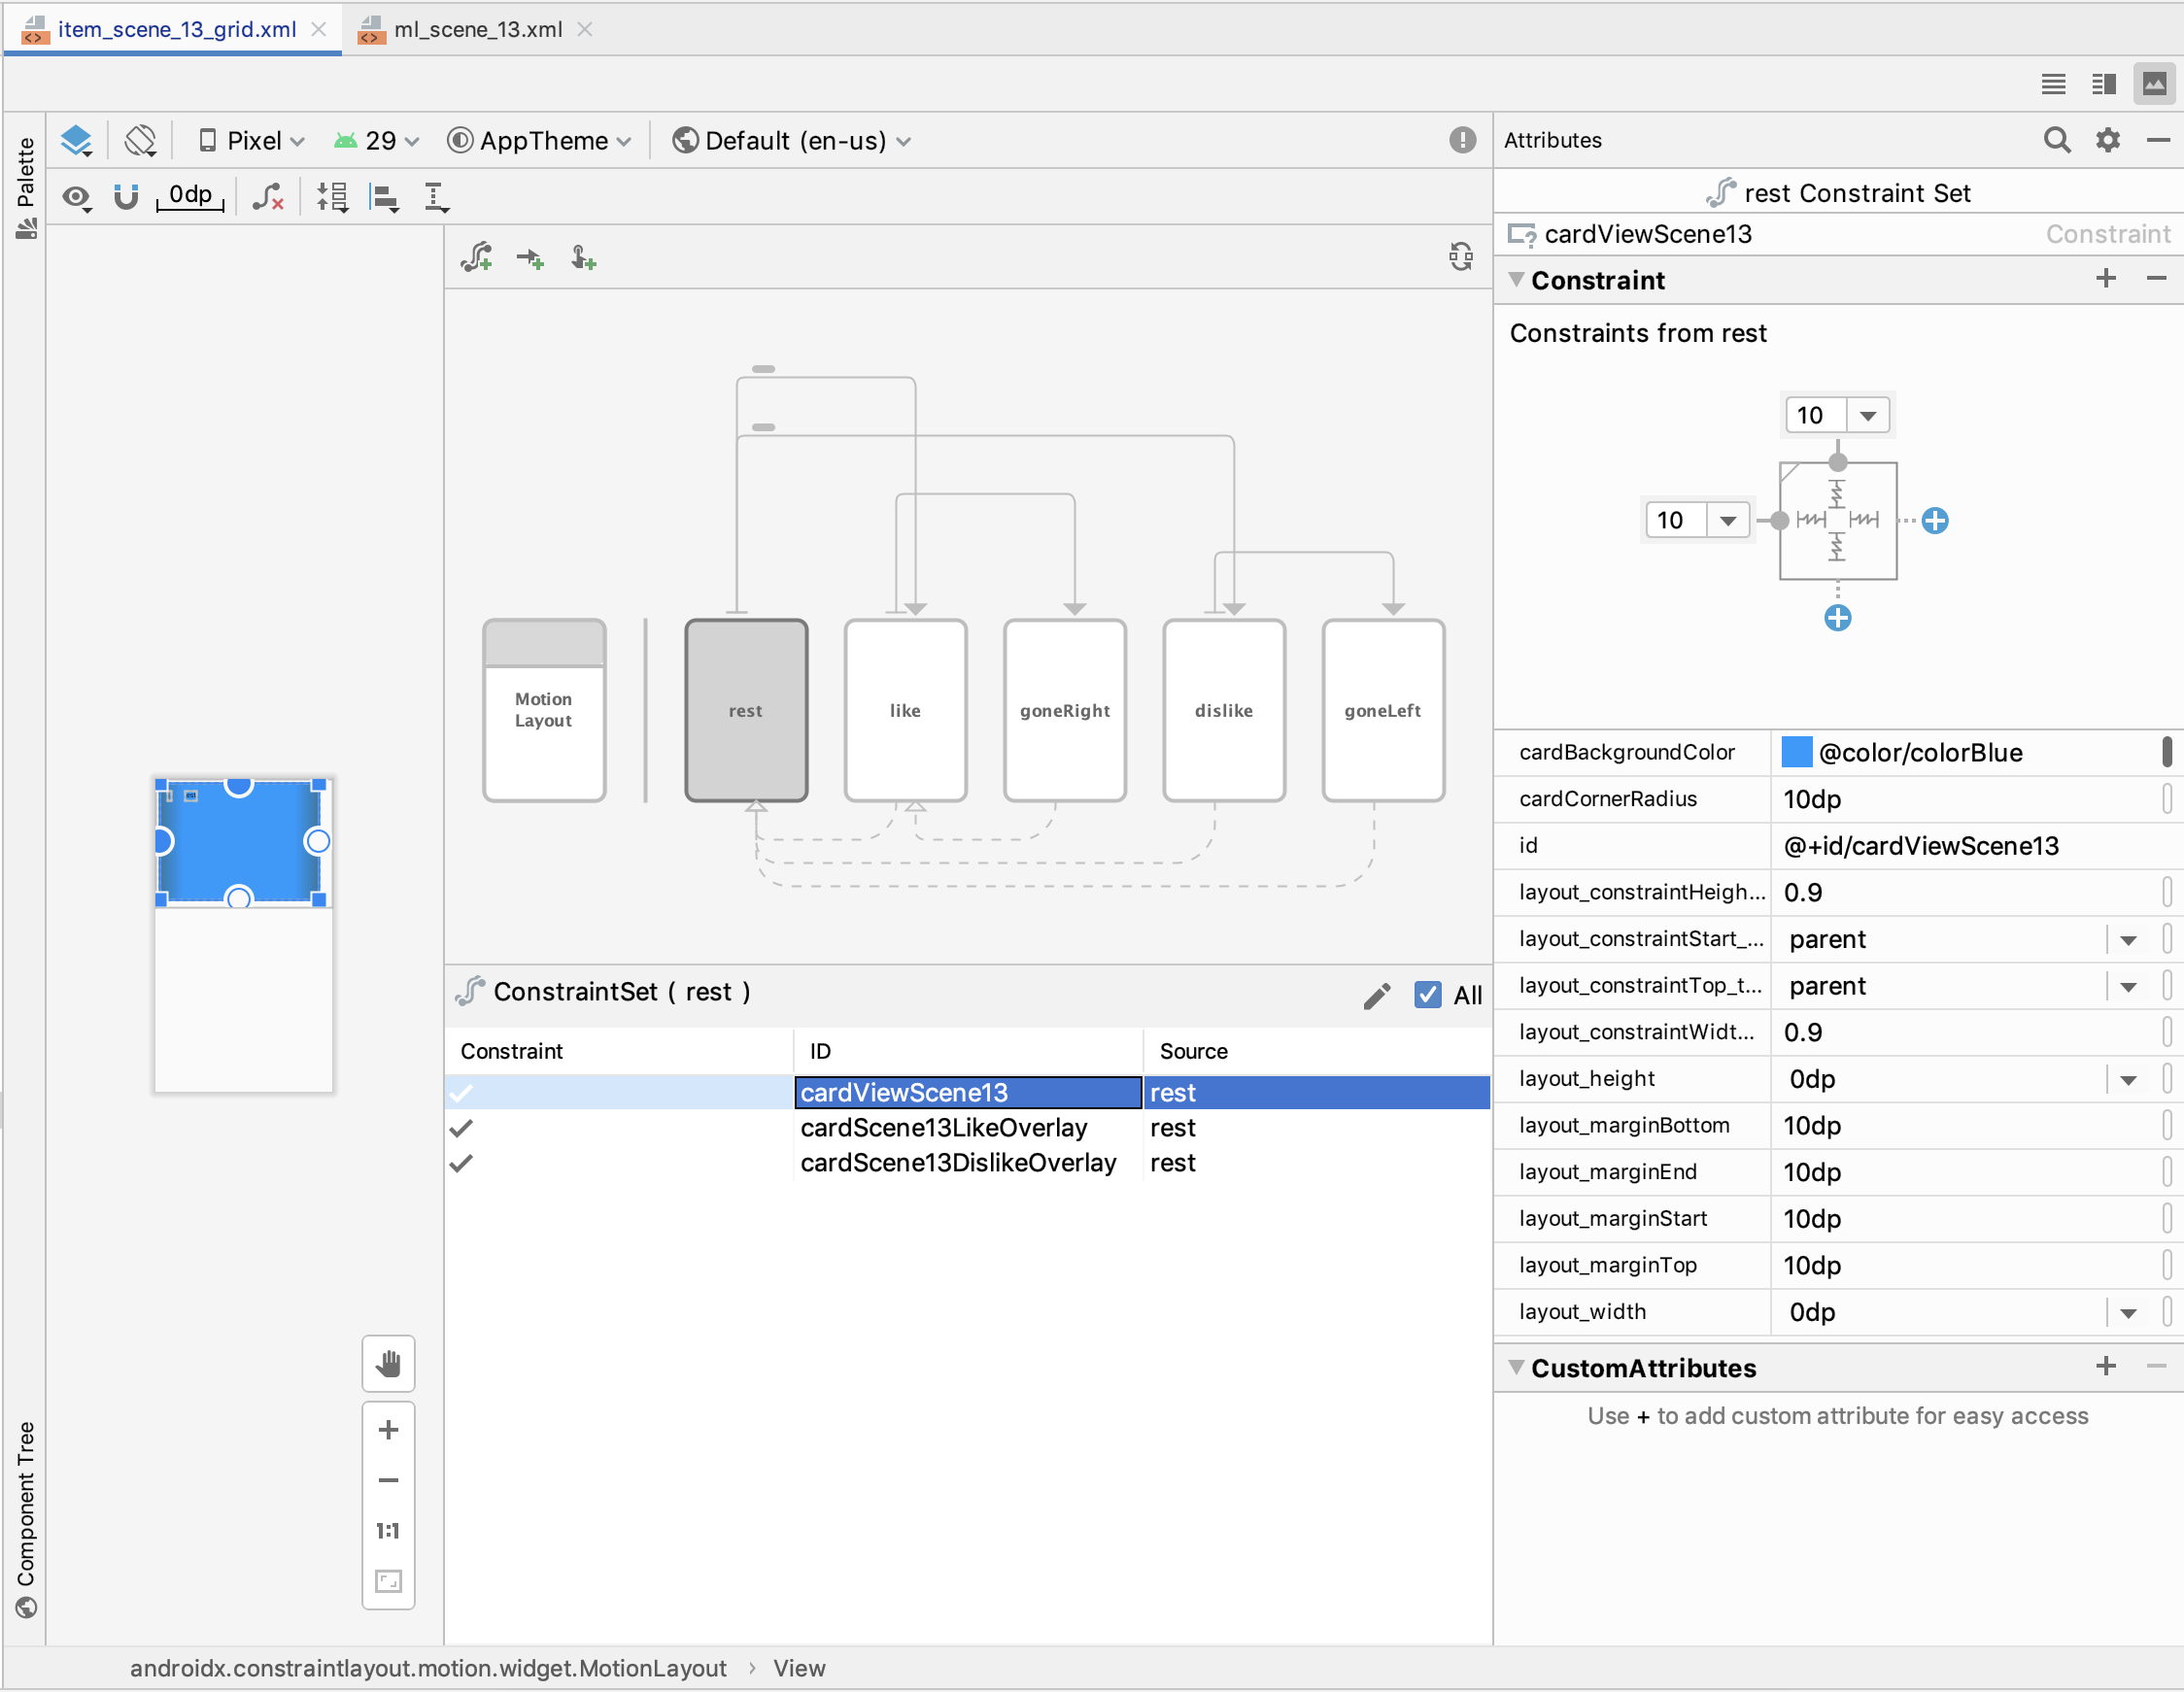
ConstraintSet restを矢印がlikeとdislikeのConstraintSetに設定されています。まずはlikeの矢印を見てみますが、矢印はTransitionを表します。Transitionを再生すると右に回転していくことがわかります。

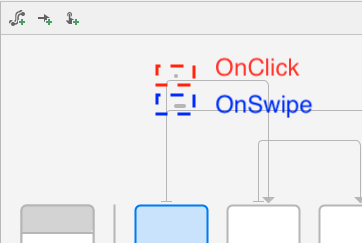
ちなみにrestからlikeのTransition上のマークはスワイプやクリックイベントを表すマークとなっています。
ConstraintSet like
次にいいねの処理に当たる、ConstraintSet likeについて見てみます。CardViewが回転されている状態であることがわかります。
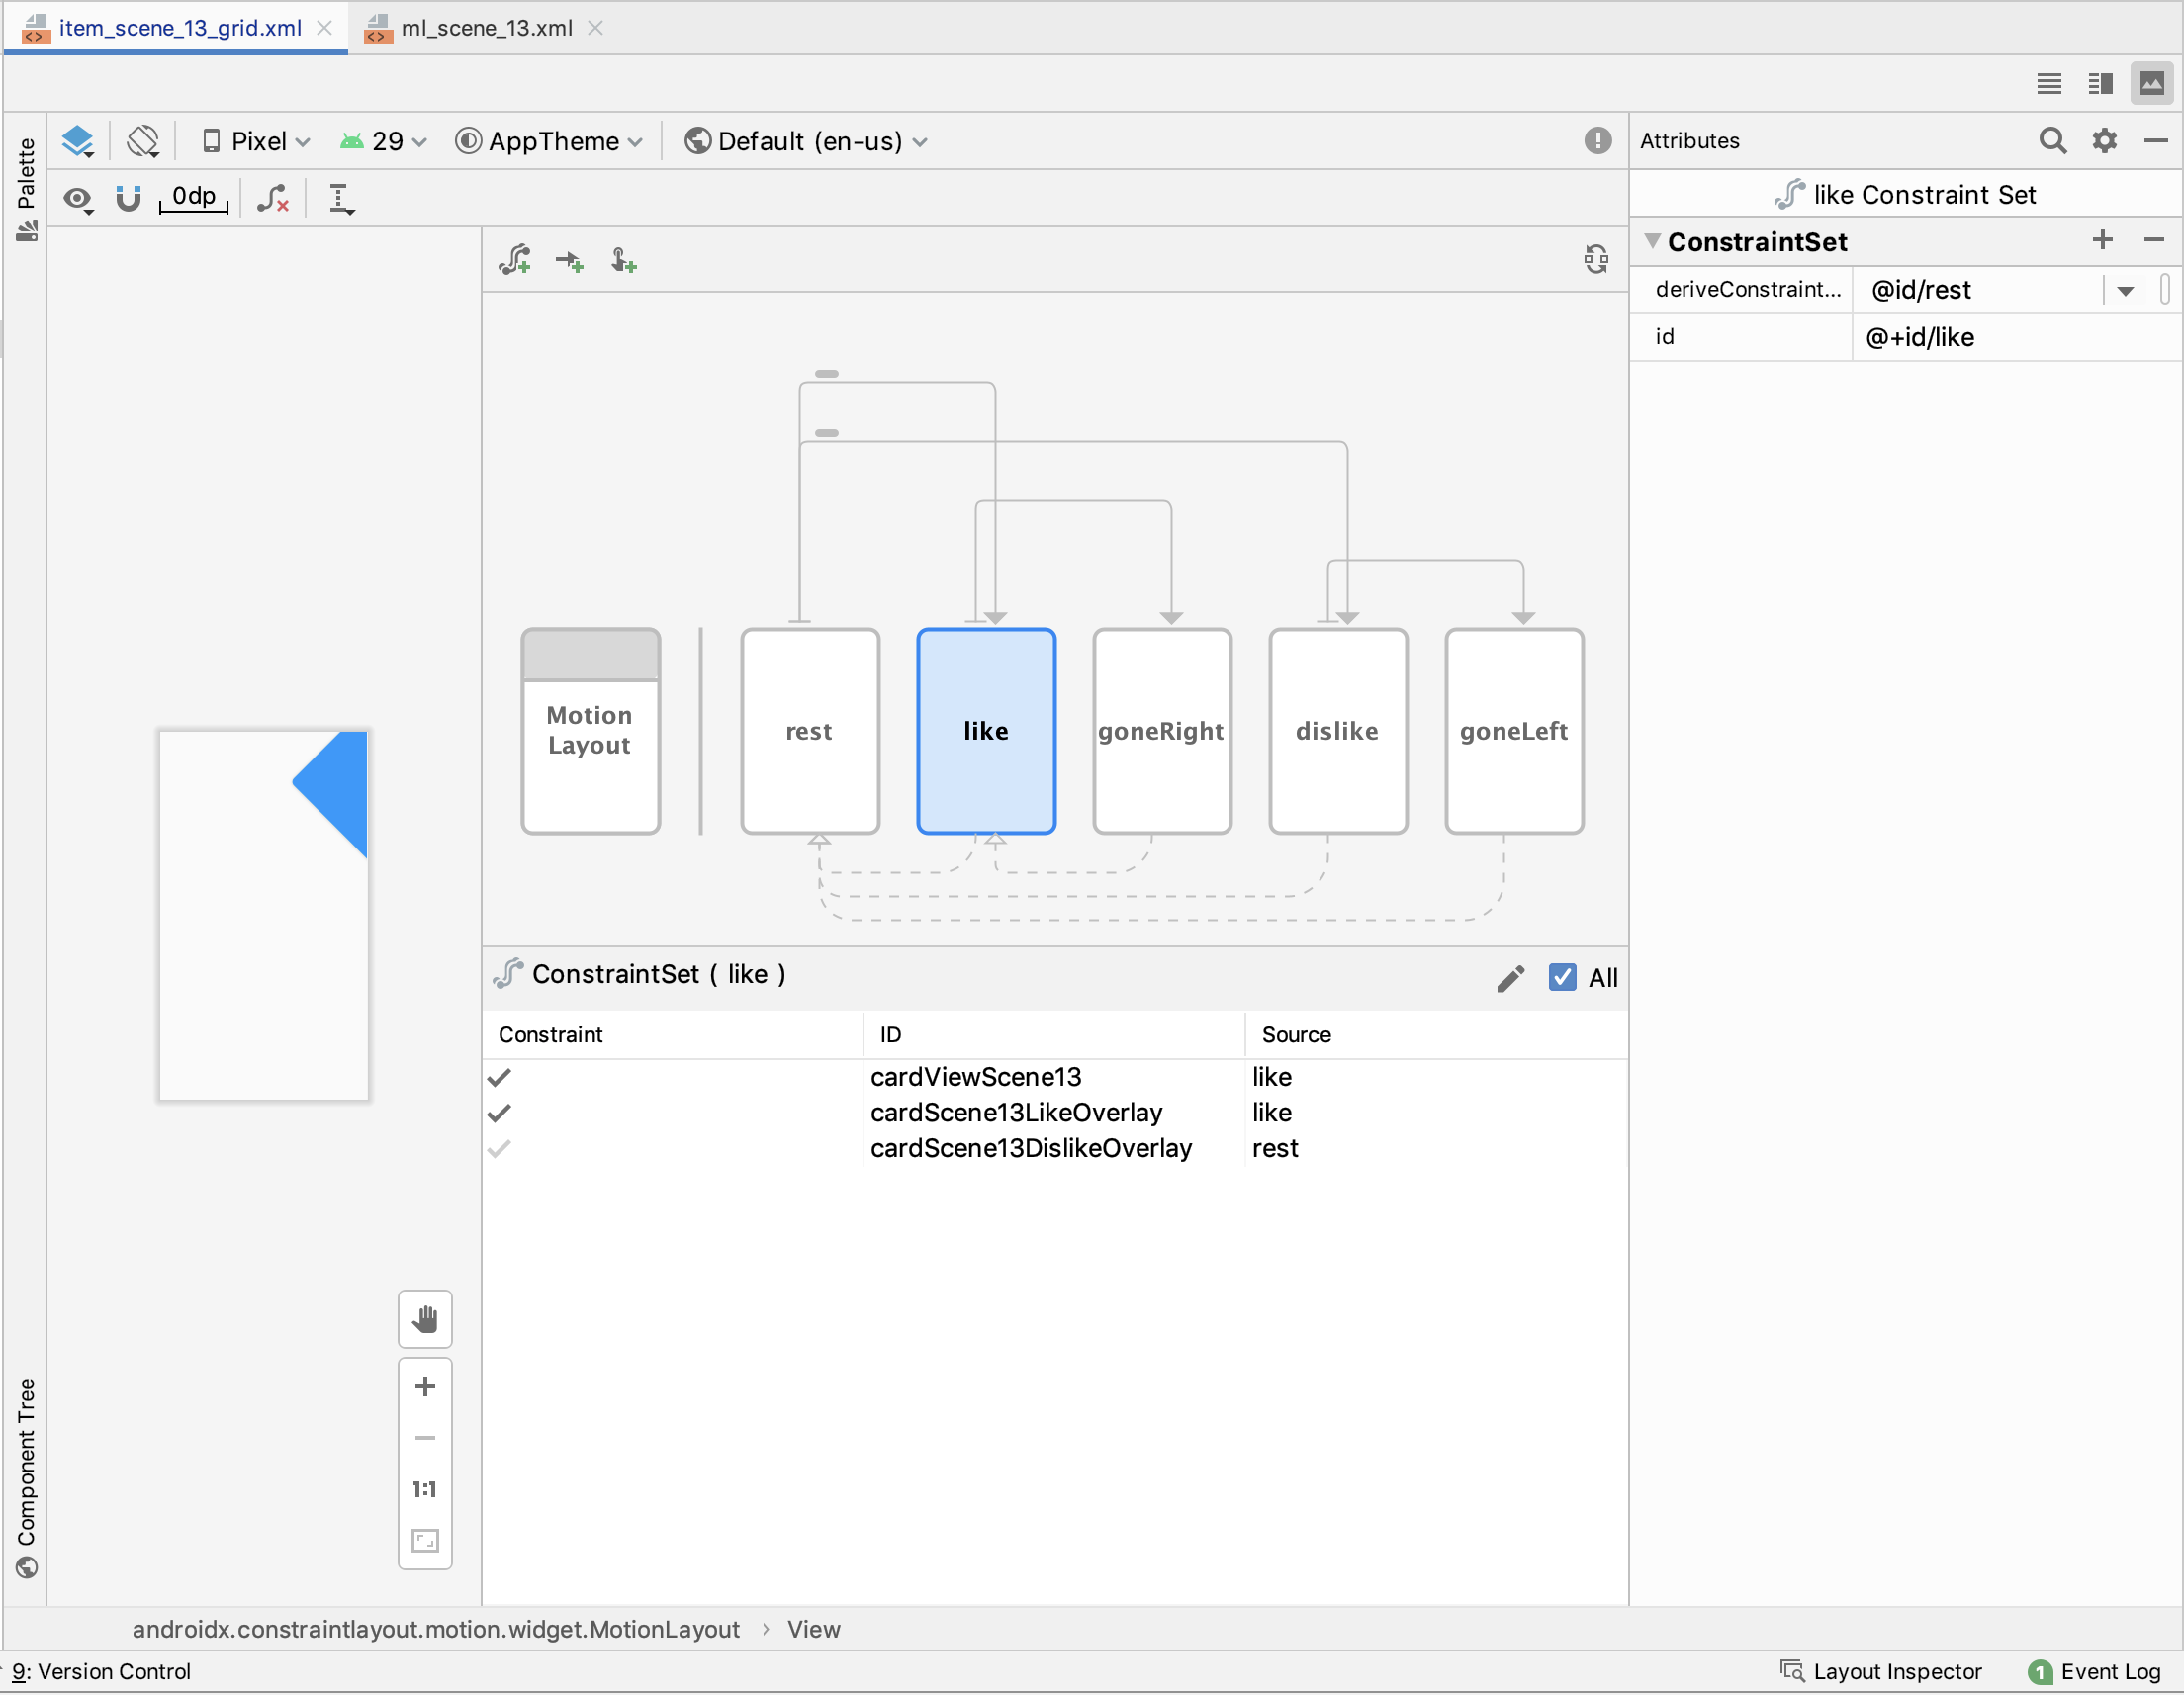
Constraint cardViewScene13で右にローテーションしていることがわかります。
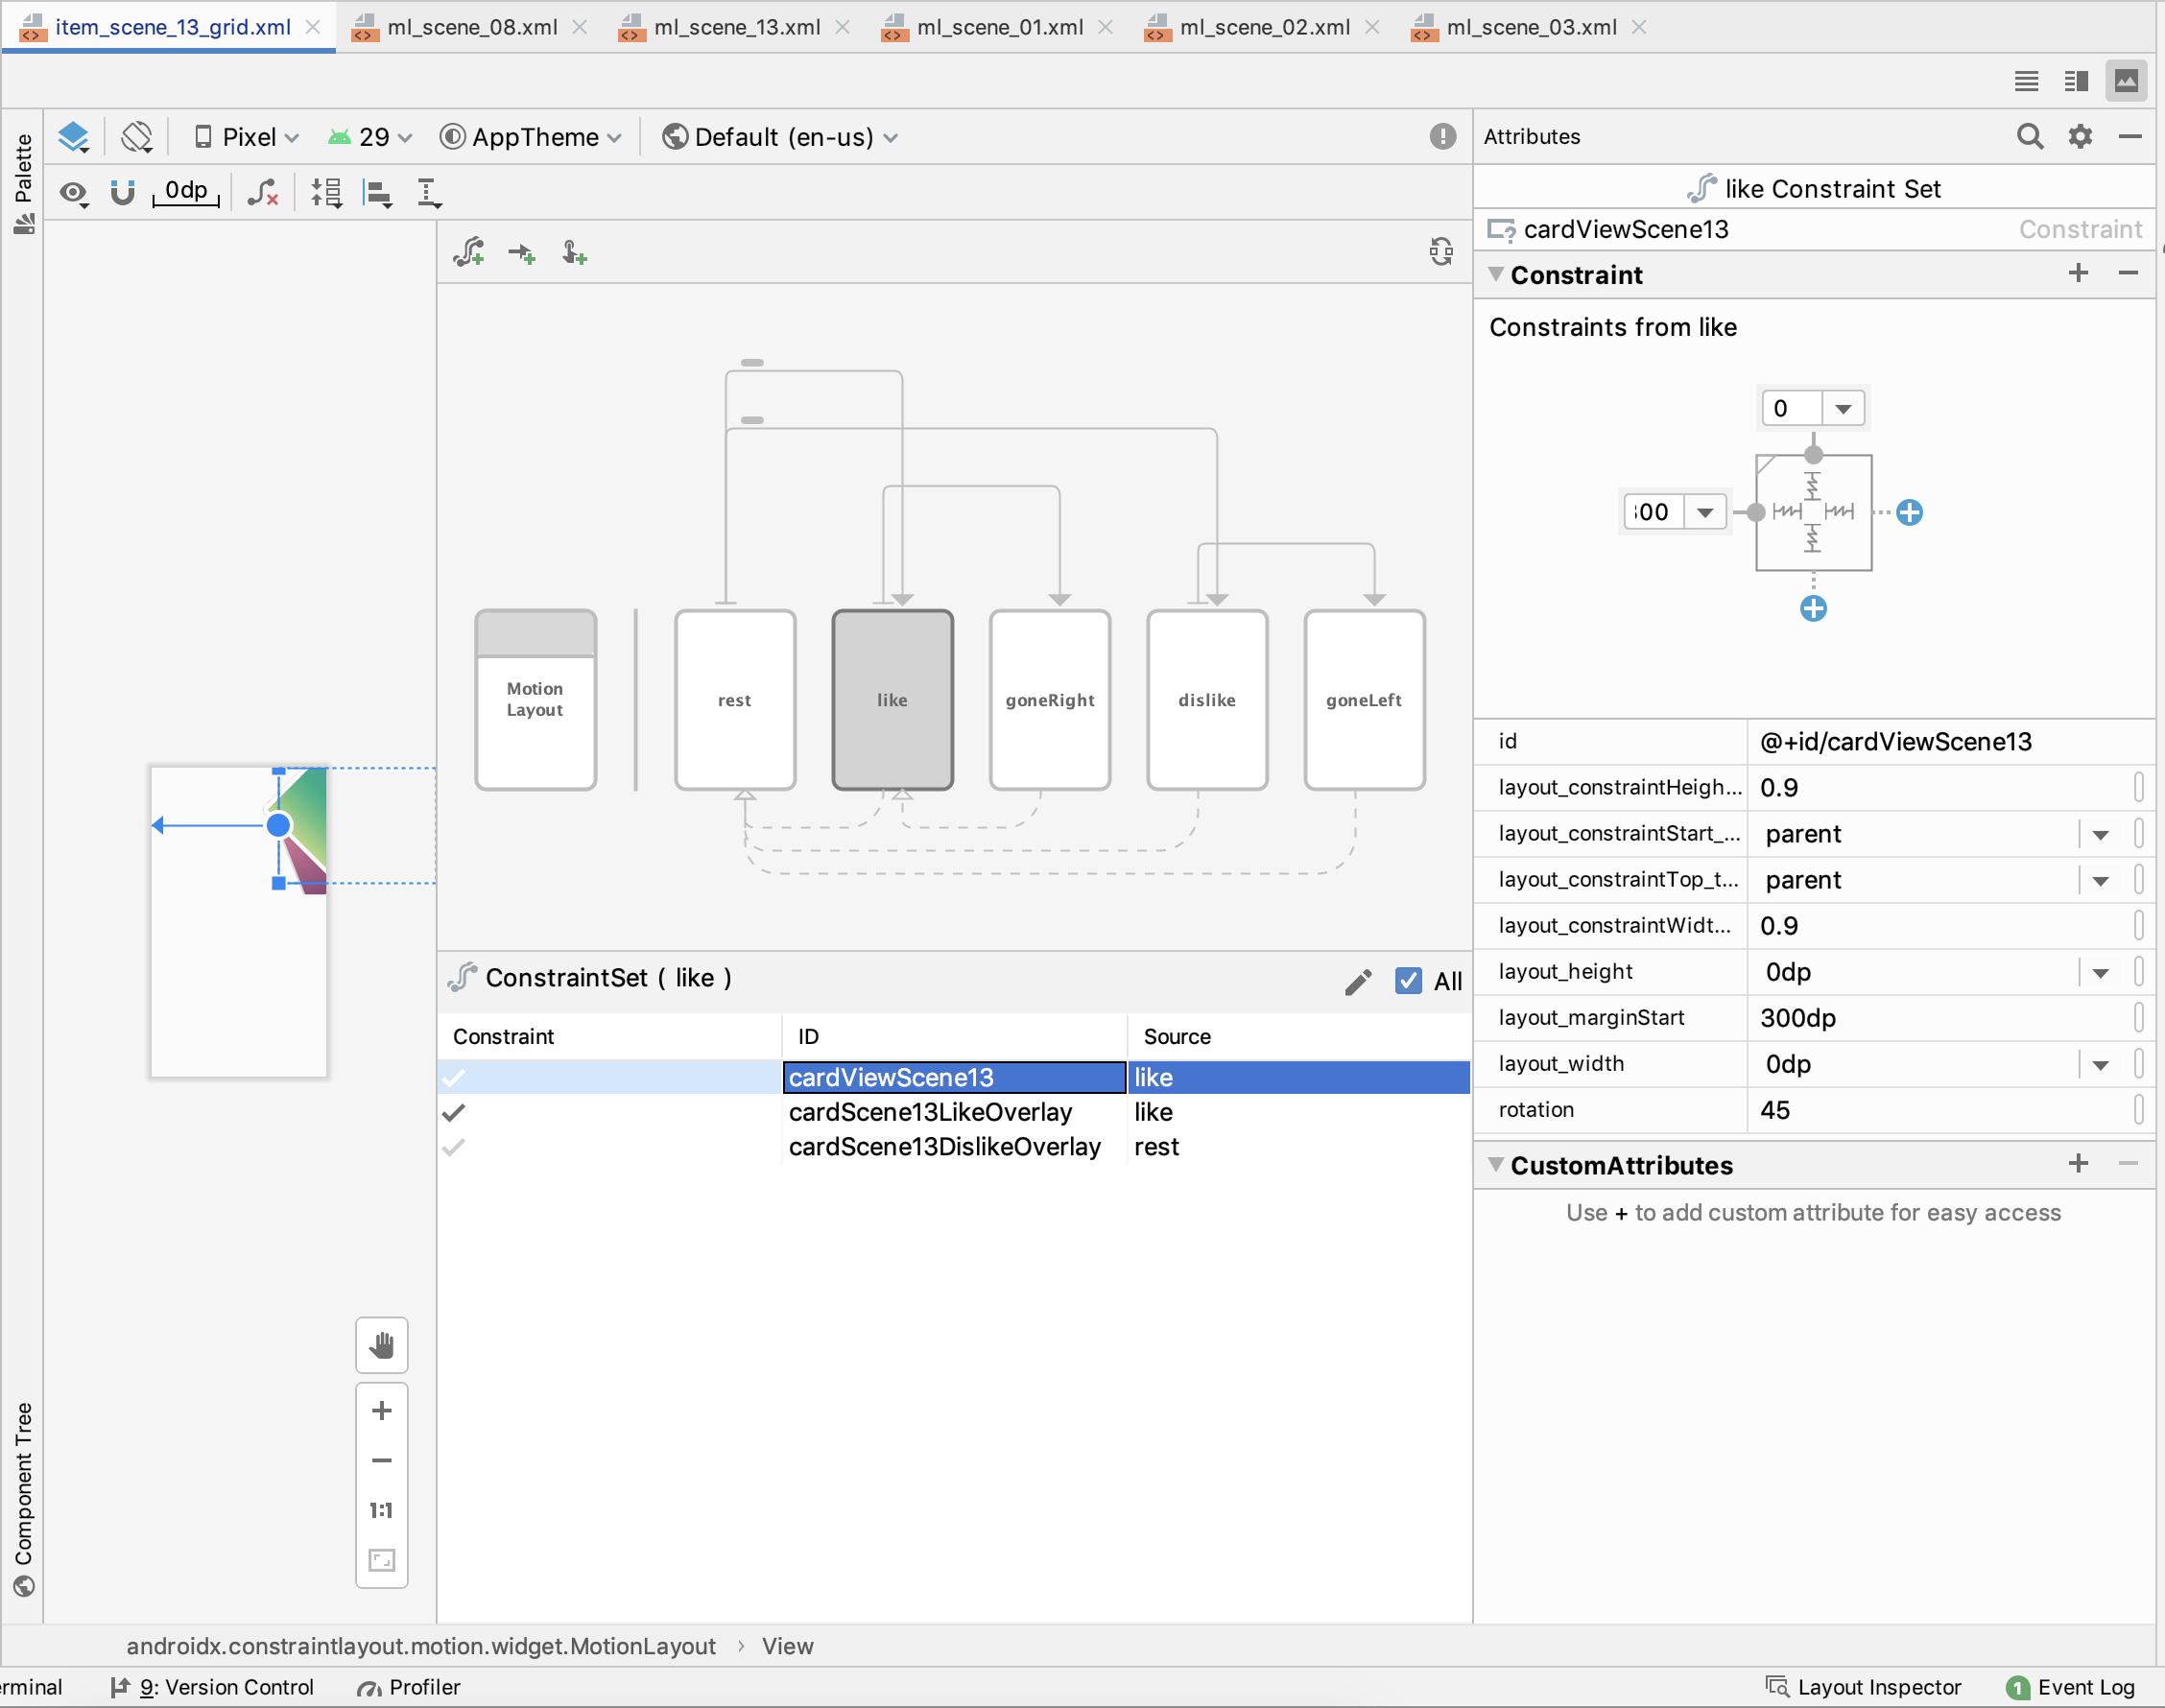
次にTransitionがlikeからgoneRightへと定義されており、Transitionを再生してみるとViewが画面外に移動し見えなくなることがわかります。autoTransitionプロパティにanimateToEndが設定されていますが、これによってlikeからgoneRight状態に自動的にアニメーション化されます。
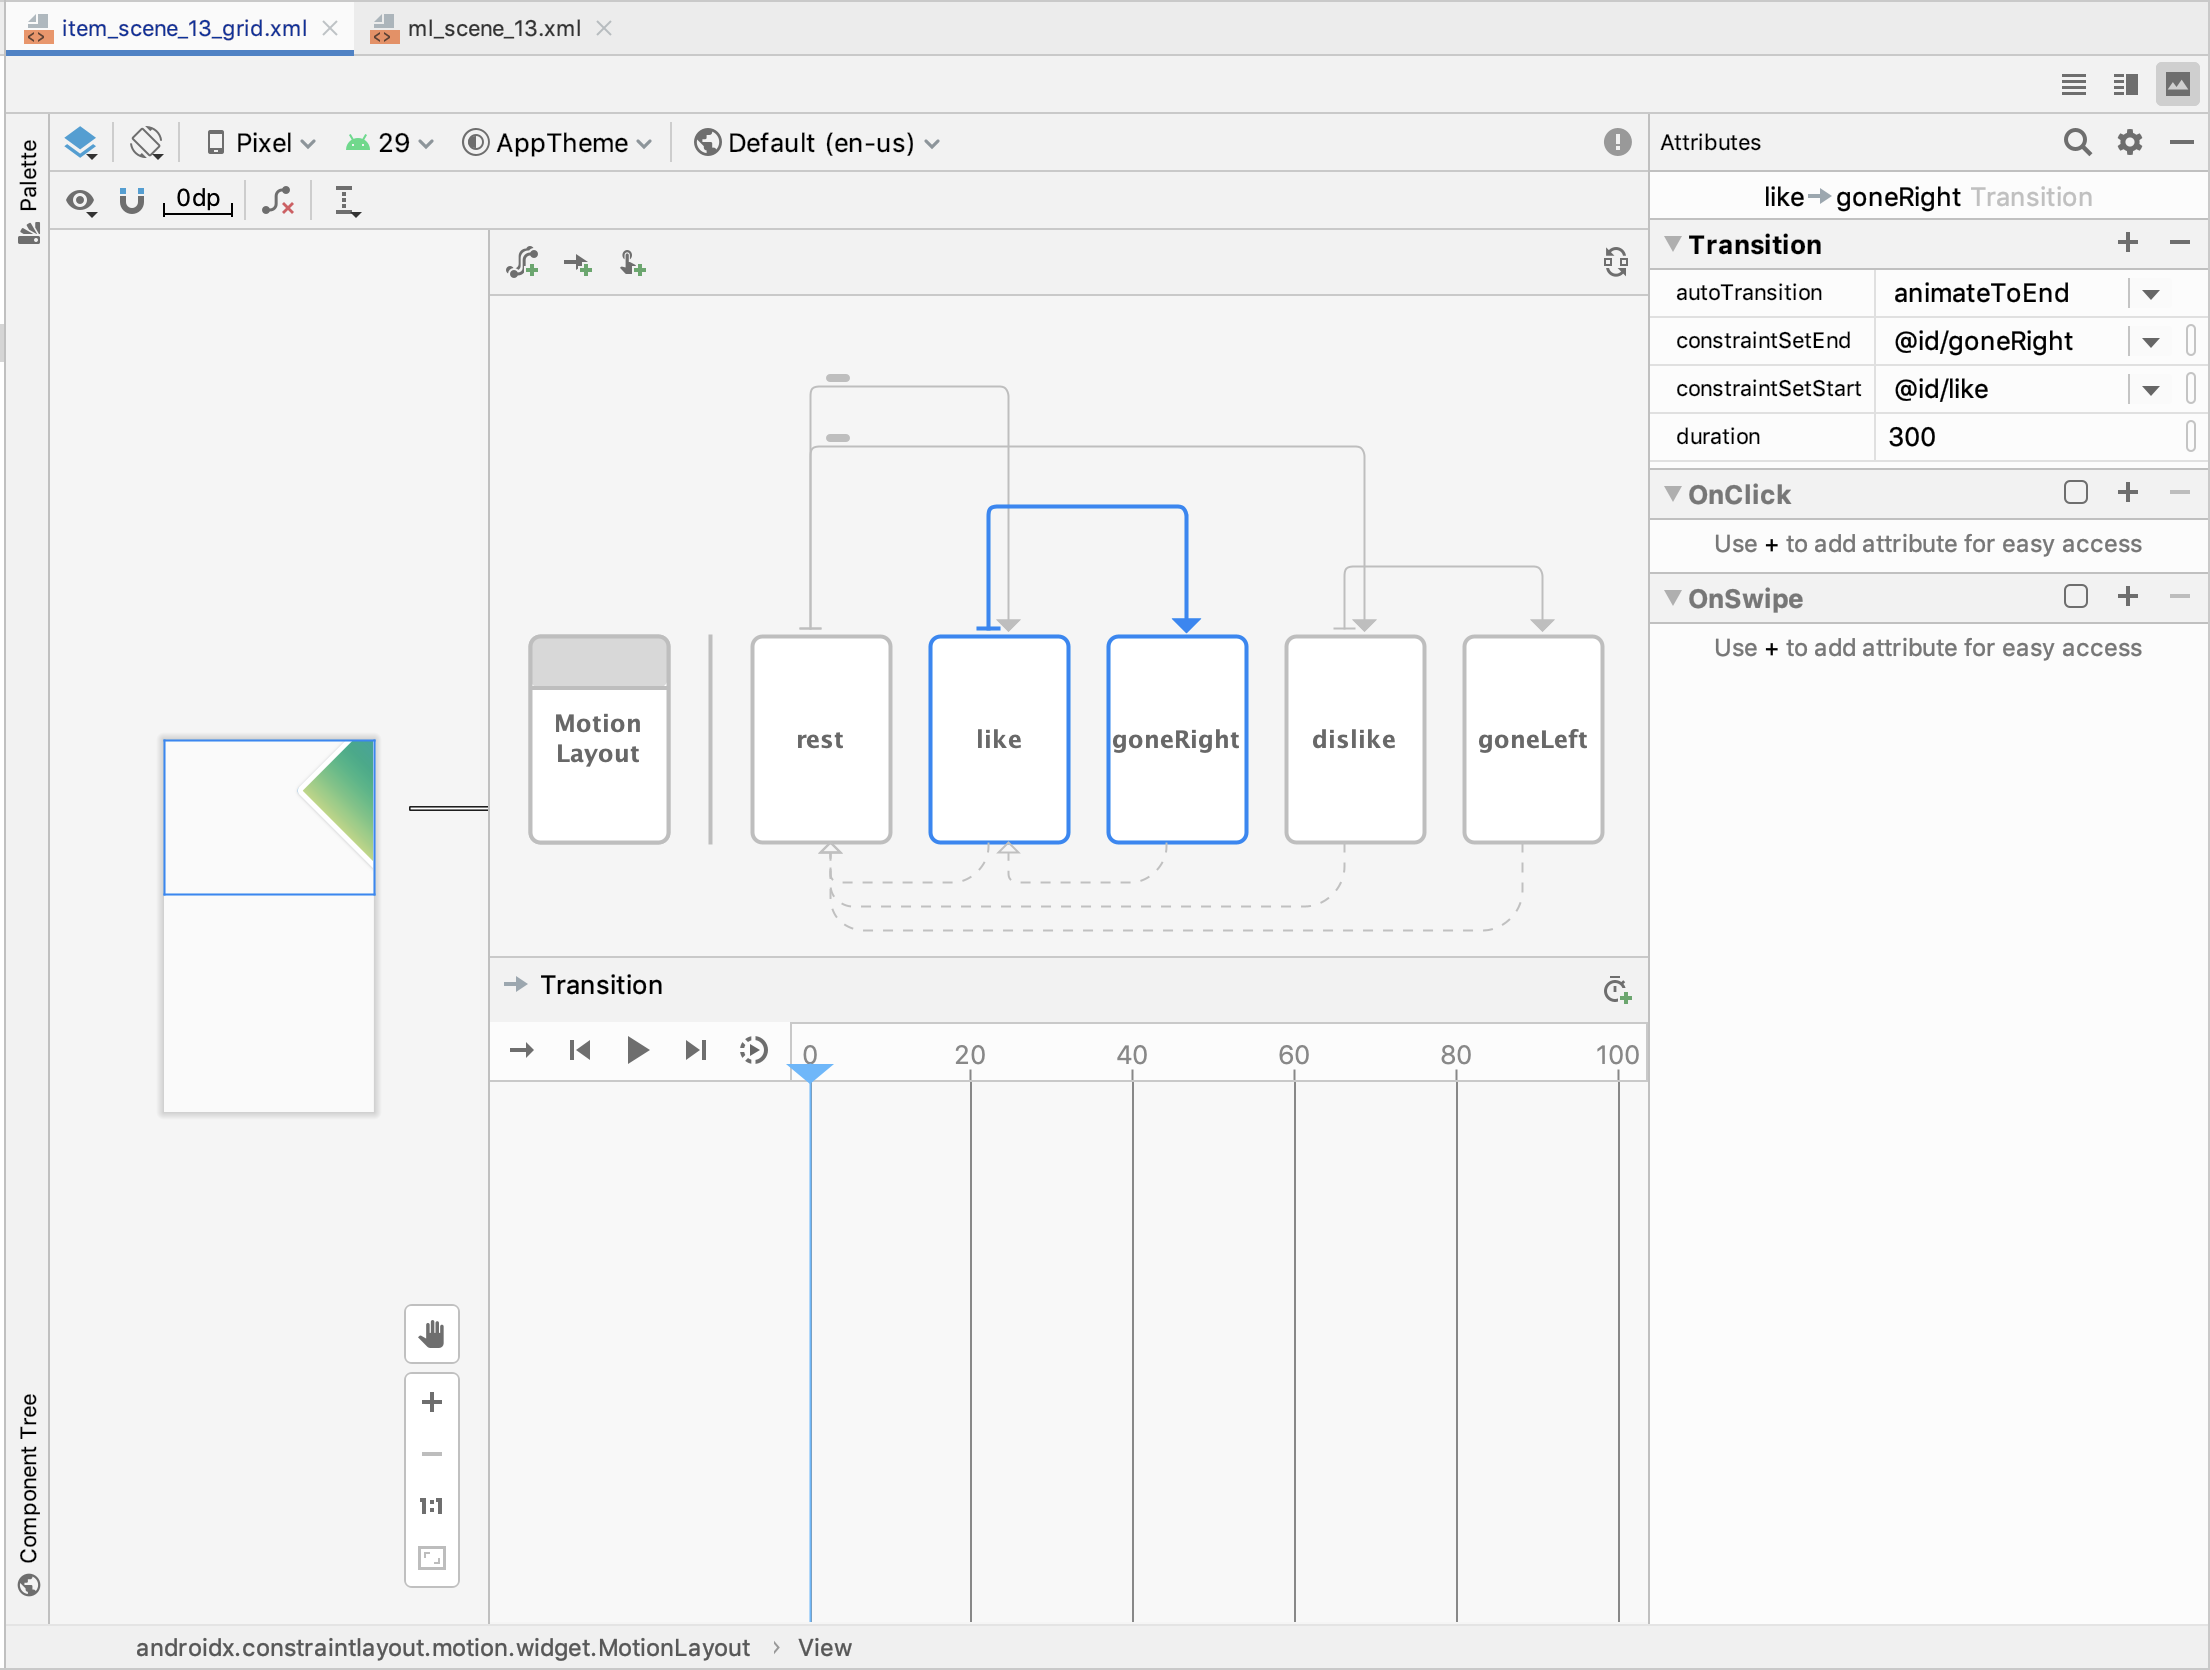
ConstraintSet goneRight
ここまでrestからlike、goneRightまでConstraintSetを組み合わせてアニメーションを実装していることがわかりました。ConstraintSet goneRightの中にはConstraintとして、cardViewScene13などが定義されており、左のプレビューからcardViewScene13が画面でかつalpha0になっていることがわかります。このようにして右スワイプしてCardViewが消えるアニメーションを実装されています。

以上がlike処理になります。restなどのConstraintSet以下に破線がありますが、これはConstraintSetのderiveConstraintsFromプロパティを利用すると表示されます。likeの場合はrestから派生しているという意味になります。リストから削除されている部分については、コード側で実装されているため別途後述します。次にdislike処理についても確認します。
dislike処理
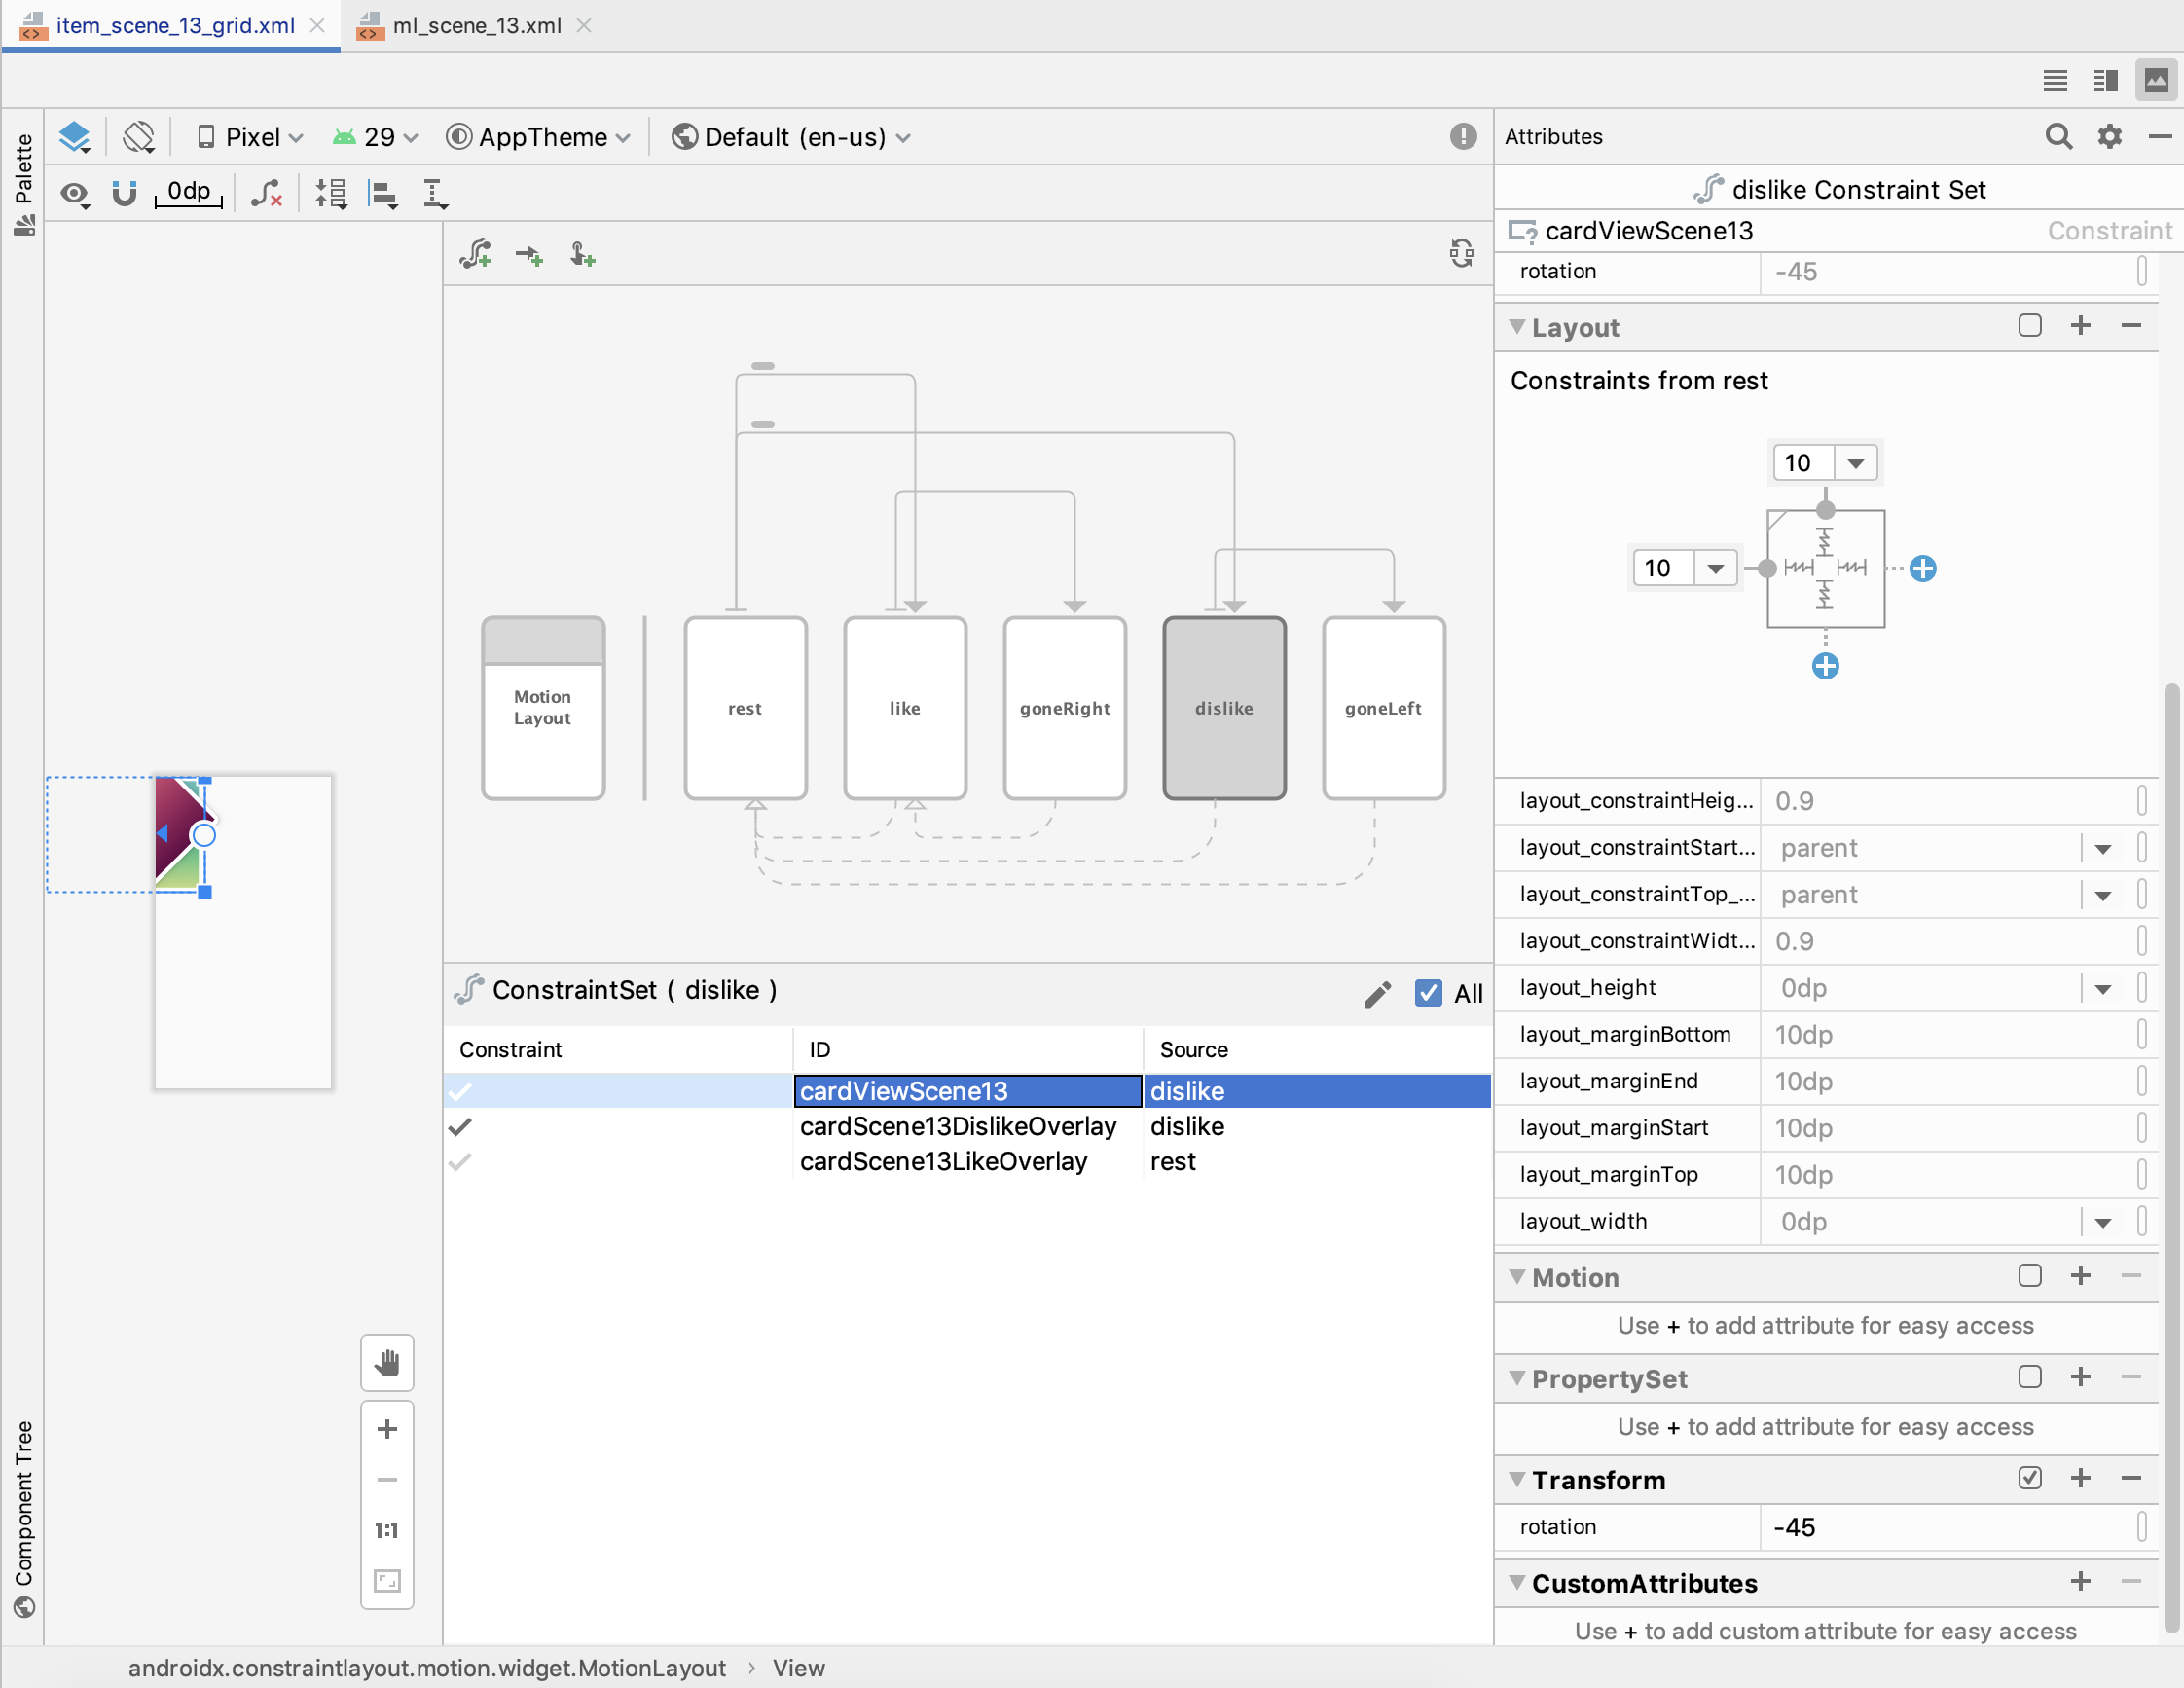
ConstraintSet dislike
likeと同様にConstraintSetでrestからdislikeが定義されています。左スワイプをされるとローテートされた状態がConstraintSet dislikeです。さらにConstraintSet dislikeのcardViewScene13を見てみると左向きにローテーションされているのがわかります。
次にTransitionを見てみるとConstraintSet dislikeからConstraintSet goneLeftに設定されているのがわかります。
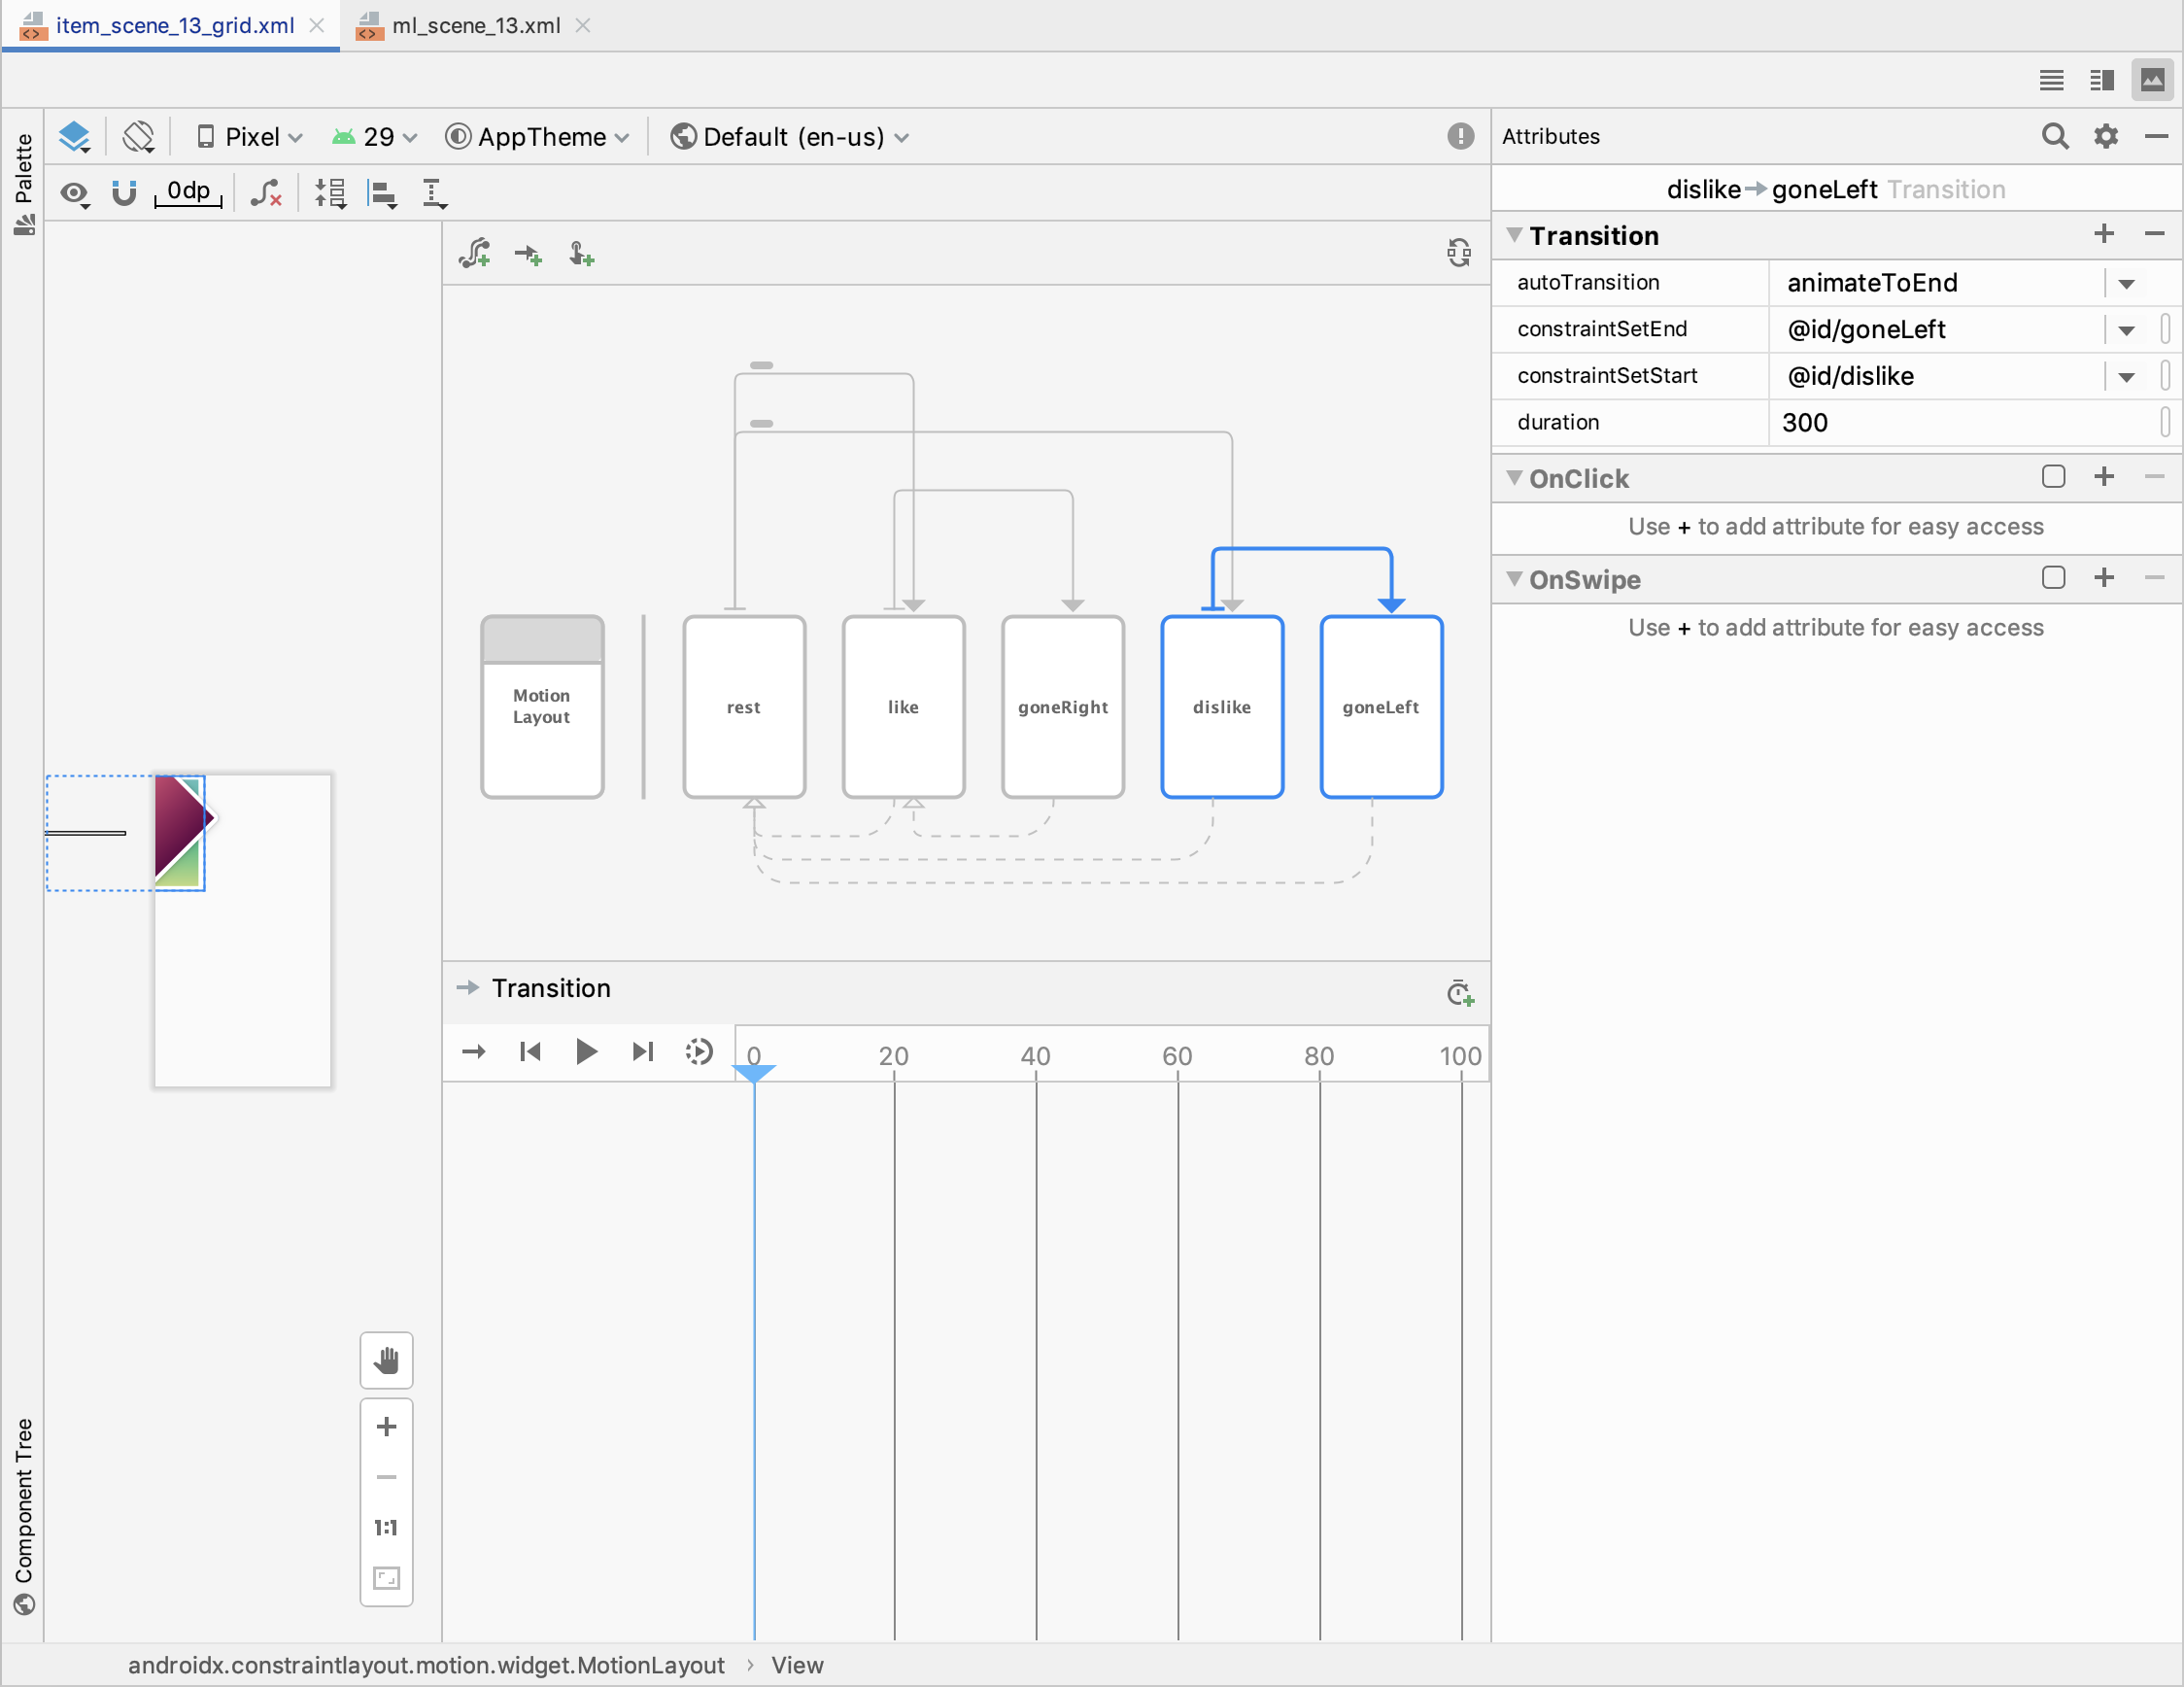
ConstraintSet goneLeft
rest -> dislike -> goneLeft ConstraintSetとTransitionが定義されており、goneLeftでは、alpha:0で透過し、rotation:-70、layout_marginEnd:600dpで画面外にViewが移動していることがわかります。ここまでがdislikeのアニメーションになります。
like、dislike後のリスト削除
likeとdislike後にリストから削除されるようになっていて、ここの部分はコード側で実装されているため解説します。
Scene13Fragmentでは、MySceneGridItemRecyclerViewAdapterを使っています。リスト削除についてですが、MotionLayout.TransitionListenerインターフェースが提供されていて、goneRight、goneLeftのトランジッションが完了したタイミングでリストから削除しています。
class MySceneGridItemRecyclerViewAdapter(
    private val mValues: MutableList<DummyItem>,
    private val animationListener: (state: AnimationState) -> Unit
) : RecyclerView.Adapter<MySceneGridItemRecyclerViewAdapter.ViewHolder>() {
    // 〜省略〜

    private val removeItemListener: (Int) -> Unit = {
        Handler().postDelayed({
            mValues.removeAt(it)
            notifyDataSetChanged()
        }, 100)
    }

    inner class ViewHolder(val mView: View, removeItemListener: (Int) -> Unit) :
        RecyclerView.ViewHolder(mView) {
        val mIdView: TextView = mView.item_number
        val mContentView: TextView = mView.content
        internal var position = 0

        override fun toString(): String {
            return super.toString() + " '" + mContentView.text + "'"
        }

        init {
            (mView as MotionLayout).setTransitionListener(object : MotionLayout.TransitionListener {
                override fun onTransitionTrigger(
                    p0: MotionLayout?,
                    p1: Int,
                    p2: Boolean,
                    p3: Float
                ) {
                }

                override fun onTransitionChange(p0: MotionLayout?, p1: Int, p2: Int, p3: Float) {
                    when {
                        p1 == R.id.rest && p3 > 0f -> animationListener(AnimationState.STARTED)
                    }
                }

                override fun onTransitionCompleted(p0: MotionLayout?, p1: Int) {
                    animationListener(AnimationState.COMPLETED)
                    if (p1 == R.id.goneRight || p1 == R.id.goneLeft) {
                        Log.d("Adapter", "Remove item at position: $position")
                        removeItemListener(position)
                    }
                }

                override fun onTransitionStarted(p0: MotionLayout?, startId: Int, endId: Int) {

                }
            })
        }
    }
}
おわりに
簡単にでしたが、MotionLayoutのサンプルを用いてMotion Editorについて触れてみました。GUIによってConstraintSetとTransitionの関係性がわかりやすくなり、Transitionも手軽に再生できるのでとても便利です。Motion EditorはAndroid Studio 4.0 Canaryの新機能でもっと触っておかしいところがあればIssueを投げていけるように頑張ります。
PR
コネヒトではエンジニアを募集しています!家族向けサービスをつくりたいエンジニアの皆さん、お待ちしています。
家族の課題を解決するサービスのMAUを増やすAndroidエンジニア募集!
