はじめに
今回は、jQueryを使って、フォームの入力ならびに選択が完了するまで送信ボタンが押せないように設定していきます。
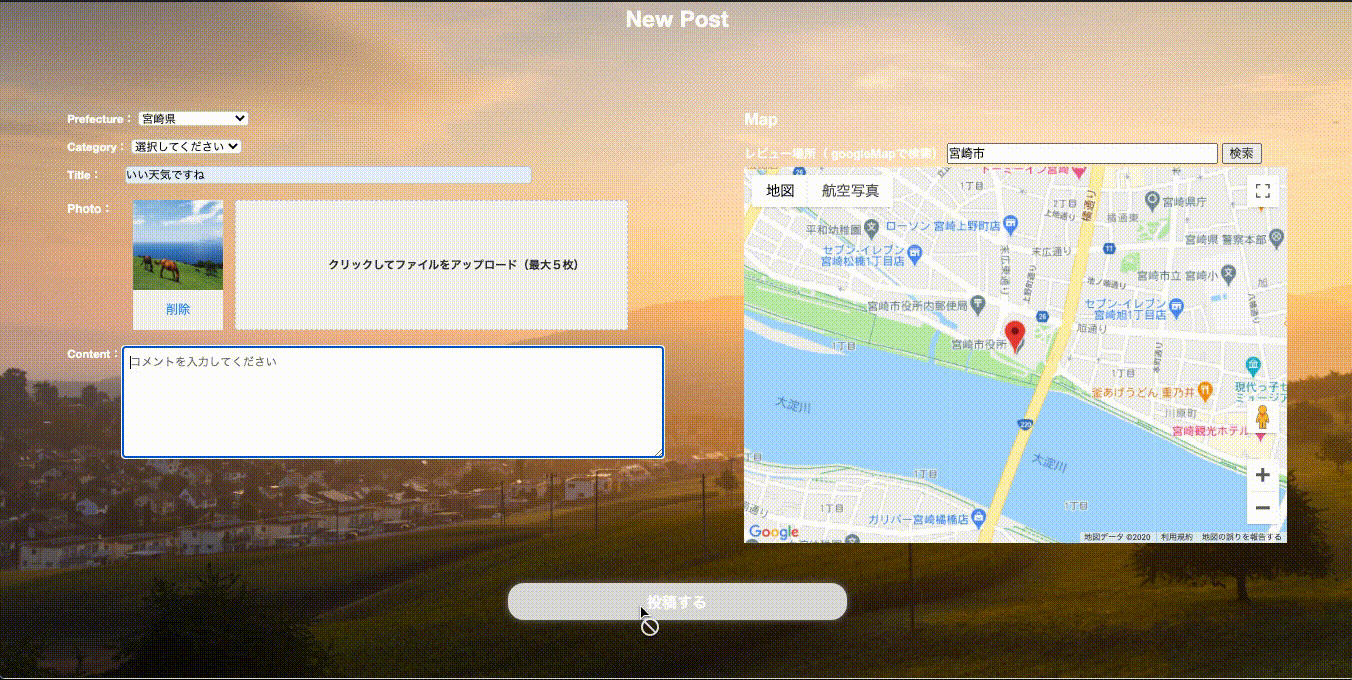
完成イメージ
記事を書いた目的
情報の共有ならびに、自身の備忘録として執筆する。
導入した目的
誤送信を防ぎ、ユーザビリティを向上させるため。
環境
MacOS 10.15.7
ruby 2.6.5
Ruby on Rails 6.0.0
前提条件
- jQueryが導入済みであること。
- 画像の複数枚投稿機能を実装している。
記事執筆者の状況
テーブル
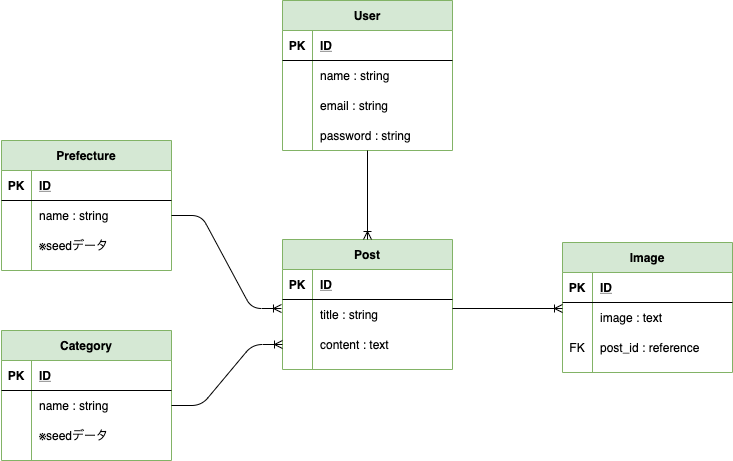
Userテーブルが「投稿者」、Postテーブルが「投稿」、Imageテーブルが「投稿画像」、Prefectureテーブルが「都道府県データ」、Categoryテーブルが「投稿カテゴリー」となります。
PrefectureテーブルとCategoryテーブルはseedデータを活用しております。
コントローラー
新規投稿機能はposts_controller.rbが担当しております。
class PostsController < ApplicationController
  def new
    @post = Post.new
    @post.build_spot
    @post.images.build()
  end

  def create
    @post = Post.new(post_params)
    if @post.save
      redirect_to root_path, notice: "投稿が完了しました"
    else
      flash.now[:alert] = "必須項目を入力してください"
      @post.images.build()
      render :new
    end
  end
  ...下記一部記述を省略
  .
  .
  .
  private
  def post_params
    params.require(:post).permit(:title, :content, :prefecture_id, :category_id, images_attributes: [:id, :image, :_destroy]).merge(user_id: current_user.id)
  end
それでは作業していきましょう。
①-1 new.html.erbを作成する
まずはフォームをhtmlで作成していきます。
<%= form_with(model: @post, local: true, multipart: true) do |form| %>
  <ul class='formSpace'>
    <li class="prefecture">
      <label class="labelName" for="Prefecture">Prefecture:</label>
      <%= form.collection_select :prefecture_id, Prefecture.all, :id, :name, {include_blank: '選択してください'}, {class: "prefecture__input", id: 'input01'} %>
    </li>
    <li class="category">
      <label class="labelname" for="category">Category:</label>
      <%= form.collection_select :category_id, Category.all, :id, :name, {include_blank: '選択してください'}, {class: "category__input", id: 'input02'} %>
    </li>
    <li class="title">
      <label class="labelName" for="titleSpace">Title:</label>
      <%= form.text_field :title, class: 'title__input', id: "input03", placeholder: "タイトルを入力してください" %>
    </lil
    <li class='newImage'>
      <label class="labelName" for="imageSpace">Photo:</label>
      <div class="prevContent">
      </div>
      <div class="labelContent">
        <label class="labelBox" for="post_images_attributes_0_image">
          <div class="labelBox__text-visible">
            クリックしてファイルをアップロード(最大5枚)
          </div>
        </label>
      </div>
      <div class="hiddenContent">
        <%= form.fields_for :images do |i| %>
          <%= i.file_field :image, class: "hiddenField", id: "post_images_attributes_0_image", name: "post[images_attributes][0][image]", type: "file" %>
          <%= i.file_field :image, class: "hiddenField", id: "post_images_attributes_1_image", name: "post[images_attributes][1][image]", type: "file" %>
          <%= i.file_field :image, class: "hiddenField", id: "post_images_attributes_2_image", name: "post[images_attributes][2][image]", type: "file" %>
          <%= i.file_field :image, class: "hiddenField", id: "post_images_attributes_3_image", name: "post[images_attributes][3][image]", type: "file" %>
          <%= i.file_field :image, class: "hiddenField", id: "post_images_attributes_4_image", name: "post[images_attributes][4][image]", type: "file" %>
        <% end %>
      </div>
    </li>
    <li class='content'>
      <label class="labelName" for="contentSpace">Content:</label>
      <%= form.text_area :content, class: 'content__input', id: "input05", placeholder: "コメントを入力してください" %>
    </li>
  </ul>
  <div class='send'>
    <%# <%= form.submit "送信中", class: 'send__btn', id: 'sending', value: "投稿する" %>
    <input type='submit' id='sending' class='send__btn' value='投稿する'>
  </div>
<% end %>
続いてscssを記述します。
.formSpace {
  height: auto;
}

.labelName {
  color: #000000;
}
// 都道府県================================================================

.prefecture {
  height: auto;
  width: auto;
  margin-top: 1vh;
  font-size: 1.5vh;
  line-height: 1.5;
  color: #fff;
  &__input {
    width: auto;
    border: 1px solid #ccc;
    background-color: #fff;
    border-radius: 5px;
    text-align: center;
    color: #000000;
  }
}

// カテゴリー==============================================
.category {
  height: auto;
  width: auto;
  margin-top: 1vh;
  font-size: 1.5vh;
  line-height: 1.5;
  color: #fff;
  &__input {
    width: auto;
    border: 1px solid #ccc;
    background-color: #fff;
    border-radius: 5px;
    color: #000000;
  }
}

//Title===================================================================
.title {
  height: auto;
  width: auto;
  margin-top: 1vh;
  font-size: 1.5vh;
  line-height: 1.5;
  color: #fff;
  &__input {
    width: 30vw;
    border-radius: 5px;
    border: 1px solid #ccc;
    background-color: #fff;
    color: #000000;
    margin-left: 25px;
  }
}

//Image======================================================================

.newImage {
  display: block;
  margin: 16px auto 0;
  display: flex;
  flex-wrap: wrap;
  cursor: pointer;
}

.imageLabelName {
  color: #fff;
  margin-right: 25px;
}

.prevContent {
  display: flex;
}

.previewBox {
  height: 162px;
  width: 112px;
  margin: 0 15px 10px 0;
}

.upperBox {
  height: 112px;
  width: 100%;
  img {
    width: 112px;
    height: 112px;
  }
}

.lowerBox {
  display: flex;
  text-align: center;
}

.deleteBox {
  color: #1e90ff;
  width: 100%;
  height: 50px;
  line-height: 50px;
  background: #f5f5f5;
  display: flex;
  justify-content: center;
  align-items: center;
  cursor: pointer;
}

.imageDeleteBtn {
  background-color: #f5f5f5;
  line-height: 4vh;
  height: 4vh;
  width: 60px;
}

.imageDeleteBtn:hover {
  color: rgba($color: #1e90ff, $alpha: 0.7);
}

//投稿クリックエリアのCSS
.labelContent {
  margin-bottom: 10px;
  width: 620px;
  .labelBox {
    display: block;
    border: 1px dashed #ccc;
    position: relative;
    background: #f5f5f5;
    width: 100%;
    height: 162px;
    cursor: pointer;
    &__text-visible {
      position: absolute;
      top: 50%;
      left: 16px;
      right: 16px;
      text-align: center;
      font-size: 14px;
      line-height: 1.5;
      font-weight: bold;
      -webkit-transform: translate(0, -50%);
      transform: translate(0, -50%);
      pointer-events: none;
      white-space: pre-wrap;
      word-wrap: break-word;
    }
  }
}
//file_fieldのcss
.hiddenContent {
  .hiddenField {
    display: none;
  }
  .hidden-checkbox {
    display: none;
  }
}

//コメント====================================================================

.content {
  display: flex;
  height: auto;
  width: auto;
  margin-top: 5px;
  line-height: 1.5;
  font-size: 1.5vh;
  &__input {
    height: 15vh;
    width: 40vw;
    border-radius: 5px;
    color: #000000;
    border: 1px solid #ccc;
    background-color: #fff;
    margin-left: 0px;
    padding: 1vh;
  }
}


//SENDボタン=========================================================================
.send {
  display: flex;
  justify-content: center;
  &__btn {
    height: 5vh;
    width: 25vw;
    margin: 50px 0;
    border-radius: 20px;
    background-color: #87cefa;
    border: none;
    box-shadow: 0 0 8px gray;
    color: #ffffff;
    line-height: 1.5;
    font-size: 2vh;
    font-weight: bold;
    -webkit-transition: all 0.3s ease;
    -moz-transition: all 0.3s ease;
    -o-transition: all 0.3s ease;
    transition: all 0.3s ease;
  }
  :hover {
    background-color: #00bfff;
  }
  .send__btn[disabled] {
    background-color: #ddd;
    cursor: not-allowed;
  }
}
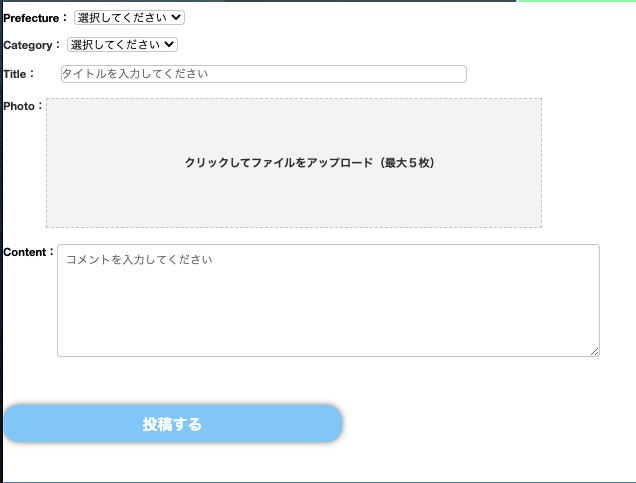
ここまで行うと次のような形になると思います。
ポイント
今回、JavaScriptにてフォームが入力または選択されているかどうかを状態管理するために
<%= form.collection_select :prefecture_id, Prefecture.all, :id, :name, {include_blank: '選択してください'}, {class: "prefecture__input", id: 'input01'} %>
という風に、id: 'input01'という形でidを指定しています。
このように、各フォームにidを指定していくのですが、idは同名のものを使い回しすることが不可のため、今回は
id='input02'、id='input03'・・・という形でidを順番に振っています。
(クラス名を統一して、使い回すのもありですが、今回は省略します。)
SCSSについては、ボタン(class:send__btn)が有効・無効の状態別でボタンの色を変更する記述をしております。ボタンの状態管理は後述するdistabledという値を使って管理します。
無効の場合にはdistabledという値が要素に付与されることになるので、scssの方で
.send__btn[disabled] {
  background-color: #ddd;
  cursor: not-allowed;
}
という記述をして、ボタンが無効状態の場合は色を灰色にして、カーソルを無効にしています。
①-2 submit.jsに処理を記述
あとはjsファイルにフォームの入力・選択がされているかどうかを判定し、送信ボタンの有効・無効を切り替える処理を記述していきます。
今回はsubmit.jsというファイルに記述していきます。
// フォームを入力・選択するまで送信ボタンが押せないようにする=============================================
$(function() {
  //最初に送信ボタンを無効にする
  $('#sending').prop("disabled", true);

  //idに「input」と設定している入力欄の操作時
  $("[id^= input],#post_images_attributes_0_image").change(function () {
      //入力欄が空かどうか判定を定義するために、sendという変数を使ってフォームの中身の状態管理を行う。
      let send = true;
      //id=input~と指定している入力欄をひとつずつチェック&画像(インデックス番号が0番の画像)をチェックする
      $("[id^= input],#post_images_attributes_0_image").each(function(index) {
        //フォームの中身(値)を順番に確認し、もしフォームの値が空の時はsend = false とする
        if ($("[id^= input],#post_images_attributes_0_image").eq(index).val() === "") {
          send = false;
        }
      });
      //フォームが全て埋まっていたら(send = trueの場合)
      if (send) {
          //送信ボタンを有効にする
          $('#sending').prop("disabled", false);
      }
      // フォームが一つでも空だったら(send = falseの場合)
      else {
          //送信ボタンを無効にする
          $('#sending').prop("disabled", true);
      }
  });
});
ポイント
最初に送信ボタン
<input type='submit' id='sending' class='send__btn' value='投稿する'>
に対して、prop(disabled, false)として、ボタンを無効化しています。
propメソッドは__指定した属性に値を設定する__役割を持っています。
distabledとは__指定したHTML要素を無効化できる属性__のことです。
propメソッドと組み合わせて使うことで
prop( ‘disabled’, true)」・・・要素を無効化
prop( ‘disabled’, false)」・・・要素を有効化
というふうに使用することができます。
参照:
propメソッド・・・http://js.studio-kingdom.com/jquery/attributes/prop
distabled・・・https://persol-tech-s.co.jp/hatalabo/it_engineer/463.html#disabled
次に、
$("[id^= input],#post_images_attributes_0_image").change(function ()
と記述しています。
「[id^= input]と#post_images_attributes_0_imageの値が変化した時に、イベントが発火する」という記述になります。
注目いただきたいのは
[id^= input]
の部分です。
こちらはjQueryの属性を使った指定方法を採用しています。
指定方法には大まかに分けて4つあります。
- 前方一致
- 後方一致
- 部分一致
- 否定
「前方一致」は「属性 ^= 属性名」のように「^」を追加するだけで、属性名の先頭部分の文字列が一致するすべての要素を取得することができます。
今回の場合、[id^= input]とすることで、id="input01", id="input02,・・・ id="input05の要素、つまりid名にinputと命名されている要素を全て取得することができます。
なお、jQueryの属性を使った指定方法についてはこちらの記事を参考にさせていただきました。前方一致指定意外にも知りたい方はご覧いただければと思います。
続いて、
let send = true;
については、入力欄が空かどうか判定するために、sendという変数を用いてフォームの状態管理を行うために記述しています。trueの場合は、フォームが全て埋まっている状態を表します。
$("[id^= input],#post_images_attributes_0_image").each(function(index) {
  //フォームの中身(値)を順番に確認し、もしフォームの値が空の時はsend = false とする
  if ($("[id^= input],#post_images_attributes_0_image").eq(index).val() === "") {
    send = false;
  }
});
については、eachメソッドを使って、idにinputと命名している要素を、要素の個数分に応じて取り出します。
取り出す際、eachメソッドの引数にコールバック関数を定義する必要があるので、「function(index)」と指定します。こうすることでindex番号を取得することができ、取り出した要素にそれぞれindex番号を振り分けます。
今回の場合、イメージとしては
0 : id="input01"の要素
1 : id="input02"の要素
2 : id="input03"の要素
3 : id="input04"の要素
4 : id="input05"の要素
このような形になるかと思います。
加えて、#post_images_attributes_0_imageも対象のオブジェクトに加えております。正直なところ、
複数枚画像投稿する際、上手いidの設定、指定ができなくて、ここに加えております。
(他に上手い方法があれば教えていただけると助かります!)
eachメソッドでインデックス番号と一緒に取り出したあと、
if ($("[id^= input],#post_images_attributes_0_image").eq(index).val() === "") {
  send = false;
}
の処理に移ります。
ここでは、取り出した要素1つ1つのフォームの中身が空なのかを検証しています。
1つ1つ検証するにあたり、eqメソッドを使用しています。
eqメソッドとは現在マッチしている要素をインデックス番号でフィルタリングします。(eqメソッド参照サイト)
idにinputと命名されている要素は、eachメソッドでインデックス番号が0〜4が振られているので、順番にeqメソッドの引数にインデックス番号が入るイメージです。(例: eq(0),eq(1)...eq(4) )
フォームの値を取得するのはvalメソッドを使用します(valメソッド参照サイト)
〜〜 === ""とは、「〜〜は空である」という意味を表します。
1つ1つ取り出した要素を検証して、1つでもフォームの値が空の要素があれば、send = falseを返します。
最後の
//フォームが全て埋まっていたら(send = trueの場合)
if (send) {
  //送信ボタンを有効にする
  $('#sending').prop("disabled", false);
}
// フォームが一つでも空だったら(send = falseの場合)
else {
  //送信ボタンを無効にする
  $('#sending').prop("disabled", true);
}
の部分については、
if (send)(if send ==trueという意味)の場合つまりフォームが全て埋まっている場合は、$('#sending').prop("disabled", false);というふうに、送信ボタンを有効にして、押せる状態にしています。
else(send == false)の場合つまりフォームが1つでも空だった場合は、$('#sending').prop("disabled", true);という形で、送信ボタンを無効にして、押せない状態にします。
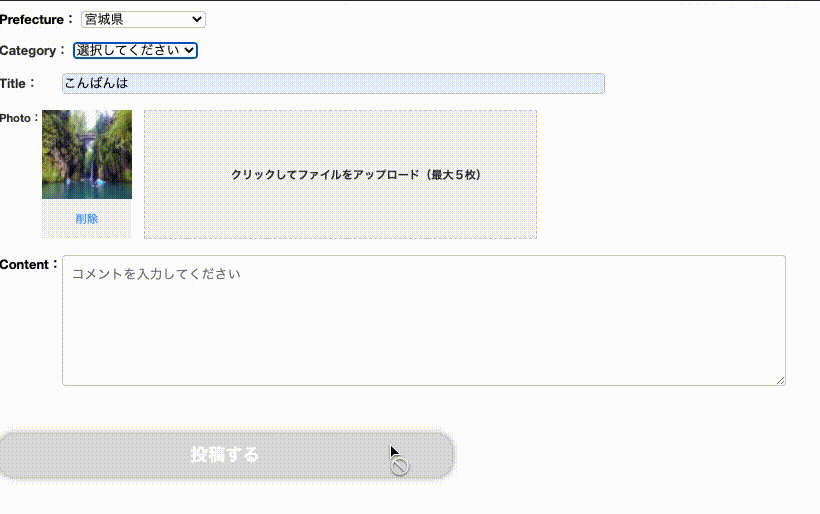
①-3 完成
以上で完成です。
最後に
初学者のためまだまだ理解不足な部分も多く、今回の実装については正直、改善の予知が多くあると思いますので、もっと良い実装の方法等がありましたらご教示いただけますと幸いです。
また、この記事をご覧いただきましたら、LGTMもいただけるとすごく嬉しいです。何卒よろしくお願い致します。