以下の記事でLINE Messging APIの検証APIを試しました。
弊社の開発メンバー以外がこれを気軽に使えるように、Chrome拡張機能としてNext.jsで実装したので紹介しようと思います。
使い方
Chromeウェブストアのページから、Chrome拡張機能を有効化してください。
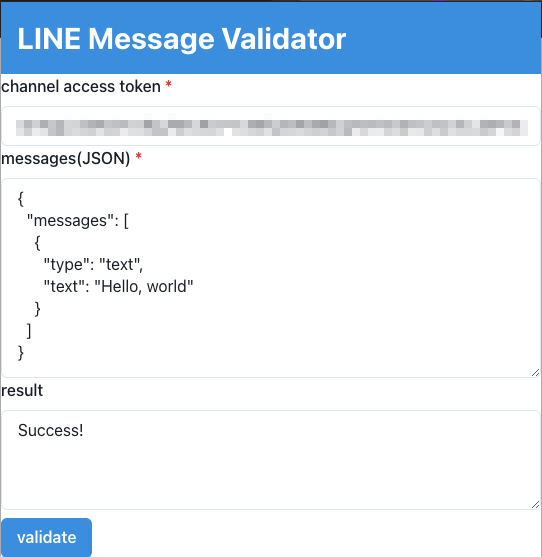
channel accese tokenとmessagesを入れてvalidateボタンを押すとresultに結果が表示されます ![]()

- コードからビルドする方法
リポジトリは以下で公開しています。
使い方はこちらを参考に以下のコマンドでビルドした後、extensionsフォルダを読み込んでください。
yarn install
yarn export
Chrome拡張機能の作り方
以前、Reactで拡張機能を作ったことがありました。
今回はNext.jsで作ってみました。まずはプロジェクトを作成します
yarn create next-app
色々記事を見ていると、extensionsというフォルダに一式吐き出す設定にしている方が多そうだったので、それに倣います。
package.jsonに以下のスクリプトを追加します。
"export": "next build && next export -o extensions/dist"
next.config.jsに以下の設定を追加します。
swcMinify: true,
trailingSlash: true,
assetPrefix: "./",
manifest.jsonはextensionsフォルダの下に作っておきます。
{
  "manifest_version": 3,
  "name": "LINE Message Validator",
  "description": "LINE Message Validator",
  "version": "1.0",
  "action": {
    "default_icon": "./dist/icon.png",
    "default_popup": "./dist/index.html"
  },
  "permissions": ["storage"],
  "host_permissions": ["https://api.line.me/v2/bot/message/validate/*"]
}
今回は設定値を保存しておくためにpermissioinsにstorageを追加しています。
メインページのコード
機能としては単純で、チャネルアクセストークンとメッセージオブジェクトを入れてvalidateボタンを押すと、検証結果が返ってきます。
ほとんど以前Reactで作った拡張機能からコードを拝借しているので、違う部分だけコメントで解説します。
/* eslint-disable react-hooks/exhaustive-deps */
import {
  Box,
  Button,
  FormControl,
  FormErrorMessage,
  FormLabel,
  Heading,
  Input,
  Textarea,
} from "@chakra-ui/react";
import { useEffect, useState } from "react";
import { useForm } from "react-hook-form";
import { validator } from "../api/validator";
import { FormData } from "../types";

const placeholder = `
{
  "messages": [
    {
      "type": "text",
      "text": "Hello, world"
    }
  ]
}
`.trim();

export default function Home() {
  const [result, setResult] = useState("");
  const {
    register,
    setValue,
    handleSubmit,
    formState,
    formState: { errors },
  } = useForm<FormData>();

  const onSubmit = handleSubmit(async (data) => {
    // 拡張機能で使えるストレージに受け取ったデータを保存しておく
    await chrome.storage.local.set(data);
    // api/validator.tsに実装してあるvalidatorを呼んで、検証用エンドポイントにアクセスする。
    await validator(
      data.token,
      JSON.parse(data.body),
      () => setResult("Success!"),
      (validateError) => setResult(JSON.stringify(validateError, null, 2)),
      (_) => setResult("unknown error")
    );
  });

  useEffect(() => {
    // 初期化時にまずストレージを確認し、値があれば初期値として設定する。
    chrome.storage.local.get(["token", "body"], (items) => {
      const data = items as FormData;
      const body = data && data.body ? data.body : placeholder;
      setValue("token", data.token);
      setValue("body", body);
    });
  }, []);

  return (
    <>
      <Box w="540px">
        <Box bg="#4299E1" w="100%" p={4} color="white">
          <Heading as="h3" size="xl" isTruncated>
            LINE Message Validator
          </Heading>
        </Box>
        <form onSubmit={onSubmit}>
          <FormControl isInvalid={!!errors.body || !!errors.token} isRequired>
            <FormLabel>channel access token</FormLabel>
            <Input
              placeholder="CHANNEL ACCESS TOKEN"
              {...register("token", { required: true })}
            />
            <FormErrorMessage>
              {!!errors.token && "channel access token is required"}
            </FormErrorMessage>
            <FormLabel>messages(JSON)</FormLabel>
            <Textarea
              placeholder={placeholder}
              h="200"
              {...register("body", { required: true })}
            />
            <FormErrorMessage>
              {!!errors.body && "messages(JSON) is required"}
            </FormErrorMessage>
          </FormControl>
          <FormLabel>result</FormLabel>
          <Textarea value={result} h="100" />
          <Button
            mt={2}
            bg="#4299E1"
            color="white"
            isLoading={formState.isSubmitting}
            type="submit"
          >
            validate
          </Button>
        </form>
      </Box>
    </>
  );
}
validatorはこちらの記事で書いたものを少し改良しています。
import axios, { AxiosResponse } from "axios";
import { ValidateError } from "../types";

// 成功時、失敗時の動作はsuccess,invalid,errorのコールバックで外から制御できるようにしている。
export const validator = async (
  token: string,
  body: string,
  success: (response: AxiosResponse) => void,
  invalid: (validateError: ValidateError) => void,
  error: (reason: any) => void
) => {
  console.log(`validator token=${token},body=${JSON.stringify(body)}`);
  const headers = {
    "Content-Type": "application/json",
    Authorization: `Bearer ${token}`,
  };
  await axios
    .post("https://api.line.me/v2/bot/message/validate/reply", body, {
      headers: headers,
    })
    .then((response) => {
      success(response);
    })
    .catch((reason) => {
      console.log(reason);
      if (!!reason && !!reason.response && !!reason.response.data) {
        const validateError: ValidateError = reason.response.data;
        invalid(validateError);
      } else {
        error(reason);
      }
    });
};
まとめ
今まで書いた記事の内容を組み合わせて一つものを作るのはなんだか面白かったです。
これ結構便利だと思うので、みなさんもぜひ使ってください ![]()