先日Riverpod 1.0.0がリリースされ、ついにstableになりました🎉
Riverpod 1.0.0 is now released 🎉
— Remi Rousselet (@remi_rousselet) November 5, 2021
Stay tuned for an article detailing the changes.
In the meantime, you can read the CHANGELOG:https://t.co/h3yeM2l83K
今後大きなプロジェクトでの導入も増えてくるかと思いますので、大規模アプリを作るときの指針として、hooks_riverpod、state_notifier、freezedを使ってドメイン駆動設計を取り入れた場合の実装例を紹介したいと思います。
tl;dr
- ドメイン駆動設計とはビジネスのドメイン(解決したい課題を含んだビジネス領域)を中心に添えてソフトウェアを開発していこうという設計思想
- hooks_riverpod + state_notifier + freezed でドメイン駆動設計のパターンを使おうとしたときにどのように当てはめればよいかを解説
- riverpodの場合のテストをどのように書くかを解説
環境
-
OS
- macOS Monterey(Intel)
-
flutter doctor
 % flutter doctor
Doctor summary (to see all details, run flutter doctor -v):
[✓] Flutter (Channel stable, 2.5.3, on macOS 12.0.1 21A559 darwin-x64, locale ja-JP)
[✓] Android toolchain - develop for Android devices (Android SDK version 30.0.2)
[✓] Xcode - develop for iOS and macOS
[✓] Chrome - develop for the web
[✓] Android Studio (version 2020.3)
[✓] VS Code (version 1.62.3)
[✓] Connected device (1 available)
- pubspec.yml
dependencies:
  flutter:
    sdk: flutter
  flutter_hooks: ^0.18.0
  hooks_riverpod: ^1.0.0
  state_notifier: ^0.7.1
  freezed_annotation: ^0.15.0
  firebase_core: ^1.10.0
  firebase_auth: ^3.2.0
  cloud_firestore: ^3.1.0
  json_annotation: ^4.3.0

dev_dependencies:
  flutter_test:
    sdk: flutter
  build_runner: ^2.1.4
  freezed: ^0.15.0+1
  json_serializable: ^6.0.1
ドメイン駆動設計の概要
まずはドメイン駆動設計の概要について説明します。
この記事では要点だけにとどめていますので、詳細は以下の記事をご覧ください。
ドメインとは?
ドメインとは、解決したいビジネス上の課題を含んだ領域のこと。平たく言うと業務知識のこと。
ドメインの知識を抽象化したものをモデルと呼び、ドメイン知識をモデルに起こすことをドメインモデリングとか単にモデリングと呼ぶ。
ドメイン駆動設計では重要な概念として、ユビキタス言語というものがある。
ユビキタス言語とは、ドメインの中で開発者とドメインの知識を持った人(ドメインエキスパート)が共通に使用できる言葉のこと。
開発者とドメインエキスパートが別々の言葉で会話してしまうと、ソフトウェアとドメインの間に差が出来きてしまい、やがて破綻してしまう。
まだ、ドメインエキスパートや他の開発者と会話する中で、ドキュメントと図を適切に使用する。
UML図などを使ってモデルを表現するのは非常に有用だが、完全にコードのふるまいを示せるわけではないことを忘れないこと。
ドキュメントに起こすにも、やはり完全にコードのふるまいを示すのは無理なので、補足する程度にとどめる。(それが一番意味のあるドキュメントや図になる)
レイヤードアーキテクチャ
ドメイン駆動設計では、レイヤードアーキテクチャを用いて、ドメインと他の実装を適切に分離する。
- プレゼンテーション層
- ユーザーへの情報の表示
- ユーザーからの入力の解釈
- 外部アクタは人間ではなく別のシステムの場合もある
- アプリケーション層
- ビジネスにとって意味があるものか他のアプリケーション層と相互作用をする作業を行う
- ビジネスルールや知識自体は含まず、あくまでドメインオブジェクトに作業を委譲して調整を行う
- ドメイン層
- ビジネスルールを表す
- ビジネスの状態をここで制御する
- 永続化(DBに格納したり)は行わない
- インフラストラクチャ層
- 上位のレイヤを支える一般的な技術機能
- 永続化やメッセージ送信などを担う
ここで守るべきなのは、上位のレイヤに対しては疎結合にするべきであるが、例外的に通信しなければならない場合もあるということ。
そういう場合は、コールバックやオブザーバといった機能を使って実装する。
今回の場合はRiverpodがそれを担うことになる。
目的はモデルを適切にコードに落とし込むことなので、ドメインモデルに関係するコードをドメイン層のみに集中させ、他のレイヤーから分離すること。
DDD固有のパターン
DDDでは固有のパターンを用いて実装を行う。
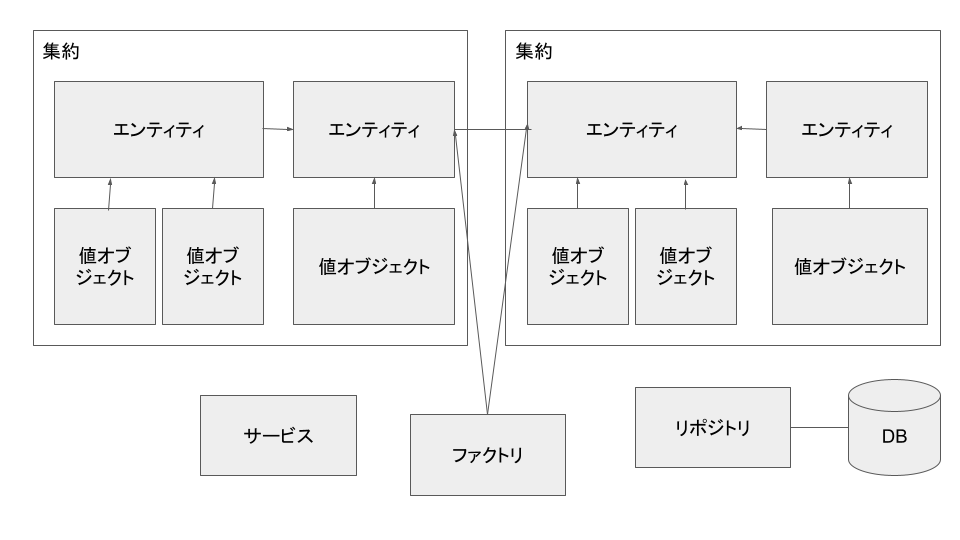
- オブジェクトモデルの基本要素
- エンティティ
- 同一性をもつ(==で比較できる)
- 連続性をもつ(可変である)
- 値オブジェクト
- 不変である
- 同一性を持たない
- 値オブジェクト同士の関連は持たせない
- サービス
- エンティティにも値オブジェクトにも属さないものやふるまい
- 引数と結果はドメインオブジェクト
- ドメインレイヤに居るとは限らない。アプリケーションサービスやインフラストラクチャサービスなども考えられる
- どのレイヤにも属させず、SINGLETONとして定義した方が分かりやすい場面もある
- モジュール
- 他と低結合で高凝集の集まり
- エンティティ
- ドメインオブジェクトのライフサイクル
- 集約
- 関連オブジェクトの集まり
- データを変更するための単位
- 集約にはルートと境界がある
- 境界は集約の内部になにがあるかを定義するもの
- ルートは集約に含まれている特定の1エンティティ
- ルートエンティティはグローバルな同一性を持つ
- 境界内部のエンティティは集約内でのみ一意となるローカルな同一性を持つ
- 境界外のエンティティは集約ルートのみ参照を持つことができ、境界内部への参照を持つことはできない
- ファクトリ
- オブジェクトの生成自体を行うもの
- オブジェクトの生成はそのオブジェクトの責務ではない
- クライアント側で生成を行ってしまうとオブジェクトの詳細をクライアントが知ることになってしまってこれも不自然
- リポジトリ
- データベースやストレージへの永続化をカプセル化して隠蔽する
- 集約ルートに対してリポジトリを提供する
- オブジェクトそのものを返さずとも、集計結果などを返すこともある
- 集約
hooks_riverpod+state_notifier+freezedの使い方
Riverpodがstableになる前から、hooks_riverpod(or flutter_riverpod) + state_notifier + freezedの組み合わせでアーキテクチャを考えていくパターンは非常によく使われてきたと思います。
Flutterはそもそもの学習コストが低いこともあり、初学者が入りやすいものの、これらの組み合わせを使うと途端に複雑になってしまうことに加えてRiverpodが今までstableではなく幾度となく書き方が変わってきたことで、日本語の記事もバージョンが少し違うだけで同じ書き方が出来ないために混乱の元となっていたと思います。
今回は自分が迷わないために、これらのパッケージを使った場合の指針となるようにここに残しておきます。
まずは各パッケージの使い方を簡単に説明します。
関連記事
- Flutterプロジェクト作成時に作られるカウンターアプリをhooks_riverpod + state_notifier + freezedで作り直した記事です。簡単な使い方を解説しています。
- githubリポジトリ
- Flutterの状態管理について記載してある記事
hooks_riverpod
RiverpodにはFlutterに関係なくdartのみで使えるもの(riverpod)、Flutterと一緒に使うもの(flutter_riverpod)、flutter_hooksと一緒に使ってReact Hooksぽく書けるもの(hooks_riverpod)の3種類が提供されています。
Providerと同じ作者(Remi Rousseletさん)が作っていて、非常に人気の状態管理パッケージとなっています。
後の方でこちらの使い方も併せて解説するので、ここでは有用な記事を紹介するにとどめます。
- Riverpodの公式ページ。英語ですが例もたくさん載っていてわかりやすいです
- 最近1.0.0になって
useProviderが使えなくなっている件
有料ですが、こちらのzenn bookは要点がまとまっていますし、バージョンアップによる追従も早くて助かります。
state_notifier
こちらもProviderやRiverpodと同じ作者が作成したパッケージです。
RiverpodやProviderと一緒に使って、状態を保持するクラスを作成する便利なパッケージです。
ProviderやRiverpodで使えるChangeNotifierの代わりといった感じです。
- ChangeNotifier
- 複数の値を持てる
- notifyListener()を明示的に呼んで、変更を通知する
- ValueNotifier
- 単一の値を持つ
- notifyListener()を明示的に呼ばなくても良い
- Provider or Riverpodと一緒に使う場合、ValueNotifierProviderなるものはない
- StateNotifier
- ValueNotifierとほぼ同じだが、パフォーマンスがこちらのほうが良い
- ValueNotifierはFlutterに含まれているが、StateNotifierは外部パッケージ
- 上述の通りProvider or Riverpodと一緒に使う場合はChangeNotifierかStateNotifierになる
freezed
riverpod + state_notifierを使うときにimmutable(不変)なクラスを自動生成してくれる便利なパッケージです。
こちらも作者は同じ方(Remi Rousseletさん)で、かんたんな使い方はこちらの記事に記載しています。
実際の使い方は実践のところで解説します。
実践
DDDのサンプルとしては、ドメイン部分が複雑なもののほうが好ましい気もしますが、今回はDDDのプロジェクトでhooks_riverpod + state_notifier + freezedをどのように当てはめていくかに焦点を当てることにします。
この記事執筆時点ではエラーハンドリングを一切行っていません。
commonフォルダに各例外クラスを作っておいて、ドメイン層でthrowしたものを補足してダイアログなどを表示すれば良いかと思います。
- フォルダ構成
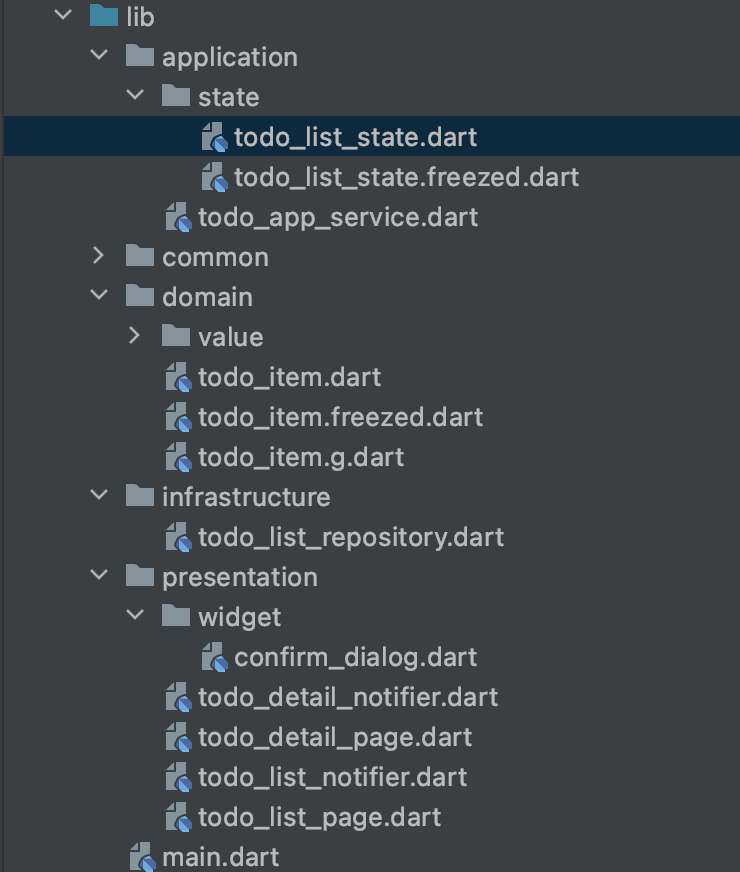
ドメイン層
ドメイン層はValueObjectとEntityをfreezedで作っています。
ValueObject
@freezed
class Title with _$Title {
  @Assert('value.length < 20')
  const factory Title(
    String value,
  ) = _Title;
}

class TitleConverter implements JsonConverter<Title, String> {
  const TitleConverter();

  @override
  Title fromJson(String value) {
    return Title(value);
  }

  @override
  String toJson(Title title) {
    return title.value;
  }
}
値オブジェクト自体は内部にフィールドを唯一もつ単純なクラスです。@Assertで長さの指定をしています。
また、Entity側でtoJson/fromJsonを使うために各値オブジェクトごとにJsonConverterを実装したTitleConverterを作成しています。
Entity
ValueObjectをフィールドに定義する形でEntityを作成します。
import 'package:flutter_ddd_riverpod/common/date_time_converter.dart';
import 'package:flutter_ddd_riverpod/domain/value/detail.dart';
import 'package:flutter_ddd_riverpod/domain/value/title.dart';
import 'package:flutter_ddd_riverpod/domain/value/todo_id.dart';
import 'package:freezed_annotation/freezed_annotation.dart';

part 'todo_item.freezed.dart';
part 'todo_item.g.dart';

@freezed
class TodoItem with _$TodoItem {
  factory TodoItem({
    @TodoIdConverter() required TodoId id,
    @TitleConverter() required Title title,
    @DetailConverter() required Detail detail,
    @Default(false) bool isDone,
    @DateTimeConverter() required DateTime createdAt,
  }) = _TodoItem;

  factory TodoItem.fromJson(Map<String, dynamic> json) =>
      _$TodoItemFromJson(json);

  factory TodoItem.initial() => TodoItem(
        id: const TodoId(null),
        title: const Title(""),
        detail: const Detail(""),
        createdAt: DateTime.now(),
      );

  TodoItem updateIsDone() {
    return copyWith(
      id: id,
      title: title,
      detail: detail,
      isDone: !isDone,
    );
  }
}
fromJson/toJsonを使うために、先程のTitleConverterをアノテーションで指定してやります。
fromJsonだけ定義しておけば、freezedが勝手にtoJsonも作ってくれます。
また、TodoItem.initial()というfacrotyコンストラクタも作っておき、新規作成の際に使い回せるようにしています。
- freezedでのコード生成
上記のように@freezedアノテーション付きのコードを作成or編集したら、以下のコマンドを叩いて自動生成します。
flutter pub run build_runner build --delete-conflicting-outputs
これによってcopyWithというシャローコピーを行えるメソッドを生成してくれたり、==オペレーターをオーバーロードして比較してくれたりするコードが自動で生成されます。
インフラストラクチャ層
DBへの永続化などを担うレイヤーです。
今回はfirestoreを利用しています。
import 'dart:async';

import 'package:cloud_firestore/cloud_firestore.dart';
import 'package:flutter_ddd_riverpod/domain/todo_item.dart';
import 'package:hooks_riverpod/hooks_riverpod.dart';

final todoListRepository = Provider((ref) => TodoListRepository());

class TodoListRepository {
  final _db = FirebaseFirestore.instance;
  late Stream<QuerySnapshot>? _stream;
  late StreamSubscription? _streamListener;

  void subscribeStream(
    void Function(List<TodoItem>) onCompleted, {
    required void Function() onEmpty,
  }) {
    _stream = _db.collection('todo-list').snapshots();
    _streamListener = _stream?.listen((snapshot) {
      if (snapshot.size != 0) {
        onCompleted(snapshot.docs.map((item) {
          return TodoItem.fromJson(_jsonFromSnapshot(item));
        }).toList());
      } else {
        onEmpty();
      }
    });
  }

  Future<TodoItem> findById({required String id}) async {
    final collectionRef = _db.collection('todo-list');
    final doc = await collectionRef.doc(id).get();
    return TodoItem.fromJson(_jsonFromSnapshot(doc));
  }

  Future<void> create({required TodoItem item}) async {
    final collectionRef = _db.collection('todo-list');
    await collectionRef.add(_convertDateTimeToTimestamp(item.toJson()));
  }

  Future<void> update({required TodoItem item}) async {
    final collectionRef = _db.collection('todo-list');
    await collectionRef
        .doc(item.id.value)
        .update(_convertDateTimeToTimestamp(item.toJson()));
  }

  Future<void> delete({required TodoItem item}) async {
    final collectionRef = _db.collection('todo-list');
    await collectionRef.doc(item.id.value).delete();
  }

  Map<String, dynamic> _convertDateTimeToTimestamp(Map<String, dynamic> json) {
    final createdAt = DateTime.parse(json['createdAt']);
    return {
      'id': json['id'],
      'title': json['title'],
      'detail': json['detail'],
      'isDone': json['isDone'],
      'createdAt': Timestamp.fromDate(createdAt),
    };
  }

  Map<String, dynamic> _jsonFromSnapshot<T extends DocumentSnapshot>(T json) {
    final createdAt = (json['createdAt'] as Timestamp).toDate().toLocal();
    return {
      'id': json.id,
      'title': json['title'],
      'detail': json['detail'],
      'isDone': json['isDone'],
      'createdAt': createdAt.toString(),
    };
  }
}
Riverpodではfinal todoListRepository = Provider((ref) => TodoListRepository());のようにグローバルにProviderを宣言します。
_convertDateTimeToTimestampと_jsonFromSnapshotというプライベートメソッドを作って、toJsonとfromJsonでTodoItemとの変換の際に、FirestoreのTimestamp型をDateTimeに変換する処理を行っています。
もっと単純にcreatedAtの値オブジェクトを作ってJsonConverterを作るなりできると思うかもしれませんが、TimestampはFirestoreを使ったときにだけ出てくる型ですので、インフラストラクチャ層の外にその概念を持ち込ませたくなかったためこうしています。
アプリケーション層
この層にはいわゆるユースケースを配置します。Repositoryと集約ルートであるEntityを使って、ユースケースを書いていくのですが、今回は機能がかなり単純なので、こちらで処理を集約して、各UIで使う形となっています。
service
class TodoAppService {
  TodoAppService({required TodoListRepository todoListRepository})
      : _todoListRepository = todoListRepository;
  final TodoListRepository _todoListRepository;

  Future<void> updateIsDone({required TodoId todoId}) async {
    final item = await _todoListRepository.findById(id: todoId.value ?? '');
    await _todoListRepository.update(item: item.updateIsDone());
  }
例えば上記のupdateIsDoneの例ではTodoIdを受け取って、リポジトリからTodoItemを取得し、TodoItemエンティティのupdateIsDoneを呼び出して、isDoneだけ反転させています。
state
state_notifierで状態を扱うときに、collectionが扱いづらいので、List<TodoItem>の方だけStateクラスを作成しました。
どこに配置すべきか迷いましたが、ドメイン知識とは関係がなく、エンティティを直接使うクラスなので、アプリケーション層に配置しました。
基本的にUI側がapp_serviceとstateを使うことになります。
import 'package:flutter_ddd_riverpod/domain/todo_item.dart';
import 'package:freezed_annotation/freezed_annotation.dart';

part 'todo_list_state.freezed.dart';

@freezed
class TodoListState with _$TodoListState {
  const factory TodoListState({
    @Default(false) bool isFetching,
    @Default(<TodoItem>[]) List<TodoItem> todoList,
  }) = _TodoListState;
}
プレゼンテーション層
UIに関わる処理を書く部分です。
ViewとViewModelの関係になるようにpageとnotifierを対応付けて作成します。
Notifier
StateNotifierを継承したクラスを作成します。このとき型に指定するのが管理する状態になります。
また、todoAppServiceをコンストラクタで受け取るようにしておきます。
class TodoDetailNotifier extends StateNotifier<TodoItem> {
  TodoDetailNotifier({
    required TodoAppService todoAppService,
  })  : _todoAppService = todoAppService,
        super(TodoItem.initial());

  final TodoAppService _todoAppService;
今回は新規作成と編集のときの画面を同じものを使いたいので、resetというメソッドを用意しておき、初期状態のstateに変更できるようにしてあります。
また、isNewとして新規作成なのかどうかを判断するメソッドも用意しておきます。
state.id == const TodoId(null)
このように書けるのはfreezedの恩恵ですね。
  void reset() {
    state = TodoItem.initial();
  }

  bool isNew() {
    return state.id == const TodoId(null);
  }
ほかは画面の入力に応じたメソッドを定義して、使用できるようにします。
  void setTodoItem(TodoItem item) {
    state = item.copyWith(
      id: item.id,
      title: item.title,
      detail: item.detail,
      createdAt: item.createdAt,
      isDone: item.isDone,
    );
  }

  void changeTitle(String title) {
    state = state.copyWith(
      id: state.id,
      title: Title(title),
      detail: state.detail,
      createdAt: state.createdAt,
      isDone: state.isDone,
    );
  }

  void changeDetail(String detail) {
    state = state.copyWith(
      id: state.id,
      title: state.title,
      detail: Detail(detail),
      createdAt: state.createdAt,
      isDone: state.isDone,
    );
  }

  Future<void> onTapElevatedButton() async {
    if (isNew()) {
      await _todoAppService.createTodoItem(
          );
    } else {
      await _todoAppService.updateTodoItem(item: state);
    }
  }
}
最後にStateNotifireProviderをつかってtodoAppServiceを注入しつつ、TodoDetailProviderをグローバルに宣言します。
final todoItemProvider =
    StateNotifierProvider<TodoDetailNotifier, TodoItem>((ref) {
  return TodoDetailNotifier(
    todoAppService: ref.read(todoAppService),
  );
});
Page
hooks_riverpodを使うときは、UIとなるクラスはHookConsumerWidgetを継承します。するとWidget build(BuildContext context, WidgetRef ref)をオーバーライドすることになり、このrefを使って今までに宣言したProviderたちを呼べるようになります。
riverpod:1.0.0 での記載となっています。Providerの呼び出し方など破壊的変更が入ってますので、詳しくはhttps://pub.dev/の各パッケージのCHANGELOGを確認してください。
import 'package:flutter/material.dart';
import 'package:flutter_ddd_riverpod/presentation/todo_detail_notifier.dart';
import 'package:flutter_hooks/flutter_hooks.dart';
import 'package:hooks_riverpod/hooks_riverpod.dart';

class TodoDetailPage extends HookConsumerWidget {
  const TodoDetailPage({Key? key}) : super(key: key);

  @override
  Widget build(BuildContext context, WidgetRef ref) {
    final state = ref.watch(todoItemProvider);
    final notifier = ref.read(todoItemProvider.notifier);
    final titleController = useTextEditingController(
      text: notifier.isNew() ? "" : state.title.value,
    );
    final detailController = useTextEditingController(
      text: notifier.isNew() ? "" : state.detail.value,
    );

    return Scaffold(
      appBar: AppBar(
        title: Text(notifier.isNew() ? '新規作成' : '編集画面'),
      ),
      body: Padding(
        padding: const EdgeInsets.all(16.0),
        child: Column(
          children: [
            TextField(
              decoration: const InputDecoration(
                labelText: 'タイトル',
                hintText: 'やること',
              ),
              onChanged: (title) {
                notifier.changeTitle(title);
              },
              controller: titleController,
            ),
            const SizedBox(
              height: 16,
            ),
            TextField(
              decoration: const InputDecoration(
                labelText: '詳細',
                hintText: 'やることの詳細',
              ),
              onChanged: (detail) {
                notifier.changeDetail(detail);
              },
              controller: detailController,
            ),
            const SizedBox(
              height: 16,
            ),
            ElevatedButton(
              onPressed: () async {
                await notifier.onTapElevatedButton();
                Navigator.pop(context);
              },
              child: Text(notifier.isNew() ? '作成' : '更新'),
            )
          ],
        ),
      ),
    );
  }
}
基本的にはfinal state = ref.watch(todoItemProvider);で呼んだstateを用いて表示したい値を取得し、final notifier = ref.read(todoItemProvider.notifier);で取得したnotifierを用いて定義したメソッドを呼び出します。
またhooksを使うとTextEditingControllerが以下のように便利に使えます。
    final titleController = useTextEditingController(
      text: notifier.isNew() ? "" : state.title.value,
    );
    final detailController = useTextEditingController(
      text: notifier.isNew() ? "" : state.detail.value,
    );
useTextEditingController(初期値)で初期値を指定して、TextFieldのcontrollerに渡してやれば良いです。
テスト
RiverpodではProviderのときよりテストがしやすくなっています。
Providerでのテストの仕方は以下を御覧ください。
今回はTodoAppServiceのテストを一部だけ実装します。DDDで正しく組まれていれば、アプリケーション層のテストを行うと必然的にドメイン層も網羅的にテストされるはずです。
カバレッジまで計測するとなお良いと思います。
準備
FirestoreにアクセスしているRepositoryをモックします。
Riverpodの公式ドキュメントにならって記載していきます。
import 'package:flutter_ddd_riverpod/domain/todo_item.dart';
import 'package:flutter_ddd_riverpod/domain/value/todo_id.dart';
import 'package:flutter_ddd_riverpod/infrastructure/todo_list_repository.dart';
import 'dart:math';

class TodoListRepositoryMem implements TodoListRepository {
  final Map<String, TodoItem> _data = {}; // データを内部でMapとして保持する
  late String nextId; // Firebaseに習って自動でIdを振るための変数

  // _dataをクリアするためのメソッド
  void reset() {
    nextId = '';
    _data.clear();
  }

  // テストデータを一気にセットするためのメソッド
  void set(List<TodoItem> list) {
    for (var element in list) {
      _data[element.id.value!] = element;
    }
  }

  @override
  Future<TodoItem> findById({required String id}) async {
    return await Future.value(_data[id]); // 素のデータをFutureで渡したいときはこのように書く
  }

  @override
  Future<void> create({required TodoItem item}) async {
    // ここが今回特殊
    // 無限ループ内で乱数を振り、重複を確認して重複していなければ追加する
    while (true) {
      final rand = Random(DateTime.now().microsecondsSinceEpoch);
      nextId = rand.nextInt(4294967296).toString();
      if (!_data.containsKey(nextId)) {
        _data[nextId] = item.copyWith(
          id: TodoId(nextId),
          title: item.title,
          detail: item.detail,
          isDone: item.isDone,
          createdAt: item.createdAt,
        );
        break;
      }
    }
  }
上記のようにRepositoryを作ったあと、これを以下のようにオーバーライドします。
import 'package:flutter_ddd_riverpod/infrastructure/todo_list_repository.dart';
import 'package:hooks_riverpod/hooks_riverpod.dart';
import 'todo_list_repository_mem.dart';

ProviderContainer overrideTodoListRepository() {
  return ProviderContainer(overrides: [
    todoListRepository.overrideWithProvider(
      Provider((ref) => TodoListRepositoryMem()),
    )
  ]);
}
これでoverrideTodoListRepositoryを使ってtodoAppServiceやtodoListRepositoryを呼ぶと実態はTodoListRepositoryMemがオーバーライドされたインスタンスを取得することができます。
Unit Test
実際のテストは次のように書きます。
void main() {
  late ProviderContainer _container;
  late TodoListRepositoryMem _repository;

  setUp(() {
    _container = overrideTodoListRepository();
    _repository = _container.read(todoListRepository) as TodoListRepositoryMem;
    _repository.reset();
  });
先程定義したProviderContainerとTodoListRepositoryMemをlateで宣言しておいて、setUpの中で呼び出します。
setUpはgroupやtestの単位ごとに毎回実行されるので、中の値をリセットしたい場合などに有効です。
テスト自体は以下のように書きます。コード内にコメントしています。
  test('findByTodoId', () async {
    final item = TodoItem.initial(); // からのTodoItemを生成
    await _repository.create(item: item); // これをrepositoryに直接クリエイトする
    final nextId = _repository.nextId; // クリエイトの際にnextIdが発行されるので、取得

    final service = _container.read(todoAppService); // テスト対象のインスタンス取得
    final result = await service.findByTodoId(todoId: TodoId(nextId)); // 先程取得したnextIdでitemを取得

    // 受け取った値と期待する結果をexpectに渡して確認する
    // 同じならpass、違えばfailとなる
    expect(
      result,
      item.copyWith(
        id: TodoId(nextId),
        title: item.title,
        detail: item.detail,
        isDone: item.isDone,
        createdAt: item.createdAt,
      ),
    );
  });

  test('updateIsDone', () async {
    _repository.set(dummyTodoList); // ダミーデータをセット
    final service = _container.read(todoAppService); // serviceのインスタンスを取得

    // 事前に正しくserviceがitemを取得できるか確認
    final result1 =
        await service.findByTodoId(todoId: TodoId(dummyTodoList[0].id.value));
    expect(result1, dummyTodoList[0]);

    // updateIsDoneを実行して、もとのデータとisDoneのbool値が反転しているかを確認
    await service.updateIsDone(todoId: dummyTodoList[0].id);
    final result2 =
        await service.findByTodoId(todoId: TodoId(dummyTodoList[0].id.value));
    expect(result2.isDone, !dummyTodoList[0].isDone);
  });
}
まとめ
長々と解説しましたが、まだまだ私も勉強しなければなぁと強く感じました笑
繰り返す部分もありますが、まとめとしては以下のようになるかと思います。
- ドメイン駆動設計とはビジネスのドメイン(解決したい課題を含んだビジネス領域)を中心に添えてソフトウェアを開発していこうという設計思想
- hooks_riverpod + state_notifier + freezed でドメイン駆動設計のパターンを使おうとしたときにどのように当てはめればよいかを解説
- EntityやValueObjectをfreezedとstate_notifierで作る際のやり方
- hooks_riverpodでのUIの組み方、state_notifierの使い方
- riverpodの場合のテストをどのように書くかを解説
- abstractクラスなどに依存點せなくても、そのままでoverrideできるのは便利
- widgetテストもnotifierをモックして簡単に書けそう
間違っている点や、改善したほうが良い点などございましたらぜひコメント下さい ![]()
2022/1/20追記
2021/12にこちらに関する発表を行いました。
参考
- 【Flutter】Statefullなカウンターアプリをhooks_riverpod+state_notifier+freezedでリファクタリングする - Qiita
- tokku5552/flutter_riverpod_sample
- Flutterの状態管理手法の選定. Flutterの状態管理周りの手法はちょくちょく動きがあって、それに関する話題が… | by mono | Flutter 🇯🇵 | Medium
- rrousselGit (Remi Rousselet)
- Riverpod
- 【Flutter】hooks_riverpod 1.0.0 (stable)にしたらuseProviderが使えなくなっていた | インフラエンジニアがもがくブログ
- Flutter x Riverpod でアプリ開発!実践入門
- state_notifier | Dart Package
- freezed | Dart Package
- 【Flutter】Providerで最低限のDIを行ってテスタブルなコードにリファクタリングする - Qiita
- 【Flutter】GitHubActionsでテストと静的解析を自動化する - Qiita
- Testing | Riverpod
- ドメイン知識とユースケースの違いは何か?[ドメイン駆動設計][DDD] - little hands' lab
- Freezedの代替方法を考える(Immutability編) - のんびり精進
- Flutterに関する記事まとめ | インフラエンジニアがもがくブログ