やっほー!
リンクアンドモチベーションでバックエンドエンジニアをしております清水と申します(社内ではマイケルと呼ばれています)。
弊社ではアジャイル(スクラム)を採用しており、チケットの管理を外部ツールのJIRAを使用しています。
さて、突然ですがみなさんはJIRAチケットをどうやって作っていますか?
- 「プランニングの度にひーこら言いながら大量のチケットを作っているぜ!」
- 「大量にチケットを作ってプランニングで優先順位の高いものから取っているよ」
などなど、いろんなやり方があるかと思います。
現在、私が所属しているチームでは、プランニングの際にチケットを大量に作成しています。その際に気づくことがあります。
1. ライブラリ更新
2. プロダクト対応
3. QA関連
.
.
.
.
(果てしない道のり)
「...このチケット、ほぼ毎回作っているんですが。」
SO!
定期タスクやユーザーストーリーごとに必須のチケットがあることに気づくのです!
OH!
なんて無駄なんだ!
HO!
これはエンジニアらしく工数削減だ!
ということで、この記事では定期チケットを簡単に作れるようにJIRAのAPIをGoogle Apps Scriptで実装しましたので、その紹介です。
※ 実装コードはすべて生成AIに任せました
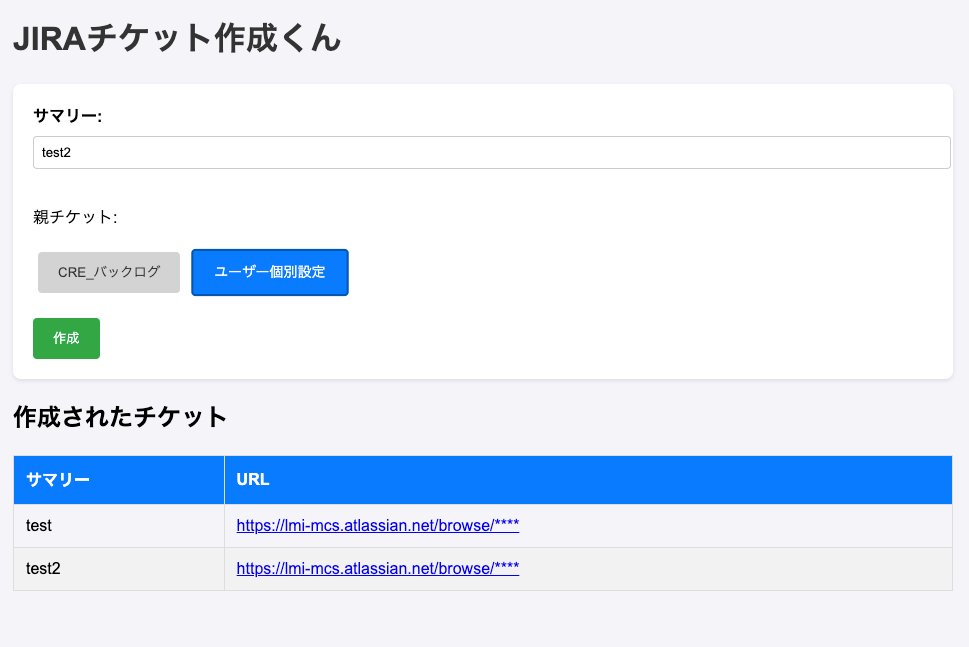
成果物
<!DOCTYPE html>
<html>
  <head>
    <base target="_top">
    <style>
      body {
        font-family: Arial, sans-serif;
        margin: 20px;
        background-color: #f4f4f9;
      }
      h1 {
        color: #333;
      }
      form {
        background-color: #fff;
        padding: 20px;
        border-radius: 8px;
        box-shadow: 0 2px 4px rgba(0, 0, 0, 0.1);
        margin-bottom: 20px;
      }
      label {
        display: block;
        margin-bottom: 8px;
        font-weight: bold;
      }
      input[type="text"] {
        width: 100%;
        padding: 8px;
        margin-bottom: 20px;
        border: 1px solid #ccc;
        border-radius: 4px;
      }
      .parent-button {
        background-color: #d3d3d3; /* 薄いグレー */
        color: #333;
        border: none;
        padding: 10px 20px;
        margin: 5px;
        cursor: pointer;
        border-radius: 4px;
        transition: background-color 0.3s, transform 0.3s;
      }
      .parent-button:hover {
        background-color: #b0b0b0; /* ホバー時の色 */
      }
      .selected {
        background-color: #007bff; /* 濃い青 */
        color: white;
        border: 2px solid #0056b3;
        transform: scale(1.05);
      }
      .create-button {
        background-color: #28a745;
        color: white;
        border: none;
        padding: 10px 20px;
        cursor: pointer;
        border-radius: 4px;
        transition: background-color 0.3s;
      }
      .create-button:hover {
        background-color: #218838;
      }
      table {
        width: 100%;
        border-collapse: collapse;
        margin-top: 20px;
      }
      th, td {
        border: 1px solid #ddd;
        padding: 12px;
        text-align: left;
      }
      th {
        background-color: #007bff;
        color: white;
      }
      tr:nth-child(even) {
        background-color: #f2f2f2;
      }
      .loader {
        border: 8px solid #f3f3f3;
        border-top: 8px solid #3498db;
        border-radius: 50%;
        width: 40px;
        height: 40px;
        animation: spin 1s linear infinite; /* スピードを速く */
        display: none;
        margin: 20px auto;
      }
      @keyframes spin {
        0% { transform: rotate(0deg); }
        100% { transform: rotate(360deg); }
      }
    </style>
  </head>
  <body>
    <h1>JIRAチケット作成くん</h1>
    <form id="jiraForm">
      <label for="summary">サマリー:</label>
      <input type="text" id="summary" name="summary" required>

      <p>親チケット:</p>
      <button type="button" class="parent-button" value="**-151" onclick="selectParent(this)">CRE_バックログ</button>
      <button type="button" class="parent-button" value="**-6696" onclick="selectParent(this)">ユーザー個別設定</button><br><br>

      <button type="button" class="create-button" onclick="createTicket()">作成</button>
    </form>

    <div class="loader" id="loader"></div>

    <h2>作成されたチケット</h2>
    <table id="ticketTable">
      <thead>
        <tr>
          <th>サマリー</th>
          <th>URL</th>
        </tr>
      </thead>
      <tbody>
        <!-- チケット情報がここに追加されます -->
      </tbody>
    </table>

    <script>
      let selectedParentKey = null;

      function selectParent(button) {
        const buttons = document.querySelectorAll('.parent-button');
        buttons.forEach(btn => btn.classList.remove('selected'));
        button.classList.add('selected');
        selectedParentKey = button.value;
      }

      function createTicket() {
        const summary = document.getElementById('summary').value;

        if (!selectedParentKey) {
          alert('親チケットを選択してください。');
          return;
        }

        // ローディングUIを表示
        document.getElementById('loader').style.display = 'block';

        google.script.run.withSuccessHandler(addTicketToTable).createJiraTicket(summary, selectedParentKey);
      }

      function addTicketToTable(issueUrl) {
        // ローディングUIを非表示
        document.getElementById('loader').style.display = 'none';

        const summary = document.getElementById('summary').value;
        const tableBody = document.getElementById('ticketTable').getElementsByTagName('tbody')[0];
        const newRow = tableBody.insertRow();

        const summaryCell = newRow.insertCell(0);
        const urlCell = newRow.insertCell(1);

        summaryCell.textContent = summary;
        urlCell.innerHTML = `<a href="${issueUrl}" target="_blank">${issueUrl}</a>`;
      }
    </script>
  </body>
</html>
function doGet() {
  return HtmlService.createHtmlOutputFromFile('index');
}

const JIRA_USER = "メールアドレス";
const JIRA_API_TOKEN = "トークン";
const BOARD_URL = "ボードのURL";

function createJiraTicket(summary, parentKey) {
  const payload = {
    fields: {
      parent: {
        key: parentKey // 親チケットキー
      },
      project: {
        key: 'プロジェクトキー'
      },
      summary: summary,
      issuetype: {
        id: "10008"
      },
      customfield_10010: getTargetSprintId()
    }
  };

  const options = {
    method: "post",
    contentType: "application/json",
    headers: {
      "Authorization": "Basic " + Utilities.base64Encode(JIRA_USER + ":" + JIRA_API_TOKEN),
      "Accept": "application/json"
    },
    payload: JSON.stringify(payload)
  };

  const response = UrlFetchApp.fetch(BOARD_URL + "/rest/api/3/issue", options);
  const responseData = JSON.parse(response.getContentText());

  const issueKey = responseData.key;
  const issueUrl = `${BOARD_URL}/browse/${issueKey}`;

  Logger.log(`チケットが作成されました: ${issueUrl}`);
  return issueUrl;
}

// アクティブおよび将来のスプリントを取得
function getTargetSprintId() {
  const response = UrlFetchApp.fetch(`${BOARD_URL}/rest/agile/1.0/board/***/sprint?state=active,future`, {
    method: "get",
    headers: {
      "Authorization": "Basic " + Utilities.base64Encode(JIRA_USER + ":" + JIRA_API_TOKEN),
      "Accept": "application/json"
    }
  });

  const sprints = JSON.parse(response.getContentText()).values;
  let targetSprintId = null;

  // アクティブなスプリントを探す
  for (let sprint of sprints) {
    if (sprint.state === "active") {
      targetSprintId = sprint.id;
      break;
    }
  }

  // アクティブなスプリントがない場合、将来のスプリントを取得
  if (!targetSprintId) {
    const futureSprints = sprints.filter(sprint => sprint.state === "future");
    if (futureSprints.length > 0) {
      targetSprintId = futureSprints.sort((a, b) => new Date(a.createdDate) - new Date(b.createdDate))[0].id;
    }
  }

  return targetSprintId;
}
before after
before
「チケットを作る度にモーダル開くわ、遷移しちゃうわで使いづらい...」
after
「なんてことだ!1つの画面でチケットがつくり放題だと!?」
before
「あれ、どのチケットが作成済みだっけ...」
after
「なんてことだ!1つの画面で作ったチケットが見放題だなんて!?」
before
「チケット作成の度に親チケット選ぶのめんどいな...」
after
「なんてことだ!親チケットがずっと選択状態だなんて!?」
まとめ
今回紹介したコードですが、「これが僕の考えた最強のコード」というわけではないです。
この記事で伝えたかったことは、「JIRAのAPIを使うと自分好みにカスタマイズできるからおすすめだよ」ということです。
issue作成のAPI以外にも便利なAPIがたくさんあるので、皆さんも使ってみたらぜひ紹介してください!
参考
