UI部品の配置をカスタマイズする
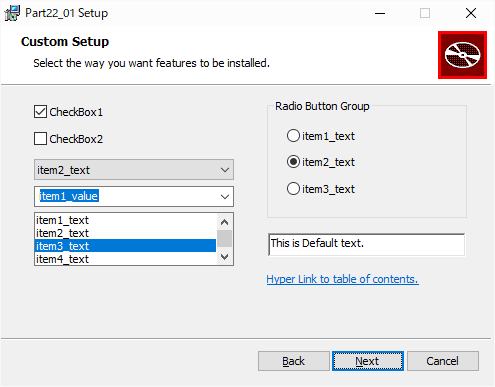
今回は、インストーラーのウィンドウにチェックボックスやコンボボックスなどを自由に配置して、ユーザーが入力した結果をインストールに反映する方法を説明します。
プロジェクトの準備
手軽にカスタマイズする方法として、Wix Toolsetが用意しているダイアログボックスを改造する方法を紹介します。使用するのは、CustomizeDlgです。もともとのCustomizeDlgは下図のようなウィンドウです。
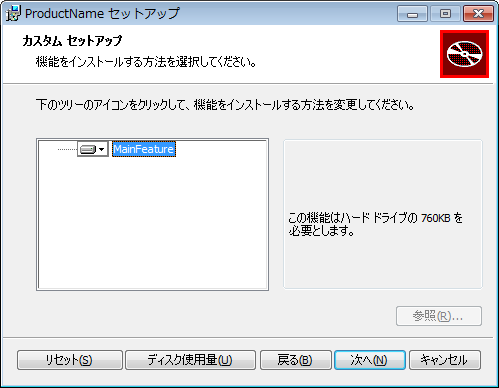
このダイアログのソースは、Wix Toolsetのソースのsrc\ext\UIExtension\wixlib\CustomizeDlg.wxsですので、これを自分のプロジェクトのディレクトリにコピーし、CustomizeDlg2.wxsにリネームします。また、Dialog SetはFeatureTreeを使いますので、src\ext\UIExtension\wixlib\WixUI_FeatureTree.wxsを自分のプロジェクトのディレクトリにコピーし、WixUI_Part22.wxsのようにリネームします。そして、プロジェクトに追加します。UI Extensionも使用するので、ReferencesにWix UIExtensionを忘れずに追加しておきます。
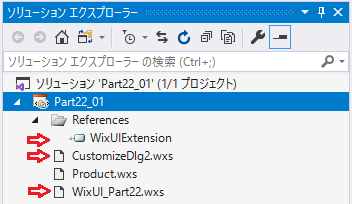
WixUI_Part22.wxsは、前回同様UIエレメントのIdを独自のもの(今回はWixUI_Part22)に変更し、コピーしてきたCustomizeDlg2.wxsを使うように、CustomizeDlgとなっているところをCustomizeDlg2に変更します。
<?xml version="1.0" encoding="UTF-8"?>
<!-- Copyright (c) .NET Foundation and contributors. All rights reserved. Licensed under the Microsoft Reciprocal License. See LICENSE.TXT file in the project root for full license information. -->
<Wix xmlns="http://schemas.microsoft.com/wix/2006/wi">
    <Fragment>
        <UI Id="WixUI_Part22">
            <TextStyle Id="WixUI_Font_Normal" FaceName="Tahoma" Size="8" />
            <TextStyle Id="WixUI_Font_Bigger" FaceName="Tahoma" Size="12" />
            <TextStyle Id="WixUI_Font_Title" FaceName="Tahoma" Size="9" Bold="yes" />

            <Property Id="DefaultUIFont" Value="WixUI_Font_Normal" />
            <Property Id="WixUI_Mode" Value="FeatureTree" />

            <DialogRef Id="ErrorDlg" />
            <DialogRef Id="FatalError" />
            <DialogRef Id="FilesInUse" />
            <DialogRef Id="MsiRMFilesInUse" />
            <DialogRef Id="PrepareDlg" />
            <DialogRef Id="ProgressDlg" />
            <DialogRef Id="ResumeDlg" />
            <DialogRef Id="UserExit" />

            <Publish Dialog="ExitDialog" Control="Finish" Event="EndDialog" Value="Return" Order="999">1</Publish>

            <Publish Dialog="WelcomeDlg" Control="Next" Event="NewDialog" Value="LicenseAgreementDlg">NOT Installed</Publish>
            <Publish Dialog="WelcomeDlg" Control="Next" Event="NewDialog" Value="VerifyReadyDlg">Installed AND PATCH</Publish>

            <Publish Dialog="LicenseAgreementDlg" Control="Back" Event="NewDialog" Value="WelcomeDlg">1</Publish>
            <Publish Dialog="LicenseAgreementDlg" Control="Next" Event="NewDialog" Value="CustomizeDlg2">LicenseAccepted = "1"</Publish>

            <Publish Dialog="CustomizeDlg2" Control="Back" Event="NewDialog" Value="MaintenanceTypeDlg" Order="1">Installed</Publish>
            <Publish Dialog="CustomizeDlg2" Control="Back" Event="NewDialog" Value="LicenseAgreementDlg" Order="2">NOT Installed</Publish>
            <Publish Dialog="CustomizeDlg2" Control="Next" Event="NewDialog" Value="VerifyReadyDlg">1</Publish>

            <Publish Dialog="VerifyReadyDlg" Control="Back" Event="NewDialog" Value="CustomizeDlg2" Order="1">NOT Installed OR WixUI_InstallMode = "Change"</Publish>
            <Publish Dialog="VerifyReadyDlg" Control="Back" Event="NewDialog" Value="MaintenanceTypeDlg" Order="2">Installed AND NOT PATCH</Publish>
            <Publish Dialog="VerifyReadyDlg" Control="Back" Event="NewDialog" Value="WelcomeDlg" Order="3">Installed AND PATCH</Publish>

            <Publish Dialog="MaintenanceWelcomeDlg" Control="Next" Event="NewDialog" Value="MaintenanceTypeDlg">1</Publish>

            <Publish Dialog="MaintenanceTypeDlg" Control="ChangeButton" Event="NewDialog" Value="CustomizeDlg2">1</Publish>
            <Publish Dialog="MaintenanceTypeDlg" Control="RepairButton" Event="NewDialog" Value="VerifyReadyDlg">1</Publish>
            <Publish Dialog="MaintenanceTypeDlg" Control="RemoveButton" Event="NewDialog" Value="VerifyReadyDlg">1</Publish>
            <Publish Dialog="MaintenanceTypeDlg" Control="Back" Event="NewDialog" Value="MaintenanceWelcomeDlg">1</Publish>
        </UI>

        <UIRef Id="WixUI_Common" />
    </Fragment>
</Wix>
CustomizeDlg2.wxsの方は、DialogエレメントのIdをCustomizeDlg2に変更しておきます。そして前回同様、Product.wxsにUIRefエレメントを追加します。
<UIRef Id="WixUI_Part22"/>
ここまでくればビルドできるはずですので、一旦間違いがないか確認する意味でビルドしてみます。
下ごしらえ
自由にダイアログにUI部品を置くために、まずもともとCustomizeDlgに置かれているUI部品を削除します。下図の赤枠部分を削除します。
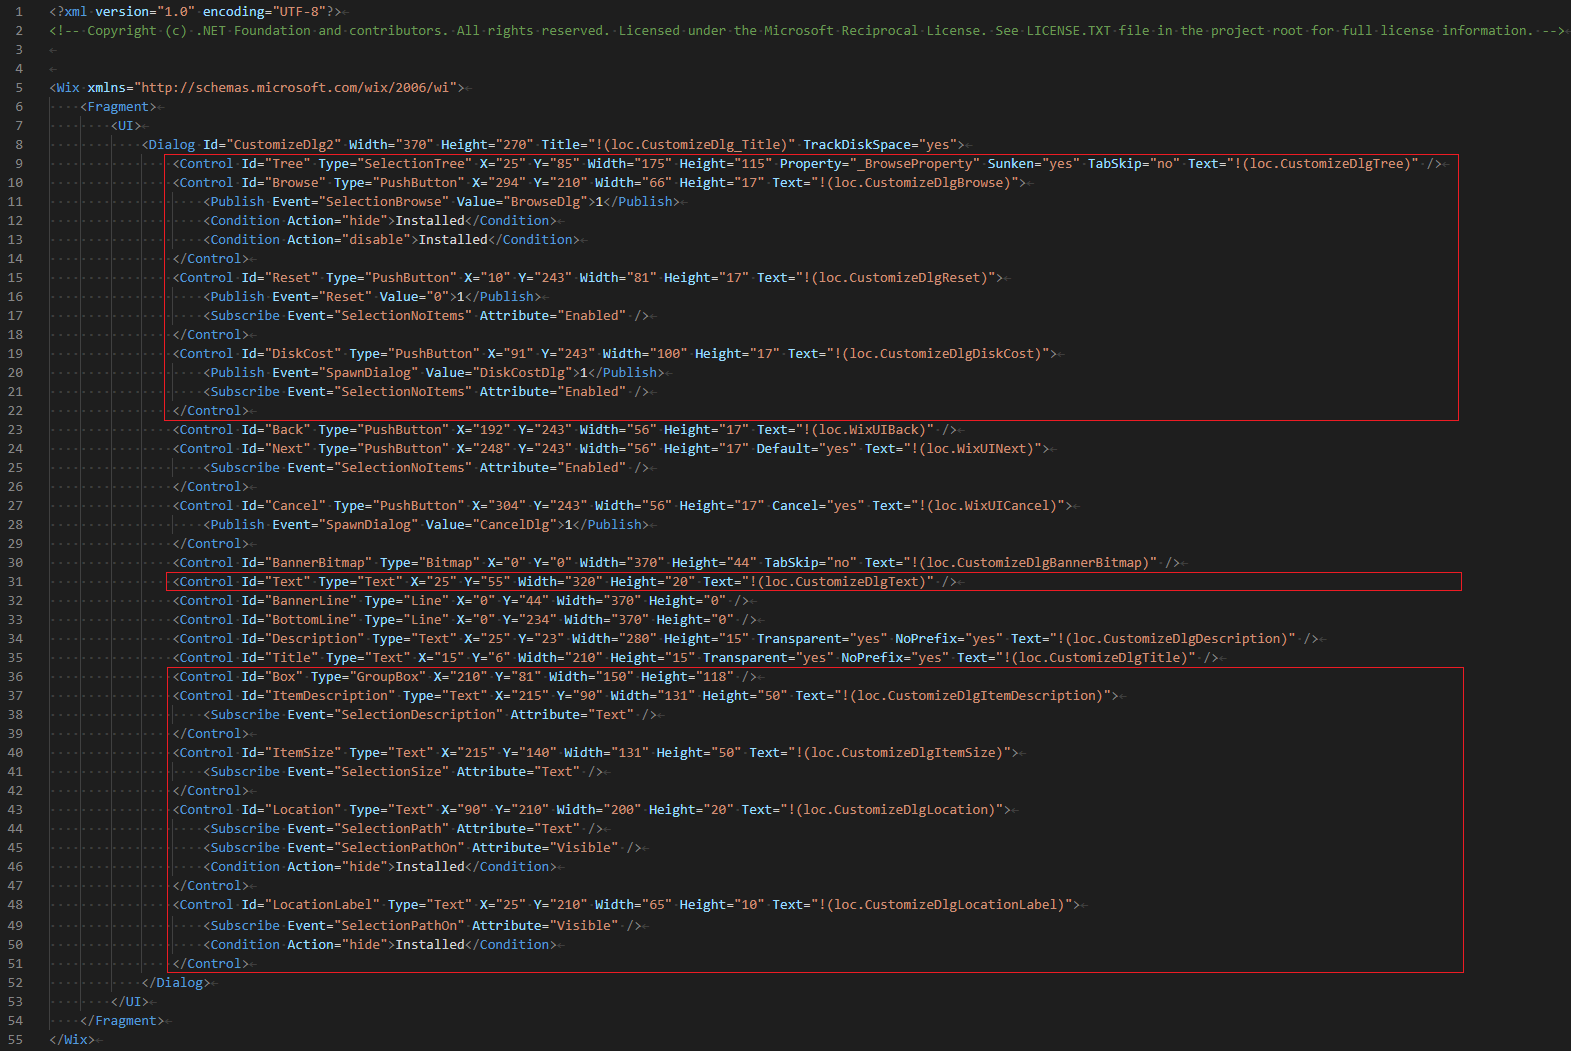
これを実行すると、以下のように、のっぺらぼうのダイアログになります。
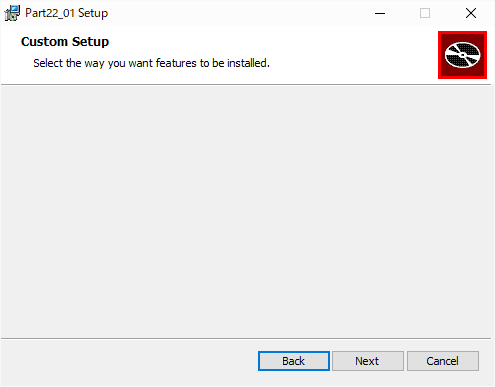
この空いた空間にUI部品を載せていきます。
UI部品の追加
下記のUI部品を追加してみます。
上記のリンク先を開くと、まだまだ色々なUI部品が用意されていることがわかりますので、目を通しておくと良いでしょう。まず、これらを追加したソースを示します。UI部品名のコメントが入っているところが追加したところです。
<?xml version="1.0" encoding="UTF-8"?>
<!-- Copyright (c) .NET Foundation and contributors. All rights reserved. Licensed under the Microsoft Reciprocal License. See LICENSE.TXT file in the project root for full license information. -->

<Wix xmlns="http://schemas.microsoft.com/wix/2006/wi">
    <Fragment>
        <!-- 初期値 -->
        <Property Id="VALCHKBOX1" Value="1" />
        <Property Id="VALCMBBOX1" Value="item2_value" />
        <Property Id="VALCMBBOX2" Value="item1_value" />
        <Property Id="VALLISTBOX" Value="item3_value" />
        <Property Id="VALRADIOBTN" Value="item2_value" />
        <Property Id="VALEDIT" Value="This is Default text." />
        <UI>
            <Dialog Id="CustomizeDlg2" Width="370" Height="270" Title="!(loc.CustomizeDlg_Title)" TrackDiskSpace="yes">
                <Control Id="Next" Type="PushButton" X="248" Y="243" Width="56" Height="17" Default="yes" Text="!(loc.WixUINext)">
                    <Subscribe Event="SelectionNoItems" Attribute="Enabled" />
                </Control>
                <Control Id="Back" Type="PushButton" X="192" Y="243" Width="56" Height="17" Text="!(loc.WixUIBack)" />
                <Control Id="Cancel" Type="PushButton" X="304" Y="243" Width="56" Height="17" Cancel="yes" Text="!(loc.WixUICancel)">
                    <Publish Event="SpawnDialog" Value="CancelDlg">1</Publish>
                </Control>
                <Control Id="BannerBitmap" Type="Bitmap" X="0" Y="0" Width="370" Height="44" TabSkip="no" Text="!(loc.CustomizeDlgBannerBitmap)" />
                <Control Id="BannerLine" Type="Line" X="0" Y="44" Width="370" Height="0" />
                <Control Id="BottomLine" Type="Line" X="0" Y="234" Width="370" Height="0" />
                <Control Id="Description" Type="Text" X="25" Y="23" Width="280" Height="15" Transparent="yes" NoPrefix="yes" Text="!(loc.CustomizeDlgDescription)" />
                <Control Id="Title" Type="Text" X="15" Y="6" Width="210" Height="15" Transparent="yes" NoPrefix="yes" Text="!(loc.CustomizeDlgTitle)" />
                <!-- チェックボックス -->
                <Control Id="tChkBox1" Type="CheckBox" Property="VALCHKBOX1" CheckBoxValue="1" X="25" Y="55" Width="150" Height="20" Text="CheckBox1" />
                <Control Id="tChkBox2" Type="CheckBox" Property="VALCHKBOX2" CheckBoxValue="1" X="25" Y="75" Width="150" Height="20" Text="CheckBox2" />
                <!-- コンボボックス -->
                <Control Id="tComboBox1" Type="ComboBox" Property="VALCMBBOX1" ComboList="yes" X="25" Y="100" Width="150" Height="20" Text="Combo box">
                    <ComboBox Property="VALCMBBOX1">
                        <ListItem Text="item1_text" Value ="item1_value" />
                        <ListItem Text="item2_text" Value ="item2_value" />
                        <ListItem Text="item3_text" Value ="item3_value" />
                    </ComboBox>
                </Control>
                <Control Id="tComboBox2" Type="ComboBox" Property="VALCMBBOX2" X="25" Y="120" Width="150" Height="20" Text="Combo box">
                    <ComboBox Property="VALCMBBOX2">
                        <ListItem Text="item1_text" Value ="item1_value" />
                        <ListItem Text="item2_text" Value ="item2_value" />
                        <ListItem Text="item3_text" Value ="item3_value" />
                    </ComboBox>
                </Control>
                <!-- リストボックス -->
                <Control Id="tListBox" Type="ListBox" Property="VALLISTBOX" X="25" Y="140" Width="150" Height="45" Text="List Box">
                    <ListBox Property="VALLISTBOX">
                        <ListItem Text="item1_text" Value ="item1_value" />
                        <ListItem Text="item2_text" Value ="item2_value" />
                        <ListItem Text="item3_text" Value ="item3_value" />
                        <ListItem Text="item4_text" Value ="item4_value" />
                        <ListItem Text="item5_text" Value ="item5_value" />
                    </ListBox>
                </Control>
                <!-- ラジオボタン -->
                <Control Id="tRadioBtn" Type="RadioButtonGroup" Property="VALRADIOBTN" X="210" Y="75" Width="150" Height="90">
                    <RadioButtonGroup Property="VALRADIOBTN">
                        <RadioButton Text="item1_text" Value ="item1_value" X="5" Y="0"  Width="80" Height="15"/>
                        <RadioButton Text="item2_text" Value ="item2_value" X="5" Y="20" Width="80" Height="15"/>
                        <RadioButton Text="item3_text" Value ="item3_value" X="5" Y="40" Width="80" Height="15"/>
                    </RadioButtonGroup>
                </Control>
                <Control Id="tGroupBox" Type="GroupBox" X="200" Y="55" Width="150" Height="90" Text="Radio Button Group"/>
                <!-- エディットボックス -->
                <Control Id="tEditBox" Type="Edit" Property="VALEDIT" X="200" Y="155" Width="150" Height="20"></Control>
                <!-- ハイパーリンク -->
                <Control Id="tHyperLink" Type="Hyperlink" X="200" Y="185" Height="20" Width="150">
                    <Text>
                        <![CDATA[<a href="https://qiita.com/tohshima/items/dc4c4721d50a2ad70c7a">Hyper Link to table of contents.</a>]]>
                    </Text>
                </Control>
            </Dialog>
        </UI>
    </Fragment>
</Wix>
各UI部品にはプロパティが割り当てられていて、ユーザーが操作した値が格納されます。ほとんどの場合、ユーザー入力の結果を利用して動作を変える部分はExecuteシーケンスになります。Executeシーケンスでは、これらのプロパティを利用して実際のインストール動作をカスタマイズしていくことになります。
ユーザーが入力した結果の利用
すでに説明したとおり、ユーザーが入力した結果は各UI部品に割り当てられたプロパティに入っているので、利用は簡単です。今回は、Part15で作成したSimpleMsgBox.exeをカスタムアクションから呼んで、プロパティの内容をダイアログとコマンドプロンプトに表示してみます。Product.wxsは以下のようになります。
<?xml version="1.0" encoding="UTF-8"?>
<Wix xmlns="http://schemas.microsoft.com/wix/2006/wi">
<Product Id="36FAB80F-5380-4F96-BC9F-80E6522307E0" Name="Part22_01" Language="1033" Version="1.0.0" Manufacturer="tohshima" UpgradeCode="07b8a8d5-63a0-4010-b1bf-89c0e6e2587b">
<Package InstallerVersion="200" Compressed="yes" InstallScope="perMachine" />
<MajorUpgrade DowngradeErrorMessage="A newer version of [ProductName] is already installed." />
<MediaTemplate />
<UIRef Id="WixUI_Part22"/>
<Binary Id="msgBox_exe" SourceFile="SimpleMsgBox.exe" />
<CustomAction Id="aShowMsg" BinaryKey="msgBox_exe" ExeCommand=""
VALCHKBOX1 = [VALCHKBOX1]
VALCHKBOX2 = [VALCHKBOX2]
VALCMBBOX1 = [VALCMBBOX1]
VALCMBBOX2 = [VALCMBBOX2]
VALLISTBOX = [VALLISTBOX]
VALRADIOBTN = [VALRADIOBTN]
VALEDIT = [VALEDIT]"" Return="check" Execute="immediate" />
<InstallExecuteSequence>
<Custom Action="aShowMsg" After="InstallInitialize">NOT Installed</Custom>
</InstallExecuteSequence>
<Feature Id="ProductFeature" Title="Part22_01" Level="1">
<ComponentGroupRef Id="ProductComponents" />
</Feature>
</Product>
<Fragment>
<Directory Id="TARGETDIR" Name="SourceDir">
<Directory Id="ProgramFilesFolder">
<Directory Id="INSTALLFOLDER" Name="Part22_01" />
</Directory>
</Directory>
</Fragment>
<Fragment>
<ComponentGroup Id="ProductComponents" Directory="INSTALLFOLDER">
<Component Id="cExe" Guid="{7882989E-48AE-4869-8877-C5503751FBF7}" >
<File Id="fExe" Source="C:\Windows\System32\calc.exe" KeyPath="yes"/>
</Component>
</ComponentGroup>
</Fragment>
</Wix>
今回の変更は、UIRefエレメントからInstallExecuteSequenceエレメントに集約しました。このコードでは、プロパティの内容を表示するために、CustomActionエレメントのExeCommand要素でプロパティを参照していますが、多くの場合はCustomエレメントのConditionで使われることになるでしょう。
チェックボックスのプロパティ初期化について
チェックボックスの初期化は、他のUI部品と比べて少し特殊です。Windows Insrtallerのプロパティは、値なしという状態を持つことができます(未定義の方が正確かも)。今回のコード例で示したように、チェックボックスをチェック有りで初期化するときはプロパティに1を設定し、チェック無しで初期化するときはプロパティを設定しません。チェックを外すつもりで、うっかりプロパティに0を設定すると、チェックが付いた状態でUI部品が表示されてしまうので注意が必要です。また、チェックボックスのプロパティを1以外の値で初期化しても、ユーザーがチェックを一旦外してチェックを入れ直すと、値が1に変わってしまいます。チェックボックスのプロパティには1以外を入れない方が無難です。
