Feature
基本的なFeatureの使い方
これまで、Component、Directoryを説明してきましたが、Featureを定義すればファイルやレジストリをインストールできます。基本は、Featureエレメントの子エレメントとしてインストールしたいComponentのIdを持つComponentRefエレメントを置くことです。例えば、IdがexeComponent、pngComponentのComponentをインストールしたければ次のようになります。
 1: <Feature Id="ProductFeature" Title="Part4_01" Level="1">
 2:   <ComponentRef Id="exeComponent" />
 3:   <ComponentRef Id="pngComponent" />
 4: </Feature>
しかし、このやり方だとComponentが増えるたびにFeatureエレメントの子エレメントとしてComponentRefエレメントを追加しなければなりません。そこで、インストールしたい全てのComponentエレメントをComponentGroupエレメントでくくってしまえば、Componentを追加してもFeatureエレメントの子エレメントを変更する必要がなくなります。例えば、Componentを下記のように定義します。
 1: <ComponentGroup Id="ProductComponents" Directory="INSTALLFOLDER">
 2:   <Component Id="exeComponent" Guid="e198536a-2730-4dd7-97e2-b8d5b3466497">
 3:     <File Id="calcFile" KeyPath="yes" Source="C:\Windows\System32\calc.exe" />
 4:   </Component>
 5:   <Component Id="pngComponent" Guid="ea36035e-7ddd-4f3d-9995-1c64adb5ffae">
 6:     <File Id="pngFile" KeyPath="yes" Source="C:\Windows\System32\SecurityAndMaintenance.png" />
 7:   </Component>
 8: </ComponentGroup>
そうすると、Featureエレメントの子エレメントは下記のように簡略化できます。
 1: <Feature Id="ProductFeature" Title="Part4_01" Level="1">
 2:   <ComponentGroupRef Id="ProductComponents" />
 3: </Feature>
これならComponentGroupエレメントの子にComponentエレメントを追加していけばFeatureエレメントに変更を加える必要がありません。WiX ToolsetがVisual Studioにインストールする「新しいプロジェクト」のテンプレートもこの構造になっていて、シンプルなインストーラーならFeatureエレメントに変更を加える必要がないようになっています。
ユーザーが機能を選択できるようにする
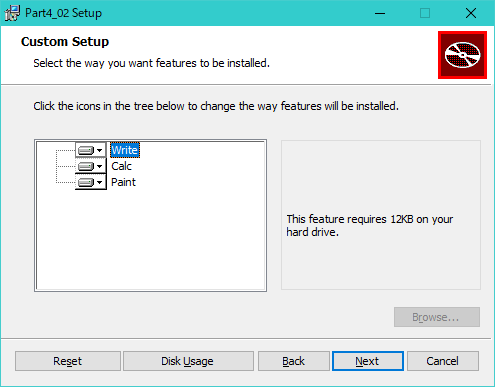
大規模なアプリではインストールウィザード内でインストールしたい機能を選択できるようにしたものがあります。Featureはユーザーが機能を選択したとき、どのComponentをインストールするか定義するためにあります。WiXでUI付きのインストーラーを作成するなら、CustomizeDlgを表示するだけでFeatureエレメントの定義通りに機能が選択可能になります。例えば、下記のようにFeatureを定義します。
 1: <Feature Id="writeFeature" Title="Write" Level="1">
 2:   <ComponentGroupRef Id="writeComponents" />
 3: </Feature>
 4: <Feature Id="calcFeature" Title="Calc" Level="1">
 5:   <ComponentGroupRef Id="calcComponents" />
 6: </Feature>
 7: <Feature Id="paintFeature" Title="Paint" Level="1">
 8:   <ComponentGroupRef Id="paintComponents" />
 9: </Feature>
こうすると、CustomizeDlgは下図のような表示になります。

Featureエレメントにはこの画面の選択肢を制御する色々な機能があるので、WiXのドキュメントFeature Elementを参照してください。
INSTALLLEVELとFeature
FeatureエレメントのLevel属性にはInstall Levelを0以上の数値で指定します。0を設定したFeatureはインストールされません。INSTALLLEVELプロパティに設定された数値以下(等しい数値も含む)のInstall Levelを持つFeatureがインストールされます。INSTALLLEVELに何も設定しなかった場合は1が入っています。最も簡単にInstall Levelを利用する方法は、SetupTypeDlgを利用することです。

[Typical]ボタンはINSTALLLEVELを3に、[Complete]ボタンはINSTALLLEVELを1000に設定します1。これに合わせてFeatureエレメントのLevel属性を設定すれば、望みの動作になります。[Custom]ボタンはCustomizeDlgを表示し、INSTALLLEVELにとらわれずに機能を選択するとき利用します。INSTALLLEVELはPublic Propertyなので2msiexecのコマンドラインから指定することもできます。SetupTypeDlgを表示せずに[Typical]ボタンを押したときと同じ動作をさせる場合は、下記のようにインストーラーを起動させます。
msiexec INSTALLLEVEL=3 /i Part4_01.msi
-
これを確認するにはWiXのソースにあるファイルsrc/ext/UIExtension/wixlib/SetupTypeDlg.wxsを見る必要があります。WiXのドキュメントに書いて欲しいところです。 ↩
-
これは全部大文字であることからも読み取れますね。 ↩