目次へのリンク
概要
このデモではSSD(Single Shot Multibox Detector)による物体検出器の学習および推論を行います。
実行には下記のToolboxが必要になります。
- MATLAB R2020a 以降
- Image Processing Toolbox
- Computer Vision Toolbox
- Deep Learning Toolbox
- Parallel Computing Toolbox (NVIDIA GPUでの学習・推論の高速化)
この例ではバックボーンのネットワークとしてResNet50を使用します。
ResNet50の読み込みには無償のアドオンをインストールが必要です。 (※[ホーム]-[アドオン]からインストール)
対応ファイル
さらにGPUコード生成を通してNVIDIA Jetson Nanoへの実装を行います。
GPU実装には下記のToolboxが必要です。
- MATLAB Coder
- GPU Coder
- GPU Coder Support Package for NVIDIA GPUs (GPU Coderのアドオン)
CUDAコードのビルドはターゲット上で行うためホスト側にNVIDIA GPUやCUDA Toolkitなどは不要です。
初期化
clear; close all force; clc; rng('default');
車両検出器用の学習データセットをロード
同梱の車両検出用のラベリング済み学習データセットを展開します。
unzip vehicleDatasetImages.zip
data = load('vehicleDatasetGroundTruth.mat');
vehicleDataset = data.vehicleDataset;
学習データとテスト用データに分割
学習用データ(60%)とテスト用データ(40%)に分割
rng(0); % 乱数シードを実行毎に固定にする(同じ結果を再現できるように)
shuffledIndices = randperm(height(vehicleDataset));
idx = floor(0.6 * length(shuffledIndices) );
trainingData = vehicleDataset(shuffledIndices(1:idx),:);
testData = vehicleDataset(shuffledIndices(idx+1:end),:);

imdsTrain = imageDatastore(trainingData{:,'imageFilename'});
bldsTrain = boxLabelDatastore(trainingData(:,'vehicle'));

imdsTest = imageDatastore(testData{:,'imageFilename'});
bldsTest = boxLabelDatastore(testData(:,'vehicle'));

trainingData = combine(imdsTrain,bldsTrain);
testData = combine(imdsTest, bldsTest);
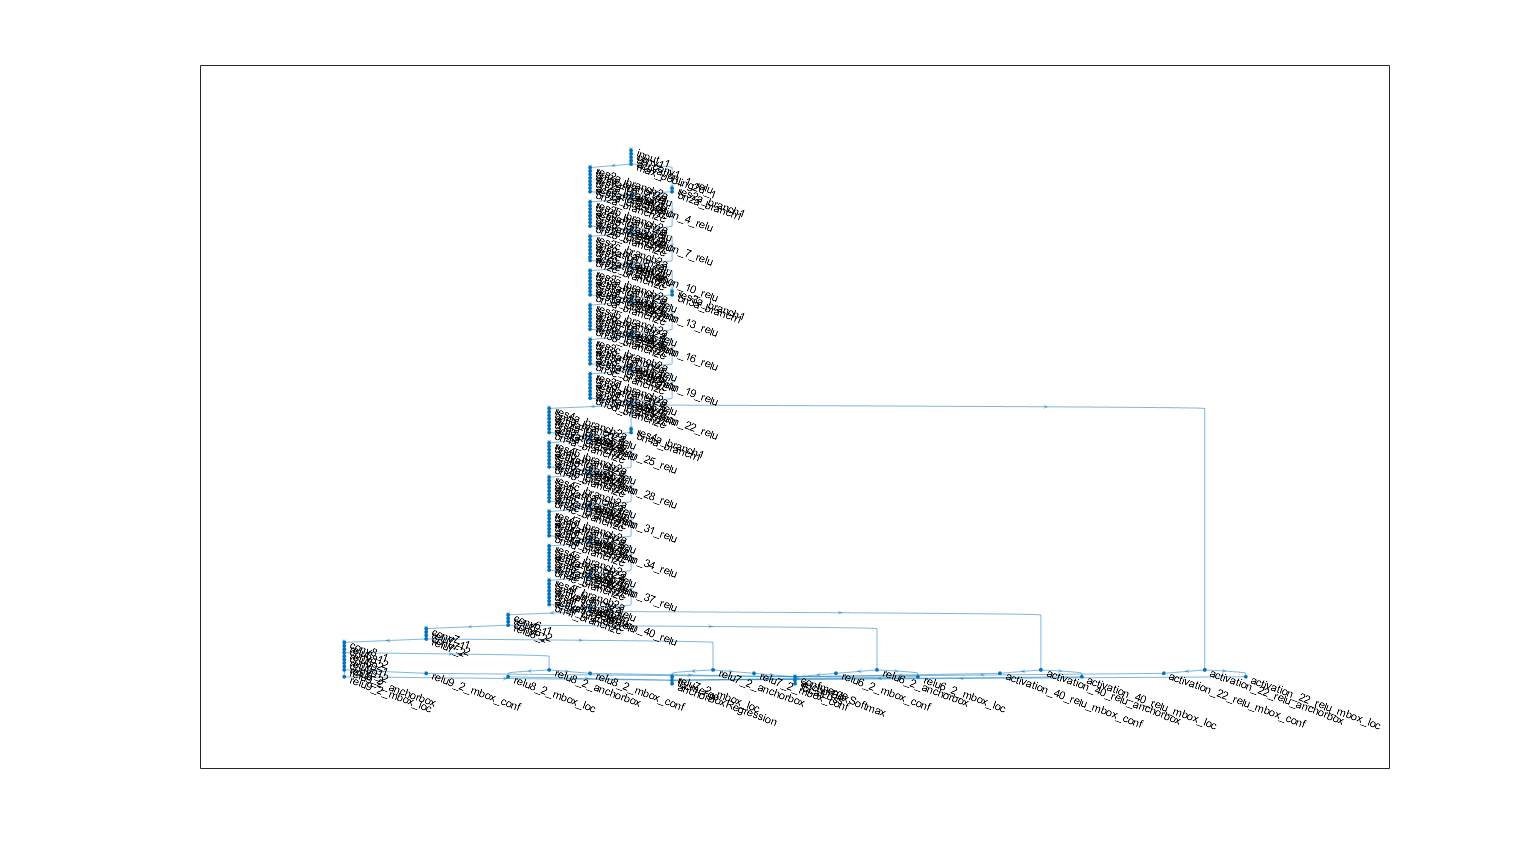
SSDネットワークを定義
ResNet50をベースにSSDのネットワークを定義します。
% 入力画像サイズ
inputSize = [300 300 3];

% クラス数(今回は車両のみなので1個)
numClasses = width(vehicleDataset)-1;

% SSDネットワークの作成(ベースはvgg16, resnet50, resnet101が使用可能)
lgraph = ssdLayers(inputSize, numClasses, 'resnet50');

% プロットする
figure('Units','normalized','Position',[0.1 0.1 0.8 0.8]);
plot(lgraph);
データの水増しと前処理
反転やシフトなどのデータ拡張(水増し、augmentation)を学習時に適用し、検出器の汎用性を高めます。
その後、ネットワークの入力に合わせてリサイズを行います。
% データの水増し(反転・移動)
augmentedTrainingData = transform(trainingData,@augmentData);
% 前処理(リサイズ)
preprocessedTrainingData = transform(augmentedTrainingData,@(data)preprocessData(data,inputSize));
学習オプションを指定
学習率は初期値は0.1とし、30エポックごとに0.8かけて小さくしていきます。
options = trainingOptions('sgdm', ...
        'MiniBatchSize', 16, ....
        'InitialLearnRate',1e-1, ...
        'LearnRateSchedule', 'piecewise', ...
        'LearnRateDropPeriod', 30, ...
        'LearnRateDropFactor', 0.8, ...
        'MaxEpochs', 300, ...
        'VerboseFrequency', 30, ...        .
        'Shuffle','every-epoch');
SSDネットワークの学習
学習を実行します。(GPUがない場合は数十時間かかります。)
doTraining = false;
if doTraining
    [detector, info] = trainSSDObjectDetector(preprocessedTrainingData,lgraph,options);
    save('ssdResNet50VehicleExample_20a','detector');
else
    % 学習済みモデルは以下でダウンロード可能
    if ~exist('ssdResNet50VehicleExample_20a.mat','file')
        disp('Downloading pretrained detector (44 MB)...');
        pretrainedURL = 'https://www.mathworks.com/supportfiles/vision/data/ssdResNet50VehicleExample_20a.mat';
        websave('ssdResNet50VehicleExample_20a.mat',pretrainedURL);
    end
    pretrained = load('ssdResNet50VehicleExample_20a.mat');
    detector = pretrained.detector;
end
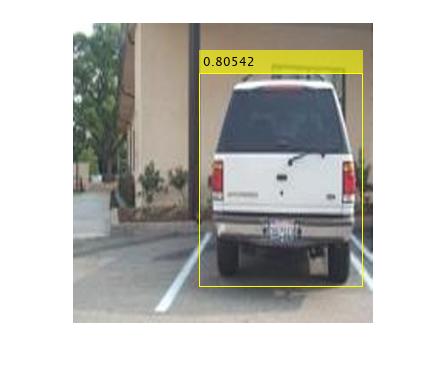
テスト画像の読み込みと学習済みSSDによる検出
テストデータから1枚画像を読み込み、検出を実行します。
実行結果を可視化し、目視で確認します。
data = read(testData); % テストデータから1枚読み込み
I = data{1,1}; % 画像のみ取り出す
I = imresize(I,inputSize(1:2));
[bboxes,scores] = detect(detector,I, 'Threshold', 0.4);

I = insertObjectAnnotation(I,'rectangle',bboxes,scores);
figure
imshow(I)
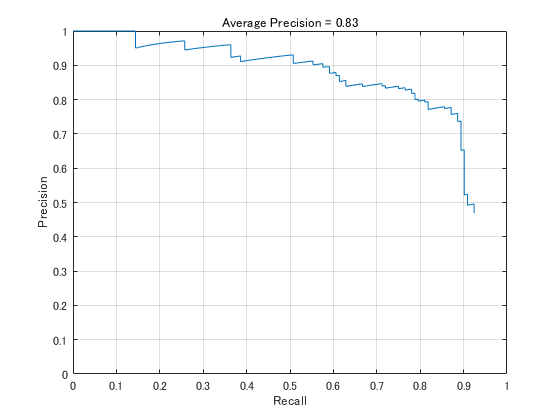
テストデータセットを使い検出器の性能評価
テストデータセット全体を使って検出器の性能を評価します。
テストデータの真値と検出結果を使ってPR曲線を計算します。
今回はIoU(どれぐらい真値のバウンディングボックスと検出結果のバウンディングボックスが重なるか)が
0.5以上の検出を対象します。
% テストデータに前処理適用(ただし、データの拡張は行わない)
preprocessedTestData = transform(testData,@(data)preprocessData(data,inputSize));

% 全てのテストデータに検出器をかける (スコアが0.4以上のものを検出結果として出力)
detectionResults = detect(detector, preprocessedTestData, 'Threshold', 0.4);

% 平均精度, 再現率, 適合率を計算
[ap,recall,precision] = evaluateDetectionPrecision(detectionResults, preprocessedTestData);

% PR曲線を表示
figure
plot(recall,precision)
xlabel('Recall')
ylabel('Precision')
grid on
title(sprintf('Average Precision = %.2f',ap))
axis([0 1 0 1]);
学習したSSDをNVIDIA Jetson Nano向けにCUDAコード生成
学習したSSDの検出器をNVIDIA Jetson Nanoに実装します。GPU実装には下記のToolboxが必要です。
- MATLAB Coder
- GPU Coder
- GPU Coder Support Package for NVIDIA GPUs (GPU Coderのアドオン)
Jetson実装に関連するハードウェアやソフトウェアの設定は上記のアドオンのヘルプをご覧ください。
セットアップが完了していないと下記は実行できないのでご注意ください。
Jetsonに接続
jetsonコマンドでJetsonに接続します。
hwobj = jetson('192.168.55.1','nvidia','nvidia')
Checking for CUDA availability on the Target...
Checking for 'nvcc' in the target system path...
Checking for cuDNN library availability on the Target...
Checking for TensorRT library availability on the Target...
Checking for prerequisite libraries is complete.
Gathering hardware details...
Checking for third-party library availability on the Target...
Gathering hardware details is complete.
 Board name         : NVIDIA Jetson TX1
 CUDA Version       : 10.0
 cuDNN Version      : 7.3
 TensorRT Version   : 5.0
 GStreamer Version  : 1.14.5
 V4L2 Version       : 1.14.2-1
 SDL Version        : 1.2
 Available Webcams  : Microsoft® LifeCam Cinema(TM)
 Available GPUs     : NVIDIA Tegra X1
hwobj =
  jetson のプロパティ:

       DeviceAddress: '192.168.55.1'
                Port: 22
           BoardName: 'NVIDIA Jetson TX1'
         CUDAVersion: '10.0'
        cuDNNVersion: '7.3'
     TensorRTVersion: '5.0'
          SDLVersion: '1.2'
         V4L2Version: '1.14.2-1'
    GStreamerVersion: '1.14.5'
             GPUInfo: [1x1 struct]
          WebcamList: {'Microsoft® LifeCam Cinema(TM)'}
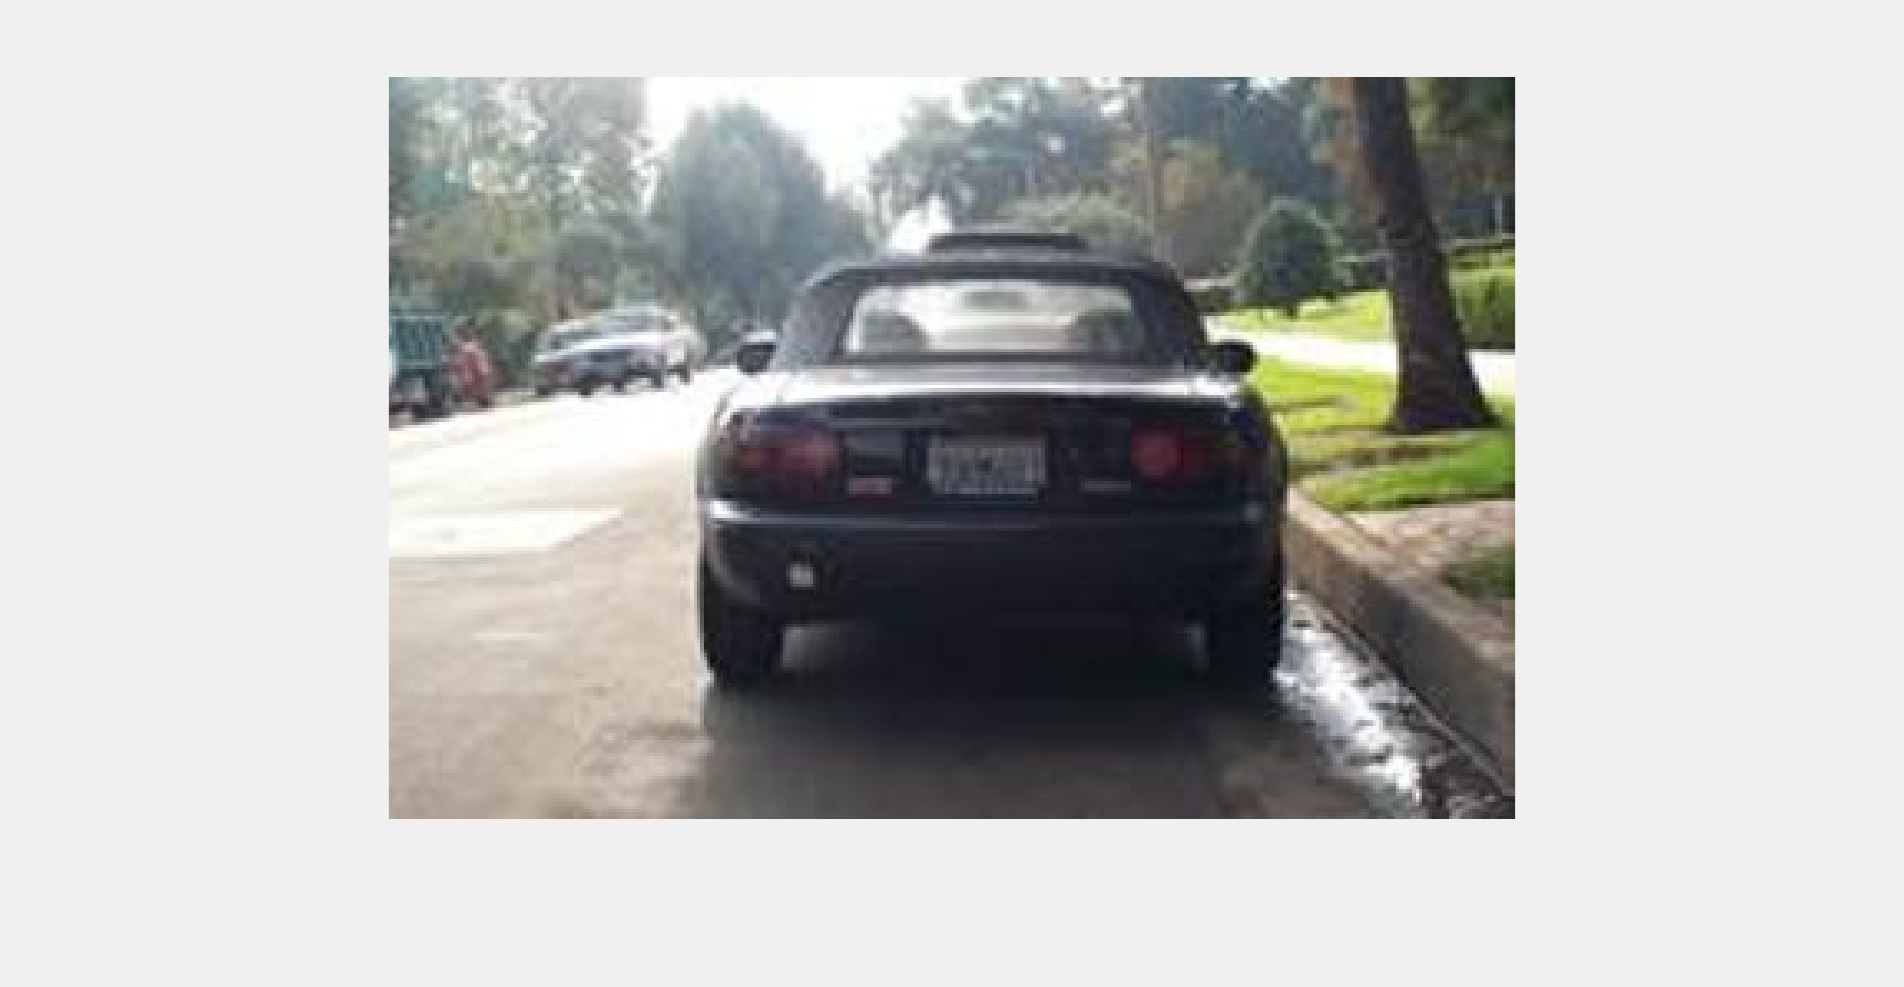
Jetson Nanoのカメラに映すテスト画像を表示
画像をディスプレイに最大サイズで表示します。
data = read(testData);
I = data{1,1};
figure;
set(gcf,'Visible','on','units','normalized','outerposition',[0 0 1 1]);
imshow(I)
Jetsonに接続されているカメラで画像取得
表示している車両画像を取り込みます。
clear cam display;
cam = hwobj.webcam; % カメラデバイスを取得
img = snapshot(cam); % 1枚画像取得
display = hwobj.imageDisplay; % ディスプレイを取得
figure;
display.image(img); % ディスプレイに表示
車両検出のプログラムを作成
type vehicleDetection.m
MATLAB上で作成した車両検出プログラムを実行
Jetsonのカメラから画像をMATLAB上に取り込んで処理します。
まだ、Jetson上でプログラムが動いているわけではないことに注意してください。
vehicleDetection
CUDA Cをコード生成しJetsonでビルド
Jetson Nano向けにCUDAコードを生成し、ビルドします。
クロスコンパイルではなくターゲット上でのコンパイルのためCUDA ToolkitはホストPCには不要です。
SSDの推論はTensorRTをバックエンドとして使用します。
cfg = coder.gpuConfig('exe');
cfg.Hardware = coder.hardware('NVIDIA Jetson');
cfg.Hardware.BuildDir = '~/remoteBuildDir';
cfg.GenerateExampleMain = 'GenerateCodeAndCompile';
cfg.GenerateReport = true;
cfg.LaunchReport = true;
codegen('-config ',cfg,'vehicleDetection','-report','-v');
Jetson上でアルゴリズム実行
ビルドしたJetson Nano上の実行ファイルを実行します。
clear hwobj cam display;
hwobj = jetson
Checking for CUDA availability on the Target...
Checking for 'nvcc' in the target system path...
Checking for cuDNN library availability on the Target...
Checking for TensorRT library availability on the Target...
Checking for prerequisite libraries is complete.
Gathering hardware details...
Checking for third-party library availability on the Target...
Gathering hardware details is complete.
 Board name         : NVIDIA Jetson TX1
 CUDA Version       : 10.0
 cuDNN Version      : 7.3
 TensorRT Version   : 5.0
 GStreamer Version  : 1.14.5
 V4L2 Version       : 1.14.2-1
 SDL Version        : 1.2
 Available Webcams  : Microsoft® LifeCam Cinema(TM)
 Available GPUs     : NVIDIA Tegra X1
hwobj =
  jetson のプロパティ:

       DeviceAddress: '192.168.55.1'
                Port: 22
           BoardName: 'NVIDIA Jetson TX1'
         CUDAVersion: '10.0'
        cuDNNVersion: '7.3'
     TensorRTVersion: '5.0'
          SDLVersion: '1.2'
         V4L2Version: '1.14.2-1'
    GStreamerVersion: '1.14.5'
             GPUInfo: [1x1 struct]
          WebcamList: {'Microsoft® LifeCam Cinema(TM)'}
hwobj.setDisplayEnvironment('0.0');
pid = hwobj.runApplication('vehicleDetection');
### Launching the executable on the target...
Executable launched successfully with process ID 10988.
Displaying the simple runtime log for the executable...

Note: For the complete log, run the following command in the MATLAB command window:
system(hwobj,'cat /home/nvidia/remoteBuildDir/MATLAB_ws/R2020a/C/IPCV_Eval_Kit/demo_files/vehicleDetection.log')
下記のような実行結果が得られます。(Jetson Nano上の実行結果をVNCを使ってキャプチャ)
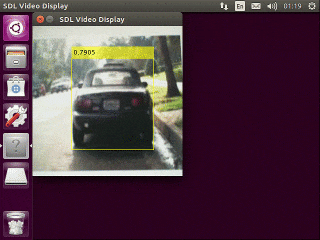
今回はバックボーンがResNet50のためJetson Nano上で数fps程度の速度しか得られません。
Mobilenet v2などをバックボーンにするとより軽量で高速な検出器が学習できます。
実行中のプロセスを停止
% hwobj.killProcess(pid);
まとめ
SSDによる物体検出器の学習、推論およびGPUコード生成について紹介しました。
参考
- Object Detection Using SSD Deep Learning
- Code Generation for Object Detection by Using Single Shot Multibox Detector
謝辞
本記事は @eigs さんのlivescript2markdownを使わせていただいてます。