綺麗になりそうでならないと思ったコードをデリゲートに爆殺してもらい感動したので投稿。
今までデリゲートはEventHandlerにしか使ったことがなかったので良い学びになりました。
問題のコード
  public void Movement(Button button)
        {
            if (button.Alignment == Alignment.Left)
            {
                if (button.LocationX >= button.Border + button.OffsetX)
                {
                    button.LocationX = button.Border + button.OffsetX;
                }
                else
                {
                    button.LocationX += button.Value;
                }
            }
            else if (button.Alignment == Alignment.Top)
            {
                if (button.LocationY >= button.Border + button.OffsetY)
                {

                    button.LocationY = button.Border + button.OffsetY;
                }
                else
                {
                    button.LocationY += button.Value;
                }
            }
            else if (button.Alignment == Alignment.Right)
            {
                if (button.LocationX <= button.Border - button.OffsetX)
                {
                    button.LocationX = button.Border - button.OffsetX;
                }
                else
                {
                    button.LocationX += button.Value;
                }
            }
            else if (button.Alignment == Alignment.Bottom)
            {
                if (button.LocationY <= button.Border - button.OffsetY)
                {
                    button.LocationY = button.Border - button.OffsetY;
                }
                else
                {
                    button.LocationY += button.Value;
                }
            }
        }
何をしているのかというとボタンが画面外にある場合は画面内へ入ろうとし、画面内に入ったら決まった位置+オフセットで止まるコードです。
上下左右で不等号と演算子が変わるので絶妙に普通の方法では一般化できません。
ボタン移動前
borderに到達するまで右に移動

ボタン移動後
border+offsetで止まるようになっている

デリゲート+ラムダ式で上記コードをシンプルにまとめる
public void MovementRefactored(Button button)
        {
            Func<int, int, bool> ge = (buttonLocation, limit) => buttonLocation >= limit;
            Func<int, int, bool> le = (buttonLocation, limit) => buttonLocation <= limit;

            if (button.Alignment == Alignment.Left)
            {
                button.LocationX = CheckBorder(button.LocationX, ge, button.Border + button.OffsetX, button.Value);
            }
            else if (button.Alignment == Alignment.Top)
            {
                button.LocationY = CheckBorder(button.LocationY, ge, button.Border + button.OffsetY, button.Value);
            }
            else if (button.Alignment == Alignment.Right)
            {
                button.LocationX = CheckBorder(button.LocationX, le, button.Border - button.OffsetX, button.Value);
            }
            else if (button.Alignment == Alignment.Bottom)
            {
                button.LocationY = CheckBorder(button.LocationY, le, button.Border - button.OffsetY, button.Value);
            }
        }

        private int CheckBorder(int buttonLocation, Func<int, int, bool> comp, int limit, int Value)
        {
            if (comp(buttonLocation, limit))
            {
                buttonLocation = limit;
            }
            else
            {
                buttonLocation += Value;
            }
            return buttonLocation;
        }
LocationとBorder+Offsetの比較演算子をひっくり返すのが問題だったので、そこをデリゲートを利用して関数を引数として与えることができるようになりました。
ラムダを利用しない書き方1
上記の書き方を提案されましたが、自分の理解のために別の書き方も試してみました。
        public delegate bool CompFunc(int buttonLocation, int limit);

        public bool GreaterEqual(int buttonLocation, int limit)
        {
            return buttonLocation >= limit;
        }

        public bool LessEqual(int buttonLocation, int limit)
        {
            return buttonLocation <= limit;
        }

        public void MovementRefactored(Button button)
        {
            Func<int, int, bool> ge = GreaterEqual;
            Func<int, int, bool> le = LessEqual;

            if (button.Alignment == Alignment.Left)
            {
                button.LocationX = CheckBorder(button.LocationX, ge, button.Border + button.OffsetX, button.Value);
            }
            else if (button.Alignment == Alignment.Top)
            {
                button.LocationY = CheckBorder(button.LocationY, ge, button.Border + button.OffsetY, button.Value);
            }
            else if (button.Alignment == Alignment.Right)
            {
                button.LocationX = CheckBorder(button.LocationX, le, button.Border - button.OffsetX, button.Value);
            }
            else if (button.Alignment == Alignment.Bottom)
            {
                button.LocationY = CheckBorder(button.LocationY, le, button.Border - button.OffsetY, button.Value);
            }
        }

        private int CheckBorder(int buttonLocation, Func<int, int, bool> comp, int limit, int Value)
        {
            if (comp(buttonLocation, limit))
            {
                buttonLocation = limit;
            }
            else
            {
                buttonLocation += Value;
            }
            return buttonLocation;
        }
ラムダを利用しない書き方2
        public delegate bool CompFunc(int buttonLocation, int limit);

        public bool GreaterEqual(int buttonLocation, int limit)
        {
            return buttonLocation >= limit;
        }

        public bool LessEqual(int buttonLocation, int limit)
        {
            return buttonLocation <= limit;
        }

        public void MovementRefactored(Button button)
        {
            CompFunc ge = GreaterEqual;
            CompFunc le = LessEqual;

            if (button.Alignment == Alignment.Left)
            {
                button.LocationX = CheckBorder(button.LocationX, ge, button.Border + button.OffsetX, button.Value);
            }
            else if (button.Alignment == Alignment.Top)
            {
                button.LocationY = CheckBorder(button.LocationY, ge, button.Border + button.OffsetY, button.Value);
            }
            else if (button.Alignment == Alignment.Right)
            {
                button.LocationX = CheckBorder(button.LocationX, le, button.Border - button.OffsetX, button.Value);
            }
            else if (button.Alignment == Alignment.Bottom)
            {
                button.LocationY = CheckBorder(button.LocationY, le, button.Border - button.OffsetY, button.Value);
            }
        }

        private int CheckBorder(int buttonLocation, CompFunc comp, int limit, int Value)
        {
            if (comp(buttonLocation, limit))
            {
                buttonLocation = limit;
            }
            else
            {
                buttonLocation += Value;
            }
            return buttonLocation;
        }
この書き方でも動きは同じになるかと思います。
コード全体
最後に実際にコードを動かしてみたので貼ります。
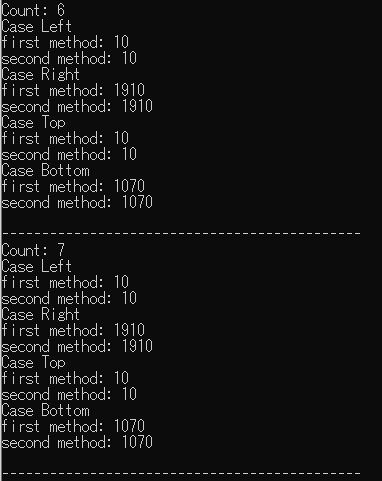
Method1がラムダを使った結果で、Method2がラムダを使っていない結果です。
実際の業務でこのようなリファクタリングを行う際は、ユニットテストを書いておき、リファクタリング前後でテストが通るかどうかを調べるのがよさそうです。
class Program
    {
        static void Main(string[] args)
        {
            var buttonMovement = new ButtonMovement();
            var buttonLeft = new Button()
            {
                Alignment = Alignment.Left,
                LocationX = -100,
                LocationY = 300,
                Border = 0,
                OffsetX = 10,
                OffsetY = 0,
                Value = 30
            };
            var buttonLeft2 = new Button()
            {
                Alignment = Alignment.Left,
                LocationX = -100,
                LocationY = 300,
                Border = 0,
                OffsetX = 10,
                OffsetY = 0,
                Value = 30
            };
            var buttonRight = new Button()
            {
                Alignment = Alignment.Right,
                LocationX = 2000,
                LocationY = 300,
                Border = 1920,
                OffsetX = 10,
                OffsetY = 0,
                Value = -30
            };
            var buttonRight2 = new Button()
            {
                Alignment = Alignment.Right,
                LocationX = 2000,
                LocationY = 300,
                Border = 1920,
                OffsetX = 10,
                OffsetY = 0,
                Value = -30
            };
            var buttonTop = new Button()
            {
                Alignment = Alignment.Top,
                LocationX = 300,
                LocationY = -130,
                Border = 0,
                OffsetX = 0,
                OffsetY = 10,
                Value = 30
            };
            var buttonTop2 = new Button()
            {
                Alignment = Alignment.Top,
                LocationX = 300,
                LocationY = -130,
                Border = 0,
                OffsetX = 0,
                OffsetY = 10,
                Value = 30
            };
            var buttonBottom = new Button()
            {
                Alignment = Alignment.Bottom,
                LocationX = 300,
                LocationY = 1200,
                Border = 1080,
                OffsetX = 0,
                OffsetY = 10,
                Value = -30
            };
            var buttonBottom2 = new Button()
            {
                Alignment = Alignment.Bottom,
                LocationX = 300,
                LocationY = 1200,
                Border = 1080,
                OffsetX = 0,
                OffsetY = 10,
                Value = -30
            };

            for (int i = 0; i < 10; i++)
            {
                Console.WriteLine("Count: "+ i);
                Console.WriteLine("Case Left");
                buttonMovement.Movement(buttonLeft);
                Console.WriteLine("first method: " + buttonLeft.LocationX);

                buttonMovement.MovementRefactored(buttonLeft2);
                Console.WriteLine("second method: " + buttonLeft2.LocationX);

                Console.WriteLine("Case Right");
                buttonMovement.Movement(buttonRight);
                Console.WriteLine("first method: " + buttonRight.LocationX);

                buttonMovement.Movement(buttonRight2);
                Console.WriteLine("second method: " + buttonRight2.LocationX);

                Console.WriteLine("Case Top");
                buttonMovement.Movement(buttonTop);
                Console.WriteLine("first method: " + buttonTop.LocationY);

                buttonMovement.MovementRefactored(buttonTop2);
                Console.WriteLine("second method: " + buttonTop2.LocationY);

                Console.WriteLine("Case Bottom");
                buttonMovement.Movement(buttonBottom);
                Console.WriteLine("first method: " + buttonBottom.LocationY);

                buttonMovement.Movement(buttonBottom2);
                Console.WriteLine("second method: " + buttonBottom2.LocationY + "\n");
                Console.WriteLine("---------------------------------------------");
            }
        }
    }

    public enum Alignment
    {
        Left,
        Top,
        Right,
        Bottom
    }

    public class Button
    {
        public Alignment Alignment { get; set; }
        public int LocationX { get; set; }
        public int LocationY { get; set; }
        public int Border { get; set; }
        public int OffsetX { get; set; }
        public int OffsetY { get; set; }
        public int Value { get; set; }
    }
実行結果です。
少しずつ画面内へ入っていき最終的に決まった値で止まっていることが確認できます。


最後に
デリゲートを使って、微妙に気持ち悪いコードを爆殺してもらいました。
リファクタリングする前のコードが必ずしも悪いかというとそうではなく、すべて書き下すことで一目見て何をやっているのかがわかるので、以前のままでも問題はないコードであったと思います。
ただ今回はこれよりも短くなる方法があるなら知りたいという目的があり、それをデリゲートを利用することで実際に達成することができたという点で非常にうれしかったです。