はじめに
はじめてやると躓いたり、わからなかったりするものです。私もそうでした。WPFのデータバインディングは便利だし今はかなり良い設計だと思います。うまくいかなくてエラーにも例外にもならず、もういいやってなるのはもったいないので、こんなんでも書いておこうね。
プロジェクト初期のアプリをMVVMにする
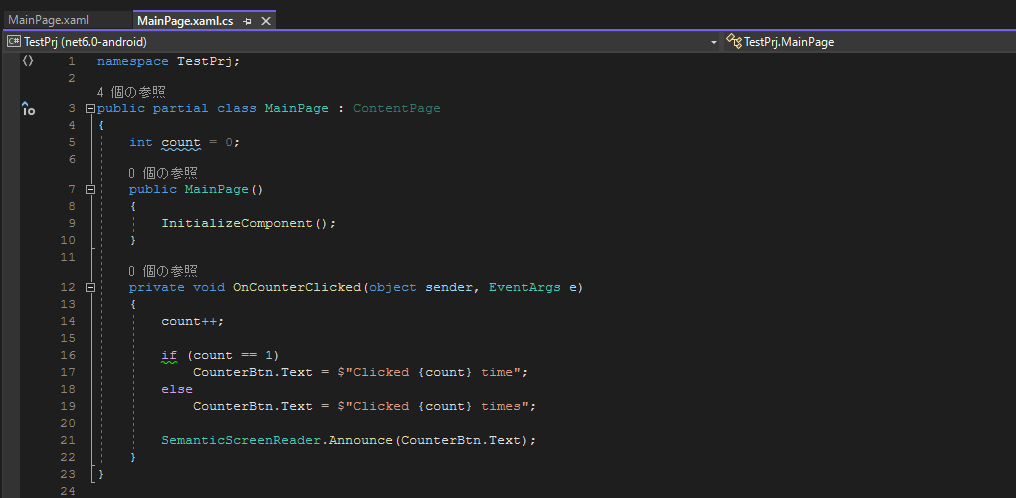
プロジェクトを作るとクリックしてクリック回数がでるだけのソースができています。これはコードビハインドでかかれているので、この機能をそのままにMVVMにします。コードビハインドとはxaml.csに書かれる部分です。クリック時の処理がかかれていますが、これをViewModelで処理するようにします。
この部分です。
実装
プロジェクトを作る
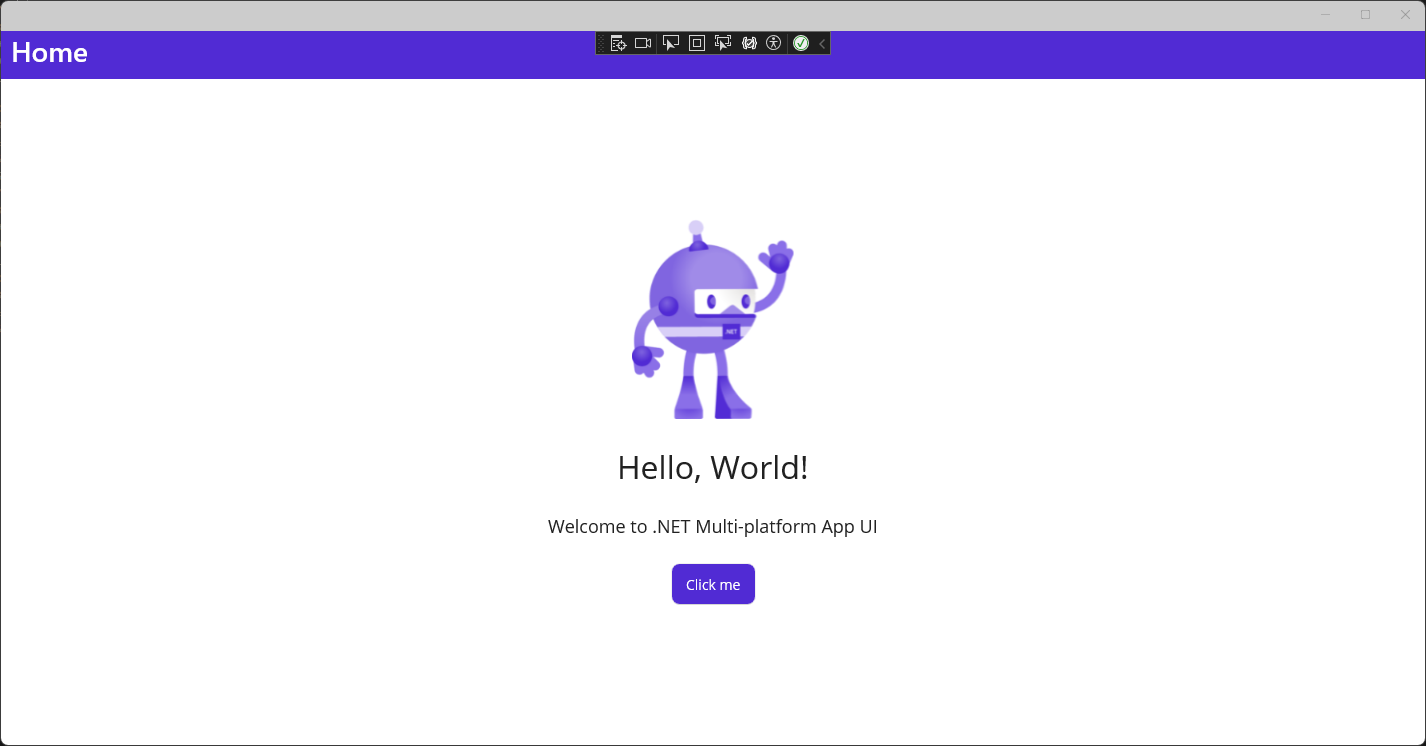
まずは普通にvisual studioからMAUIを選んで作成します。とりあえずコンパイル、実行します。
こんなかんじの画面になります。
View、ViewModel、Modelフォルダーを作る
ソリューションエクスプローラーのプロジェクト名の部分を右クリック→追加→新しいフォルダーでView、ViewModel、Modelの3つのフォルダーを作成します。
MainPage.xamlをViewフォルダーに移動する
MainPage.xamlをViewフォルダーにドラッグアンドドロップします。これでxaml.csも一緒に移動します。警告がでますが、OKを押します。
AppShell.xamlを編集する
Shell直下とShelContentの中を編集します。
<?xml version="1.0" encoding="UTF-8" ?>
<Shell
    x:Class="OneCalcer.AppShell"
    xmlns="http://schemas.microsoft.com/dotnet/2021/maui"
    xmlns:x="http://schemas.microsoft.com/winfx/2009/xaml"
    xmlns:local="clr-namespace:OneCalcer"
    xmlns:view="clr-namespace:OneCalcer.View"
    Shell.FlyoutBehavior="Disabled">

    <ShellContent
        Title="Home"
        ContentTemplate="{DataTemplate view:MainPage}"
        Route="MainPage" />

</Shell>
今回はOneCalcerというプロジェクト名です。
(もともと別の目的で作ってたプロジェクトの使いまわしです💦)
これでとりあえずビルドが通ります。
Modelを作成
Modelフォルダーを右クリック→追加→新しい項目→クラス
で、以下のようにします。
using System.ComponentModel;
using System.Runtime.CompilerServices;

namespace OneCalcer.Model
{
    internal class ClickCount : INotifyPropertyChanged
    {
        private int _count;

        public int Count
        {
            get => _count;
            set
            {
                if (value == 1)
                    ClickText = $"Clicked {value} time";
                else
                    ClickText = $"Clicked {value} times";

                _count = value;
            }
        }

        private string _clickText = "Click me";

        public string ClickText
        {
            get => _clickText;
            set => _ = SetField(ref _clickText, value);
        }

        public event PropertyChangedEventHandler PropertyChanged;

        protected virtual void OnPropertyChanged([CallerMemberName] string propertyName = null)
        {
            PropertyChanged?.Invoke(this, new PropertyChangedEventArgs(propertyName));
        }

        protected bool SetField<T>(ref T field, T value, [CallerMemberName] string propertyName = null)
        {
            if (EqualityComparer<T>.Default.Equals(field, value)) return false;
            field = value;
            OnPropertyChanged(propertyName);
            return true;
        }
    }
}
ここではボタンに表示する部分の情報がはいっています。まず一個ずつ。
INotifyPropertyChangedはC#での変数の変化を画面に伝えるために使います。これがないとC#上で値をいくら変えてもデータバインディング先の画面に反映しません。デバッグすると変数は書き換わってるのに画面は変わらないという症状になります。
_count、Countについて、ボタンが押されるとCountが変化するようにします。するとCountのsetが動くので、Count.set→ClickText→SetField→OnPropertyChangedの順に動きます。
_clickText、ClickTextについて、画面のボタンに表示されてる文字列です。これをデータバインディングし、画面を変化させます。
ここから下はおまじないというか定型文です。INotifyPropertyChengedの宣言を実装します。
PropertyChanged、OnPropertyChangedは変更イベントです。イベントを起動します。
SetFieldは実際に値を変更し、変更イベントを着火しています。変更元、変更先を比較して変わっていた場合にイベントを着火します。実際、最初はここまでやなくてもsetで直接OnPropertyChengedをよんでしまっても良いと思います。
Viewにコマンドを作成する
MVVMはINotifyPropertyChengedが大事ですが、それとICommandというのも大事になってきます。ボタン押下のクリックイベントをViewModelが受け取らなくてはいけません。それをするのがICommandというインターフェースです。
Viewフォルダー下に追加→新しい項目でクラスを作ります。
using System.Windows.Input;

namespace OneCalcer.View
{
    internal class AddCounterCommand : ICommand
    {
        public AddCounterCommand(Action func)
        {
            this.func = func;
        }

        public bool CanExecute(object parameter)
        {
            return true;
        }

        public void Execute(object parameter)
        {
            func();
        }

        private Action func;

        public event EventHandler CanExecuteChanged;
    }
}
ICommandにはCanExecute、Execute、CanExecuteChengedイベントがあります。
CanExecuteは一般にenableと言われているものです。Trueで押下可能、Falseで押下不可となります。今回の場合は常にtrueです。
Action funcが追加されていますが、これはViewModelでボタン押下時の挙動を設定したいからです。今回はボタン一個で、クラス名も特化してる名前ですが、一般にはDelegateCommandと呼ばれて汎用的にいろいろなボタンに使われるクラスです。そのままつかったり、他のコマンドクラスの基底クラスにしたりします。
ViewModel作成
using OneCalcer.Model;
using OneCalcer.View;

namespace OneCalcer.ViewModel
{
    internal class MainPageViewModel
    {
        public string Text { get; set; } = "Initial Text";

        public ClickCount ClickCount { get; set; } = new();

        public AddCounterCommand AddCounterCommand { get; set; }

        public MainPageViewModel()
        {
            AddCounterCommand = new AddCounterCommand(() =>
            {
                ClickCount.Count++;
            });
        }
    }
}
ViewModelはModelであるClickCountクラスとコマンドであるAddCounterCommandを持っています。コンストラクターでボタン押下時にCountを変更する処理を入れています。
データバインディングする
ここからがbindingです。
xamlを変更します
<?xml version="1.0" encoding="utf-8" ?>
<ContentPage xmlns="http://schemas.microsoft.com/dotnet/2021/maui"
             xmlns:x="http://schemas.microsoft.com/winfx/2009/xaml"
             x:Class="OneCalcer.View.MainPage"
             xmlns:vm="clr-namespace:OneCalcer.ViewModel">
    <ContentPage.BindingContext>
        <vm:MainPageViewModel/>
    </ContentPage.BindingContext>

    <ScrollView>
        <VerticalStackLayout
            Spacing="25"
            Padding="30,0"
            VerticalOptions="Center">

            <Image
                Source="dotnet_bot.png"
                SemanticProperties.Description="Cute dot net bot waving hi to you!"
                HeightRequest="200"
                HorizontalOptions="Center" />

            <Label
                Text="{Binding Text}"
                SemanticProperties.HeadingLevel="Level1"
                FontSize="32"
                HorizontalOptions="Center"/>

            <Label
                Text="Welcome to .NET Multi-platform App UI"
                SemanticProperties.HeadingLevel="Level2"
                SemanticProperties.Description="Welcome to dot net Multi platform App U I"
                FontSize="18"
                HorizontalOptions="Center" />

            <Button
                x:Name="CounterBtn"
                Text="{Binding ClickCount.ClickText}"
                SemanticProperties.Hint="Counts the number of times you click"
                Command="{Binding AddCounterCommand}"
                HorizontalOptions="Center" />

        </VerticalStackLayout>
    </ScrollView>

</ContentPage>
大事なのは上の方
    <ContentPage.BindingContext>
        <vm:MainPageViewModel/>
    </ContentPage.BindingContext>
これでこの画面全体とViewModelを紐づけています。要素のみに紐づけたり色々できますが、とりあえずはこれがシンプルに使えます。
次にボタン部分
            <Button
                x:Name="CounterBtn"
                Text="{Binding ClickCount.ClickText}"
                SemanticProperties.Hint="Counts the number of times you click"
                Command="{Binding AddCounterCommand}"
                HorizontalOptions="Center" />
バインドするには{Binding XXXXXX}とします。
Command属性によって押下時の処理をdindingします。これで動きます。いけましたか?
あ、最初のコードビハインド部分は消してね。
蛇足
今回はModelをIporpertychangedにしましたが、ViewModelをIporpertychangedにしてもOKです。
NugetができるのであればCommunityToolkitをNugetして、こういう風にもできます
using System.ComponentModel;
using System.Runtime.CompilerServices;
using CommunityToolkit.Mvvm.ComponentModel;

namespace OneCalcer.Model
{
    internal class ClickCount : ObservableObject
    {
        private int _count;

        public int Count
        {
            get => _count;
            set
            {
                if (value == 1)
                    ClickText = $"Clicked {value} time";
                else
                    ClickText = $"Clicked {value} times";

                _count = value;
            }
        }

        private string _clickText = "Click me";
        public string ClickText
        {
            get => _clickText;
            set => SetProperty(ref _clickText, value);
        }
    }
}
ObservableObjectがIporpertychangedであり、SetPropertyするだけでOnPropertyChengedをしてくれます。
ということで、おわり!WPFでも同じようなものなのでこれでできます。UWPはわかんね。