はじめに
最近セキュリティをお勉強中です。セキュリティと言っても幅が広いのですが、IoTセキュリティの実験をしてみたいと思います。
バッテリーで動作し、LPWAのような無線通信ができるIoTデバイスは、どこにでも設置できる便利さがありますが、セキュリティのリスクもあります。例えばデバイスが盗まれ、MCU内のROMに書き込まれた認証情報や暗号鍵などの秘密情報を盗まれると、偽のデバイスをネットワークに接続されて誤ったデータを送り込まれる可能性があります。
こうした秘密情報を、外部に取り出せないセキュアストレージに記録する方法もありますが、セキュアストレージがない一般的なマイコンではどういった形になるのかを実験してみます。
使用した機材
マイコンはNUCLEO-F401REに搭載されているSTM32F401REを使用し、テスト用プログラムの作成はMbed Studioを使用しました。マイコン内蔵のFlash ROMはJTAGインタフェースを使うと読み出しができることが多いです。ですので、ARMのJTAG相当のデバッグインタフェースであるSWDを使ってMCU内蔵Flash ROMの読み出しを行います。
Mbedが動くマイコンボードにはSWDの端子がついているものが多いです。その中で配線のしやすさを考えて、2.5mmピッチのピンが出ているNUCLEOを使いました。
JTAGインタフェース
JTAG(SWD)インタフェースはBus Pirateをスイッチサイエンスさんで購入。価格が安い分速度が遅く、JTAGを使ったデバッグには使えないですが、今回の用途はFlash ROMの吸い出しなのでこれで十分でしょう(そもそもMbedならDAPLinkでデバックができる)。とは言っても、Flash ROM全体512KBをダンプするには105分かかりました。読み出し速度83bytes/s の世界です...
Bus PirateのファームウエアはGithubにあるv6.3に更新してあります。ファームのアップデーター(pirate-loader)は、macOS版、Windows版、Linux版があるのですが、Mac版はMacOS 10.15では動きませんでした。32bitアプリのため、Catalinaでは動かないようです。Windows版では問題なくアップデートができました。コミュニティ版でv7というファームウェアも別のGithubにあるのですが、こちらはチェックサムエラーが発生してアップデートできませんでした。
Bus Priateのファームアップデートの詳細は割愛します。アップデートを行うとファームウェアのバージョン表示は以下のようになります。モード設定を見るとJTAGが出てこないのですが、次項に示すやり方でOpenOCDのJTAGインタフェースとして動作しました。
HiZ>i
Bus Pirate v3.5
Firmware v6.3-beta1 r2151  Bootloader v4.4
DEVID:0x0447 REVID:0x3046 (24FJ64GA002 B8)
http://dangerousprototypes.com
HiZ>
HiZ>m
1. HiZ
2. 1-WIRE
3. UART
4. I2C
5. SPI
6. 2WIRE
7. 3WIRE
8. LCD
x. exit(without change)
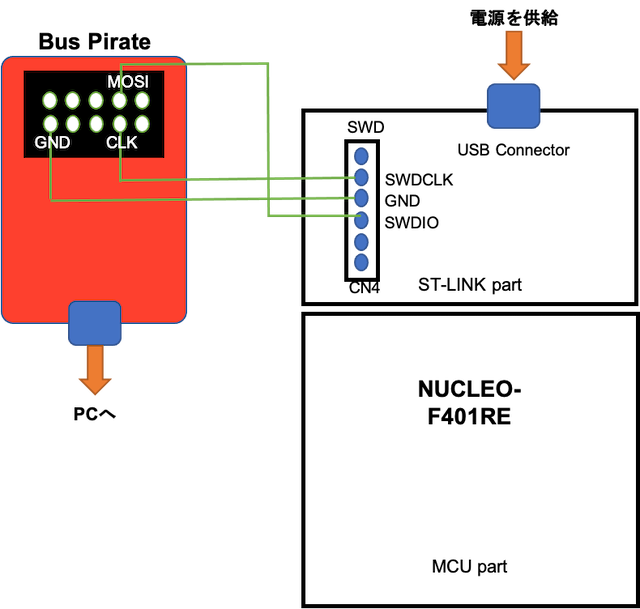
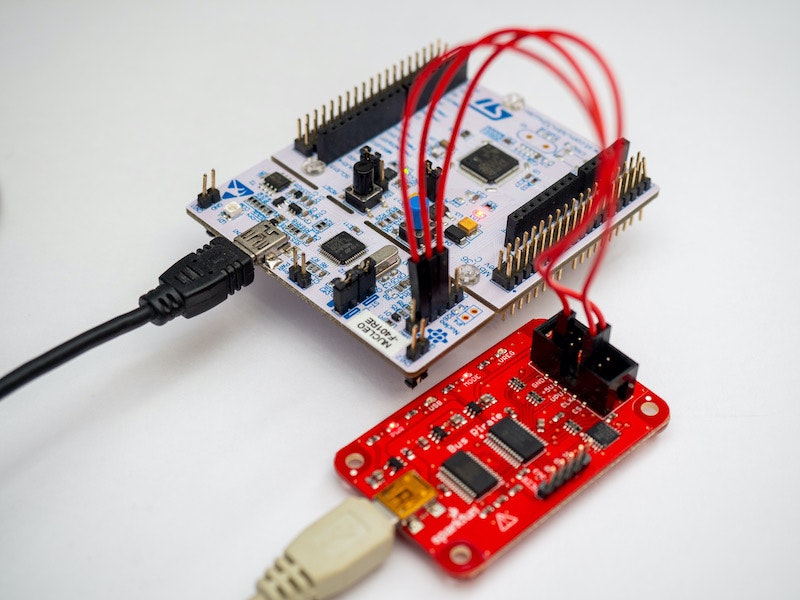
NUCLEO基盤とBus Pirate間の接続図を以下に示します。

JTAGデバッガ
JTAGに対応したデバッガにはLinux版のOpenOCDを使いました。LinuxディストリビューションはOpenOCDが最初から入っているKali Linux 2019.4を使っています(Ubuntuでもaptでインストールすれば使えると思います)。
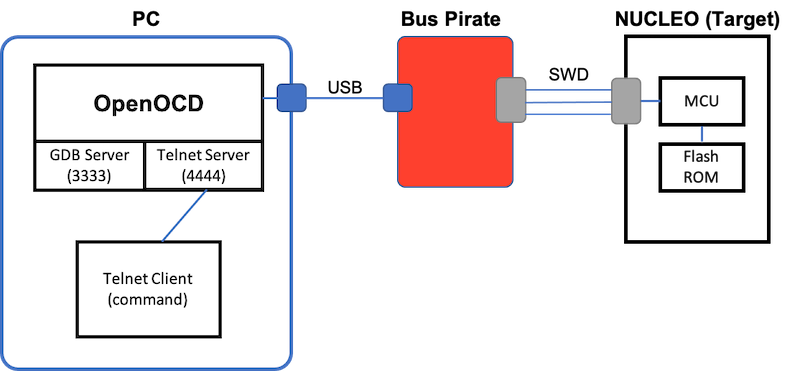
OpenOCD - Bus Pirate - NUCLEOの接続関係を以下の図に示します。Linux上でOpenOCDを起動するとTelnet Serverがポート4444で待ち受け状態になります(今回はGDBは使いません)。このTelnetポートにターミナルソフトから接続してOpenOCDのコマンドを入力しながら操作を行います。

OpenOCDのconfig
OpenOCDにBus Pirate(Interface)やSTM32F401(Target)を認識させるために以下のconfigファイル(openocd.cfg)を/usr/share/openocdに配置します。aptでOpenOCDをインストールすると(Kali Linuxでは最初から入っている)、buspirate.cfgやstm32f4x.cfgも同時にインストールされます。
source [find interface/buspirate.cfg]

buspirate_port /dev/ttyUSB0
buspirate_vreg 1
buspirate_mode normal
transport select swd

source [find target/stm32f4x.cfg]
OpenOCDの起動
ターミナルを立ち上げて、OpenOCDを起動します。その際に、先ほど作ったconfigファイルを指定します。以下のようにポート4444でTelnetがListening状態になります(3333のgdbは無視します)。
$ openocd -f /usr/share/openocd/openocd.cfg
Open On-Chip Debugger 0.10.0+dev-snapshot (2020-08-19-07:12)
Licensed under GNU GPL v2
For bug reports, read
        http://openocd.org/doc/doxygen/bugs.html
Info : Buspirate SWD mode enabled
Info : Listening on port 6666 for tcl connections
Info : Listening on port 4444 for telnet connections
Info : Some stale data from a previous connection was discarded.
Info : Buspirate SWD Interface ready!
Info : This adapter doesn't support configurable speed
Info : SWD DPIDR 0x2ba01477
Info : stm32f4x.cpu: hardware has 6 breakpoints, 4 watchpoints
Info : starting gdb server for stm32f4x.cpu on 3333
Info : Listening on port 3333 for gdb connections
次にもう一つターミナルを立ち上げてtelnetでポート4444に接続します。これでOpenOCDのコマンドが入力できるようになります。
$ telnet localhost 4444
Trying ::1...
Trying 127.0.0.1...
Connected to localhost.
Escape character is '^]'.
Open On-Chip Debugger
>
次にMCUをリセットしてからhalt状態にします(reset haltコマンドを実行)。
実は、haltを実行するまで、事前に書き込んであったLチカプログラムが動いていました。
> init
> reset halt
Translation from khz to jtag_speed not implemented
Error executing event reset-start on target stm32f4x.cpu:
embedded:startup.tcl:279: Error:
in procedure 'ocd_process_reset'
in procedure 'ocd_process_reset_inner' called at file "embedded:startup.tcl", line 279
target halted due to debug-request, current mode: Thread
xPSR: 0x61000000 pc: 0x08001582 psp: 0x20001d08
>
次にFlash ROMの状態を確認します。flash banksコマンドのレスポンスにある#0 (バンク0)がプログラム格納用のFlash ROMエリアです。開始番地とサイズの表示が変です。細かいことは気にぜずにどんどん行きます...
flash info 0コマンドでセクタ毎の状態が見えます。ここで"not protected"となっていれば直ぐにFlash ROMが読み出せます。
> flash banks
# 0 : stm32f4x.flash (stm32f2x) at 0x00000000, size 0x00000000, buswidth 0, chipwidth 0
# 1 : stm32f4x.otp (stm32f2x) at 0x1fff7800, size 0x00000000, buswidth 0, chipwidth 0

> flash info 0
device id = 0x10006433
flash size = 512 kbytes
# 0 : stm32f2x at 0x08000000, size 0x00080000, buswidth 0, chipwidth 0
        #  0: 0x00000000 (0x4000 16kB) not protected
        #  1: 0x00004000 (0x4000 16kB) not protected
        #  2: 0x00008000 (0x4000 16kB) not protected
        #  3: 0x0000c000 (0x4000 16kB) not protected
        #  4: 0x00010000 (0x10000 64kB) not protected
        #  5: 0x00020000 (0x20000 128kB) not protected
        #  6: 0x00040000 (0x20000 128kB) not protected
        #  7: 0x00060000 (0x20000 128kB) not protected
STM32F4xx (Low Power) - Rev: A
プログラムはセクタ0から書き込まれているため、先頭256バイトを読み出してみます。
このようにたやすくプログラムをダンプすることができました。
> mdb 0x08000000 256
0x08000000: 00 80 01 20 3d 03 00 08 45 03 00 08 e1 02 00 08 e5 02 00 08 e9 02 00 08 ed 02 00 08 00 00 00 00
0x08000020: 00 00 00 00 00 00 00 00 00 00 00 00 1d 02 00 08 51 03 00 08 00 00 00 00 b5 02 00 08 c5 02 00 08
0x08000040: 57 03 00 08 57 03 00 08 57 03 00 08 57 03 00 08 57 03 00 08 57 03 00 08 57 03 00 08 57 03 00 08
0x08000060: 57 03 00 08 57 03 00 08 57 03 00 08 57 03 00 08 57 03 00 08 57 03 00 08 57 03 00 08 57 03 00 08
0x08000080: 57 03 00 08 57 03 00 08 57 03 00 08 00 00 00 00 00 00 00 00 00 00 00 00 00 00 00 00 57 03 00 08
0x080000a0: 57 03 00 08 57 03 00 08 57 03 00 08 57 03 00 08 57 03 00 08 57 03 00 08 57 03 00 08 57 03 00 08
0x080000c0: 57 03 00 08 57 03 00 08 57 03 00 08 57 03 00 08 57 03 00 08 57 03 00 08 57 03 00 08 00 00 00 00
0x080000e0: 57 03 00 08 57 03 00 08 57 03 00 08 00 00 00 00 00 00 00 00 00 00 00 00 00 00 00 00 57 03 00 08
ターゲットを繋いだ状態で何回かMCUのリセットを行うと、Flash ROMの状態が"protected"になります。もしくは、最初からプロテクト状態になっていることもありました。プロテクト状態でFlash ROMの読み出しを行うと殆どの番地で0x00が返ってきます。
> flash info 0
Device Security Bit Set
# 0 : stm32f2x at 0x08000000, size 0x00080000, buswidth 0, chipwidth 0
        #  0: 0x00000000 (0x4000 16kB) protected
        #  1: 0x00004000 (0x4000 16kB) protected
        #  2: 0x00008000 (0x4000 16kB) protected
        #  3: 0x0000c000 (0x4000 16kB) protected
        #  4: 0x00010000 (0x10000 64kB) protected
        #  5: 0x00020000 (0x20000 128kB) protected
        #  6: 0x00040000 (0x20000 128kB) protected
        #  7: 0x00060000 (0x20000 128kB) protected
STM32F4xx (Low Power) - Rev: A

> mdb 0x08000000 256
0x08000000: 00 00 00 00 00 00 00 00 00 00 00 00 00 00 00 00 00 00 00 00 e9 02 00 08 00 00 00 00 00 00 00 00
0x08000020: 00 00 00 00 00 00 00 00 00 00 00 00 00 00 00 00 00 00 00 00 00 00 00 00 00 00 00 00 00 00 00 00
0x08000040: 00 00 00 00 00 00 00 00 00 00 00 00 00 00 00 00 57 03 00 08 00 00 00 00 00 00 00 00 00 00 00 00
0x08000060: 00 00 00 00 00 00 00 00 00 00 00 00 00 00 00 00 00 00 00 00 00 00 00 00 00 00 00 00 00 00 00 00
0x08000080: 00 00 00 00 00 00 00 00 00 00 00 00 00 00 00 00 00 00 00 00 00 00 00 00 00 00 00 00 00 00 00 00
0x080000a0: 00 00 00 00 00 00 00 00 00 00 00 00 00 00 00 00 00 00 00 00 00 00 00 00 00 00 00 00 00 00 00 00
0x080000c0: 00 00 00 00 00 00 00 00 00 00 00 00 00 00 00 00 00 00 00 00 00 00 00 00 00 00 00 00 00 00 00 00
0x080000e0: 00 00 00 00 00 00 00 00 00 00 00 00 00 00 00 00 00 00 00 00 00 00 00 00 00 00 00 00 00 00 00 00
プロテクトがかかってしまった場合は、以下のコマンドで解除することができます(リセットや電源Off/Onでまたプロテクトに戻ります)。
> flash protect 0 0 7 off
cleared protection for sectors 0 through 7 on flash bank 0

> flash info 0
# 0 : stm32f2x at 0x08000000, size 0x00080000, buswidth 0, chipwidth 0
        #  0: 0x00000000 (0x4000 16kB) not protected
        #  1: 0x00004000 (0x4000 16kB) not protected
        #  2: 0x00008000 (0x4000 16kB) not protected
        #  3: 0x0000c000 (0x4000 16kB) not protected
        #  4: 0x00010000 (0x10000 64kB) not protected
        #  5: 0x00020000 (0x20000 128kB) not protected
        #  6: 0x00040000 (0x20000 128kB) not protected
        #  7: 0x00060000 (0x20000 128kB) not protected
STM32F4xx (Low Power) - Rev: A
ハードコードした文字列はFlash ROMのダンプで分かってしまう
テストプログラムには、ダミーの文字列 message = "Hello World." を平文で定義しています。
# include "mbed.h"
# include <cstdint>

// Blinking rate in milliseconds
# define BLINKING_RATE     500ms

char message[] = "Hello World.";      // Dummy storing stored in Flash ROM
uint8_t  *pRDP = (uint8_t*)0x1FFFc001;
uint32_t *pFLASH_CR = (uint32_t*)(0x40023C00 + 0x10);
uint32_t *pFLASH_OPTCR = (uint32_t*)(0x40023C00 + 0x14);

int main()
{
    // Initialise the digital pin LED1 as an output
    DigitalOut led(LED1);
    unsigned int count = 0;

    printf("Start message: %s\n", message);
    printf("FLASH_CR: %08X\n", *pFLASH_CR);
    printf("FLASH_OPTCR: %08X\n", *pFLASH_OPTCR);
    printf("RDP byte: %X\n", *pRDP);

    while (true) {
        led = !led;
        ThisThread::sleep_for(BLINKING_RATE);
        printf("count = %d\n", count++);
    }
}
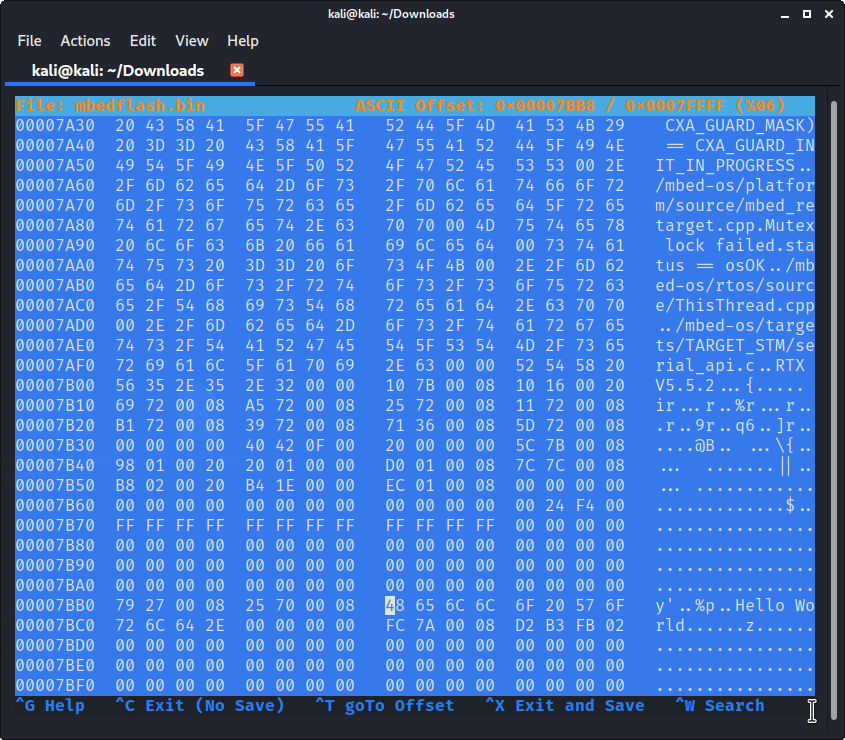
Flash ROMをダンプすると、message変数に定義した文字列がそのまま見えます(下図の0x7BB8以降)。ですので、クラウドにアクセスするためのパスワードやTLSの暗号鍵をここに格納したらアウトです。

では秘密情報を保護できるのか?
STM32 MCUには「Read protection (RDP)」という機能があり、この機能を設定するとデバックインタフェース(JTAG/SWD)からのFlash ROMの読み出しを禁止することができます。保護レベルには以下の3つがありデフォルトはLevel 0です。
- Level 0: 保護なし(デフォルト)
- Level 1: デバックインタフェースからのFlash ROMの読み出しや消去を禁止。そのため、有効にするとDAPLinkを使ったソフトウェアの更新もできなくなる。設定でLevel 0に戻すことができるが、戻した際にFlash ROM全体が消去される。JTAGポートは生きており、Flash ROMの状態確認やレジスタのダンプはできる。
- Level 2: Level 1の保護に加えて、JTAGポートが無効化されバウンダリスキャンもできなくなる。Leve 2を設定すると元に戻すことはできない。
ということで、RDP Level 1を設定すれば、勝手にJTAG/SWDからFlash ROM内の秘密情報を抜かれることはなさそうです。また、JTAG/SWDをつないでRDP Level 0に戻されても、その時はFlash ROMが消去されるので情報を抜かれることはなさそうです(抜け道がなければ・・)。
RDP Level 0 <=> 1の変更はOpenOCDのコマンドで実行できます。ロック後はFlash ROMの読み出しのmdbコマンドがエラーになり、機能が動作していることが分かります。
> stm32f2x lock 0
stm32f2x locked

> mdb 0x08000000 256
SWD DPIDR 0x2ba01477
Failed to read memory at 0x08000001
おわりに
ここまでやったところで、Bus Pirateを使わなくても、元々備わっているDAPLinK + PyOCDあたりでFlash ROMの読み出しくらいはできたのではという気がしています。別途調べてみよう・・
RDPを使えば、デバイスを盗まれてもFlash ROM内の秘密情報を抜かれるリスクは相当低減できそうですが、それでも平文の文字列でパスワードなどをFlash ROMに書き込んでおくのは怖いですね。Flash ROMの片隅に暗号化して格納しておくのもありかと思いますが、何らかの方法でFlash ROMを吸い出されるとプログラム中の復号鍵を見つけて復号されてしまう可能性もありや?
やはり、秘密情報はMCUのバス(プログラム)以外からは読み出せないセキュアストレージに格納し、かつ外部からプログラムのダンプや書き換えができないようにFlash ROMを保護するというのがよいのでしょうか。引き続きお勉強しようかと。このあたりのセキュリティを強化したARM PSA(Platform Security Architecture)に対応したNXP LPCXpresso55S69を持っているのですが使いきれず死蔵しているので(MbedのDAPLink経由で書き込みができないし・・)どこかで使ってみたいです。
