動機
「Hooksを使えば、アニメーションがスッキリ書ける」という話を聞いて、興味が湧きました。今までRiverpodを使う際も、hooks_riverpodではなく、何となくflutter_riverpodを使用していました。
噂ではFlutterの開発チームがHooksにはあまり肯定的ではないという声も聞いたのと、Hooksが何となく敷居が高そうなので敬遠していました。ただもう少し調べていくと、Riverpod自体もhooks_riverpodが主流で、Hooksは深く使いこまなくても限定的な利用を出来るものだという意見を多く見かけました。
今後Hooksがどうなるかは分かりませんが、少なくともJavaScriptのReactでは単なる流行りではない新しい概念であるとのことなので、まずは自分も使ってみようと思いました。
今回のコードとアニメーション(null safety対応)
■アニメーションの内容
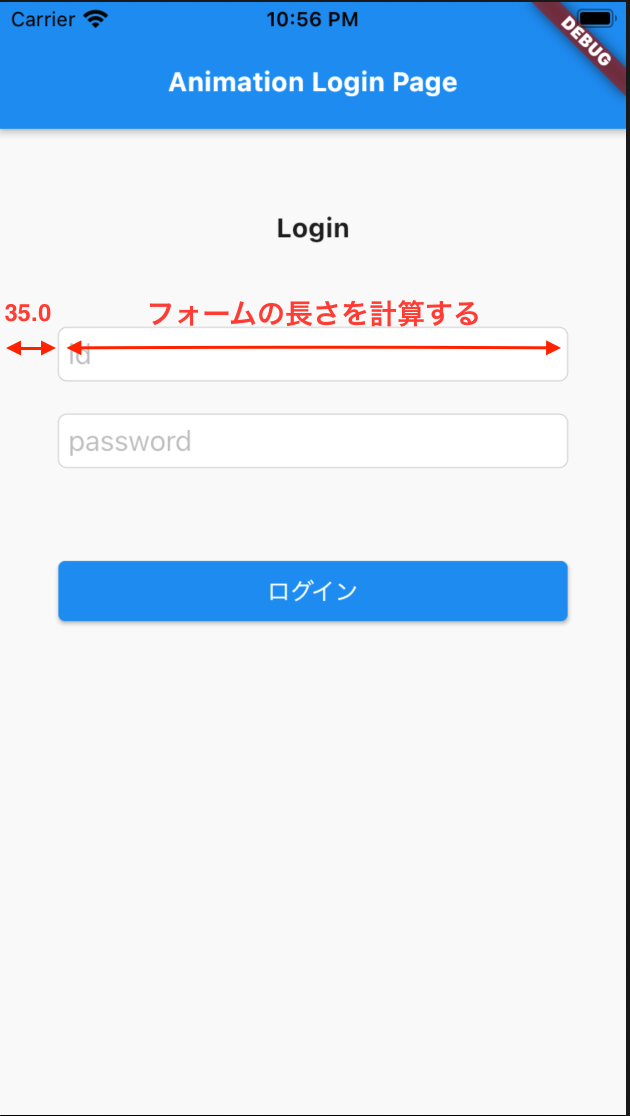
1.画面左から、ログインIDフォームがスライドイン(duration 0.8秒)
2.画面が起動して0.4秒後に画面左から、0.8秒かけてパスワードフォームがスライドイン(duration 1.2秒)
3.画面が起動して1秒後に、ログインボタンがフェードインしながら、上方向に30pxスライドイン(duration 0.6秒)

- 今回のコード(Flutter Hooks使用)
今回のサンプルのアニメーションについて、色々考えているうちに時間が経ち、Flutter2.0がリリースされました。まだnull safetyなFlutterのコードのことがイマイチ分かりませんが、今後のコードのメンテナンスのことも考え、今後はライブラリさえ対応していれば、どんどんnull safety対応で記事のサンプルも作成していきたいです。
コードの補足や説明
まずはライブラリのインストールなど。
(略)
environment:
  sdk: ">=2.12.0 <3.0.0" # ここで2.12.0にすることでnull safetyが強制されるそう

dependencies:
  flutter:
    sdk: flutter
  flutter_hooks: ^0.16.0
(略)
今回はアニメーションするログイン画面を作りました。サンプルコードが少し長くなったので、サンプルの方にコメントを残す形にします。
import 'dart:ui';

import 'package:flutter/cupertino.dart';
import 'package:flutter/material.dart';
import 'package:flutter_hooks/flutter_hooks.dart';

void main() {
  runApp(MyApp());
}

class MyApp extends StatelessWidget {
  // This widget is the root of your application.
  @override
  Widget build(BuildContext context) {
    return MaterialApp(
      title: 'Animation Login Page',
      theme: ThemeData(
        primarySwatch: Colors.blue,
      ),
      home: _AnimationLoginPage(),
    );
  }
}

// ignore: must_be_immutable
class _AnimationLoginPage extends HookWidget {
  final globalKey = GlobalKey();
  double formWidth = 0;

  @override
  Widget build(BuildContext context) {
    AnimationController _loginIdAnimationController = useAnimationController(
      duration: Duration(milliseconds: 800),
    );
    AnimationController _passwordAnimationController = useAnimationController(
      duration: Duration(milliseconds: 1200),
    );
    AnimationController _buttonAnimationController = useAnimationController(
      duration: Duration(milliseconds: 600),
    );

    // ログインIDフォームとログインボタンのアニメーション定義
    Animatable<double> _animatable = Tween<double>(
      begin: 0.0,
      end: 1.0,
    ).chain(
      CurveTween(
        curve: Curves.bounceOut,
      ),
    );

    // パスワードフォームのアニメーション定義
    Animatable<double> _passwordAnimatable = TweenSequence([
      // アニメーションが1.2秒で、最初の0.4秒は待機
      TweenSequenceItem(
        tween: Tween<double>(
          begin: 0.0,
          end: 0.0,
        ),
        weight: 400 / 1200, // 1.2秒のアニメーションのうちの0.4秒
      ),
      // アニメーションが1.2秒で、0.8秒かけてアニメーション
      TweenSequenceItem(
        tween: Tween<double>(
          begin: 0.0,
          end: 1.0,
        ).chain(
          CurveTween(
            curve: Curves.bounceOut,
          ),
        ),
        weight: 800 / 1200, // 1.2秒のアニメーションのうちの0.8秒
      ),
    ]);

    Animation<double> _loginIdAnimation =
        _animatable.animate(_loginIdAnimationController);
    Animation<double> _passwordAnimation =
        _passwordAnimatable.animate(_passwordAnimationController);
    Animation<double> _buttonAnimation =
        _animatable.animate(_buttonAnimationController);

    // Widgetが描画されてから、フォームの長さを取得して、アニメーションを発火させる
    WidgetsBinding.instance?.addPostFrameCallback((_) {
      // フォームのwidthを取得
      RenderBox form =
          globalKey.currentContext!.findRenderObject() as RenderBox;
      formWidth = form.size.width;

      // アニメーションの開始
      _loginIdAnimationController.forward();
      _passwordAnimationController.forward();
      // 1秒後にアニメーション開始
      Future.delayed(Duration(milliseconds: 1000)).then(
        (_) => _buttonAnimationController.forward(),
      );
    });

    return Scaffold(
      appBar: AppBar(
        title: Text(
          'Animation Login Page',
          style: TextStyle(
            fontWeight: FontWeight.bold,
            fontSize: 16,
          ),
        ),
      ),
      body: SingleChildScrollView(
        child: Column(
          crossAxisAlignment: CrossAxisAlignment.stretch,
          children: [
            SizedBox(
              height: 50,
            ),
            Text(
              'Login',
              textAlign: TextAlign.center,
              style: TextStyle(
                fontWeight: FontWeight.bold,
                fontSize: 16,
              ),
            ),
            Padding(
              padding: EdgeInsets.symmetric(horizontal: 35),
              child: Column(
                children: [
                  SizedBox(
                    height: 50,
                  ),
                  AnimatedBuilder(
                    animation: _loginIdAnimation,
                    builder: (BuildContext context, _) {
                      return Transform(
                        transform: _generateFormMatrix(_loginIdAnimation),
                        child: CupertinoTextField(
                          key: globalKey,
                          placeholder: 'id',
                        ),
                      );
                    },
                  ),
                  SizedBox(
                    height: 20,
                  ),
                  AnimatedBuilder(
                    animation: _passwordAnimation,
                    builder: (BuildContext context, _) {
                      return Transform(
                        transform: _generateFormMatrix(_passwordAnimation),
                        child: CupertinoTextField(
                          placeholder: 'password',
                        ),
                      );
                    },
                  ),
                  SizedBox(
                    height: 50,
                  ),
                  AnimatedBuilder(
                    animation: _buttonAnimation,
                    builder: (BuildContext context, _) {
                      return FadeTransition(
                        opacity: _buttonAnimation,
                        child: Transform(
                          transform: _generateButtonMatrix(_buttonAnimation),
                          child: SizedBox(
                            width: double.infinity,
                            child: ElevatedButton(
                              child: Text(
                                'ログイン',
                              ),
                              onPressed: () => null,
                            ),
                          ),
                        ),
                      );
                    },
                  ),
                ],
              ),
            ),
          ],
        ),
      ),
    );
  }

  /// フォームがスライドするアニメーションの移動量(画面左のPadding(35px) + フォームの長さ)
  Matrix4 _generateFormMatrix(Animation animation) {
    final value = lerpDouble(35.0 + formWidth, 0, animation.value);
    return Matrix4.translationValues(-value!, 0.0, 0.0);
  }

  /// ボタンが上にスライドするアニメーションの移動量(30px)
  Matrix4 _generateButtonMatrix(Animation animation) {
    final value = lerpDouble(30.0, 0, animation.value);
    return Matrix4.translationValues(0.0, value!, 0.0);
  }
}
今回連続アニメーションをすることでコードのボリュームが増えてしまいましたが、シンプル過ぎるとFlutter Hooksの使い心地が分からないと考え、今回のような連続アニメーションのサンプルにしました。
フォームをアニメーションさせる移動量は以下のように考えて設定しました。
感想
StatefulWidgetのボイラープレートのコードを捨てることが出来たので、コードは少しスッキリしたものになりました。
- Hooksを使わなかったバージョンのコード
Hooksを使わなかった場合は225行に対して、Hooksを使用した場合は200行と短くなりました。
しかし慣れの問題もあるとは思いますが、StatefulWidgetのinitStateメソッド内に色々書く習慣があった者としては、少し書きづらさも感じました。
(もう少しHooksの機能などを使いこなせば、また感想が変わるかも知れません)
ちなみに最初の目的であったHookを理解するということに関しては、今回のようにuseAnimationControllerを使っただけでは、Hooksのことは全然分かりませんでした。。また別の何かでHooksの理解を深めたいです。
また連続アニメーションのコード自体にも、もっと良い方法があるのではと、まだまだ思考を重ねる日々です。null safety対応のコードのこともまだよく分からず、今回のサンプルコードはいつも以上にご意見を頂きたいです。
参考記事
-
【Flutter】アニメーションを作成する【Dart】
https://tkzo.jp/blog/flutter-create-animation/ -
Flutter Hooks, say goodbye to StatefulWidget and reduce boilerplate code.
https://medium.com/flutter-community/flutter-hooks-say-goodbye-to-statefulwidget-and-reduce-boilerplate-code-8573d4720f9a -
Flutterのwidgetについて、build完了直後コールバックが欲しい時に使えるやつ
https://qiita.com/Rwf-9DH3/items/b681c68b06e70b02ae8d