概要
ユーザに複数の選択肢を促す手法として、Suggestions chipsがありますが、こちらだと表現に限界があります。
たくさん選択肢を表示したい場合や、よりその選択肢を詳細を記述したい場合、ListやCarouselで表示したほうが良い場合があります。
ただ、ListやCarouselの場合で表現するには、JSONで出力する必要があるのですが、
その際のループ処理に少し躓いたので、こちらでメモをしておきます。
どんな機能か見てみたいときは、アシスタントに「ブラウザチェッカーにつないで」といってみてください!!
構造について
まず、ListとCarouselの大まかな構造について解説します。
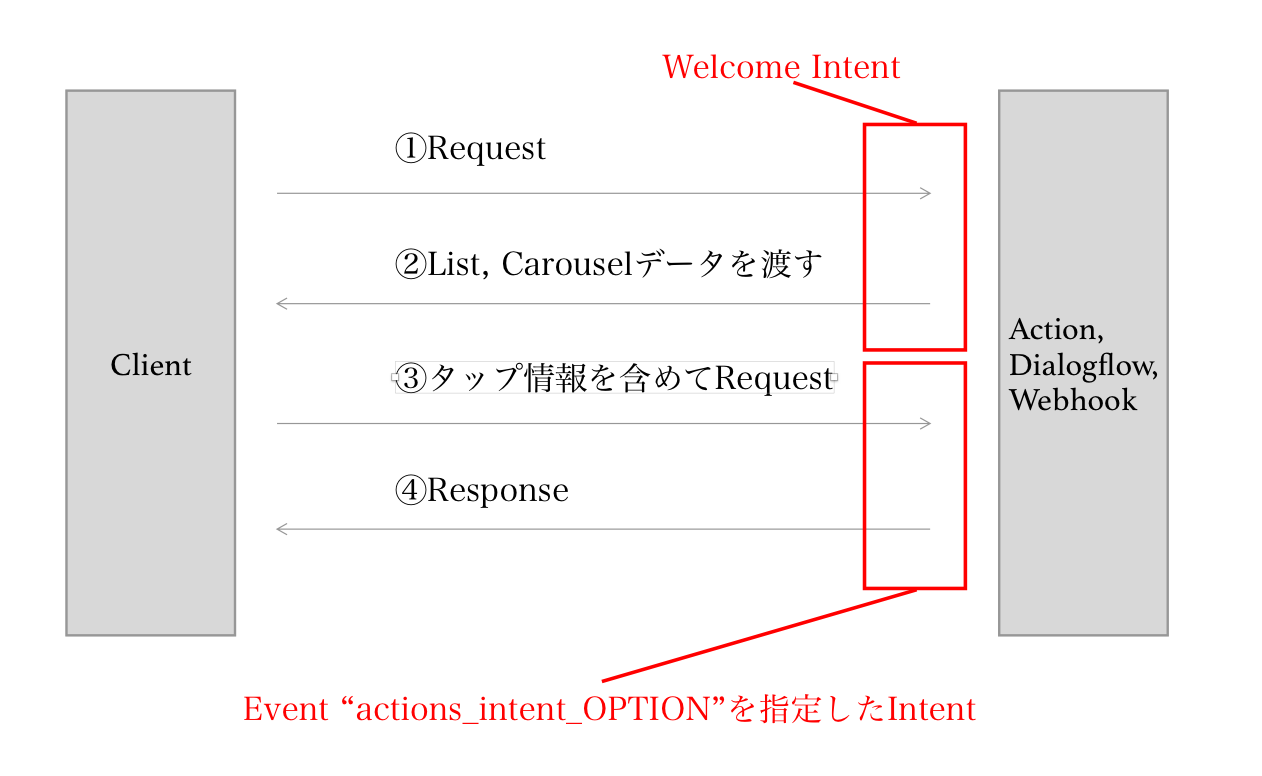
- Request「○○につないで」といってアプリ起動します。
-
ListまたはCarouselが記述されたデータがResponseされます。
このとき、クライアントではListまたはCarouselが表示されます。
サンプルコードでいうと「Sample code」の部分。Welcome Intentはここまで。 - ユーザは2から好きな項目を選ぶと、Dialogflowで"actions_intent_OPTION"が指定されたIntentに情報が飛びます。
後述しますが、Suggestion chipsとの違いは、ここでのListまたはCarousel返答は開発者側で自由に選べるところです。 - Responseされます。サンプルコードでいうと「Handling selected item」でResponseされます。
組み方(必要な分だけ絞る)
まずサンプルコードからタイトル(title), 説明(description)だけを絞ると、Responseは以下のようになる。
Listの場合
app.intent('Default Welcome Intent', conv => {
    conv.ask('This is a list example.');  // Rich Responseを出力する際はSimple Responseは不可欠
    conv.ask(new List({
        title: 'List Title',
        items: {
            'Title AAA': {
                title: 'Title of AAA',
                description: 'This is a description of AAA.',
            },
            'Title BBB': {
                title: 'Title of BBB',
                description: 'This is a description of BBB.',
            },
            'Title CCC': {
                title: 'Title of CCC',
                description: 'This is a description of CCC.',
            },
        },
    }));
});
Carouselの場合
app.intent('Default Welcome Intent', conv => {
    conv.ask('This is a carousel example.');  // Rich Responseを出力する際はSimple Responseは不可欠
    conv.ask(new Carousel({
        items: {
            'Title AAA': {
                title: 'Title of AAA',
                description: 'This is a description of AAA.',
            },
            'Title BBB': {
                title: 'Title of BBB',
                description: 'This is a description of BBB.',
            },
            'Title CCC': {
                title: 'Title of CCC',
                description: 'This is a description of CCC.',
            },
        },
    }));
});
組み方2 ループ処理
続いて、大抵の場合は情報を配列とかオブジェクトに格納すると思うので、以下のようにデータが用意し、...①
ListまたはCarousel用のオブジェクトを作ってあげます。...②
引き渡します。...③
app.intent('hoge', conv =>{

    // ①データを用意
    const original = {
        "aaa" : {title:'Title aaa', description:"Description aaa", imageUrl:'https://developers.google.com/actions/images/badges/XPM_BADGING_GoogleAssistant_VER.png'},
        "bbb" : {title:'Title bbb', description:"Description bbb", imageUrl:'https://developers.google.com/actions/images/badges/XPM_BADGING_GoogleAssistant_VER.png'},
        "ccc" : {title:'Title ccc', description:"Description ccc", imageUrl:'https://developers.google.com/actions/images/badges/XPM_BADGING_GoogleAssistant_VER.png'},
        "ddd" : {title:'Title ddd', description:"Description ddd", imageUrl:'https://developers.google.com/actions/images/badges/XPM_BADGING_GoogleAssistant_VER.png'},
        "eee" : {title:'Title eee', description:"Description eee", imageUrl:'https://developers.google.com/actions/images/badges/XPM_BADGING_GoogleAssistant_VER.png'},
        "fff" : {title:'Title fff', description:"Description fff", imageUrl:'https://developers.google.com/actions/images/badges/XPM_BADGING_GoogleAssistant_VER.png'},
        "ggg" : {title:'Title ggg', description:"Description ggg", imageUrl:'https://developers.google.com/actions/images/badges/XPM_BADGING_GoogleAssistant_VER.png'},
    };

    //②リスト用にデータを用意してあげる
    let arr = {};  // List, Carouselはオブジェクトを返す必要があることに注意!!
    for(let i in original){
        let title = original[i].title;
        let description = original[i].description;
        let imageUrl = original[i].imageUrl;

        // console.log("[確認]title--------->" + title);
        // console.log("[確認]description--->" + description);
        // console.log("[確認]imageUrl------>" + imageUrl);

        let valueObj = {
            'title': title,
            'description': description,
            image: new Image({
                url: imageUrl,
                alt: title,
            }),
        }
        arr[title] = valueObj;  // 変数化したKeyにValueを代入する。
    }
    // console.log("[確認]arr----------->" + JSON.stringify(arr));

    //③引き渡す
    conv.ask("Simple respponse.")
    conv.ask(new List({       // <-- Carousel表示したいの場合はCarouselに入れ替える
        title: "List Test",   // <-- Carousel表示したいの場合はここのtitleはいらない
        items: arr
    }));

})
組み方3 ListとCarouselの返答
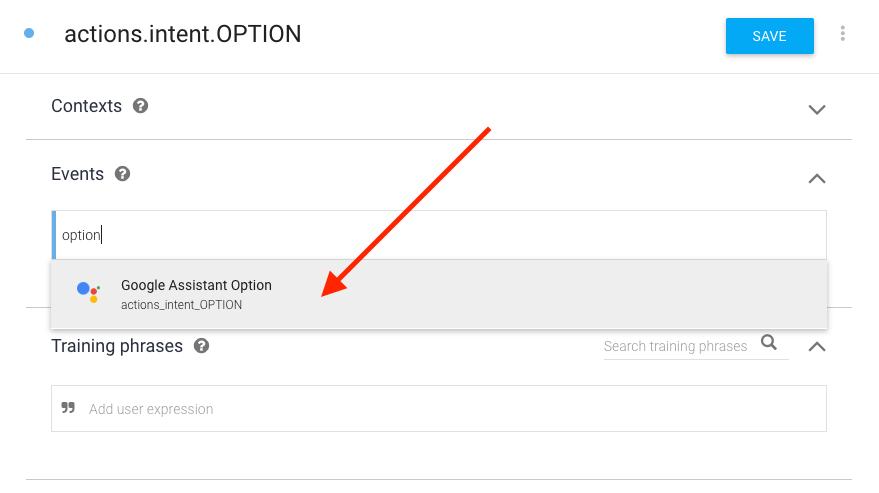
ユーザが入力した項目をIntentで受け取るためには、Dialogflow側で新たにインテントを作成し、
Event入力欄に"actions_intent_OPTION"を入力します。
Helper IntentsにEvent指定できる一覧があります。
ソースコード側では以下のように指定すると、ユーザが選択した情報を回答として出力することができます。
app.intent('actions.intent.OPTION', (conv, params, option) =>{
    conv.ask(option); // ユーザの返答は引数optionに入ってくる
})
おまけ Browsing Carousel
私が知る限り、アプリ起動したままマイククローズできるを唯一の手段はBrowsing Carouselです。
ただそのかわり、Browsing Carouselは、項目をタップしたらWebページに飛ぶ使用です。
なので、飛び先のリンクを用意する必要があります。
詳しくは→Browsing Carousel が詳しいです。
app.intent('hoge', conv =>{

    // ①データを用意、飛先リンクとしてsearchUrlを追加
    const original = {
        "aaa" : {title:'Title aaa', description:"Description aaa", imageUrl:'https://developers.google.com/actions/images/badges/XPM_BADGING_GoogleAssistant_VER.png', searchUrl:'https://google.com'},
        "bbb" : {title:'Title bbb', description:"Description bbb", imageUrl:'https://developers.google.com/actions/images/badges/XPM_BADGING_GoogleAssistant_VER.png', searchUrl:'https://google.com'},
        "ccc" : {title:'Title ccc', description:"Description ccc", imageUrl:'https://developers.google.com/actions/images/badges/XPM_BADGING_GoogleAssistant_VER.png', searchUrl:'https://google.com'},
        "ddd" : {title:'Title ddd', description:"Description ddd", imageUrl:'https://developers.google.com/actions/images/badges/XPM_BADGING_GoogleAssistant_VER.png', searchUrl:'https://google.com'},
        "eee" : {title:'Title eee', description:"Description eee", imageUrl:'https://developers.google.com/actions/images/badges/XPM_BADGING_GoogleAssistant_VER.png', searchUrl:'https://google.com'},
        "fff" : {title:'Title fff', description:"Description fff", imageUrl:'https://developers.google.com/actions/images/badges/XPM_BADGING_GoogleAssistant_VER.png', searchUrl:'https://google.com'},
        "ggg" : {title:'Title ggg', description:"Description ggg", imageUrl:'https://developers.google.com/actions/images/badges/XPM_BADGING_GoogleAssistant_VER.png', searchUrl:'https://google.com'},
    };

    //②配列を用意してあげる
    let arr = [];   // <-- ListやCarouselの場合はObjectでしたが、
                    //     Browsing Carouselの場合は配列です。
    for(let i in original){
        let title = original[i].title;
        let description = original[i].description;
        let imageUrl = original[i].imageUrl;
        let searchUrl = original[i].searchUrl;

        // console.log("[確認]title--------->" + title);
        // console.log("[確認]description--->" + description);
        // console.log("[確認]imageUrl------>" + imageUrl);
        // console.log("[確認]searchUrl----->" + searchUrl);

        let item = new BrowseCarouselItem({
            title: title,
            description: description,
            url: searchUrl,
            image: new Image({
                url: imageUrl,
                alt: title,
            }),
            footer: 'タップするとWebページに飛ぶぜよ。',
        })
        arr.push(item);  // Browsing Carouselの場合は配列なのでPushが使える!!
    }

    // console.log("[確認]arr----------->" + arr);

    //③引き渡す
    conv.ask("Simple respponse.")
    conv.ask(new BrowseCarousel({
        items: arr
    }));

})
そんなことより
上記のListとBrowsing Carousel機能を取り入れたアプリを作ったので、
リストってどんな感じなの?ってかたはアシスタントに「ブラウザチェッカーにつないで」といって見てみてください!笑
ブラウザチェッカー