概要
リアクティヴプログラミングで Web アプリケーションを構築できる Framework の Vert.x 3系を、 Gradle を使って stand-alone で動かしてみました。
Vert.x とは?
Vert.x is a tool-kit for building reactive applications on the JVM.
出典:公式サイト
Scale
- イベントドリブン、すべてコールバックで結果が返る……ただし単体だとコールバック地獄に陥りやすいので RxJava との併用が推奨されている
- Non-blockking I/O
- 少数のスレッドで大量のコネクションを並行処理
Polyglot
コアは Java だが、さまざまな言語でのアプリケーション開発をサポート
- Java
- JavaScript
- Groovy
- Ruby
- Ceylon
ライセンス
バージョン 3.3.0.CR2 の時点では Eclipse Public License version 1.0 と Apache License 2.0 のデュアルライセンス のようです。
トレンド
2012/05 と 2013/01 に大きな山があります。Vert.x History によると、 2012/05/09(Wed) には version 1.0 の最終リリース、2013/01 には Eclipse Foundation への参加があったようです。
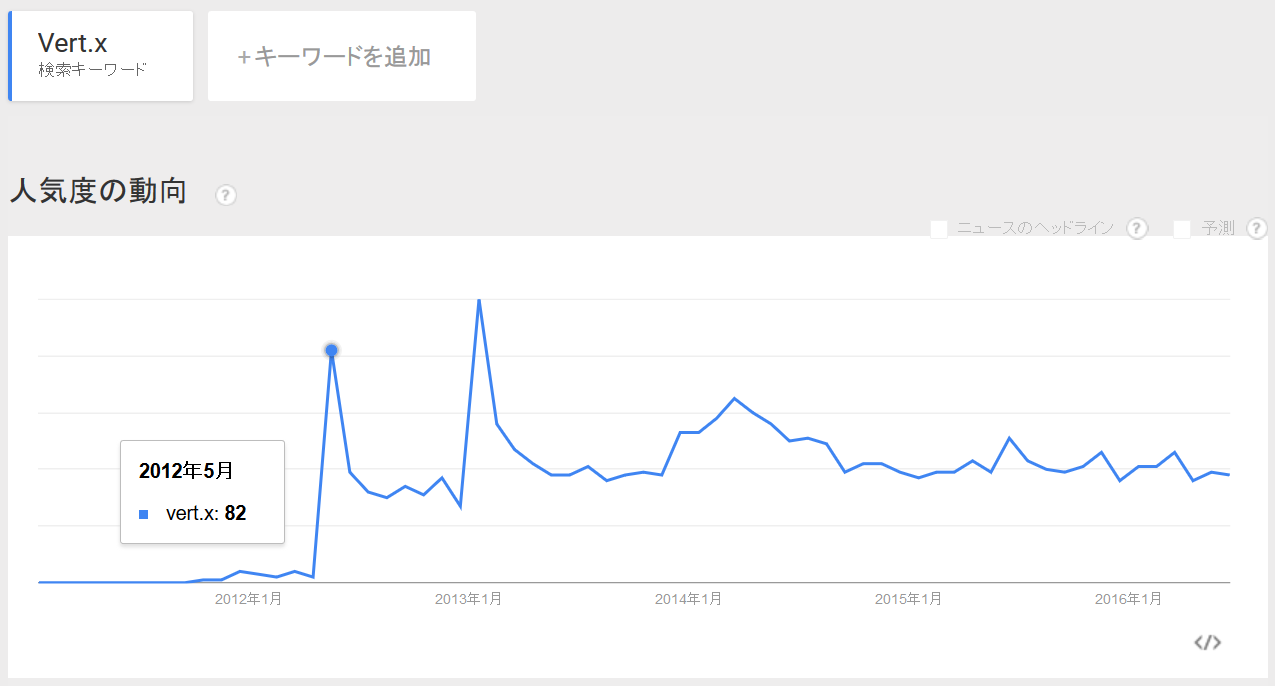
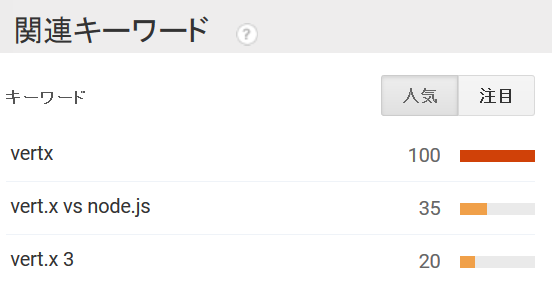
関連キーワードを見ると、 Node.js との比較を求めるユーザが多いようです。
実行環境
| Java | SE 1.8.0_91 |
|---|---|
| Eclipse | Mars 4.5.2 |
| Vert.x | 3.3.0.CR1 |
| Gradle | 2.12 |
最小構成で動かす
Vert.x を動かすには Java アプリケーションの開発と別に Framework 本体もダウンロードする必要があると思っていたのですが、本体をダウンロードしなくとも Vert.x の依存を追加するだけで動かすことが可能なようです。ということで、今回は stand-alone で Vert.x アプリケーションを開発し動かしてみます。
build.gradle の定義
apply plugin: 'application'

sourceCompatibility = 1.8
mainClassName       = "io.vertx.core.Starter"

def defaultEncoding = 'UTF-8'
def vertxVersion    = '3.0.0'
def mainVerticle    = "HelloVerticle"

repositories {
    mavenCentral()
}

dependencies {
  compile "io.vertx:vertx-core:${vertxVersion}"
}

run {
  args = ["run", mainVerticle]
}

jar {
  manifest {
    attributes 'Main-Verticle': mainVerticle
    attributes 'Main-Class'   : mainClassName
  }
  destinationDir = projectDir
  from configurations.compile.collect { it.isDirectory() ? it : zipTree(it) }
}
重要な点は下記の通りです。
- mainClassName に
"io.vertx.core.Starter"を指定 - run で 引数に mainVerticle を指定
- jar manifest に
Main-VerticleとMain-Class、 2つの attributes を指定
Verticle クラスの定義
import io.vertx.core.AbstractVerticle;
import io.vertx.core.Future;

public class HelloVerticle extends AbstractVerticle {

    @Override
    public void start(final Future<Void> future) {
        vertx
            .createHttpServer()
            .requestHandler(r ->
                r.response().end("<h1>Hello from my first Vert.x 3 application</h1>")
                )
            .listen(8940, result -> {
                if (result.succeeded()) {
                    future.complete();
                } else {
                    future.fail(result.cause());
                }
            });
    }
}
このコードでは AbstractVerticleの Vertx オブジェクト vertx に対し、下記3つを実施しています。
- Http Server の作成
- Request Handler の設定
- Listen Port の変更
ファイルツリー
$ tree /F
│  build.gradle
│  LICENSE
│  settings.gradle
└─src
    └─main
        └─java
                HelloVerticle.java
実行
$ gradle run
Download https://repo1.maven.org/maven2/io/vertx/vertx-core/3.0.0/vertx-core-3.0.0.jar
Download https://repo1.maven.org/maven2/io/netty/netty-common/4.0.28.Final/netty-common-4.0.28.Final.jar
Download https://repo1.maven.org/maven2/io/netty/netty-buffer/4.0.28.Final/netty-buffer-4.0.28.Final.jar
Download https://repo1.maven.org/maven2/io/netty/netty-transport/4.0.28.Final/netty-transport-4.0.28.Final.jar
Download https://repo1.maven.org/maven2/io/netty/netty-handler/4.0.28.Final/netty-handler-4.0.28.Final.jar
Download https://repo1.maven.org/maven2/io/netty/netty-codec-http/4.0.28.Final/netty-codec-http-4.0.28.Final.jar
Download https://repo1.maven.org/maven2/com/fasterxml/jackson/core/jackson-core/2.5.3/jackson-core-2.5.3.jar
Download https://repo1.maven.org/maven2/com/fasterxml/jackson/core/jackson-databind/2.5.3/jackson-databind-2.5.3.jar
Download https://repo1.maven.org/maven2/io/netty/netty-codec/4.0.28.Final/netty-codec-4.0.28.Final.jar

:compileJava
:processResources UP-TO-DATE
:classes
:run
6 18, 2016 8:45:55 午前 io.vertx.core.Starter
情報: Succeeded in deploying verticle
> Building 75% > :run
確認
出力が止まったところで http://localhost:8940/ にアクセスし、 "Hello from my first Vert.x 3 application" と表示されていることを確認します。
FatJar を生成
サーバにデプロイする時は FatJar を作って、それをサーバ上で実行します。
$ gradle jar
:compileJava UP-TO-DATE
:processResources UP-TO-DATE
:classes UP-TO-DATE
:jar

BUILD SUCCESSFUL

Total time: 5.227 secs
実行
生成された FatJar を java -jar で動かします。
$ java -jar vertx_v.jar
6 18, 2016 8:58:30 午前 io.vertx.core.Starter
情報: Succeeded in deploying verticle
先ほどと同様、http://localhost:8940/ にアクセスして "Hello from my first Vert.x 3 application" と表示されていることを確認します。
ワードクラウドを生成する Web アプリケーションを作る
Web アプリケーション開発での使い方を勉強するために、小さめの Web アプリケーションを作ってみました。入力された文章を単語に分解して数え上げ、ワードクラウドを生成するものです。
構成
| 要素 | 採用 |
|---|---|
| テンプレートエンジン | Freemarker |
| 単語分解 | tinySegmenter |
| ワードクラウド描画用ライブラリ | D3-cloud.js |
開発
ソースコード全体は こちら をご参照ください。以下、ポイントを紹介します。
build.gradle
Freemarker のテンプレートエンジンを使うため、依存を1つ追加します。
dependencies {
  compile "io.vertx:vertx-core:${vertxVersion}"
  compile "io.vertx:vertx-web-templ-freemarker:${vertxVersion}" // 追加
}
start メソッド
listen メソッドでポートを 8940 に変えているほか、 routing を route という別メソッドで実行します。
@Override
public void start(final Future<Void> future) {
    vertx
        .createHttpServer()
        .requestHandler(route()::accept)
        .listen(8940, result -> {
            if (result.succeeded()) {
                future.complete();
            } else {
                future.fail(result.cause());
            }
        });
}
route メソッド
パス "/wc" にアクセスがあった際、フォームから送信されたパラメータを受け取り、ワードクラウド描画に必要な形に変換してテンプレートエンジンの描画に必要なパラメータを context に put していきます。
main.get("/wc").handler(context -> {
    context.put("title",  TITLE);

    final String sentence = context.request().getParam("sentence");

    if (sentence == null || sentence.trim().length() == 0) {
        handler.handle(context);
        return;
    }
    context.put("wcData",    new WordCloud().count(sentence));
    context.put("paramSentence", sentence);
    context.put("width",     WIDTH);
    context.put("height",    HEIGHT);
    handler.handle(context);
});
ファイルツリー
$ tree /F
│  build.gradle
│  LICENSE
│  settings.gradle
│
└─src
    └─main
        ├─java
        │  └─jp
        │      └─toastkid
        │          ├─libs
        │          │  └─tinysegmenter
        │          │          CharacterClassifier.java
        │          │          ScoreMap.java
        │          │          TinySegmenter.java
        │          │
        │          └─wordcloud
        │                  WordCloud.java
        │                  WordCloudVerticle.java
        │
        └─resources
            ├─assets
            │  │  index.html
            │  │
            │  ├─images
            │  │      icon.png
            │  │
            │  ├─javascripts
            │  │  ├─d3
            │  │  │      d3.js
            │  │  │      LICENSE(d3)
            │  │  │
            │  │  └─d3-cloud
            │  │          d3.layout.cloud.js
            │  │          index.js
            │  │          LICENSE
            │  │          package.json
            │  │          README.md
            │  │
            │  └─stylesheets
            │          main.css
            │
            └─templates
                    c.ftl
                    common_header.ftl
動かす
$ gradle run
:compileJava UP-TO-DATE
:processResources
:classes
:run
6 26, 2016 5:49:49 午後 io.vertx.core.Starter
情報: Succeeded in deploying verticle
> Building 75% > :run
http://localhost:8940/wc にアクセスすると下記のように表示されます。

下部の TextArea に何か文章を入力し、「送信」ボタンを押すと……

下図のようにワードクラウドが生成されます。

詰まった点
先に route で設定した方が優先される
CSS 等の静的リソース用の route は最初に定義しておくとよいでしょう。下記の例だと src/main/resources/assets 以下のファイルが static リソースとして参照可能になります。
main.route("/assets/*").handler(StaticHandler.create("assets"));
context に渡したパラメータは、テンプレート側では context.<パラメータ名> で参照しないといけない
テストで参照している template を見てようやく気付きました。これ、知らないと本当に詰まります。
例えば、 Vert.x App 内で下記のように指定したパラメータ "paramSentence" は
context.put("paramSentence", sentence);
テンプレートファイル内で下記のようにして参照します。
<p>${context.paramSentence}</p>
context には data というメソッドがあるので、 data という名前のパラメータをテンプレートファイルに渡して使おうとすると一見意味不明のエラーが出る
For "${...}" content: Expected a string or something automatically convertible to string (number, date or boolean), but this has evaluated to a method+sequence (wrapper: f.e.b.SimpleMethodModel):
==> context.data  [in template "templates/freemarker/word_cloud.ftl" at line 38, column 26]
「そんな抽象的な名前付けなさんな」ということでしょう。data から別の名前に変えました。
文字化け
Windows 環境で Vert.x を動かすと文字化けがついて回って非常にやりづらかったです。 accept-charset で Form の文字コードを指定できると知りました。
<form method="get" action="/wc" accept-charset="UTF-8">
テンプレートファイルのパス
Freemarker テンプレートエンジンを使うと、なぜか「パスの最後の1文字+拡張子」というパスのテンプレートファイルを参照しようとします。ちょっと意味がわからないです。今回はパスが "/wc" なので、 templates/c.ftl という場所にテンプレートファイルを用意しました。なお、テンプレートファイル内から参照するのは特に問題がないようです。
課題
GET でパラメータを受け取っている
普通であれば POST で受け渡しをするものです。Vert.x で POST を使ったデータの受け渡しをやるのが少し手間だったので、今回は GET で妥協してしまいました。
Windows 環境では次のように、 context.request().bodyHandler のコールバックを利用すれば POST パラメータの "sentence" を取り出せるようです、が、取り出した後の処理が上手く動きませんでした。
main.post("/wc")
    .handler(context -> {
        context.request().bodyHandler(body -> {
            final String sentence = extractSentence(body).get();
            if (sentence == null || sentence.trim().length() == 0) {
                context.next();
            }
            handler.handle(context);
        });
    });

private Optional<String> extractSentence(final Buffer body) {
    try {
        final String decoded = URLDecoder.decode(new String(body.getBytes(), "shift-jis"), "shift-jis");
        return Stream.of(decoded.split("\\&"))
                    .filter(str -> str.startsWith("sentence"))
                    .map(str -> str.substring("sentence".length() + 2))
                    .findFirst();
    } catch (final UnsupportedEncodingException e) {
        e.printStackTrace();
    }
    return Optional.empty();
}
解決に挑む際は下記の記事が参考になりそうです。
テンプレートエンジンに Freemarker を使っている
今回は以前作った Freemarker のものを流用しました。できれば Thymeleaf を使ってみたいです。
Vert.x では下記のテンプレートエンジンが利用可能です。
ソースコード
参考
今回開発したアプリケーションのソースコード全体
GitHub repository
Documents
Vert.x & RxJava の開発事例
1.RxJava + Vert.x + jOOλ で Microservice的な何かを作ってみた